LEXICAL ANALYSIS 

Lexical analysis is the first phase of a compiler. It takes the modified source code from language preprocessors that are written in the form of sentences. The lexical analyzer breaks these syntaxes into a series of tokens, by removing any whitespace or comments in the source code.

If the lexical analyzer finds a token invalid, it generates an error. The lexical analyzer works closely with the syntax analyzer. It reads character streams from the source code, checks for legal tokens, and passes the data to the syntax analyzer when it demands.


DATA BASE IN LEXICAL PHASE

1) SOURCE PROGRAM

2)TERMINAL TABLE

3)LITERAL TABLE

4)IDENTIFIER TABLE

CROSS  COMPILERS 

compiler that runs on one computer but produces object code for a different type of computer. Cross compilers are used to generate software that can run on computers with a new architecture or on special-purpose devices that cannot host their own compilers.

Cross-compilation is the act of compiling code for one computer system (often known as the target) on a different system, called the host.

It’s a very useful technique, for instance when the target system is too small to host the compiler and all relevant files.

Common examples include many embedded systems, but also typical game consoles.

To “cross compile” is to compile source on say a Linux box with intent on running it on a MAC or Windows box. This is usually done using a cross compilation plugin, which are readily available from various web servers across the net. If one is to install a cross compilation plugin onto their Linux box that is designed to compile for Windows boxes. Then they may compile for either a Linux/*NIX box as well as have the option to compile and link a Windows-ready executable. This is extremely convenient for a freelance programmer whom has access to no more than a single Linux/Windows/MAC box. Note that various cross compilation plugins will allow for multitudes of applications, some of which you may or may not perceive as useful, thus a thorough perusal of the plugin’s README file.


In a strict sense, it is the compilation of code on one host that is intended to run on another.

Most commonly it is used with reference to compilation for architectures that are not binary-compatible with the host — for instance, building RISC binaries on a CISC CPU platform, or 64-bit binaries on a 32-bit system. Or, for example, building firmware intended to run on embedded devices (perhaps using the ARM CPU architecture) on Intel PC-based OSs.

The breadth-first search algorithm

Breadth-first search assigns two values to each vertex 

vv:

  • distance, giving the minimum number of edges in any path from the source vertex to vertex vv.
  • The predecessor vertex of vvalong some shortest path from the source vertex. The source vertex’s predecessor is some special value, such as null, indicating that it has no predecessor.

If there is no path from the source vertex to vertex vv, then vv‘s distance is infinite and its predecessor has the same special value as the source’s predecessor.

For example, here’s an undirected graph with eight vertices, numbered 0 to 7, with vertex numbers appearing above or below the vertices. Inside each vertex are two numbers: its distance from the source, which is vertex 3, followed by its predecessor on a shortest path from vertex 3. A dash indicatesnull:

BFS result

In BFS, we initially set the distance and predecessor of each vertex to the special value (null). We start the search at the source and assign it a distance of 0. Then we visit all the neighbors of the source and give each neighbor a distance of 1 and set its predecessor to be the source. Then we visit all the neighbors of the vertices whose distance is 1 and that have not been visited before, and we give each of these vertices a distance of 2 and set its predecessor to be vertex from which we visited it. We keep going until all vertices reachable from the source vertex have been visited, always visiting all vertices at distance kk from the source before visiting any vertex at distance k+1k+1.

Given the example above, here are the steps plus a visualization to play through each step:

  • Start by visiting vertex 3, the source, setting its distance to 0.
  • Then visit vertices 2 and 6, setting their distance to 1 and their predecessor to vertex 3.
  • Start visiting from vertices at distance 1 from the source, beginning with vertex 2. From vertex 2, visit vertices 4 and 5, setting their distance to 2 and their predecessor to vertex 2. Don’t visit vertex 3, because it has already been visited.
  • From vertex 6, don’t visit vertex 5, because it was just visited from vertex 2, and don’t visit vertex 3, either.
  • Now start visiting from vertices at distance 2 from the source. Start by visiting from vertex 4. Vertex 2 has already been visited. Visit vertex 1, setting its distance to 3 and its predecessor to vertex 4.
  • From vertex 5, don’t visit any of its neighbors, because they have all been visited.
  • Now start visiting from vertices at distance 3 from the source. The only such vertex is vertex 1. Its neighbors, vertices 4 and 5, have already been visited. But vertex 0 has not. Visit vertex 0, setting its distance to 4 and its predecessor to vertex 1.
  • Now start visiting from vertices at distance 4 from the source. That’s just vertex 0, and its neighbor, vertex 1, has already been visited. We’re done!

https://www.khanacademy.org/computer-programming/bfs-visualization/4680035984474112/embedded?embed=yes&article=yes&editor=no&buttons=no&author=no&autoStart=yes&width=400&height=240&settings=%7B%22sortType%22%3A%22selection%22%7D

Notice that because there is no path from vertex 3 to vertex 7, the search never visits vertex 7. Its distance and predecessor remain unchanged from their initial values of null.

A couple of questions come up. One is how to determine whether a vertex has been visited already. That’s easy: a vertex’s distance is null until it has been visited, at which time it gets a numeric value for its distance. Therefore, when we examine the neighbors of a vertex, we visit only the neighbors whose distance is currently null.

The other question is how to keep track of which vertices have already been visited but have not yet been visited from. We use a queue, which is a data structure that allows us to insert and remove items, where the item removed is always the one that has been in the queue the longest. We call this behavior first in, first out. A queue has three operations:

  • enqueue(obj) inserts an object into the queue.
  • dequeue() removes from the queue the object that has been in it the longest, returning this object.
  • isEmpty() returns true if the queue currently contains no objects, and false if the queue contains at least one object.

Whenever we first visit any vertex, we enqueue it. At the start, we enqueue the source vertex because that’s always the first vertex we visit. To decide which vertex to visit next, we choose the vertex that has been in the queue the longest and remove it from the queue—in other words, we use the vertex that’s returned fromdequeue(). Given our example graph, here’s what the queue looks like for each step, plus the previous visualization shown with the queue state:

  • Initially, the queue contains just vertex 3 with distance 0.
  • Dequeue vertex 3, and enqueue vertices 2 and 6, both with distance 1. The queue now contains vertex 2 with distance 1 and vertex 6 with distance 1.
  • Dequeue vertex 2, and enqueue vertices 4 and 5, both with distance 2. The queue now contains vertex 6 with distance 1, vertex 4 with distance 2, and vertex 5 with distance 2.
  • Dequeue vertex 6, and don’t enqueue any vertices. The queue now contains vertex 4 with distance 2 and vertex 5 with distance 2.
  • Dequeue vertex 4, and enqueue vertex 1 with with distance 3. The queue now contains vertex 5 with distance 2 and vertex 1 with distance 3.
  • Dequeue vertex 5, and don’t enqueue any vertices. The queue now contains just vertex 1 with distance 3.
  • Dequeue vertex 1, and enqueue vertex 0 with distance 4. The queue now contains just vertex 0 with distance 4.
  • Dequeue vertex 0, and don’t enqueue any vertices. The queue is now empty. Because the queue is empty, breadth-first search terminates.

https://www.khanacademy.org/computer-programming/bfs-queue-visualization/5903707466366976/embedded?embed=yes&article=yes&editor=no&buttons=no&author=no&autoStart=yes&width=400&height=360&settings=%7B%22sortType%22%3A%22selection%22%7D

Notice that at each moment, the queue either contains vertices all with the same distance, or it contains vertices with distance kk followed by vertices with distance k+1k+1. That’s how we ensure that we visit all vertices at distance kk before visiting any vertices at distance k+1k+1.

Data Structures & Algorithms – Overview

Data Structures are the programmatic way of storing data so that data can be used efficiently. Almost every enterprise application uses various types of data structures in one or the other way. This tutorial will give you a great understanding on Data Structures needed to understand the complexity of enterprise level applications and need of algorithms, and data structures.

Audience

This tutorial is designed for Computer Science graduates as well as Software Professionals who are willing to learn data structures and algorithm programming in simple and easy steps.

After completing this tutorial you will be at intermediate level of expertise from where you can take yourself to higher level of expertise.

Prerequisites

Before proceeding with this tutorial, you should have a basic understanding of C programming language, text editor, and execution of programs, etc.

Compile and Execute C Online

For most of the examples given in this tutorial you will find Try it option, so just make use of this option to execute your programs on the spot and enjoy your learning.

Try the following example using the Try it option available at the top right corner of the following sample code box −

#include <stdio.h>

int main(){
   /* My first program in C */
   printf("Hello, World! \n");
   
   return 0;
}

DESIGN ANALYSIS AND ALGORITHM 

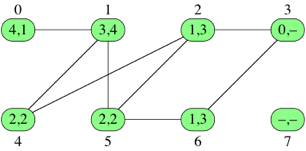
 Algorithms Lecture Notes

  1. Introduction
  2. Mathematics for Algorithmic
  3. Greedy Algorithms
  4. Divide & Conquer Algorithms
  5. Dynamic Programming
  6. Amortized Analysis
  7. Hash Table
  8. Binary Search Tree
  9. Graph Algorithms
  10. String Matching
  11. Sorting
  12. Linear-Time Sorting
  13. Computational Geometry
  14. Computational Complexity
  15. Approximate Algorithms
  16. Linear Programming
  17. Appendix
    1. Parabola
    2. Tangent
  18. Codes
  19. References

 Algorithm Home Page 
 Dictionary of Algorithms & Data Structures —  NIST   
 Dictionary of Algorithms & Data Structures — FOLDOC
 On-line Encyclopedia of Integer Sequences
 Glossary (Design & Analysis of Algorithms). 
 Algorithms and Data Structures Books  
 Books by Don Knuth (and links to papers)


 Books

 Journals

 Links

 Computatability


 Quantum Computing


 Algorithms

 Graph Algorithms


 Societies and Organizations

 Geometry

DEVICE DRIVER – SYSTEM PROGRAMMING 

1    Introduction to Device Drivers

This chapter presents an overview of device drivers by discussing:

  • The purpose of a device driver
  • The types of device drivers
  • Single binary module
  • When a device driver is called
  • Device driver configuration
  • The place of a device driver in the Digital UNIX operating system

The chapter concludes with an example of how a device driver in Digital UNIX reads a single character.


[Return to Library] [Contents] [Previous Chapter]  [Next Section] [Next Chapter] [Index] [Help]


1.1    Purpose of a Device Driver

The purpose of a device driver is to handle requests made by the kernel with regard to a particular type of device. There is a well-defined and consistent interface for the kernel to make these requests. By isolating device-specific code in device drivers and by having a consistent interface to the kernel, adding a new device is easier.


[Return to Library] [Contents] [Previous Chapter] [Previous Section] [Next Section] [Next Chapter] [Index] [Help]


1.2    Types of Device Drivers

A device driver is a software module that resides within the Digital UNIX kernel and is the software interface to a hardware device or devices. A hardware device is a peripheral, such as a disk controller, tape controller, or network controller device. In general, there is one device driver for each type of hardware device. Device drivers can be classified as:

  • Block device drivers
  • Character device drivers (including terminal drivers)
  • Network device drivers
  • Pseudodevice drivers

The following sections briefly discuss each type.

Note

This book does not discuss how to write STREAMS device drivers. However,Writing Device Drivers: Referencecontains reference pages for kernel interfaces that STREAMS device drivers use. See the Network Programmer’s Guide for information on STREAMS programming frameworks and other information related to STREAMS.


[Return to Library] [Contents] [Previous Chapter] [Previous Section] [Next Section] [Next Chapter] [Index] [Help]


1.2.1    Block Device Driver

A block device driver is a driver that performs I/O by using file system block-sized buffers from a buffer cache supplied by the kernel. The kernel also provides for the device driver support interfaces that copy data between the buffer cache and the address space of a process.

Block device drivers are particularly well-suited for disk drives, the most common block devices. For block devices, all I/O occurs through the buffer cache.


[Return to Library] [Contents] [Previous Chapter] [Previous Section] [Next Section] [Next Chapter] [Index] [Help]


1.2.2    Character Device Driver

A character device driver does not handle I/O through the buffer cache, so it is not tied to a single approach for handling I/O. You can use a character device driver for a device such as a line printer that handles one character at a time. However, character drivers are not limited to performing I/O one character at a time (despite the name “character” driver). For example, tape drivers frequently perform I/O in 10K chunks. You can also use a character device driver when it is necessary to copy data directly to or from a user process.

Because of their flexibility in handling I/O, many drivers are character drivers. Line printers, interactive terminals, and graphics displays are examples of devices that require character device drivers.

A terminal device driver is actually a character device driver that handles I/O character processing for a variety of terminal devices. Like any character device, a terminal device can accept or supply a stream of data based on a request from a user process. It cannot be mounted as a file system and, therefore, does not use data caching.


[Return to Library] [Contents] [Previous Chapter] [Previous Section] [Next Section] [Next Chapter] [Index] [Help]


1.2.3    Network Device Driver

A network device driver attaches a network subsystem to a network interface, prepares the network interface for operation, and governs the transmission and reception of network frames over the network interface. This book does not discuss network device drivers.


[Return to Library] [Contents] [Previous Chapter] [Previous Section] [Next Section] [Next Chapter] [Index] [Help]


1.2.4    Pseudodevice Driver

Not all device drivers control physical hardware. Such device drivers are called “pseudodevice” drivers. Like block and character device drivers, pseudodevice drivers make use of the device driver interfaces. Unlike block and character device drivers, pseudodevice drivers do not operate on a bus. One example of a pseudodevice driver is the pseudoterminal or pty terminal driver, which simulates a terminal device. The pty terminal driver is a character device driver typically used for remote logins.


[Return to Library] [Contents] [Previous Chapter] [Previous Section] [Next Section] [Next Chapter] [Index] [Help]


1.3    Single Binary Module

Digital UNIX provides the tools and techniques for you to produce a single binary module. A single binary module is the executable image of a device driver that can be statically or dynamically configured into the kernel. A single binary module has a file extension of .mod. The .mod file for the current version of Digital UNIX is not the same as the .mod file used in previous versions of the operating system.

To produce a single binary module, there is code you need to implement in the driver’sconfigure interface. Chapter 6 describes how to write a configure interface so that your device driver can be statically or dynamically configured into the kernel. In addition, there are steps you follow when using the system management tools for statically and dynamically configuring the driver (the single binary module) into the kernel. Chapter 14 explains how to statically and dynamically configure drivers into the kernel.


[Return to Library] [Contents] [Previous Chapter] [Previous Section] [Next Section] [Next Chapter] [Index] [Help]


1.4    When a Device Driver Is Called

Figure 1-1 shows that the kernel calls a device driver during:

  • AutoconfigurationThe kernel calls a device driver (specifically, the driver’s probe interface) at autoconfiguration time to determine what devices are available and to initialize them. 
  • I/O operationsThe kernel calls a device driver to perform I/O operations on the device. These operations include opening the device to perform reads and writes and closing the device.
  • Interrupt handlingThe kernel calls a device driver to handle interrupts from devices capable of generating them.
  • Special requestsThe kernel calls a device driver to handle special requests through ioctl calls.
  • ReinitializationThe kernel calls a device driver to reinitialize the driver, the device, or both when the bus (the path from the CPU to the device) is reset.
  • User-level requests to the sysconfig utilityThe kernel calls a device driver (specifically, the driver’s configureinterface) to handle requests that result from use of the sysconfig utility. Thesysconfig utility allows a system manager to dynamically configure, unconfigure, query, and reconfigure a device. These requests cause the kernel to call the device driver’s configure interface. In addition, the driver’s configure interface performs one-time initializations when called by the boot software or by thesysconfig utility.

Figure 1-1: When the Kernel Calls a Device Driver

Some of these requests, such as input or output, result directly or indirectly from corresponding system calls in a user program. Other requests, such as the calls at autoconfiguration time, do not result from system calls but from activities that occur at boot time.


[Return to Library] [Contents] [Previous Chapter] [Previous Section] [Next Section] [Next Chapter] [Index] [Help]


1.5    Device Driver Configuration

Device driver configuration consists of the tasks necessary to incorporate device drivers into the kernel to make them available to system management and other utilities. After you write your device driver you need to create a single binary module (a file with a .mod extension) from the driver source file (a file with a .cextension). After you create the single binary module, you need to configure it into the kernel so that you can test it on a running system. There are two methods of device driver configuration: static configuration and dynamic configuration. Static configuration consists of the tasks and tools necessary to link a device driver (single binary module) directly into the kernel at kernel build time. Dynamic configuration consists of the tasks and tools necessary to link a device driver (single binary module) directly into the kernel at any point in time. Chapter 14 describes how to create a single binary module and then how to statically and dynamically configure the single binary module (the device driver) into the kernel.

Do not confuse device driver configuration (static configuration and dynamic configuration), which encompasses the tools and steps for configuring the driver into the kernel, with autoconfiguration and configuration. Autoconfiguration is a process that determines what hardware actually exists during the current instance of the running kernel at static configuration time. The autoconfiguration software (specifically, the bus’s confl1interface) calls the driver’s probeattach, and slave interfaces. Thus, the driver’sprobeattach, and slave interfaces cooperate with the bus’s confl1 interface to determine if devices exist and are functional on a given system.

Configuration is a process associated with handling user-level requests to thesysconfig utility to dynamically configure, unconfigure, query, and reconfigure devices. The cfgmgr framework calls the driver’s configure interface as a result of these sysconfig utility requests. The cfgmgrframework also calls the driver’s configureinterface as a result of static configuration requests. Thus, the driver’s configureinterface cooperates with the cfgmgrframework to statically configure and to dynamically configure, unconfigure, query, and reconfigure devices. The driver’sconfigure interface also cooperates with thecfgmgr framework to perform one-time initialization tasks such as allocating memory, initializing data structures and variables, and adding driver entry points to the dsent table. A driver’s configureinterface should be implemented to handle static and dynamic configuration. 


[Return to Library] [Contents] [Previous Chapter] [Previous Section] [Next Section] [Next Chapter] [Index] [Help]


1.6    Place of a Device Driver in Digital UNIX

Figure 1-2 shows the place of a device driver in Digital UNIX relative to the device:

  • User program or utilityA user program, or utility, makes calls on the kernel but never directly calls a device driver.
  • KernelThe kernel runs in supervisor mode and does not communicate with a device except through calls to a device driver.
  • Device driverA device driver communicates with a device by reading and writing through a bus to peripheral device registers.
  • BusThe bus is the data path between the main processor and the device controller.

    Figure 1-2: Place of a Device Driver in Digital UNIX

  • ControllerA controller is a physical interface for controlling one or more devices. A controller connects to a bus.
  • Peripheral deviceA peripheral device is a device that can be connected to a controller, for example, a disk or tape drive. Other devices (for example, the network) may be integral to the controller.

The following sections describe these parts, with an emphasis on how a device driver relates to them.


[Return to Library] [Contents] [Previous Chapter] [Previous Section] [Next Section] [Next Chapter] [Index] [Help]


1.6.1    User Program or Utility

User programs, or utilities, make system calls on the kernel that result in the kernel making requests of a device driver. For example, a user program can make a readsystem call, which calls the driver’s readinterface.


[Return to Library] [Contents] [Previous Chapter] [Previous Section] [Next Section] [Next Chapter] [Index] [Help]


1.6.2    Kernel

The kernel makes requests to a device driver to perform operations on a particular device. Some of these requests result directly from user program requests. For example:

  • Block I/O (open, strategy, close)
  • Character I/O (open, write, close)

Autoconfiguration requests, such as probeand attach, do not result directly from a user program, but result from activities performed by the kernel. At boot time, for example, the kernel (specifically, the bus code) calls the driver’s probe interface. Configuration requests, such as configure, unconfigure, and query, result from a system manager’s use of the sysconfigutility.

A device driver may call on kernel support interfaces to support such tasks as:

  • Sleeping and waking (process rescheduling)
  • Scheduling events
  • Managing the buffer cache
  • Moving or initializing data


[Return to Library] [Contents] [Previous Chapter] [Previous Section] [Next Section] [Next Chapter] [Index] [Help]


1.6.3    Device Driver

A device driver, run as part of the kernel software, manages each of the device controllers on the system. Often, one device driver manages an entire set of identical device controller interfaces. With Digital UNIX, you can statically configure more device drivers into the kernel than there are physical devices in the hardware system. At boot time, the autoconfiguration software determines which of the physical devices are accessible and functional and can produce a correct run-time configuration for that instance of the running kernel. Similarly, when a driver is dynamically configured, the kernel performs the configuration sequence for each instance of the physical device.

As stated previously, the kernel makes requests of a driver by calling the driver’s standard entry points (such as the probe,attachopenreadwriteclose entry points). In the case of I/O requests such as read andwrite, it is typical that the device causes an interrupt upon completion of each I/O operation. Thus, a write system call from a user program may result in several calls on the interrupt entry point in addition to the original call on the write entry point. This is the case when the write request is segmented into several partial transfers at the driver level.

Device drivers, in turn, make calls upon kernel support interfaces to perform the tasks mentioned earlier.

The device register offset definitions giving the layout of the control registers for a device are part of the source for a device driver. Device drivers, unlike the rest of the kernel, can access and modify these registers. Digital UNIX provides generic CSR I/O access kernel interfaces that allow device drivers to read from and write to these registers.


[Return to Library] [Contents] [Previous Chapter] [Previous Section] [Next Section] [Next Chapter] [Index] [Help]


1.6.4    Bus

When a device driver reads or writes to the hardware registers of a controller, the data travels across a bus.

A bus is a physical communication path and an access protocol between a processor and its peripherals. A bus standard, with a predefined set of logic signals, timings, and connectors, provides a means by which many types of device interfaces (controllers) can be built and easily combined within a computer system. The term OPENbus refers to those buses whose architectures and interfaces are publicly documented, allowing a vendor to easily plug in hardware and software components. The TURBOchannel bus, the EISA bus, the PCI bus, and the VMEbus, for example, can be classified as having OPENbus architectures.

Device driver writers must understand the bus that the device is connected to. This book covers topics that all driver writers need to know regardless of the bus.


[Return to Library] [Contents] [Previous Chapter] [Previous Section] [Next Section] [Next Chapter] [Index] [Help]


1.6.5    Device Controller

A device controller is the hardware interface between the computer and a peripheral device. Sometimes a controller handles several devices. In other cases, a controller is integral to the device.


[Return to Library] [Contents] [Previous Chapter] [Previous Section] [Next Section] [Next Chapter] [Index] [Help]


1.6.6    Peripheral Device

A peripheral device is hardware, such as a disk controller, that connects to a computer system. It can be controlled by commands from the computer and can send data to the computer and receive data from it.Examples of peripheral devices include:

  • A data acquisition device, like a digitizer
  • A line printer
  • A disk or tape drive


[Return to Library] [Contents] [Previous Chapter] [Previous Section] [Next Section] [Next Chapter] [Index] [Help]


1.7    Example of Reading a Character

This section provides an example of how Digital UNIX processes a read request of a single character in raw mode from a terminal. (Raw mode returns single characters.) Although the example takes a simplified view of character processing, it does show how control can pass from a user program to the kernel to the device driver. It also shows that interrupt processing occurs asynchronously from other device driver activity.

Figure 1-3 summarizes the flow of control between a user program, the kernel, the device driver, and the hardware. The figure shows the following sequence of events:

  • A read request is made to the device driver (C-1 to C-3).
  • The character is captured by the hardware (I-4 and I-5).
  • The interrupt is generated (I-6).
  • The interrupt handler services the interrupt (I-7 to I-9).
  • The character is returned (C-10 to C-13).

Figure 1-3 provides a snapshot of the processing that occurs in the reading of a single character. The following sections elaborate on this sequence.

Figure 1-3: Simple Character Driver Interrupt Example


[Return to Library] [Contents] [Previous Chapter] [Previous Section] [Next Section] [Next Chapter] [Index] [Help]


1.7.1    A Read Request Is Made to the Device Driver

A user program issues a read system call (C-1). The figure shows that the read system call passes three arguments: a file descriptor (the fd argument), the character pointer to where the information is stored (the buf argument), and an integer (the value 1) that tells the driver’s read interface how many bytes to read. The calling sequence is blocked inside the device driver’s read interface because the buffer where the data is stored is empty, indicating that there are currently no characters available to satisfy the read. The kernel’s read interface makes a request of the device driver’s read interface to perform a read of the character based on the arguments passed by the read system call (C-2). Essentially, the driver read interface is waiting for a character to be typed at the terminal’s keyboard. The currently blocked process that caused the kernel to call the driver’s read interface is not running in the CPU (C-3).


[Return to Library] [Contents] [Previous Chapter] [Previous Section] [Next Section] [Next Chapter] [Index] [Help]


1.7.2    The Character Is Captured by the Hardware

Later, a user types the letter k on the terminal keyboard (I-4). The letter is stored in the device’s data register (I-5).


[Return to Library] [Contents] [Previous Chapter] [Previous Section] [Next Section] [Next Chapter] [Index] [Help]


1.7.3    The Interrupt Is Generated

When the user types a key, the console keyboard controller alters some signals on the bus. This action notifies the CPU that something has changed inside the console keyboard controller. This condition causes the CPU to immediately start running the console keyboard controller’s interrupt handler (I-6). The state of the interrupted process (either some other process or the idle loop) is saved so that the process can be returned to its original state as though it had never been interrupted in the first place.


[Return to Library] [Contents] [Previous Chapter] [Previous Section] [Next Section] [Next Chapter] [Index] [Help]


1.7.4    The Interrupt Handler Services the Interrupt

The console device driver’s interrupt handler first checks the state of the driver and notices that a pending read operation exists for the original process. The console device driver manipulates the controller hardware by way of the bus hardware in order to obtain the value of the character that was typed. This character value was stored somewhere inside the console controller’s hardware (I-7). In this case, the value 107 (the ASCII representation for the k character) is stored. The interrupt handler stores this character value into a buffer that is in a location known to the rest of the console driver interfaces (I-8). It then awakens the original, currently sleeping, process so that it is ready to run again (I-9). The interrupt handler returns, in effect restoring the interrupted process (not the original process yet) so that it may continue where it left off.


[Return to Library] [Contents] [Previous Chapter] [Previous Section] [Next Section] [Next Chapter] [Index] [Help]


1.7.5    The Character Is Returned

Later, the kernel’s process scheduler notices that the original process is ready to run, and so allows it to run. After the original process resumes running (after the location where it was first blocked), it knows which buffer to look at to obtain the typed character (C-10). It removes the character from this buffer and puts it into the user’s address space (C-11). The device driver’s read interface returns control to the kernel’s read interface (C-12). The kernelread interface returns control to the user program that previously initiated the read request (C-13).


[Return to Library] [Contents] [Previous Chapter] [Previous Section]  [Next Chapter] [Index] [Help]


1.7.6    Summary of the Example

Although this example presents a somewhat simplified view of character processing, it does illustrate how control passes from a user program to the kernel to the device driver. It also shows clearly that interrupt processing occurs asynchronously from other device driver activity.

Operating System

An Operating System (OS) is an interface between a computer user and computer hardware. An operating system is a software which performs all the basic tasks like file management, memory management, process management, handling input and output, and controlling peripheral devices such as disk drives and printers.

Some popular Operating Systems include Linux, Windows, OS X, VMS, OS/400, AIX, z/OS, etc.

Definition

An operating system is a program that acts as an interface between the user and the computer hardware and controls the execution of all kinds of programs.

Conceptual view of an Operating System

Following are some of important functions of an operating System.

  • Memory Management
  • Processor Management
  • Device Management
  • File Management
  • Security
  • Control over system performance
  • Job accounting
  • Error detecting aids
  • Coordination between other software and users

Memory Management

Memory management refers to management of Primary Memory or Main Memory. Main memory is a large array of words or bytes where each word or byte has its own address.

Main memory provides a fast storage that can be accessed directly by the CPU. For a program to be executed, it must in the main memory. An Operating System does the following activities for memory management −

  • Keeps tracks of primary memory, i.e., what part of it are in use by whom, what part are not in use.

  • In multiprogramming, the OS decides which process will get memory when and how much.

  • Allocates the memory when a process requests it to do so.

  • De-allocates the memory when a process no longer needs it or has been terminated.

Processor Management

In multiprogramming environment, the OS decides which process gets the processor when and for how much time. This function is called process scheduling. An Operating System does the following activities for processor management −

  • Keeps tracks of processor and status of process. The program responsible for this task is known as traffic controller.

  • Allocates the processor (CPU) to a process.

  • De-allocates processor when a process is no longer required.

Device Management

An Operating System manages device communication via their respective drivers. It does the following activities for device management −

  • Keeps tracks of all devices. Program responsible for this task is known as theI/O controller.

  • Decides which process gets the device when and for how much time.

  • Allocates the device in the efficient way.

  • De-allocates devices.

File Management

A file system is normally organized into directories for easy navigation and usage. These directories may contain files and other directions.

An Operating System does the following activities for file management −

  • Keeps track of information, location, uses, status etc. The collective facilities are often known as file system.

  • Decides who gets the resources.

  • Allocates the resources.

  • De-allocates the resources.

Other Important Activities

Following are some of the important activities that an Operating System performs −

  • Security − By means of password and similar other techniques, it prevents unauthorized access to programs and data.

  • Control over system performance − Recording delays between request for a service and response from the system.

  • Job accounting − Keeping track of time and resources used by various jobs and users.

  • Error detecting aids − Production of dumps, traces, error messages, and other debugging and error detecting aids.

  • Coordination between other softwares and users − Coordination and assignment of compilers, interpreters, assemblers and other software to the various users of the computer systems.

JOKES

God is really creative, I mean.. just look at me! 🙂

I hate fake people. You know what I’m talking about. Mannequins. 😀

I’m not lazy, I’m on energy saving mode.

I love my job only when I’m on vacation…..

Never make eye contact while eating a banana.

Life is Short – Chat Fast!

If life gives you lemons, just add vodka.

How can i miss something i never had?

Hey there whatsapp is using me.

Girls use photoshop to look beautiful.. Boys use photoshop to show their creativity.

Fact: Phone on silent mode- 10 Missed call… Turns volume to loud- Nobody calls all day!!

Girls, if he only wants your breasts, legs, and thighs. send him to KFC.

You can never buy Love….But still you have to pay for it ..

If you are going to speak bad things about me on my back, come to me. I’ll tell you more.

Did anyone else notice the sound if you click the like button on my status?

I live in a world of fantasy, so keep your reality away from me!

A bank is a place that will lend you money, if you can prove that you don’t need it.

My biggest concern in life is actually how my online friends can be informed of my death..!!

When I’m a Pedestrian I Hate cars.. When I’m Driving I Hate Pedestrians…

Whoever says “Good Morning” on Monday’s deserves to get slapped 🙂

Mosquitos are like family. Annoying but they carry your blood.

Funny Status for Whatsapp Facebook

Who needs television when there is so much drama on Facebook.

Everything funnier when your supposed to be quiet..

I want someone to look at me the way I look at cupcakes!!

Save water drink beer.

6 Peg Loading .. 😀

Dear Lord, there is a bug in your software…it’s called #Monday, please fix it

Always wear cute pajamas to bed you’ll never know who you will meet in your dreams.

God is really creative , i mean ..just look at me 😛

Decided to burn lots of calories today so I set a fat kid on fire.

When I’m on my death bed, I want my final words to be “I left one million dollars in the…

I wake up when I cant hold my pee in any longer.

My father always told me, ‘Find a job you love and you’ll never have to work a day in your life.

Life is too short smile while you still have teeth…

My study period = 15 minutes. My break time = 3 hours.

If College has taught us anything, it’s texting without looking 🙂

I’m Jealous Of My Parents… I’ll Never Have A Kid As Cool As Theirs!

Here my dad comes on whatsapp… From now on my status would be ‘***no status***’ or just a smiley…

Don’t kiss behind the garden, Love is blind but the neighbors are not.

I Like to study.. Arithmetic – NO … world history – NO …. chemistry – NO …. GIRLS – YES!!!

Friends are forever, until they get in a relationship!! 😛

People call me mike .. You can call me tonight.. :p

In Modern Politics, Even The Leader Of The Free World Needs Help From The Sultan Of Facebookistan!!!

C.L.A.S.S- come late and start sleeping 🙂

Faces YOU Make ON The Toilet lol (o_o) (>_<) (0_0) (^_^)

Everything is 10x funnier when you are not supposed to laugh.

People who exercise live longer, but what’s the point when those extra years are spent at gym.

Relationship Status: Looking for a WiFi connection.

It may look like I’m deep in thought, but 99% of the time I’m just thinking about what food to eat later.

Checking your symptoms on Google and accepting that fact that you’re going to die.

When a newly married man looks happy, we know why. But when a ten-year married man looks happy, we wonder why.

Wrestling is obviously fake. Why would two people fight over a belt when neither of them are wearing pants?

Sorry about those texts I sent you last night, my phone was drunk.

We are WTF generation …. WhatsApp, Twitter and Facebook 😀

Having a best friend with the same mental disorder is a blessing. LOL

It’s been 70+ years, Tom. You’re never going to eat Jerry 🙂

I want some one to give me a Loan and then leave me Alone. 🙂

There’s like 7 billion people in this world and no one wants to date me. I hate this world … huh

Dear Lord, all I ask for a chance to prove that winning the lottery won’t make a bad person.

I don’t usually sleep enough, but when I do, it’s still not enough 😉

My family says I talk in my sleep but nobody at work has ever mentioned it. lolz

The only thing I gained so far in THIS YEAR is weight 🙂

I am not addicted to WHATS APP. I only use it when I have time ……. lunch time, break time, bed time, this time, that time, any time, all the time. 🙂

Marriage is just a fancy word for adopting an overgrown male child who can not be handled by his parents anymore.

The most powerful words other than I LOVE YOU is “Salary is Credited” 🙂

Is there anything more awkward than when you are singing along to a song on youtube and the music stops loading.

Years of education, solving tough problems, handling complex issues, yet we take a while standing before glass doors thinking whether to Push or Pull.

Flirtationship: More than a friendship and less than a relationship.

Running away does not help you with your problems, unless you are fat.

In bed, it’s 6AM you close your eyes for 5 minutes, it’s 7:45. At school it’s 1:30, close your eyes for 5 minutes, it’s 1:31

I wonder what happens when doctor’s wife eats an apple a day. 🙂

GOOGLE must be a woman because it knows everything.

I only need 3 things in life: Food, Wifi, Sleep 🙂

Boys, if you don’t look like calvin klein models, don’t expect us to look like victoria secrets angels. (From All Bachelor Girls Association) 🙂

I have enough money to last me the rest of my life, unless I buy something.

TODAY has been cencelled. Go back to BED 🙂

I’ve had a horribly busy day converting oxygen into carbon dioxide. 🙂

Some people should have multiple Facebook accounts to go along with their multiple personalities.

At least mosquito’s are attracted to me.

Funny Status Quotes for Whatsapp Facebook

Laughing at your own texts before you send them because you are so damn funny.

I really need 5 hours of Facebook to balance out my 5 minutes of studying.

When a bird hits your window have you ever wondered if God is playing angry birds with you?

Today morning when I was driving my Ferrari, the alarm woke me up. 😀

Restaurant Advertisement: We serve food as HOT as your neighbour’s wife; And beer as COLD as your own. 🙂

My family says I talk in my sleep but nobody at work has ever mentioned it. lol

If you love someone, set them free. If they come back, nobody else wanted them either 🙂

Today’s Relationships: You can touch each other but not each others phones.

I am sure I have a defective iPhone, I keep pressing the home button and I’m still at work.

A husband is someone who, after taking the trash out, gives the impression he just cleaned the whole house.

When a woman says WHAT? Its not because she didn’t hear you. She’s giving you a chance to change what you said.

My bed is always extra comfortable when I need to get out of it in the morning.

One day your prince will come. Mine just took a wrong turn, got lost and is too stubborn to ask for directions 🙂

I always learn from mistake of others who take my advice 🙂

If time does not wait for you, don’t worry. Just remove the battery from the clock and enjoy life.

If school has taught us anything, it’s texting without looking 🙂

I hate people who steal my ideas, before I think of them 🙂

All my life I thought air is free until I bought a bag of chips.

Create your first Cordova app

This guide shows you how to create a JS/HTML Cordova application and deploy them to various native mobile platforms using the cordovacommand-line interface (CLI). For detailed reference on Cordova command-line, review theCLI reference

Installing the Cordova CLI

The Cordova command-line tool is distributed as an npm package.

To install the cordova command-line tool, follow these steps:

  1. Download and install Node.js. On installation you should be able to invoke node andnpm on your command line.

  2. (Optional) Download and install a git client, if you don’t already have one. Following installation, you should be able to invokegit on your command line. The CLI uses it to download assets when they are referenced using a url to a git repo.

  3. Install the cordova module using npmutility of Node.js. The cordova module will automatically be downloaded by the npmutility.

  • on OS X and Linux:

       $ sudo npm install -g cordova
    

    On OS X and Linux, prefixing the npmcommand with sudo may be necessary to install this development utility in otherwise restricted directories such as/usr/local/share. If you are using the optional nvm/nave tool or have write access to the install directory, you may be able to omit the sudo prefix. There are more tipsavailable on using npm without sudo, if you desire to do that.

  • on Windows:

       C:\>npm install -g cordova
    

The -g flag above tells npm to install cordovaglobally. Otherwise it will be installed in thenode_modules subdirectory of the current working directory.

Following installation, you should be able to runcordova on the command line with no arguments and it should print help text.

Create the App

Go to the directory where you maintain your source code, and create a cordova project:

$ cordova create hello com.example.hello HelloWorld

This creates the required directory structure for your cordova app. By default, the cordova create script generates a skeletal web-based application whose home page is the project’swww/index.html file.

See Also

Add Platforms

All subsequent commands need to be run within the project’s directory, or any subdirectories:

$ cd hello

Add the platforms that you want to target your app. We will add the ‘ios’ and ‘android’ platform and ensure they get saved to config.xml:

$ cordova platform add ios --save
$ cordova platform add android --save

To check your current set of platforms:

$ cordova platform ls

Running commands to add or remove platforms affects the contents of the project’s platformsdirectory, where each specified platform appears as a subdirectory.

Note: When using the CLI to build your application, you should notedit any files in the /platforms/directory. The files in this directory are routinely overwritten when preparing applications for building, or when plugins are re-installed.

Install pre-requisites for building

To build and run apps, you need to install SDKs for each platform you wish to target. Alternatively, if you are using browser for development you can use browser platform which does not require any platform SDKs.

To check if you satisfy requirements for building the platform:

$ cordova requirements
Requirements check results for android:
Java JDK: installed .
Android SDK: installed
Android target: installed android-19,android-21,android-22,android-23,Google Inc.:Google APIs:19,Google Inc.:Google APIs (x86 System Image):19,Google Inc.:Google APIs:23
Gradle: installed

Requirements check results for ios:
Apple OS X: not installed
Cordova tooling for iOS requires Apple OS X
Error: Some of requirements check failed

See Also

Build the App

By default, cordova create script generates a skeletal web-based application whose start page is the project’s www/index.html file. Any initialization should be specified as part of thedeviceready event handler defined inwww/js/index.js.

Run the following command to build the project for all platforms:

$ cordova build

You can optionally limit the scope of each build to specific platforms – ‘ios’ in this case:

$ cordova build ios

See Also

Test the App

SDKs for mobile platforms often come bundled with emulators that execute a device image, so that you can launch the app from the home screen and see how it interacts with many platform features. Run a command such as the following to rebuild the app and view it within a specific platform’s emulator:

$ cordova emulate android

Following up with the cordova emulatecommand refreshes the emulator image to display the latest application, which is now available for launch from the home screen:

Alternately, you can plug the handset into your computer and test the app directly:

$ cordova run android

Before running this command, you need to set up the device for testing, following procedures that vary for each platform.

See Also

Add Plugins

You can modify the default generated app to take advantage of standard web technologies, but for the app to access device-level features, you need to add plugins.

plugin exposes a Javascript API for native SDK functionality. Plugins are typically hosted on npm and you can search for them on the plugin search page. Some key APIs are provided by the Apache Cordova open source project and these are referred to as Core Plugin APIs. You can also use the CLI to launch the search page:

$ cordova plugin search camera

To add the camera plugin, we will specify the npm package name for the camera plugin:

$ cordova plugin add cordova-plugin-camera
Fetching plugin "cordova-plugin-camera@~2.1.0" via npm
Installing "cordova-plugin-camera" for android
Installing "cordova-plugin-camera" for ios

Plugins can also be added using a directory or a git repo.

NOTE: The CLI adds plugin code as appropriate for each platform. If you want to develop with lower-level shell tools or platform SDKs as discussed in theOverview, you need to run the Plugman utility to add plugins separately for each platform. (For more information, see Using Plugman to Manage Plugins.)

Use plugin ls (or plugin list, or plugin by itself) to view currently installed plugins. Each displays by its identifier:

$ cordova plugin ls
cordova-plugin-camera 2.1.0 "Camera"
cordova-plugin-whitelist 1.2.1 "Whitelist"

See Also

Using merges to Customize Each Platform

While Cordova allows you to easily deploy an app for many different platforms, sometimes you need to add customizations. In that case, you don’t want to modify the source files in various wwwdirectories within the top-level platformsdirectory, because they’re regularly replaced with the top-level www directory’s cross-platform source.

Instead, the top-level merges directory offers a place to specify assets to deploy on specific platforms. Each platform-specific subdirectory within merges mirrors the directory structure of the www source tree, allowing you to override or add files as needed. For example, here is how you might uses merges to boost the default font size for Android devices:

  • Edit the www/index.html file, adding a link to an additional CSS file, overrides.css in this case:

    <link rel="stylesheet" type="text/css" href="css/overrides.css" />
    

  • Optionally create an emptywww/css/overrides.css file, which would apply for all non-Android builds, preventing a missing-file error.

  • Create a css subdirectory withinmerges/android, then add a corresponding overrides.css file. Specify CSS that overrides the 12-point default font size specified within www/css/index.css, for example:

    body { font-size:14px; }
    

When you rebuild the project, the Android version features the custom font size, while others remain unchanged.

You can also use merges to add files not present in the original www directory. For example, an app can incorporate a back button graphic into the iOS interface, stored inmerges/ios/img/back_button.png, while the Android version can instead capture backbuttonevents from the corresponding hardware button.

Updating Cordova and Your Project

After installing the cordova utility, you can always update it to the latest version by running the following command:

$ sudo npm update -g cordova

Use this syntax to install a specific version:

$ sudo npm install -g cordova@3.1.0-0.2.0

Run cordova -v to see which version is currently running. To find the latest released cordova version, you can run:

$ npm info cordova version

To update platform that you’re targeting:

$ cordova platform update android --save
$ cordova platform update ios --save
...etc.

Monopoly IEED

Monopoly is a market in which a single seller controls the entire supply of a commodity. The different types of monopoly are as follows: 


  • Private monopoly:
    The monopoly firm owned and operate by private individuals is called the private monopoly. Their main motive is to make profit.

  • Public monopoly:
    The monopoly firm owned and operated by public or state government is called public monopoly. It is also known as social monopoly. The entire operation is controlled either by central or state government. Their main motive is to provide welfare to the public.

  • Absolute monopoly:
    It is a type of monopoly, where a single seller controls the entire supply of market without facing competition. It is also known as pure monopoly. His product does not have even any remote substitute also.

  • Imperfect monopoly:
    It is a type of monopoly in which a single seller controls the entire supply of the market which does not have a close substitute. But there might be remote substitute for the product available in the market.

  • Simple or single monopoly:
    It is a type of monopoly in which a single seller controls the entire market, by selling the commodity at a single price for all the consumer. There is no price discrimination in the market.

  • Discriminative monopoly:
    When a monopoly firm changes different prices for the same goods or services to different consumers it is known as discriminative monopoly.

  • Legal monopoly:
    When a firms enjoys rights like trade mark, copy right, patent right, etc. then it is known as legal monopoly. Such monopoly rights are approved by the government.

  • Natural monopoly:
    When a firms enjoys monopoly right due to natural factors like location reputation earned etc, it is called as natural monopoly. Natural talent, skill of the producer also makes him to enjoy this right.

  • Technological monopoly:
    When a firm enjoys monopoly power due to technical superiority over other products in the market, then it is called as technological monopoly. For example products produced by L & T, Godrej etc. are technological monopoly.

    So by explaining technological monopoly and other monopolies we have finished with the full explanation of different types of monopoly.

Running Your App

In the previous lesson, you created an Android project that displays “Hello World.” You can now run the app on a real device or on an emulator. If you don’t have a real device available, skip toRun on an Emulator


Set up your device as follows:

  1. Connect your device to your development machine with a USB cable. If you’re developing on Windows, you might need to install the appropriate USB driver for your device. For help installing drivers, see theOEM USB Drivers document.
  2. Enable USB debugging on your device by going toSettings > Developer options.

    Note: On Android 4.2 and newer, Developer options is hidden by default. To make it available, go to Settings > About phone and tapBuild number seven times. Return to the previous screen to find Developer options.

Run the app from Android Studio as follows:

  1. In Android Studio, select your project and click Run  from the toolbar.
  2. In the Select Deployment Target window, select your device, and click OK.

Android Studio installs the app on your connected device and starts it.

Run on an Emulator


Before you run your app on an emulator, you need to create an Android Virtual Device (AVD) definition. An AVD definition defines the characteristics of an Android phone, tablet, Android Wear, or Android TV device that you want to simulate in the Android Emulator.

Create an AVD Definition as follows:

  1. Launch the Android Virtual Device Manager by selecting Tools > Android > AVD Manager, or by clicking the AVD Manager icon  in the toolbar.
  2. In the Your Virtual Devices screen, click Create Virtual Device.
  3. In the Select Hardware screen, select a phone device, such as Nexus 6, and then click Next.
  4. In the System Image screen, choose the desired system image for the AVD and click Next.

    If you don’t have a particular system image installed, you can get it by clicking the downloadlink.

  5. Verify the configuration settings (for your first AVD, leave all the settings as they are), and then clickFinish.

For more information about using AVDs, see Create and Manage Virtual Devices.

Run the app from Android Studio as follows:

  1. In Android Studio, select your project and click Run  from the toolbar.
  2. In the Select Deployment Target window, select your emulator and click OK.

It can take a few minutes for the emulator to start. You may have to unlock the screen. When you do, My First App appears on the emulator screen.

That’s how you build and run your Android app on the emulator! To start developing, continue to the next lesson.

Creating an Android Project

This lesson shows you how to create a new Android project with Android Studio and describes some of the files in the project.

  1. In Android Studio, create a new project:
    • If you don’t have a project opened, in theWelcome to Android Studio window, click Start a new Android Studio project.
    • If you have a project opened, select File > New Project.
  2. In the New Project screen, enter the following values:

    • Application Name: “My First App”
    • Company Domain: “example.com”

    Android Studio fills in the package name and project location for you, but you can edit these if you’d like.

  3. Click Next.
  4. In the Target Android Devices screen, keep the default values and click Next.

    The Minimum Required SDK is the earliest version of Android that your app supports, which is indicated by the API level. To support as many devices as possible, you should set this to the lowest version available that allows your app to provide its core feature set. If any feature of your app is possible only on newer versions of Android and it’s not critical to the core feature set, enable that feature only when running on the versions that support it (see Supporting Different Platform Versions).

  5. In the Add an Activity to Mobile screen, selectEmpty Activity and click Next.
  6. In the Customize the Activity screen, keep the default values and click Finish.

After some processing, Android Studio opens and displays a “Hello World” app with default files. You will add functionality to some of these files in the following lessons.

Now take a moment to review the most important files. First, be sure that the Project window is open (select View > Tool Windows > Project) and theAndroid view is selected from the drop-down list at the top. You can then see the following files:

app > java > com.example.myfirstapp > MainActivity.java
This file appears in Android Studio after the New Project wizard finishes. It contains the class definition for the activity you created earlier. When you build and run the app, theActivity starts and loads the layout file that says “Hello World!”
app > res > layout > activity_main.xml
This XML file defines the layout of the activity. It contains a TextView element with the text “Hello world!”.
app > manifests > AndroidManifest.xml
The manifest file describes the fundamental characteristics of the app and defines each of its components. You’ll revisit this file as you follow these lessons and add more components to your app.
Gradle Scripts > build.gradle
Android Studio uses Gradle to compile and build your app. There is a build.gradle file for each module of your project, as well as abuild.gradle file for the entire project. Usually, you’re only interested in thebuild.gradle file for the module. in this case the app or application module. For more information about this file, see Building Your Project with Gradle.

Building Your First App

Welcome to Android application development!

This class teaches you how to build your first Android app. You’ll learn how to create an Android project with Android Studio and run a debuggable version of the app. You’ll also learn some fundamentals of Android app design, including how to build a simple user interface and handle user input.

Before you start this class, download and installAndroid Studio.

Mobile Jquery

jQuery Data Attributes

jQuery Mobile uses the HTML5 data-* attribute to create a “touch-friendly” and attractive look for mobile devices.

For the reference list below, bold value specifies the default value.


Button

Deprecated in version 1.4. Use CSS Classesinstead. Hyperlinks with data-role=”button”. Button elements and links in toolbars and input fields are automatically styled as buttons, no need for data-role=”button”.

Data-attribute Value Description
data-corners true | false Specifies whether the button should have rounded corners or not
data-icon Icons Reference Specifies the icon of the button. Default is no icon
data-iconpos left | right | top | bottom | notext Specifies the position of the icon
data-iconshadow true | false Specifies whether the button icon should have shadows or not
data-inline true |false Specifies whether the button should be inline or not
data-mini true |false Specifies whether the button should be of small or regular size
data-shadow true | false Specifies whether the button should have shadows or not
data-theme letter (a-z) Specifies the theme color of the button

To group multiple buttons, use a container with the data-role=”controlgroup” attribute together with data-type=”horizontal|vertical” to specify whether to group buttons horizontally or vertically.


Checkbox

Pairs of labels and inputs with type=”checkbox”.

Data-attribute Value Description
data-mini true |false Specifies whether the checkbox should be of small or regular size
data-role none Prevents jQuery Mobile to style checkboxes as buttons
data-theme letter(a-z) Specifies the theme color of the checkbox

To group multiple checkboxes, use the data-role=”controlgroup” together with the data-type=”horizontal|vertical” to specify whether to group checkboxes horizontally or vertically.


Collapsible

A header element followed by any HTML markup inside a container with the data-role=”collapsible”.

Data-attribute Value Description
data-collapsed true | false Specifies whether the content should be closed or expanded
data-collapsed-cue-text sometext  Specifies some text to provide audible feedback for users with screen reader software. Default is “click to collapse contents”.
data-collapsed-icon Icons Reference Specifies the icon of the collapsible button. Default is “plus”
data-content-theme letter (a-z) Specifies the theme color of the collapsible content. Will also add rounded corners to the collapsible content
data-expanded-cue-text sometext  Specifies some text to provide audible feedback for users with screen reader software. Default is “click to expand contents”.
data-expanded-icon Icons Reference Specifies the icon of the collapsible button when the content is expanded. Default is “minus”
data-iconpos left | right | top | bottom Specifies the position of the icon
data-inset true | false Specifies whether the collapsible button should be styled with rounded corners and some margin or not
data-mini true |false Specifies whether the collapsible buttons should be of small or regular size
data-theme letter (a-z) Specifies the theme color of the collapsible button

Collapsible Set

Collapsible content blocks inside a container with the data-role=”collapsibleset”.

Data-attribute Value Description
data-collapsed-icon Icons Reference Specifies the icon of the collapsible button. Default is “plus”
data-content-theme letter (a-z) Specifies the theme color of the collapsible content
data-expanded-icon Icons Reference Specifies the icon of the collapsible button when the content is expanded. Default is “minus”
data-iconpos left | right | top | bottom | notext Specifies the position of the icon
data-inset true | false Specifies whether the collapsibles should be styled with rounded corners and some margin or not
data-mini true |false Specifies whether the collapsible buttons should be of small or regular size
data-theme letter (a-z) Specifies the theme color of the collapsible set

Content

Deprecated in version 1.4, and will be removed in 1.5. Container with data-role=”content”.

Data-attribute Value Description
data-theme letter(a-z) Specifies the theme color of the content

Controlgroup

A <div> or <fieldset> container with data-role=”controlgroup”. Groups multiple button-styled inputs of a single type (link-based buttons, radio buttons, checkboxes, select elements). For grouping form checkboxes and radio buttons, the <fieldset> container is recommended inside a <div> with the “ui-fieldcontain” class, to improve label styling.

Data-attribute Value Description
data-exclude-invisible true | false Specifies whether to exclude invisible children in the assignment of rounded corners
data-mini true |false Specifies whether the group should be of small or regular size
data-theme letter (a-z) Specifies the theme color of the controlgroup
data-type horizontal | vertical Specifies whether the group should be horizontally or vertically displayed

Dialog

A container with data-dialog=”true”.

Data-attribute Value Description
data-close-btn left | right | none Specifies the position of the close button
data-close-btn-text sometext Specifies the text for the close button
data-corners true | false  Specifies whether the dialog should have rounded corners or not
data-dom-cache true |false Specifies whether the to clear jQuery DOM cache or not for individual pages (if set to true, you need to take care to manage the DOM yourself and test thoroughly on all mobile devices)
data-overlay-theme letter (a-z) Specifies the overlay (background) color of the dialog page
data-theme letter (a-z) Specifies the theme color of the dialog page
data-title sometext Specifies the title for the dialog page

Enhancement

A container with data-enhance=”false” or data-ajax=”false”

Data-attribute Value Description
data-enhance true | false If set to “true”, (default) jQuery Mobile will automatically style the page, making it suitable for mobile devices. If set to “false”, the framework will not style the page  
data-ajax true | false Specifies whether to load pages via ajax or not

Note: data-enhance=”false” must be used in conjunction with $.mobile.ignoreContentEnabled=true” to stop jQuery Mobile to style pages automatically.

Any link or form element inside data-ajax=”false” containers will be ignored by the framework’s navigation functionality when $.mobile.ignoreContentEnabled is set to true.


Field Container

Deprecated in version 1.4, and will be removed in 1.5. Use class=”ui-fieldcontain instead”. A container with data-role=”fieldcontain” wrapped around label/form element pair.


Fixed Toolbar

A container with data-role=”header” or data-role=”footer” together with the data-position=”fixed” attribute.

Data-attribute Value Description
data-disable-page-zoom true | false Specifies whether the user is able to scale/zoom the page or not
data-fullscreen true |false Specifies toolbars to always be positioned at the top and/or bottom
data-tap-toggle true | false Specifies whether the user is able to toggle toolbar-visibility on taps/clicks or not
data-transition slide | fade | none Specifies the transition effect when a tap/click occurs
data-update-page-padding true | false Specifies the padding of both top and bottom of the page to be updated on resize, transition and “updatelayout” events (jQuery Mobile always updates the padding on the “pageshow” event)
data-visible-on-page-show true | false Specifies toolbar-visibility when parent page is shown

Flip Toggle Switch

An <input type=”checkbox”> with a data-role of “flipswitch”:

Data-attribute Value Description
data-mini true |false Specifies whether the switch should be of small or regular size
data-on-text sometext Specifies the “on” text on the flip switch (default is “On”)
data-off-text sometext Specifies the “off” text on the flip switch (default is “Off”)

Footer

A container with data-role=”footer”.

Data-attribute Value Description
data-id sometext Specifies a unique ID. Required for persistent footers
data-position inline | fixed Specifies whether the footer should be inline with page content or remain positioned at the bottom
data-fullscreen true |false Specifies whether the footer should always be positioned at the bottom and over the page content (slightly see-through) or not
data-theme letter (a-z) Specifies the theme color of the footer

Note: To enable the fullscreen position, use data-position=”fixed” and then add the data-fullscreen attribute to the element.


Header

A container with data-role=”header”.

Data-attribute Value Description
data-id sometext Specifies a unique ID. Required for persistent headers
data-position inline | fixed Specifies whether the header should be inline with page content or remain positioned at the top
data-fullscreen true |false Specifies whether the header should always be positioned at the top and over the page content (slightly see-through) or not
data-theme letter (a-z) Specifies the theme color of the header

Note: To enable the fullscreen position, use data-position=”fixed” and then add the data-fullscreen attribute to the element.


Inputs

Inputs with type=”text|search|etc.” or textarea elements.

Data-attribute Value Description
data-clear-btn true |false Specifies whether the input should have a “clear” button
data-clear-btn-text text Specifies a text for the “clear” button. Default is “clear text”
data-mini true |false Specifies whether the input should be of small or regular size
data-role none Prevents jQuery Mobile to style inputs/textareas as buttons
data-theme letter(a-z)  Specifies the theme color of the input field

Link

All links.

Data-attribute Value Description
data-ajax true | false Specifies whether to load pages via ajax for improved user experience and transitions. If set to false, jQuery Mobile will do a normal page request.
data-direction reverse Reverse transition animation (only for page or dialog)
data-dom-cache true |false Specifies whether the to clear jQuery DOM cache or not for individual pages (if set to true, you need to take care to manage the DOM yourself and test thoroughly on all mobile devices)
data-prefetch true |false Specifies whether to prefetch pages into the DOM so that they are available when the user visits them
data-rel back | dialog | external | popup Specifies an option for how the link should behave. Back – Moves one step back in history. Dialog – Opens a link as a dialog, not tracked in history. External – For linking to another domain. Popup – opens a popup window.
data-transition fade | flip | flow | pop | slide | slidedown | slidefade | slideup | turn | none Specifies how to transition from one page to the next. See our jQuery Mobile Transitionschapter.
data-position-to origin | jQuery selector | window Specifies the position of popup boxes. Origin – Default. Positions the popup over the link that opens it. jQuery selector – positions the popup over the specified element. Window – positions the popup in the middle of the window screen.

List

An <ol> or <ul> with data-role=”listview”.

Data-attribute Value Description
data-autodividers true |false Specifies whether to automatically divide list items or not
data-count-theme letter (a-z) Specifies the theme color of the count bubble
data-divider-theme letter (a-z) Specifies the theme color of the list divider
data-filter true |false Specifies whether to add a search box in a list or not
data-filter-placeholder sometext Deprecated in version 1.4. Use the HTML placeholder attribute instead.Specifies the text inside the search box. Default is “Filter items…”
data-filter-theme letter (a-z) Specifies the theme color of the search filter
data-icon Icons Reference Specifies the icon of the list
data-inset true |false Specifies whether the list should be styled with rounded corners and some margin or not
data-split-icon Icons Reference Specifies the icon of the split button. Default is “arrow-r”
data-split-theme letter (a-z) Specifies the theme color of the split button
data-theme letter (a-z) Specifies the theme color of the list

List item

An <li> inside an <ol> or <ul> with data-role=”listview”.

Data-attribute Value Description
data-filtertext sometext Specifies a text to search for when filtering elements. This text will then be filtered instead of the actual list item text
data-icon Icons Reference Specifies the icon of the list item
data-role list-divider Specifies a divider for list items
data-theme letter (a-z)  Specifies the theme color of the list item

Note: The data-icon attribute only work on list items with links.


Navbar

<li> elements inside a container with data-role=”navbar”.

Data-attribute Value Description
data-icon Icons Reference Specifies the icon of the list item
data-iconpos left | right | top | bottom | notext Specifies the position of the icon

Navbars inherit the theme-swatch from their parent container. It is not possible to set the data-theme attribute to a navbar. The data-theme attribute can be set individually to each link inside the navbar.


Page

A container with data-role=”page”.

Data-attribute Value Description
data-dom-cache true |false Specifies whether the to clear jQuery DOM cache or not for individual pages (if set to true, you need to take care to manage the DOM yourself and test thoroughly on all mobile devices)
data-overlay-theme letter (a-z)  Specifies the overlay (background) color of dialog pages
data-theme letter (a-z)  Specifies the theme color of the page
data-title sometext Specifies the page title
data-url url Value for updating the URL, instead of the url used to request the page

Popup

A container with data-role=”popup”.

Data-attribute Value Description
data-corners true | false Specifies whether the popup should have rounded corners or not
data-dismissible true | false Specifies whether the popup should be closed by clicking outside of the popup or not
data-history true | false Specifies whether the popup should create a browser history item when opened. If set to false, it will not create a history item, and will then not be closeable via the browser’s “Back” button
data-overlay-theme letter(a-z)  Specifies the overlay (background) color of the popup box. Default is transparent background (none).
data-shadow true | false Specifies whether the popup box should have shadows or not
data-theme letter(a-z)  Specifies the theme color of the popup box. Default inherited, “none” sets the popup to transparent
data-tolerance 30, 15, 30, 15  Specifies the distance from the edges of the window (top, right, bottom, left)

An anchor with data-rel=”popup”:

Data-attribute Value Description
data-position-to origin | jQuery selector | window Specifies the position of popup boxes. Origin – Default. Positions the popup over the link that opens it. jQuery selector – positions the popup over the specified element. Window – positions the popup in the middle of the window screen.
data-rel popup For opening the popup box
data-transition fade | flip | flow | pop | slide | slidedown | slidefade | slideup | turn |none Specifies how to transition from one page to the next. See our jQuery Mobile Transitionschapter.

Radio Button

Pairs of labels and inputs with type=”radio”.

Data-attribute Value Description
data-mini true |false Specifies whether the button should be of small or regular size
data-role none Prevents jQuery Mobile to style radiobuttons as enhanced buttons
data-theme letter(a-z) Specifies the theme color of the radio button

To group multiple radio buttons, use the data-role=”controlgroup” together with the data-type=”horizontal|vertical” to specify whether to group the buttons horizontally or vertically.


Select

All <select> elements.

Data-attribute Value Description
data-icon Icons Reference Specifies the icon of the select element. Default is “arrow-d”
data-iconpos left | right| top | bottom | notext Specifies the position of the icon
data-inline true |false Specifies whether the select element should be inline or not
data-mini true |false Specifies whether the select should be of small or regular size
data-native-menu true | false When set to false, it uses jQuery’s own custom select menu (recommended if you want the select menu to display the same on all mobile devices)
data-overlay-theme letter (a-z) Specifies the theme color of jQuery’s own custom select menu (used together with data-native-menu=”false”)
data-placeholder true |false Can be set on an <option> element of a non-native select
data-role none Prevents jQuery Mobile to style select elements as buttons
data-theme letter (a-z) Specifies the theme color of the select element

To group multiple select elements, use the data-role=”controlgroup” together with the data-type=”horizontal|vertical” to specify whether to group the elements horizontally or vertically.


Slider

Inputs with type=”range”.

Data-attribute Value Description
data-highlight true |false Specifies whether the slider track should be highlighted or not
data-mini true |false Specifies whether the slider should be of small or regular size
data-role none Prevents jQuery Mobile to style slider controls as buttons
data-theme letter(a-z)  Specifies the theme color of the slider control (the input, handle and track)
data-track-theme letter(

Which one is better android studio or eclips By Mahesh Kariya

Today I’ll tell why use Android studio rither than eclips .

As we know that android operating system based on linux.and it is developed under google.

After upadation of marshmallow google decided to stop support with eclips and after few months eclips no longer use.

So you must have to choose android studio.


And if you need any help regarding to android tutorials then visit here

Easytrix.com is collection of best tutorials of android, phonegap, big data .

Eclips is good to learn with small projects and try out Bosten video tutorials of 200 parts in youtube which will help you to make simple android project.

Thank you


About Mahesh Kariya

Hello friends I am Mahesh Kariya and I am really happy to share my knowledge with you all.

In this post I will tell you how to Become a good programmer…

Do you want to create something new something truly special …

If you have really spirit to become web developer or android master or software engineer or backend administrator or what ever it may be..

Then trust me I tell you every thing in this blog.

Now I am making this blog by wordpress app in my android galaxy j2 pro 2016 .

So its not a big deal to make any web site with wordpress or joomla but if you are thinking about learn everything then go with w3schools.com ..

If you want to become android app developer then go with android studio and start watching android tutorials on youtube .

You have to know the following languages before step up to phone gap and big data like concepts.

1 html

2 css

3 js

4 jquery

5 mobile jquery

6 bootstrap

7 css3

8 w3css

9 mysql

10 ruby

After that work with AJAX for more …

If you want to become hacker then firstly start learning all of this..

Note :- use firefox web tools for making websites with in few minutes.

And suscribe my channel mahesh kariya on youtube ok.

Have a good day.