
Understanding Color Models and Spot Color Systems
A color model is a system for creating a full range of colours from a small set of primary colors. There are two types of colour models: additive and subtractive. Additive color models use light to display color, while subtractive color models use printing inks. The most common color models that graphic designers work with are the CMYK model for printing and the RGB model for computer display.


Additional Color Modes and Models
Bitmap
In the computer graphics environment, a bitmap or pixmap is a type of memory organization or image file format used to store digital images. The term bitmap simply means a ‘map of bits’. The term bitmap implies one bit per pixel, while pixmap is used for images with multiple bits per pixel. Many graphical user interfaces use bitmaps in their built-in graphics subsystems for example, the Microsoft Windows and OS/2 platforms. For designers, this mode is mostly used in graphic design to save high resolution line art images, like a scanned signature or logo when the vector equivalent no longer exists.
Duotone
Duotone is a halftone reproduction of an image using the superimposition of one contrasting color halftone (traditionally black) over another color halftone. This is most often used to bring out middle tones and highlights of an image. By comparison, a fake duotone is created by printing a single solid color with a contrasting halftone over it. This process can generally lose a lot of the contrast in the image, but it also creates a rich effect. Duotones, tritones and quadtones can be easily created using image manipulation programs. Sepia toning effect gives a black-and-white photograph a warmer tone and creates an archival look. It serves as a good example of how duotone techniques are used today. Previously, chemicals were used to create this distinct print effect.
Grayscale
In the worlds of both photography and computing, a grayscale digital image is an image in which the value of each pixel is a single sample, which means it carries only intensity information. Images of this type, also known as black-and-white, are composed exclusively of shades of gray, varying from black at the weakest intensity to white at the strongest. Grayscale images are also called monochromatic, denoting the presence of only one (mono) colour (chrome). Color images are built of stacked grayscale channels. For example, RGB images are composed of three independent channels for red, green and blue primary color components; CMYK images have four channels for cyan, magenta, yellow and black ink plates, etc.
Halftone
Halftone is the ‘industry standard’ reprographic technique. It simulates continuous tone imagery through the use of dots, varying either in size, in shape or in spacing. A ‘halftone’ is also used to refer specifically to the image that is produced by this process. This reproduction technique relies on creating a basic optical illusion—that these tiny halftone dots are blended into smooth tones by the human eye. Color printing is made possible by repeating the halftone process for each subtractive color—most commonly using what is called the ‘CMYK color model’. The resolution of a halftone screen is measured in lines per inch (lpi). This refers to the number of lines of dots in one inch. The higher the resolution being used, the greater the detail that can be reproduced.
HSV
HSV, which stands for hue, saturation and value, depicts three-dimensional color. HSV seeks to depict relationships between colors, and improve upon the RGB color model. If you think about HSV as a wheel, the center axis goes from white at the top to black at the bottom, with other neutral colors in between. The angle from the axis depicts the hue, the distance from the axis depicts saturation, and the distance along the axis depicts value.
HSL
HSL, like HSV, is a 3-D representation of color. HSL stands for hue, saturation, and lightness. The HSL color model has distinct advantages over the HSV model, in that the saturation and lightness components span the entire range of values.
Indexed color
Simply explained, the color of each pixel is represented by a number; each number (the index) corresponds to a color in the color table (the palette). In computing, indexed colour is a technique used to manage digital image colours in a limited fashion, in order to save computer memory and file storage, while speeding up display refresh and file transfers. A graphic designer will usually encounter indexed color for web design or in multimedia applications.
LAB
LAB is designed to approximate human vision. Unlike RGB and CMYK, LAB is not device-dependent. In this three-dimensional model, the ‘L’ stands for the lightness of the color, with 0 producing black and 100 producing a diffused white. The ‘A’ is the redness vs. greenness, while the ‘B’ is the yellowness vs. blueness.
NCS
The Natural Color System (NCS) is a color opponency system based on six colors that cannot be used to describe one another: white, black, red, yellow, green and blue. Unlike the additive RGB system or the subtractive CMYK system, which are based on reactions of the eye’s color-receptive cones, NCS colors are processed in the retina’s ganglion cells.
Spot Color Systems Classification
Pantone Matching System (PMS)
Pantone Inc. is, by far, the world-renowned authority on color. It is best known for its Pantone Matching System (PMS) used in a variety of industries, but primarily in offset printing. The PANTONE® name is known worldwide as the standard language for color communication, from designer to manufacturer to retailer to customer. Most applications that support color printing allow you to specify colors by indicating the Pantone name or number. This assures that you get the right color when the file is printed, even though the color may not look right when displayed on your monitor.
ANPA
The American Newspaper Publishers Association (ANPA) has a palette of 300 spot colors for spot color usage in newspapers.
DIC
The DIC Colour Guide and TOYO are the common spot color matching systems used in Japan.
FOCOLTONE
A color matching system used to specify and match process colors. The FOCOLTONE Color Chart shows samples of 763 four-color combinations of the process colors.
Hexachrome
Hexachrome was a six-color printing process designed by Pantone Inc. In addition to custom CMYK inks, Hexachrome added orange and green inks for better color reproduction. Discontinued by Pantone in 2008 when Adobe Systems stopped supporting their software.
HKS
HKS is a color system which contains 120 spot colours and 3250 tones for both coated and uncoated paper. HKS is an abbreviation of three German printer’s ink manufacturers.
Munsell
The Munsell color system is a color space that specifies colors based on three color dimensions: hue, value (lightness) and chroma (colour purity). The Munsell system organizes color the way the human eye sees color. It is mostly used in manufacturing.
TOYO
The TOYO and DIC Color Guide are the common spot color matching systems used in Japan.
TRUEMATCH
An electronic equivalent to the Munsel and Pantone systems that is useful for accurate video color displays.
The 5 Types of Animation
What is this guide about?
The purpose of this guide is to take you through the intricacies of the different types of animation styles and techniques.
It also shows you what path you should take, and what does that path entails, in order to become an animator based on the type you choose.
This guide is not about leaning how to animate, but instead it breaks down the five different types (or genres) of animation available to you, and what you’ll need to start animating. Best software, best schools, and more.
Styles covered:
- Traditional animation
- 2D Vector-based animation
- 3D computer animation
- Motion graphics
- Stop motion
I hope that reading this will push you to take your first step to pursuing your dream of making animation.
No more excuses. All you need to know is right here.
Traditional Animation
(2D, Cel, Hand Drawn)
Traditional animation, sometimes referred to as cel animation, is one of the older forms of animation, in it the animator draws every frame to create the animation sequence. Just like they used to do in the old days of Disney. If you’ve ever had one of those flip-books when you were a kid, you’ll know what I mean. Sequential drawings screened quickly one after another create the illusion of movement.
![]() There’s always room out there for the hand-drawn image. I personally like the imperfection of hand drawing as opposed to the slick look of computer animation.
There’s always room out there for the hand-drawn image. I personally like the imperfection of hand drawing as opposed to the slick look of computer animation.
Matt Groening
About traditional animation
In traditional animation, animators draw images on a transparent piece of paper fitted on a peg using a colored pencil, one frame at the time. Animators usually test animations with very rough drawings to see how many frames they would need for the action to work. The animation process of traditional animation can be lengthy and costly. Once the clean-up and the in-between drawings are complete, the production would move on to photographing each individual frame. Today, though, traditional animation can be done on a computer using a tablet, and does not require actual photography of individual frames.
History
The history of animation can be stretched as far back as 5000 BC, if you are lenient on the techniques of the art form, found on a pottery bowl in Iran depicting a goat leaping.
The techniques of animation that we are more familiar with, however, first appeared in 1650 as The Magic Lantern, by the Venetian inventor Giovanni Fontana (whether or not he truly is the inventor is still highly debated). A simple lantern with a strip of animation sliding past a crude lens, illuminated by a single candle, was humankind’s first introduction to projection. It was primarily used to scare people with images of devilish creatures running on the wall, and generally play on people’s superstitions.
Many more inventions came along, such as the Phenakistoscope and Zoetrope, but the first projection of animation on a screen came in 1877 with the Praxinoscope, invented by the French science teacher Charles-Émile Reynaud. He then later invented the Théâtre Optique in 1888, which he used to stage the first public screening of animation at the Musée Grévin in Paris in 1892.
There he screened the animated short Pauvre Pierrot, which is notable for being the first time film perforations was used, and also for having the animation drawn directly on the frames instead of being photographed.
The first film recorded on a filmstrip was made in 1900, which included animated sequences where J. Stuart Blackton draws a man on an aisle holding a bottle of wine, and the man grabbing the bottle. Blackton followed it up five years later with the Humorous Phases of Funny Faces, which cemented J.Stuart Blackton as the forefather of American animation.
Stepping to France in 1908, we saw the world’s first fully animated film, made by the French artist Émile Cohl. The film was called Fantasmagorie, which contained stick figures encountering various inanimate objects.
As the 1910’s rolled around, studio produced animations came into fruition with the newspaper cartoonist Winsor McCay, who directed several animated shorts. During the 1910’s, animations we’re called ‘Cartoons’. They we’re mainly produced for cinemas as pre-show attractions, to be screened before the feature film. John Randolph Bray and Earl Hurd were the most successful animation producers of the decade, and were responsible for patenting the cell animation process, which would later dominate the animation industry for most of the century.
Nowadays, traditional animation is being done mostly on computers by using a tablet (such as the Wacom Cintiq.) It is usually animated on 12 frames per second, with occasional faster actions animated on 24 frames per second.
Software
TVPaint
A french animation software, TVPaint is the all-in-one 2D animation software you’ll ever need. It’s definitely more robust and complex than Photoshop, but it’s also much pricier. This software is for professional animators and studios.
Supported platforms:
- Windows
- Mac OS
- Linux
Toon Boom Harmony
Toon Boom offers a user friendly set of animation programs that has advanced rigging systems, effectsand camera tools. It is vector based, but the more advanced version also has the option for bitmap drawing.
They offer different packages for different prices. The packages are Harmony Essentials, Harmony Advanced, and Harmony Premium. For hobbyists animators I would suggest the Essentials package which is not very expensive.
Read: Toon Boom Harmony vs. Flash (Animate)
Supported platforms:
- Windows
- Mac OS
Photoshop
Photoshop is often overlooked when considering an animation software, but in reality its powerful drawing capabilities makes it a great choices for frame by frame Disney-style animation. Photoshop’s timelinefunctionality lets you animate by drawing frame by frame, using onion skinning, and is incredibly robust.
Supported platforms:
- Windows
- Mac OS
Courses
TVPaint Animation course
Learn to animate with the industry leader in 2D frame-by-frame animation.
TVPaint is a high-end professional animation software, focused on traditional hand-drawn animation style. We’re talking old-school Disney/Ghibli quality. I’ve brought in an amazing 2D animator to take you through this sophisticated program, and I truly believe he created the best TVpaint course out there.
![]()
![]()
Toon Boom Animation course
I’ve designed this course to be tailored specifically for people who want to get into 2D animation in the most professional way.
Toon Boom Harmony is an incredibly robust professional-level animation software, and can do pretty much everything in the realm of 2D animation. Anything from stick figures to Disney-level results. I’ve brought in an amazing 2D animator to take you through this amazing journey, and I truly believe he created one of the best animation courses out there.
Schools
 Sheridan College
School information: Sheridan College was founded in 1967 as The School of Graphic Design at a converted public school until it was eventually moved.
The Canadian animation industry was virtually non-existent during the 60’s and 70’s, but president Porter decided to start a course in classical animation at the college in 1968 in hopes of getting trained animators.
- Location: Toronto. Canada
- Courses: Animation, Computer Animation, Digital Creature Animation, Visual Effects
- Tuition cost: $9,356.05 (Canadian dollars) per semester
- Notable alumni: Dean DeBlois (Disney animator), Dan Lee (Pixar animator), John Kricfalusi (Creator of Ren and Stimpy show), Dan Antonucci (Creator of Ed, Edd ‘n, Eddy)
- Start of Academic year: September
- Notable graduate film: Night Light (Qing Han, 2014)
 Gobelins
School information: Founded by the Parisian Chamber of Commerce and Industry in 1964, but is best known for the Cinema Department of Animation, which was founded by Pierre Ayma in 1974 when the first Asterix and Obelix feature film was being produced by Studio Idefix.
The studio didn’t have enough animators for the project, so they asked Gobelins to start an animation training program.
- Location: Paris. France
- Courses: Character Animation and Animated Film Making, 3D Character Animation
- Tuition cost: €6,350 First year, €6,450 Second year, €6,550 Third year
Notable alumni: Pierre Coffin (Director of Despicable Me), Bibo Bergeron (Director of A Monster in Paris)
Start of Academic year: Beginning of September - BA Animated Film Making: 80 students
- Notable graduate film: Oktapodi (Julien Bocabeille, Francois-Xavier Chanioux, Olivier Delabarre, Thierry Marchand, Quentin Marmier, Emud Mokhberi, 2007)
Nominated for Academy Award, 2009
 CalArts
School information: CalArts was founded in 1961 by Walt Disney, when Chouinard Art Institute and the Los Angeles Conservatory of Music merged together due to financial difficulties.
Nelbert Chouinard, founder of the Chouinard Art Institute, started a professional relationship with Walt Disney in 1929, and agreed to train animators for him on a pay-later basis as Disney was struggling financially.
- Location: Valencia, California. USA
- Courses: Film/Video (Includes animation)
- Tuition cost: $41,700 Full-time enrolment
- Notable alumni: Tim Burton (Disney animator and Director), Brad Bird (Director, Disney and Pixar), John Lasseter (Pixar), Jennifer Lee & Chris Buck (Directors of Frozen)
- Start of Academic year: September
- Notable graduate film: Trust & Estates (Jeanette Bonds, 2013) Official Selection, Melbourne International Animation Festival 2013
![]()
Get our FREE course
Making an Animated Movie
How to make an animated short film from start to finish.
The course comes bundled with any of our other courses.
2D Animation
(Vector-Based)
This style has become very popular in the last decade due to the accessibility of the technology and the growth of online video. Flash is cheap and easy to use, as are other vector-based animation programs.
![]() Animation is different from other parts. Its language is the language of caricature. Our most difficult job was to develop the cartoon’s unnatural but seemingly natural anatomy for humans and animals.
Animation is different from other parts. Its language is the language of caricature. Our most difficult job was to develop the cartoon’s unnatural but seemingly natural anatomy for humans and animals.
Walt Disney
About vector-based 2D animation
2D animation is the term often used when referring to traditional hand-drawn animation, but it can also refer to computer vector animations that adopts the techniques of traditional animation.
Vector-based animations, meaning computer generated 2D animations, uses the exact same techniques as traditional animation, but benefits from the lack of physical objects needed to make traditional 2D animations, as well as the ability to use computer interpolation to same time.
History
In the late 90’s, due to bandwidth restrictions, many artists started using Flash to distribute short (and very limited) animations on the web, which were usually very small in size.
That limitation gave Flash the mass appeal which made it such a huge success among independent artists and animators.
Flash really skyrocketed in 2005 when it was purchased by Adobe. When YouTube started growing, it completely exploded, and today you can find thousands of Flash animations there.
The reason 2D was put in a separate category is that in addition to the option of animating frame by frame, an animator has the option of creating rigs for the characters and then move the body parts individually instead of drawing the character over and over.
These flexibilities provides beginners with more options when approaching animation, especially if drawing isn’t their strong suit. Traditional animation, on the other hand, requires very strong drawing skills.
Software
Adobe Animate (Formerly known as Flash)
Probably the most popular 2D animation softwareout there. Animate has a long lineage of animation making, dating back to the early days of internet video publishing. It is vector based, very intuitive to use (as are most of Adobe’s programs) and relatively inexpensive. It’s great for getting started with 2D animation, and though it’s not meant for professional animation production (unlike Toon Boom Harmony) you can still get amazing results with it.
Read: Toon Boom Harmony vs. Flash (Animate)
Supported platforms:
- Windows
- Mac OS
Adobe After Effects
An interesting choice for 2D animation. After effects gives you great control when creating rigs for 2D, and using the puppet tool is very convenient and intuitive. I find it to be a great choice if you’re already comfortable with the Adobe environment, but that’s a matter of preference. Since it’s an editing software it’s great to be able to edit and color correct in the same place you animate, and while it’s not the traditional way the pipeline works, it could save some time.
Supported platforms:
- Windows
- Mac OS
Courses
Animate CC Animation course (Flash)
There’s enough in this course for the person who wants to make cool short animations for YouTube, as well as for the working professional who wants to get hired as a 2D animator.
Animate CC is a very easy software to learn, though it takes time to master. I’ve brought in an amazing 2D animator to take you through the complete journey of making a full animated shot using only Animate CC. We’ll show you how simple it is to get amazing results with Animate.

![]()
After Effects Animation
There’s enough in this course for the person who wants to make cool short animations for YouTube, as well as for someone who wants to get to know After Effects, and learn what amazing things can be done in it.
After Effects is simple to learn, though hard to master. I’ve been using After Effects almost daily for the past 7 years, and I’ve done anything from animated logos, animated web series, to compositing and visual effects. This course is a great place to start your path to animation, as well as learn a highly profitable skill.
Schools
 Full Sail University
School information: Founded in 1979 by Jon Phelps in Ohio, before the University was moved to Orlando in 1980, under the name of Full Sail Recording Workshop. Focused on video and film production, but added in animation when the University moved to Orange County in 1989.
The University started offering online degree programs in 2007.
- Location: Orange County, Florida. USA
- Courses: Computer animation
- Tuition cost: $14,762 per semester
- Notable alumni: Culley Bunker (Lead visual effects artist), Chance Glasco (Senior animator)
- Start of Academic year: Second week of November
 Digital Tutors
School information: Founded in 2000 as an online tutoring program, focusing on giving lessons via streaming. Currently has 18 tutors from around the world.
- Location: Oklahoma. USA
- Courses: 3D animation, Visual Effects
- Tuition cost: $499 (American dollars) for a 12 month subscription
3D Animation
(CGI, Computer Animation)
3D animation works in a completely different way than traditional animation. They both require an understanding of the same principles of movement and composition, but the technical skill set is very different for each task. while traditional animation requires you to be an amazing draftsman, computer animation doesn’t. 3D animation is more similar to playing with puppets rather than drawing.
![]() Computers don’t create computer animation any more than a pencil creates pencil animation. What creates computer animation is the artist.
Computers don’t create computer animation any more than a pencil creates pencil animation. What creates computer animation is the artist.
John Lasseter
About 3D animation
3D animation, also referred to as CGI, or just CG, is made by generating images using computers. That series of images are the frames of an animated shot.
The animation techniques of 3D animation has a lot of similarities with stop-motion animation, as they both deal with animating and posing models, and still conforms to the frame-by-frame approach of 2D animation, but it is a lot more controllable since it’s in a digital work-space.
Instead of drawn or constructed with clay, characters in 3D animation are digitally modeled in the program, and then fitted with a ‘skeleton’ that allows animators to move the models.
Animation is done by posing the models on certain key frames, after which the computer will calculate and perform an interpolation between those frames to create movement.
When the modeling and/or animation is complete, the computer will render each frame individually, which can be very time-consuming, depending on the quality of the images and the quantity of polygons in the scene.
a 3D animator will spend most of their time looking at curves that represent the movement of different body parts over time.
Another big difference with 3D animation is that unlike traditional animation, the character’s body parts are always present and should be taken to consideration.
I’ll explain:
When animating in 2D, the character has to be drawn again every frame. When the character is viewed from the side, half of its body isn’t shown and thus isn’t drawn. It technically doesn’t exist. It’s drawn on a flat page and there isn’t really more of the character other than what the animator draws.
With 3D though, the character’s body parts always exist in the shot. Even when one hand isn’t visible, it’s still there. That adds some work for the animator, since we need to be aware of the entire character at all times.
The last major difference with 3D animation is the frame rate. Traditional animators usually work on 2’s which means they draw a new drawing every 2 frames, and thus having one drawing last for 2 frames. With 3D animation, however, the motion is always smooth (animated on 1’s), except for stylized pieces which intentionally try to look different.
Even when the character is standing still there should always be some sign of life or gentle movement to keep the illusion of life, this is something 2D animation can get away with much more easily than 3D animation.
History
3D animation has definitely revolutionized how the animation industry looks today, and it all started in 1995 with Toy Story, directed by John Lassetter.
Computer generated animation wasn’t completely new at the time, since it had already been used in TV commercials, movies and computer games, but Toy Story set the bar by being the first feature-length computer animated film, re-imagining the animation industry.
3D animation also lead to studios trying to achieve photo-realistic animations by combining high-level computer processing with advance motion-capture. This has led to films such as The Lord of the Rings trilogy and Planet of the Apes.
Software
Autodesk Maya
Maya is the industry standard 3D software, used in most studios. Maya, Softimage (which was discontinued) and 3D Max all belong to Autodesk and work quite similarly. Choosing one is a matter of personal preference.
Supported platforms:
- Windows
- Mac OS
- Linux
Autodesk 3DS Max
From Autodesk: 3DS Max provides a comprehensive 3D modeling, animation, rendering, and compositing solution for games, film, and motion graphics artists. Create massive worlds and stunning scenes more quickly and efficiently with some of the most robust animation and rendering tools in the industry
Supported platforms:
- Windows
Cinema 4D
Cinema 4D is a motion graphics artist’s best friend. It is a 3D program for the After Effects user. Very intuitive, and after a the release of Cineware it works directly with After Effects without the need to render first. This would not be my first choice for serious 3D film production, since it is designed from the ground up with motion graphics in mind, but it is an amazing and quite versatile program.
Supported platforms:
- Windows
- Mac OS
Blender
Blender is an open source, free 3D software.
From Blender: Blender provides a broad spectrum of modeling, texturing, lighting, animation and video post-processing functionality in one package. Through its open architecture, Blender provides cross-platform interoperability, extensibility, an incredibly small footprint, and a tightly integrated workflow.
Supported platforms:
- Windows
- Mac OS
- Linux
- FreeBSD
Courses
Blender Animation
Whether this is your first time animating with a 3D software, or if you are transitioning from a different one (like Maya or Softimage), this course will take you through all the necessary tools so you can start animating with the best free 3D program straight away.


Maya Animation
Maya is the industry standard for 3D animation, so if you’re planning on getting into the animation industry you need to be familiar with it.
While Maya is extremely complex and can do many different things, I’ve structured this course to only focus on what you need to know to get straight into animation. Even if you’re intimidated by it, Maya can be really fun to use, and this course could be a great way to fast-track your animation career.
Schools
 School of Visual Arts (SVA)
School information: Founded in 1947 by Silas H. Rhodes and Burne Hogarth as the Cartoonist and Illustrators School, and then renamed in 1956. Part of the Association of Independent Colleges of Art and Design as one of 36 leading art colleges in the United States.
The school offered its first degree in 1972, and it’s first master’s degree in 1983 in Fine Arts for painting, drawing and sculpture.
- Location: New York, NY. USA
- Courses: Animation, Computer Animation and Visual Effects
- Tuition cost: $16,780 per semester + Department fees (Animation: $900, Computer Animation and visual effects:$1,340)
- Notable alumni: Bill Plympton (Academy nominated animator), John.R.Dilworth (creator of Courage the Cowardly Dog), Pres Antonio Romanillos (supervising animator at Disney and Dreamworks animation)
- Start of Academic year: September
- BFA Animation: 270 students
- BFA Computer Art, Computer Animation & Visual Effects: 325 students
- Notable graduate film: Kiwi! (Dony Permedi, 2006)
 Ringling College of Art and Design
School information: Founded in Sarasota, Florida, by Dr. Ludd M. Spivey as an art school in 1931, and as a branch of the Southern College in Orlando. Became an independent college in 1933.
Qualified as a full degree-granting institution in 1971. Ringling College is named after John Ringling, a circus magnate, who was interested in funding an art college, but wasn’t interested in Southern College as he wanted to establish his own at his wife’s museum.
However, he lost his museum and residence in bankruptcy, and it was all given to the state just before he died. Ringling’s nephew made a deal with Southern College to open an art college in Sarasota, and it was named School of Fine and Applied Art of the John and Mable Ringling Art Museum.
- Location: Sarasota, Florida. USA
- Courses: Computer Animation
- Tuition cost: $18,400 per semester
- Notable alumni: Aaron Blaise (Director of Disney’s Brother Bear)
- Start of Academic year: August
- Notable graduate film: Dia De Los Muertos (Ashley Graham, Kate Reynolds, and Lindsey St. Pierre, 2013) Won Student Academy Award, 2013
 University of California (UCLA)
School information: UCLA is a public University that was founded in 1919 as part of the University of California system, comprised of three universities in the state.
The animation program was established in 1948 by William Shull, a Disney animator, as just a group of various animation classes. When Dan MacLaughlin became head of the department in 1971, he started the MFA program for animation where he worked as the sole faculty member for years.
- Location: Los Angeles, California. USA
- Courses: Animation
- Tuition cost: $33,193 per academic year
- Notable alumni: David Silverman (Animator, Producer on The Simpsons), Hoyt Yeatman (VFX supervisor, won Academy Award for The Abyss)
- Start of Academic year: February
- MFA Animation Notable graduate film: Her Lion’s Jump (Régis Camargo, 2013)
 Rhode Island School of Design (RISD)
School information: RISD was founded by the group The Centennial Women in 1877. The Centennial Women was a group formed to exhibit creations made by women from design schools, patents from female entrepreneurs, and books written exclusively by women, at the 1876 Centennial Exposition.
The group raised $10,000, and by the end of the expo had over $1,675 left, which they decided to invest into founding Rhode Island School of Design.
- Location: Providence, Rhode Island. USA
- Courses: Film/Animation/Video
- Tuition cost: $44,284 per academic year
- Notable alumni: Seth MacFarlane (Creator of Family Guy) Bryan Konietzko & Michael Dante DiMartino (Creators of Avatar: The Last Airbender), Lance Wilder (Animator, The Simpsons)
- Start of Academic year: Second week of September
- Film/Animation/Video: 50 students per year
- Notable graduate film: Inner Tubes (Tim Beckhardt, 2009) Screened at Ottawa International Animation Festival and Boston Underground Festival
 Savannah College of Art and Design (SCAD)
School information: Founded in 1978 by Paula S. Wallace with her husband and parents, taking out a $200,000 loan to build the first educational building, by renovating the Savannah Volunteer Guard Armory.
The university first opened in 1979 with only 71 students. Currently the University has over 11,000 students.
- Location: Savannah, Georgia, USA. Atlanta, Georgia, USA. Hong Kong, Guangdong, China. Lacoste, Vaucluse, France.
- Courses: Animation, Visual Effects
- Tuition cost: (In order of locations) $33,795 (American dollars), $261,911 (Hong Kong dollars), $10,983 (American dollars)
- Notable alumni: Mir Zafar Ali (Visual effects specialist, The Day After Tomorrow)
- Start of Academic year: September
- Notable graduate film: Legacy (Adam Floeck, 2013)
 University of Southern California (USC)
School information: USC was founded in 1880 by judge Robert M. Widney, who managed to acquire donations from Ozro Childs, John Gately Downey, and Isaias W. Hellman; three very influential figures at the time.
Originally operated in affiliation with the Methodist Church, but became officially secular in 1952. It has the largest amount of international students in the United States, and enrolls over 18,000 domestic/international students each year.
Has its own IMAX theater and research lab, which opened this year.
- Location: Los Angeles, California. USA
- Courses: Animation and Digital Arts
- Tuition cost: $48,347 for two semesters
- Notable alumni: George Lucas (Creator of Lucas Arts, Industrial Light and Magic, Star Wars), Eric Hanson (Digital Designer/Lead VFX artist, The Fifth Element), Ray Harryhausen (Stop-motion and Special Effects animator, Jason and the Argonauts)
- Start of Academic year: Last week of August
- BA Animation and Digital Arts: 75 students
- MFA Animation and Digital Arts: 45 students
- Notable graduate film: Ladies Knight (Joe Rothenberg, 2012) Nominated Best Animated Student Short at Annie Awards.
 Animation Mentor
School information: Founded in 2005 by Bobby Beck, Shawn Kelly, and Carlos Baena, the last two employed as animators at Industrial Light and Magic.
- Location: Emeryville, California. USA
- Courses: Classic animation, Character animation, Creature animation
- Tuition cost: $18,928 for Full 18 Month Program.
- Notable alumni: Siggurdur Orri Thorhannesson (Animator, Guardians of the Galaxy), Jude Brownbill (Animator, Pixar)
- Start of Academic year: Every Spring, Summer, Fall, and Winter
- Animation Mentor courses: 5,000 students (Total)
- Notable graduate film: Greed (Alli Sadegiani, 2011)
Motion Graphics
(Typography, Animated Logos)
While still considered a form of animation, motion graphics is quite different from the other types of animation. Unlike the other types on our list it is not character or story driven. It’s the art of creatively moving graphic elements or texts, usually for commercial or promotional purposes.
![]() I can calculate the motion of heavenly bodies, but not the madness of people.
I can calculate the motion of heavenly bodies, but not the madness of people.
Isaac Newton
About motion graphics
Think animated logos, explainer videos, app commercials, television promos or even film opening titles.
The skills for motion graphics don’t necessarily translate to the other types of animation, since they don’t require knowledge of body mechanics or acting, but they do have some attributes in common such as understanding good composition and the all important camera motion.
The process of creating Motion Graphics depends on the programs used, since video editing softwares often have different UI or settings, but the idea is the same. Motion Graphics usually involves animating images, texts or video clips using key framing that are tweened to make a smooth motion between frames.
History
The term Motion Graphics came along computer based video editing, as programs like Adobe After Effects and Apple Motion made editing images a lot easier and faster. Previously, before the advent of computer editing, it was a very time-consuming process, which limited it to high-budget productions only. Today, it is highly popular in ommercials, news shows, sporting event and online videos.
Software
Adobe After Effects
After effects is the most common software for motion graphics. It is the software that streamlined motion graphics and made it so much easier to create.
Its integration with Cinema4D made it the ultimate tool to make the best looking videos (with or without 3D) for any commercial use.
Supported platforms:
- Windows
- Mac OS
Cinema 4D
Cinema 4D is a motion graphics artist’s best friend. It is a 3D program for the After Effects user. Very intuitive, and after a the release of Cineware it works directly with After Effects without the need to render first. This would not be my first choice for serious 3D film production, since it is designed from the ground up with motion graphics in mind, but it is an amazing and quite versatile program.
Supported platforms:
- Windows
- Mac OS
Courses
After Effects Animation
There’s enough in this course for the person who wants to make cool short animations for YouTube, as well as for someone who wants to get to know After Effects, and learn what amazing things can be done in it.
After Effects is simple to learn, though hard to master. I’ve been using After Effects almost daily for the past 7 years, and I’ve done anything from animated logos, animated web series, to compositing and visual effects. This course is a great place to start your path to animation, as well as learn a highly profitable skill.
![]()
Schools
School of Visual Arts (SVA)
School information: Founded in 1947 by Silas H. Rhodes and Burne Hogarth as the Cartoonist and Illustrators School, and then renamed in 1956. Part of the Association of Independent Colleges of Art and Design as one of 36 leading art colleges in the United States.
The school offered its first degree in 1972, and it’s first master’s degree in 1983 in Fine Arts for painting, drawing and sculpture.
- Location: New York, NY. USA
- Courses: Animation, Computer Animation and Visual Effects
- Tuition cost: $16,780 per semester + Department fees (Animation: $900, Computer Animation and visual effects:$1,340)
- Notable alumni: Bill Plympton (Academy nominated animator), John.R.Dilworth (creator of Courage the Cowardly Dog), Pres Antonio Romanillos (supervising animator at Disney and Dreamworks animation)
- Start of Academic year: September
- BFA Animation: 270 students
- BFA Computer Art, Computer Animation & Visual Effects: 325 students
- Notable graduate film: Kiwi! (Dony Permedi, 2006)
Savannah College of Art and Design (SCAD)
School information: Founded in 1978 by Paula S. Wallace with her husband and parents, taking out a $200,000 loan to build the first educational building, by renovating the Savannah Volunteer Guard Armory.
The university first opened in 1979 with only 71 students. Currently the University has over 11,000 students.
- Location: Savannah, Georgia, USA. Atlanta, Georgia, USA. Hong Kong, Guangdong, China. Lacoste, Vaucluse, France.
- Courses: Animation, Visual Effects
- Tuition cost: (In order of locations) $33,795 (American dollars), $261,911 (Hong Kong dollars), $10,983 (American dollars)
- Notable alumni: Mir Zafar Ali (Visual effects specialist, The Day After Tomorrow)
- Start of Academic year: September
- Notable graduate film: Legacy (Adam Floeck, 2013)
Full Sail University
School information: Founded in 1979 by Jon Phelps in Ohio, before the University was moved to Orlando in 1980, under the name of Full Sail Recording Workshop. Focused on video and film production, but added in animation when the University moved to Orange County in 1989.
The University started offering online degree programs in 2007.
- Location: Orange County, Florida. USA
- Courses: Computer animation
- Tuition cost: $14,762 per semester
- Notable alumni: Culley Bunker (Lead visual effects artist), Chance Glasco (Senior animator)
- Start of Academic year: Second week of November
Stop Motion
(Claymation, Cut-Outs)
Stop motion is done by taking a photo of an object, and then moving it just a little bit and taking another photo. The process is repeated and when the photos are played back one after another they give the illusion of movement. This is similar to traditional animation but it uses real life materials instead of drawings.
![]() I love all forms of animation, but there is something unique and special to stop-motion: it’s more real and the set is lit like a set. But I think it’s also a kind of lonely and dark thing to want to do.
I love all forms of animation, but there is something unique and special to stop-motion: it’s more real and the set is lit like a set. But I think it’s also a kind of lonely and dark thing to want to do.
Tim Burton
About Stop Motion
Stop-Motion animation can be referred to any animation that uses objects that are photographed in a sequence to create the illusion of movement.
The process of stop-motion animation is very long, as each object has to be carefully moved inch by inch, while it’s being photographed every frame, to create a fluid sequence of animation.
Here are the different types of stop-motion animation:
Claymation
One of the most popular stop-motion form is Claymation. Working with clay or play-doh characters that can easily be manipulated for animation. Advanced claymation (such as The Neverhood or Armikrog) uses metal skeletons on which the clay is then molded for more sturdy rigs.
Puppets
Some animators use regular Puppets instead of clay ones, usually also built with some sort of skeleton rig. The faces of the characters can be replaced based on the expression, or controlled within the rig.
Cut-Out
Another popular form of stop-motion is cut-out. Using construction paper or cardboard characters and placing them on paper while shooting the animation from above (that’s how South Park was made before they switched to computers). The cardboard is then moved a little each frame to create the illusion of movement.
Silhouette
Similar to cutout animation, silhouette animation uses cardboard or some kind of flat material, but the objects are all black and the shot is depicted with silhouettes only. This is one of the oldest forms of stop motion and is rarely used today.
Action Figures / Lego
Some use action figures or lego characters for animation. This genre is very popular on YouTube with many channels dedicated to creating funny skits with Lego characters. Robot Chicken is a great example of that. They use famous action figures to make fun of pop culture.
Pixelation
Pixelation is a form of stop motion that uses real people and real environments to create unreal videos. It uses the stop motion method of taking a still photo, moving things around, and then taking another photo, but the subject matter is usually real people instead of puppets.
History
Stop-Motion animation was very often used as special effects before the introduction of CGI animation, and as such has a very long history in both the animation and film industry, starting from The Humpty Dumpty Circus (1887, Blackton). One of the earliest of clay animations was Modelling Extraordinary (1912), and the first female animator was a stop-motion artist named Helena Smith Dayton, who made a clay animated short based on Romeo and Juliet in 1917.
Another technique, which came about in the 80’s, was Go Motion. This technique involved programming a computer to move the models for the animators before each frame was photographed. It was used when creating visual effects for RoboCop (1987, Verhoven) and The Empire Strikes Back (1980, Kershner). It was a lot more complicated than doing it by hand, but the result was a more realistic-looking animation.
Stop-motion set the standards fir visual effects with masters like Ray Harryhausen, who created animations for Jason and the Argonauts (1963, Chaffey) and Clash of the Titans (1981, Davis), or Nick Park who created the Wallace and Gromit franchise. However, stop-motion wasn’t always made for shorts and visual effects. There have been many feature-length stop-motion animated films, most notably The Nightmare Before Christmas (1993, Selick) and Wallace and Gromit: The Curse of the Were-Rabbit (2005, Park.)
Software
Dragonframe
If you’re planning on making a professional stop motion video, Dragonframe is the best tool for the job. Its comprehensive software can be used with many different attachments, such as a device that controls the camera, lights and even pull focus.
It provides the user complete control over the lighting of the shot with an option to program the dimming of the different lights over a period of time, and it comes with a keypad controller for easy control of the photo taking process, as well as flipping between frames.
Dragonframe is the industry standard for stop-motion animation, and was used on films such as Kubo and the Two Strings and Shaun the Sheep.
Supported platforms:
- Windows
- Mac OS
iStopMotion
If you’re looking to spend a bit less, and make stop motion more of a hobby, this software is just for you. It’s not expensive and very user friendly. It does have some pro features though, such as DSLR support, onion skinning, using an iPad or iPhone as a remote and even chroma keying (using green screen).
Supported platforms:
- Mac OS
Schools
CalArts
School information: CalArts was founded in 1961 by Walt Disney, when Chouinard Art Institute and the Los Angeles Conservatory of Music merged together due to financial difficulties.
Nelbert Chouinard, founder of the Chouinard Art Institute, started a professional relationship with Walt Disney in 1929, and agreed to train animators for him on a pay-later basis as Disney was struggling financially.
- Location: Valencia, California. USA
- Courses: Film/Video (Includes animation)
- Tuition cost: $41,700 Full-time enrolment
- Notable alumni: Tim Burton (Disney animator and Director), Brad Bird (Director, Disney and Pixar), John Lasseter (Pixar), Jennifer Lee & Chris Buck (Directors of Frozen)
- Start of Academic year: September
- Notable graduate film: Trust & Estates (Jeanette Bonds, 2013) Official Selection, Melbourne International Animation Festival 2013
Savannah College of Art and Design (SCAD)
School information: Founded in 1978 by Paula S. Wallace with her husband and parents, taking out a $200,000 loan to build the first educational building, by renovating the Savannah Volunteer Guard Armory.
The university first opened in 1979 with only 71 students. Currently the University has over 11,000 students.
- Location: Savannah, Georgia, USA. Atlanta, Georgia, USA. Hong Kong, Guangdong, China. Lacoste, Vaucluse, France.
- Courses: Animation, Visual Effects
- Tuition cost: (In order of locations) $33,795 (American dollars), $261,911 (Hong Kong dollars), $10,983 (American dollars)
- Notable alumni: Mir Zafar Ali (Visual effects specialist, The Day After Tomorrow)
- Start of Academic year: September
- Notable graduate film: Legacy (Adam Floeck, 2013)
School of Visual Arts (SVA)
School information: Founded in 1947 by Silas H. Rhodes and Burne Hogarth as the Cartoonist and Illustrators School, and then renamed in 1956. Part of the Association of Independent Colleges of Art and Design as one of 36 leading art colleges in the United States.
The school offered its first degree in 1972, and it’s first master’s degree in 1983 in Fine Arts for painting, drawing and sculpture.
- Location: New York, NY. USA
- Courses: Animation, Computer Animation and Visual Effects
- Tuition cost: $16,780 per semester + Department fees (Animation: $900, Computer Animation and visual effects:$1,340)
- Notable alumni: Bill Plympton (Academy nominated animator), John.R.Dilworth (creator of Courage the Cowardly Dog), Pres Antonio Romanillos (supervising animator at Disney and Dreamworks animation)
- Start of Academic year: September
- BFA Animation: 270 students
- BFA Computer Art, Computer Animation & Visual Effects: 325 students
- Notable graduate film: Kiwi! (Dony Permedi, 2006)
Before you go…
Congrats for getting through this guide! You took the first step to become an animator, and that’s amazing. BUT before you leave, if you want to take it a another step further, check out our ebook Animation For Beginners. It is a step-by-step guide to becoming an animator (even if you’ve never animated before). It doesn’t matter if you can’t draw, or that you’ve never used an animation software before, Animation For Beginners will take you through the journey of becoming a professional animator. From making your demo reel, finding a job in the animation industry and all the way to making your first animated short film.
Types of Animation Systems
Scripting Systems
Scripting Systems were the earliest type of motion control systems. The animator writes a script in the animation language. Thus, the user must learn this language and the system is not interactive. One scripting system is ASAS (Actor Script Animation Language), which has a syntax similar to LISP. ASAS introduced the concept of an actor, i.e., a complex object which has its own animation rules. For example, in animating a bicycle, the wheels will rotate in their own coordinate system and the animator doesn’t have to worry about this detail. Actors can communicate with other actors be sending messages and so can synchronize their movements. This is similar to the behavior of objects in object-oriented languages.
Procedural Animation
Procedures are used that define movement over time. These might be procedures that use the laws of physics (Physically – based modeling) or animator generated methods. An example is a motion that is the result of some other action (this is called a “secondary action”), for example throwing a ball which hits another object and causes the second object to move.
Representational Animation
This technique allows an object to change its shape during the animation. There are three subcategories to this. The first is the animation of articulated objects, i.e., complex objects composed of connected rigid segments. The second is soft object animation used for deforming and animating the deformation of objects, e.g. skin over a body or facial muscles. The third is morphing which is the changing of one shape into another quite different shape. This can be done in two or three dimensions.
Stochastic Animation
This uses stochastic processes to control groups of objects, such as in particle systems. Examples are fireworks, fire, water falls, etc.
Behavioural Animation
Objects or “actors” are given rules about how they react to their environment. Examples are schools of fish or flocks of birds where each individual behaves according to a set of rules defined by the animator.
Understand Disney’s 12 principles of animation
The 12 principles of animation were first introduced by Disney animators Ollie Johnston and Frank Thomas in their book The Illusion of Life: Disney Animation, which was originally released in 1981. In this book, Johnston and Thomas examine the work of leading Disney animators from the 1930s and onwards, and boil their approach down to 12 basic principles of animation.
These principles form the basis of all animation work. They’re relevant for a number of different fields. The most obvious use is for animating a character design, but these rules are also an invaluable guide in web design – for example, if you want to introduce motion into your interface with some CSS animation.
In this article, we’ll take a closer look at each principle of animation, with helpful GIFs from Vincenzo Lodigiani, who also made the short video The Illusion of Life.
Once you understand these 12 principles of animation, you’ll be able to take your motion work to the next level. These are the principles and what they mean:
01. Squash and stretch
The squash and stretch principle is considered the most important of the 12 principles of animation. When applied, it gives your animated characters and objects the illusion of gravity, weight, mass and flexibility. Think about how a bouncing rubber ball may react when tossed into the air: the ball stretches when it travels up and down and squishes when it hits the ground.
When using squash and stretch, it’s important to keep the object’s volume consistent. So when you stretch something it needs to get thinner, and when you squash something it needs to get wider.
02. Anticipation
Anticipation helps to prepare the viewer for what’s about to happen. When applied, it has the effect of making the object’s action more realistic.
Consider how if might look if you were to jump in the air without bending your knees, or perhaps to throw a ball without first pulling your arm back. It would appear very unnatural (it may not even be possible to jump without bending your knees!). In the same way, animating movements without a flicker of anticipation will also make your motion seem awkward, stale and lifeless.
03. Staging
Staging in animation is a lot like composition in artwork. What we mean by that is, you should use motion to guide the viewer’s eye and draw attention to what’s important within the scene. Keep the focus on what’s important within the scene, and keep the motion of everything else of non-importance to a minimum.
04. Straight ahead action and pose to pose
There are two ways to handle drawing animation: straight ahead and pose to pose. Each has its own benefits, and the two approaches are often combined. Straight ahead action involves drawing frame-by-frame from start to finish. If you’re looking for fluid, realistic movements, straight ahead action is your best bet.
With the pose to pose technique, you draw the beginning frame, the end frame, and a few key frames in-between. Then you go back and complete the rest. This technique gives you a bit more control within the scene and allows you to increase the dramatic effect of the motion.
05. Follow through and overlapping action
When objects come to a standstill after being in motion, different parts of the object will stop at different rates. Similarly, not everything on an object will move at the same rate. This forms the essence of the fifth of Disney’s principles of animation.
If your character is running across the scene, their arms and legs may be moving at a different rate from their head. This is overlapping action. Likewise, when they stop running, their hair will likely continue to move for a few frames before coming to rest – this is follow through. These are important principles to understand if you want your animation to flow realistically.
06. Slow in and slow out
The best way to understand slow in and slow out is to think about how a car starts up and stops. It will start moving slowly, before gaining momentum and speeding up. The reverse will happen when the car brakes. In animation, this effect is achieved by adding more frames at the beginning and end of an action sequence. Apply this principle to give your objects more life.
07. Arc
When working in animation, it’s best to stick with the laws of physics. Most objects follow an arc or a path when they’re moving, and your animations should reflect that arc. For example, when you toss a ball into the air, it follows a natural arc as the effects of the Earth’s gravity act upon it.
08. Secondary action
Secondary actions are used to support or emphasise the main action going on within a scene. Adding secondary actions help add more dimension to your characters and objects.
For instance, the subtle movement of your character’s hair as they walk, or perhaps a facial expression or a secondary object reacting to the first. Whatever the case may be, this secondary action should not distract from the primary one.
09. Timing
For this principle of animation we need to look to the laws of physics again, and apply what we see in the natural world to our animations. In this case, the focus is on timing.
If you move an object more quickly or slowly than it would naturally move in the real world, the effect won’t be believable. Using the correct timing allows you to control the mood and the reaction of your characters and objects. That’s not to say you can’t push things a little (especially if you’re creating an imaginary world) – but if you do, be consistent.
10. Exaggeration
Too much realism can ruin an animation, making it appear static and boring. Instead, add some exaggeration to your characters and objects to make them more dynamic. Find ways to push the limits just beyond what’s possible, and your animations will pop.
11. Solid drawing
You need to understand the basics of drawing. This includes knowing how to draw in three-dimensional space and understanding form and anatomy, weight and volume, and lights and shadows.
While you can push the limits here, too, it’s important to remain consistent. If your world has wonky doors and a warped perspective, keep that perspective throughout the entire animation. Otherwise, things will fall apart.
12. Appeal
Your characters, objects, and the world in which they live need to appeal to the viewer. This includes having an easy-to-read design, solid drawing, and a personality. There is no formula for getting this right, but it starts with strong character development and being able to tell your story through the art of animation.
What is frame buffer
A frame buffer is a large, contiguous piece of computer memory. At a minimum there is one memory bit for each pixel in the rater; this amount of memory is called a bit plane. The picture is built up in the frame buffer one bit at a time.
N-bit colour Frame buffer
Color or gray scales are incorporated into a frame buffer rater graphics device by using additional bit planes. The intensity of each pixel on the CRT is controlled by a corresponding pixel location in each of the N bit planes. The binary value from each of the N bit planes is loaded into corresponding positions in a register. The resulting binary number is interpreted as an intensity level between 0 (dark) and 2n -1 (full intensity).
This is converted into an analog voltage between 0 and the maximum voltage of the electron gun by the DAC. A total of 2N intensity levels are possible. Figure given below illustrates a system with 3 bit planes for a total of 8 (23) intensity levels. Each bit plane requires the full complement of memory for a given raster resolution; e.g., a 3-bit plane frame buffer for a 1024 X1024 raster requires 3,145,728 (3 X 1024 X1024) memory bits.

An increase in the number of available intensity levels is achieved for a modest increase in required memory by using a lookup table. Upon reading the bit planes in the frame buffer, the resulting number is used as an index into the lookup table. The look up table must contain 2N entries. Each entry in the lookup table is W bit wise. W may be greater than N. When this occurs, 2W intensities are available; but only 2N different intensities are available at one time. To get additional intensities, the lookup table must be changed.

Because there are three primary colours, a simple color frame buffer is implemented with three bit planes, one for each primary color. Each bit plane drives an individual color gun for each of the three primary colors used in color video. These three primaries (red, green, and blue) are combined at the CRT to yield eight colors.

Industrial Economics
Industrial Economics is the study of firms, industries, and markets. It looks at firms of all sizes – from local corner shops to multinational giants such as WalMart or Tesco. And it considers a whole range of industries, such as electricity generation, car production, and restaurants.
When analysing decision making at the levels of the individual firm and industry, Industrial Economics helps us understand such issues as:
- the levels at which capacity, output, and prices are set;
- the extent that products are differentiated from each other;
- how much firms invest in research and development (R&D)
- how and why firms advertise
Industrial Economics also gives insights into how firms organise their activities, as well as considering their motivation. In many micro courses, profit maximisation is taken as given, but many industrial economics courses examine alternative objectives, such as trying to grow market share.
There is also an international dimension – firms have the option to source inputs (or outsource production) overseas. As such, while industrial economics more frequently uses skills and knowledge from micro courses, macroeconomic concepts are sometimes employed.
One of the key issues in industrial economics is assessing whether a market is competitive. Competitive markets are normally good for consumers (although they might not always be feasible) so most industrial economics courses include analysis of how to measure the extent of competition in markets. It then considers whether regulation is needed, and if so the form it should take. There is again an international dimension to this, as firms that operate in more than one country will face different regulatory regimes.
Industrial Economics uses theoretical models to understand firm and regulatory decision making, and so students should expect to use diagrams and maybe some basic mathematical models, including game theory. In addition, researchers often develop empirical statistical models to identify relationships between variables of interest: for example to understand the relationship between product price, advertising, and profits. While most courses will not require students to conduct their own empirical analysis (that is left to the econometrics courses) understanding and interpreting empirical results is an important skill.
Industrial Economists are also highly employable. There is an entire industry of consultancies and government agencies (such as the Office of Fair Trading (OFT) and the Competition Commission (CC)) concerned with competition policy. There is an equally large set of consultancies and regulators (such as Ofcom (the communication sector regulator)) which are concerned with the economics of regulation.
File Allocation Methods
The allocation methods define how the files are stored in the disk blocks. There are three main disk space or file allocation methods.
- Contiguous Allocation
- Linked Allocation
- Indexed Allocation
The main idea behind these methods is to provide:
- Efficient disk space utilization.
- Fast access to the file blocks.
All the three methods have their own advantages and disadvantages as discussed below:
1. Contiguous Allocation
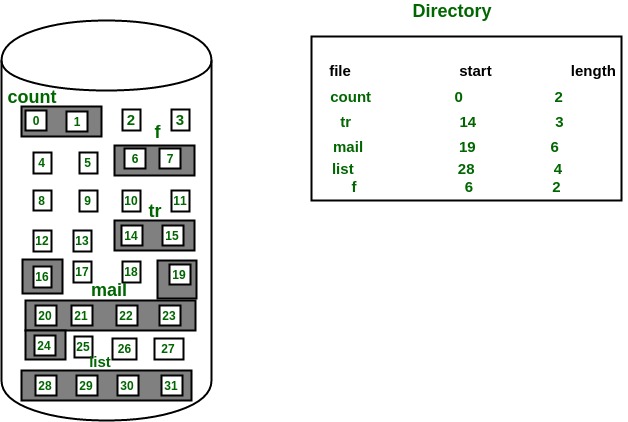
In this scheme, each file occupies a contiguous set of blocks on the disk. For example, if a file requires n blocks and is given a block b as the starting location, then the blocks assigned to the file will be: b, b+1, b+2,……b+n-1. This means that given the starting block address and the length of the file (in terms of blocks required), we can determine the blocks occupied by the file.
The directory entry for a file with contiguous allocation contains
- Address of starting block
- Length of the allocated portion.
The file ‘mail’ in the following figure starts from the block 19 with length = 6 blocks. Therefore, it occupies 19, 20, 21, 22, 23, 24 blocks.
Advantages:
- Both the Sequential and Direct Accesses are supported by this. For direct access, the address of the kth block of the file which starts at block b can easily be obtained as (b+k).
- This is extremely fast since the number of seeks are minimal because of contiguous allocation of file blocks.
Disadvantages:
- This method suffers from both internal and external fragmentation. This makes it inefficient in terms of memory utilization.
- Increasing file size is difficult because it depends on the availability of contiguous memory at a particular instance.
2. Linked List Allocation
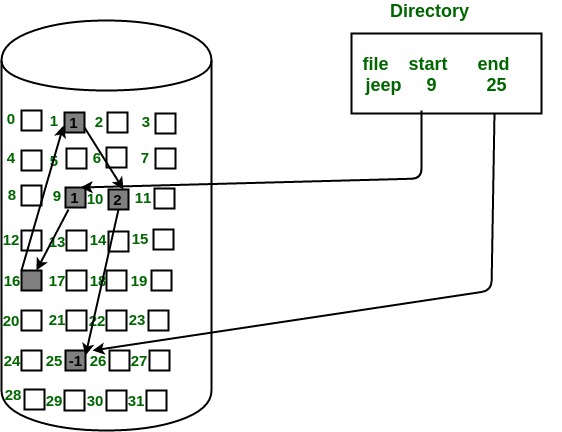
In this scheme, each file is a linked list of disk blocks which need not be contiguous. The disk blocks can be scattered anywhere on the disk.
The directory entry contains a pointer to the starting and the ending file block. Each block contains a pointer to the next block occupied by the file.
The file ‘jeep’ in following image shows how the blocks are randomly distributed. The last block (25) contains -1 indicating a null pointer and does not point to any other block.
Advantages:
- This is very flexible in terms of file size. File size can be increased easily since the system does not have to look for a contiguous chunk of memory.
- This method does not suffer from external fragmentation. This makes it relatively better in terms of memory utilization.
Disadvantages:
- Because the file blocks are distributed randomly on the disk, a large number of seeks are needed to access every block individually. This makes linked allocation slower.
- It does not support random or direct access. We can not directly access the blocks of a file. A block k of a file can be accessed by traversing k blocks sequentially (sequential access ) from the starting block of the file via block pointers.
- Pointers required in the linked allocation incur some extra overhead.
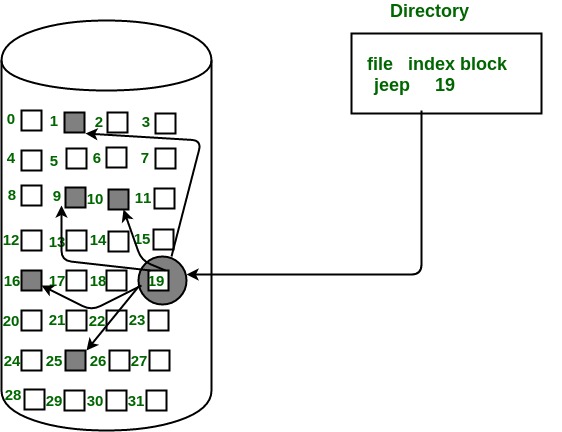
3. Indexed Allocation
In this scheme, a special block known as the Index block contains the pointers to all the blocks occupied by a file. Each file has its own index block. The ith entry in the index block contains the disk address of the ith file block. The directory entry contains the address of the index block as shown in the image:
Advantages:
- This supports direct access to the blocks occupied by the file and therefore provides fast access to the file blocks.
- It overcomes the problem of external fragmentation.
Disadvantages:
- The pointer overhead for indexed allocation is greater than linked allocation.
- For very small files, say files that expand only 2-3 blocks, the indexed allocation would keep one entire block (index block) for the pointers which is inefficient in terms of memory utilization. However, in linked allocation we lose the space of only 1 pointer per block.
For files that are very large, single index block may not be able to hold all the pointers.
Following mechanisms can be used to resolve this:
- Linked scheme: This scheme links two or more index blocks together for holding the pointers. Every index block would then contain a pointer or the address to the next index block.
- Multilevel index: In this policy, a first level index block is used to point to the second level index blocks which inturn points to the disk blocks occupied by the file. This can be extended to 3 or more levels depending on the maximum file size.
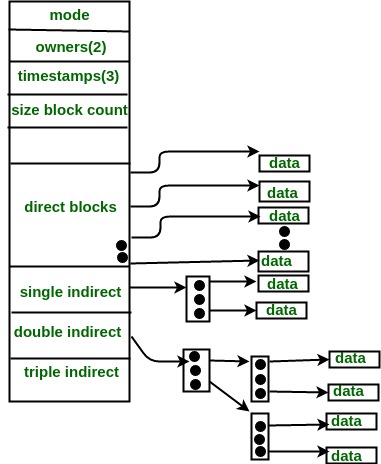
- Combined Scheme: In this scheme, a special block called the Inode (information Node) contains all the information about the file such as the name, size, authority, etc and the remaining space of Inode is used to store the Disk Block addresses which contain the actual file as shown in the image below. The first few of these pointers in Inode point to the direct blocks i.e the pointers contain the addresses of the disk blocks that contain data of the file. The next few pointers point to indirect blocks. Indirect blocks may be single indirect, double indirect or triple indirect. Single Indirect block is the disk block that does not contain the file data but the disk address of the blocks that contain the file data. Similarly, double indirect blocks do not contain the file data but the disk address of the blocks that contain the address of the blocks containing the file data.
This article is contributed by Saloni Baweja. If you like GeeksforGeeks and would like to contribute, you can also write an article using contribute.geeksforgeeks.org or mail your article to contribute@geeksforgeeks.org. See your article appearing on the GeeksforGeeks main page and help other Geeks.
Please write comments if you find anything incorrect, or you want to share more information about the topic discussed above.
Operating System | Types of Operating Systems
An Operating System performs all the basic tasks like managing file,process, and memory. Thus operating system acts as manager of all the resources, i.e. resource manager. Thus operating system becomes an interface between user and machine.
Types of Operating Systems: Some of the widely used operating systems are as follows-
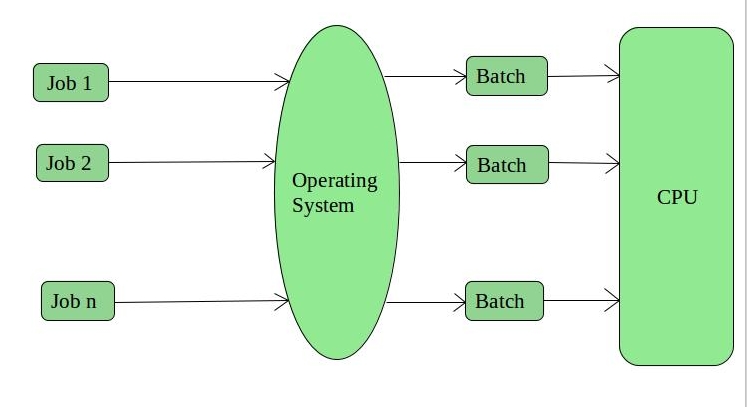
1. Batch Operating System –
This type of operating system do not interact with the computer directly. There is an operator which takes similar jobs having same requirement and group them into batches. It is the responsibility of operator to sort the jobs with similar needs.
Advantages of Batch Operating System:
- It is very difficult to guess or know the time required by any job to complete. Processors of the batch systems knows how long the job would be when it is in queue
- Multiple users can share the batch systems
- The idle time batch system is very less
- It is easy to manage large work repeatedly in batch systems
Disadvantages of Batch Operating System:
- The computer operators should be well known with batch systems
- Batch systems are hard to debug
- It is sometime costly
- The other jobs will have to wait for an unknown time if any job fails
Examples of Batch based Operating System: Payroll System, Bank Statements etc.
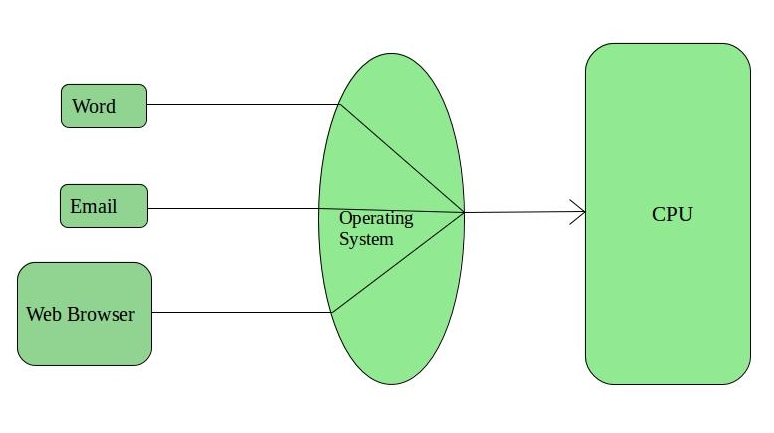
2. Time-Sharing Operating Systems –
Each task has given some time to execute, so that all the tasks work smoothly. Each user gets time of CPU as they use single system. These systems are also known as Multitasking Systems. The task can be from single user or from different users also. The time that each task gets to execute is called quantum. After this time interval is over OS switches over to next task.
Advantages of Time-Sharing OS:
- Each task gets an equal opportunity
- Less chances of duplication of software
- CPU idle time can be reduced
Disadvantages of Time-Sharing OS:
- Reliability problem
- One must have to take care of security and integrity of user programs and data
- Data communication problem
Examples of Time-Sharing OSs are: Multics, Unix etc.
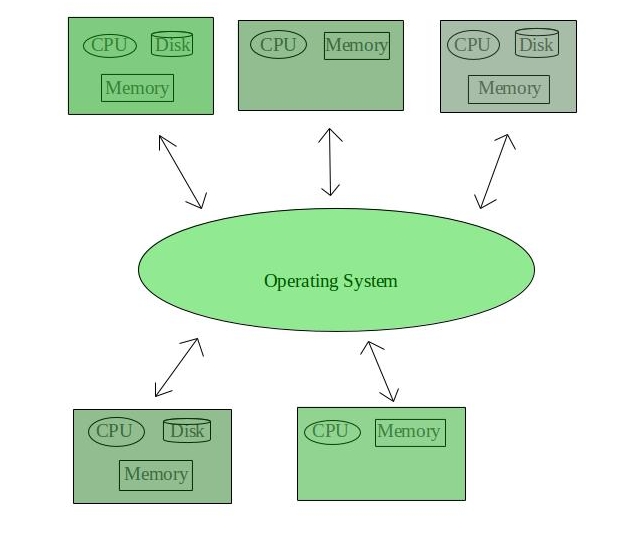
3. Distributed Operating System –
These types of operating system is a recent advancement in the world of computer technology and are being widely accepted all-over the world and, that too, with a great pace. Various autonomous interconnected computers communicate each other using a shared communication network. Independent systems possess their own memory unit and CPU. These are referred as loosely coupled systems or distributed systems. These systems processors differ in sizes and functions. The major benefit of working with these types of operating system is that it is always possible that one user can access the files or software which are not actually present on his system but on some other system connected within this network i.e., remote access is enabled within the devices connected in that network.
Advantages of Distributed Operating System:
- Failure of one will not affect the other network communication, as all systems are independent from each other
- Electronic mail increases the data exchange speed
- Since resources are being shared, computation is highly fast and durable
- Load on host computer reduces
- These systems are easily scalable as many systems can be easily added to the network
- Delay in data processing reduces
Disadvantages of Distributed Operating System:
- Failure of the main network will stop the entire communication
- To establish distributed systems the language which are used are not well defined yet
- These types of systems are not readily available as they are very expensive. Not only that the underlying software is highly complex and not understood well yet
Examples of Distributed Operating System are- LOCUS etc.
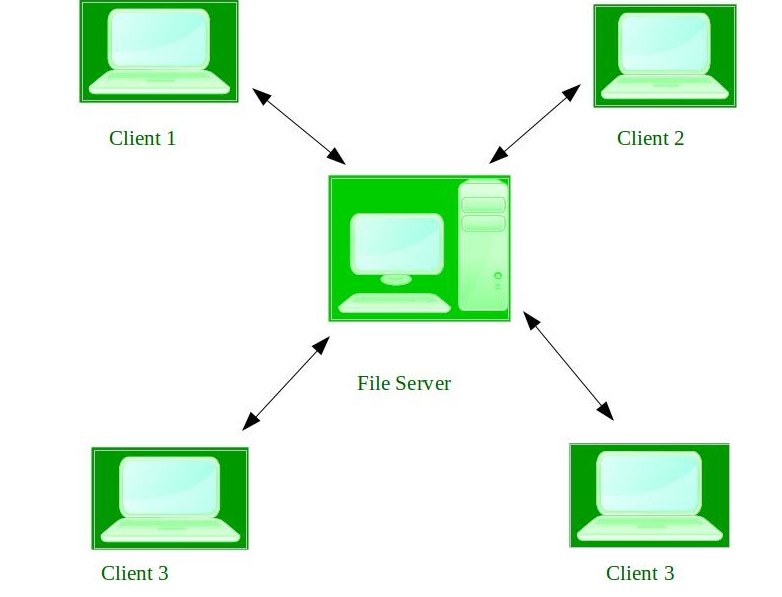
4. Network Operating System –
These systems runs on a server and provides the capability to manage data, users, groups, security, applications, and other networking functions. These type of operating systems allows shared access of files, printers, security, applications, and other networking functions over a small private network. One more important aspect of Network Operating Systems is that all the users are well aware of the underlying configuration, of all other users within the network, their individual connections etc. and that’s why these computers are popularly known as tightly coupled systems.
Advantages of Network Operating System:
- Highly stable centralized servers
- Security concerns are handled through servers
- New technologies and hardware up-gradation are easily integrated to the system
- Server access are possible remotely from different locations and types of systems
Disadvantages of Network Operating System:
- Servers are costly
- User has to depend on central location for most operations
- Maintenance and updates are required regularly
Examples of Network Operating System are: Microsoft Windows Server 2003, Microsoft Windows Server 2008, UNIX, Linux, Mac OS X, Novell NetWare, and BSD etc.
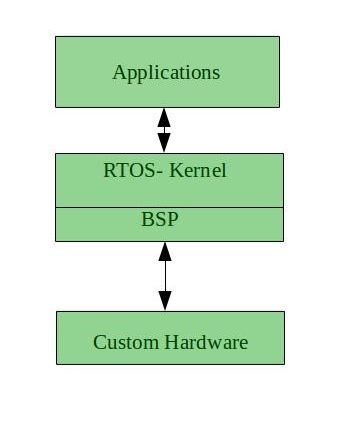
5. Real-Time Operating System –
These types of OSs serves the real-time systems. The time interval required to process and respond to inputs is very small. This time interval is called response time.
Real-time systems are used when there are time requirements are very strict like missile systems, air traffic control systems, robots etc.
Two types of Real-Time Operating System which are as follows:
- Hard Real-Time Systems:
These OSs are meant for the applications where time constraints are very strict and even the shortest possible delay is not acceptable. These systems are built for saving life like automatic parachutes or air bags which are required to be readily available in case of any accident. Virtual memory is almost never found in these systems. - Soft Real-Time Systems:
These OSs are for applications where for time-constraint is less strict.
Advantages of RTOS:
- Maximum Consumption: Maximum utilization of devices and system,thus more output from all the resources
- Task Shifting: Time assigned for shifting tasks in these systems are very less. For example in older systems it takes about 10 micro seconds in shifting one task to another and in latest systems it takes 3 micro seconds.
- Focus on Application: Focus on running applications and less importance to applications which are in queue.
- Real time operating system in embedded system: Since size of programs are small, RTOS can also be used in embedded systems like in transport and others.
- Error Free: These types of systems are error free.
- Memory Allocation: Memory allocation is best managed in these type of systems.
Disadvantages of RTOS:
- Limited Tasks: Very few task run at the same time and their concentration is very less on few applications to avoid errors.
- Use heavy system resources: Sometimes the system resources are not so good and they are expensive as well.
- Complex Algorithms: The algorithms are very complex and difficult for the designer to write on.
- Device driver and interrupt signals: It needs specific device drivers and interrupt signals to response earliest to interrupts.
- Thread Priority: It is not good to set thread priority as these systems are very less pron to switching tasks.
Examples of Real-Time Operating Systems are: Scientific experiments, medical imaging systems, industrial control systems, weapon systems, robots, air traffic control systems, etc.
Pin diagram of 8085 microprocessor
Pin diagram of 8085 microprocessor is as given below:
 The The
1. Address Bus and Data Bus:
The address bus is a group of sixteen lines i.e A0-A15. The address bus is unidirectional, i.e., bits flow in one direction from the microprocessor unit to the peripheral devices and uses the high order address bus.
2. Control and Status Signals:
- ALE – It is an Address Latch Enable signal. It goes high during first T state of a machine cycle and enables the lower 8-bits of the address, if its value is 1 otherwise data bus is activated.
- IO/M’ – It is a status signal which determines whether the address is for input-output or memory. When it is high(1) the address on the address bus is for input-output devices. When it is low(0) the address on the address bus is for the memory.
- SO, S1 – These are status signals. They distinguish the various types of operations such as halt, reading, instruction fetching or writing.
IO/M’ S1 S0 DATA BUS STATUS 0 1 1 Opcode fetch 0 1 0 Memory read 0 0 1 Memory write 1 1 0 I/O read 1 0 1 I/O write 1 1 1 Interrupt acknowledge 0 0 0 Halt - RD’ – It is a signal to control READ operation. When it is low the selected memory or input-output device is read.
- WR’ – It is a signal to control WRITE operation. When it goes low the data on the data bus is written into the selected memory or I/O location.
- READY – It senses whether a peripheral is ready to transfer data or not. If READY is high(1) the peripheral is ready. If it is low(0) the microprocessor waits till it goes high. It is useful for interfacing low speed devices.
3. Power Supply and Clock Frequency:
- Vcc – +5v power supply
- Vss – Ground Reference
- XI, X2 – A crystal is connected at these two pins. The frequency is internally divided by two, therefore, to operate a system at 3MHZ the crystal should have frequency of 6MHZ.
- CLK (OUT) – This signal can be used as the system clock for other devices.
4. Interrupts and Peripheral Initiated Signals:
The 8085 has five interrupt signals that can be used to interrupt a program execution.
(i) INTR
(ii) RST 7.5
(iii) RST 6.5
(iv) RST 5.5
(v) TRAP
The microprocessor acknowledges Interrupt Request by INTA’ signal. In addition to Interrupts, there are three externally initiated signals namely RESET, HOLD and READY. To respond to HOLD request, it has one signal called HLDA.
- INTR – It is an interrupt request signal.
- INTA’ – It is an interrupt acknowledgment sent by the microprocessor after INTR is received.
5. Reset Signals:
- RESET IN’ – When the signal on this pin is low(0), the program-counter is set to zero, the buses are tristated and the microprocessor unit is reset.
- RESET OUT – This signal indicates that the MPU is being reset. The signal can be used to reset other devices.
6. DMA Signals:
- HOLD – It indicates that another device is requesting the use of the address and data bus. Having received HOLD request the microprocessor relinquishes the use of the buses as soon as the current machine cycle is completed. Internal processing may continue. After the removal of the HOLD signal the processor regains the bus.
- HLDA – It is a signal which indicates that the hold request has been received after the removal of a HOLD request, the HLDA goes low.
7. Serial I/O Ports:
Serial transmission in 8085 is implemented by the two signals,
- SID and SOD – SID is a data line for serial input where as SOD is a data line for serial output.
8085 Addressing Modes & Interrupts
Now let us discuss the addressing modes in 8085 Microprocessor.
Addressing Modes in 8085
These are the instructions used to transfer the data from one register to another register, from the memory to the register, and from the register to the memory without any alteration in the content. Addressing modes in 8085 is classified into 5 groups −
Immediate addressing mode
In this mode, the 8/16-bit data is specified in the instruction itself as one of its operand. For example: MVI K, 20F: means 20F is copied into register K.
Register addressing mode
In this mode, the data is copied from one register to another. For example: MOV K, B: means data in register B is copied to register K.
Direct addressing mode
In this mode, the data is directly copied from the given address to the register. For example: LDB 5000K: means the data at address 5000K is copied to register B.
Indirect addressing mode
In this mode, the data is transferred from one register to another by using the address pointed by the register. For example: MOV K, B: means data is transferred from the memory address pointed by the register to the register K.
Implied addressing mode
This mode doesn’t require any operand; the data is specified by the opcode itself. For example: CMP.
Interrupts in 8085
Interrupts are the signals generated by the external devices to request the microprocessor to perform a task. There are 5 interrupt signals, i.e. TRAP, RST 7.5, RST 6.5, RST 5.5, and INTR.
Interrupt are classified into following groups based on their parameter −
-
Vector interrupt − In this type of interrupt, the interrupt address is known to the processor. For example: RST7.5, RST6.5, RST5.5, TRAP.
-
Non-Vector interrupt − In this type of interrupt, the interrupt address is not known to the processor so, the interrupt address needs to be sent externally by the device to perform interrupts. For example: INTR.
-
Maskable interrupt − In this type of interrupt, we can disable the interrupt by writing some instructions into the program. For example: RST7.5, RST6.5, RST5.5.
-
Non-Maskable interrupt − In this type of interrupt, we cannot disable the interrupt by writing some instructions into the program. For example: TRAP.
-
Software interrupt − In this type of interrupt, the programmer has to add the instructions into the program to execute the interrupt. There are 8 software interrupts in 8085, i.e. RST0, RST1, RST2, RST3, RST4, RST5, RST6, and RST7.
-
Hardware interrupt − There are 5 interrupt pins in 8085 used as hardware interrupts, i.e. TRAP, RST7.5, RST6.5, RST5.5, INTA.
Note − NTA is not an interrupt, it is used by the microprocessor for sending acknowledgement. TRAP has the highest priority, then RST7.5 and so on.
Interrupt Service Routine (ISR)
A small program or a routine that when executed, services the corresponding interrupting source is called an ISR.
TRAP
It is a non-maskable interrupt, having the highest priority among all interrupts. Bydefault, it is enabled until it gets acknowledged. In case of failure, it executes as ISR and sends the data to backup memory. This interrupt transfers the control to the location 0024H.
RST7.5
It is a maskable interrupt, having the second highest priority among all interrupts. When this interrupt is executed, the processor saves the content of the PC register into the stack and branches to 003CH address.
RST 6.5
It is a maskable interrupt, having the third highest priority among all interrupts. When this interrupt is executed, the processor saves the content of the PC register into the stack and branches to 0034H address.
RST 5.5
It is a maskable interrupt. When this interrupt is executed, the processor saves the content of the PC register into the stack and branches to 002CH address.
INTR
It is a maskable interrupt, having the lowest priority among all interrupts. It can be disabled by resetting the microprocessor.
When INTR signal goes high, the following events can occur −
-
The microprocessor checks the status of INTR signal during the execution of each instruction.
-
When the INTR signal is high, then the microprocessor completes its current instruction and sends active low interrupt acknowledge signal.
-
When instructions are received, then the microprocessor saves the address of the next instruction on stack and executes the received instruction.
Microprocessor 8085 Architecture
Microprocessor 8085 Architecture which is shown in the below figure consists of various units and each unit has its respective functionality.

Fig: 8085 Microprocessor Architecture
These units are listed below-
1 Accumulator
In Intel 8085microprocessor, accumulator acts an 8-bit register to store 8-bit data to perform arithmetic and logical operation on them. The final result stored in the accumulator. It is also called A register.
2.Arithmetic Logic Unit (ALU)
It basically performs 8-bit arithmetic operations like +, -, *, / and to perform logical operations like AND, OR, NOT etc. ALU gets inputs from the accumulator and temporary register on which it performs such operations. After processing the necessary operations, the result is stored back in the accumulator.
3. Timing and Control unit
This unit is responsible for generating timing signals and control signals and also it controls both inside and outside activities of Intel8085microprocessor. Timing and control unit is very important as it synchronizes the registers and flow of data through various registers and other units. It consists of an oscillator and controller sequencer which sends control signals needed for internal and external control of data and other units.
Following are the timing and control signals –
- Control Signals: READY,RD’, WR’, ALE
- Status Signals: S0, S1, IO/M’
- DMA Signals: HOLD, HLDA
- RESET Signals: RESET IN, RESET OUT
4.General purpose register
B, C, D, E, Hand L are six general purpose registers are there in 8085microprocessor. Each register can hold 8-bit data. They can work in pairs such as BC, DE, and HL to store 16-bit data where HL pair work as a memory pointer.
5. Program Counter
Program Counter is a 16-bit register used to store the memory address location of the next instruction to be executed. Microprocessor increments the program whenever an instruction is being executed so that the program counter points to the memory address of the next instruction that is going to be executed.
6. Stack Pointer
The stack pointer is also a 16-bit register. It is used as a memory pointer. Stack pointer gets incremented when data is retrieved from the stack which is called pop operation and decremented when data is loaded into the stack that is known as a push operation
7.Increment/decrement register
The 16-bit increment and decrement register are used to increment and decrement the PC value and SP value by 1. Increment or decrement can be performed on any register or a memory location.
8. Address and Address Data Buffer
The content of the program counter and stack pointer are loaded into address data buffer and address buffer. These buffers are bi-directional when used for data. The CPU can exchange the desired data with the memory and I/O chips as The memory and I/O chips are connected to these buses. The address data buffer is connected to both external and internal bus which consists of 8 bits.
9. Temporary Register
temporary register is an 8-bit register, which holds the temporary data of arithmetic and logical operations. This register can only be accessed by the microprocessor and it is completely inaccessible to programmers.
10. Status or Flag Register
This register is actually a group of flip-flops to give the status of different operations result. When ALU performs an operation, the result is transferred to the internal data bus and the status of the result will be stored in flip-flops.
These are the set of 5 flip-flops −
Sign (S) –If MSB bit =0then the number is positive, else it is negative.
Zero (Z) –If an operation performed in ALU results in 0value of entire 8-bits then zero flags is set, else it resets.
Auxiliary Carry (AC)– If an operation performed in ALU generates the carry from lower nibble (D0to D3) to upper nibble (D4 to D7) AC flag is set, else it resets.
Parity (P)– this flag is setIf the result contains even no. of ones and for odd no. of ones this flag is reset.
Carry (C) –If an operation performed in ALU generates the carry from D7 to next stage then CY flag is set, else it is reset.
11.Interrupt control
When a microprocessor is executing the main program and whenever an interrupt occurs, the microprocessor shifts the control from the main program to process the incoming request. After the request is completed, the control goes back to the main program.
Interrupt signals present in 8085 are
1. INTR
2. RST 7.5
3. RST 6.5
4. RST 5.5
5. TRAP
12.Serial Input/output control
It controls the serial data communication by using these two instructions: SID (Serial input data) and SOD (Serial output data).
13.Instruction Register and decoder
The instruction register is also 8-bit register. the instruction registers are specifically to store the instructions like adding two data’s, moving a data, copying a data etc. that are fetched from memory.
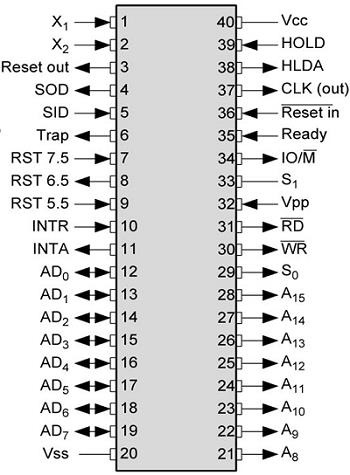
Fig: Pin diagram of 8085
Digital Arithmetic Circuits
In this chapter, let us discuss about the basic arithmetic circuits like Binary adder and Binary subtractor. These circuits can be operated with binary values 0 and 1.
Binary Adder
The most basic arithmetic operation is addition. The circuit, which performs the addition of two binary numbers is known as Binary adder. First, let us implement an adder, which performs the addition of two bits.
Half Adder
Half adder is a combinational circuit, which performs the addition of two binary numbers A and B are of single bit. It produces two outputs sum, S & carry, C.
The Truth table of Half adder is shown below.
| Inputs | Outputs | ||
|---|---|---|---|
| A | B | C | S |
| 0 | 0 | 0 | 0 |
| 0 | 1 | 0 | 1 |
| 1 | 0 | 0 | 1 |
| 1 | 1 | 1 | 0 |
When we do the addition of two bits, the resultant sum can have the values ranging from 0 to 2 in decimal. We can represent the decimal digits 0 and 1 with single bit in binary. But, we can’t represent decimal digit 2 with single bit in binary. So, we require two bits for representing it in binary.
Let, sum, S is the Least significant bit and carry, C is the Most significant bit of the resultant sum. For first three combinations of inputs, carry, C is zero and the value of S will be either zero or one based on the number of ones present at the inputs. But, for last combination of inputs, carry, C is one and sum, S is zero, since the resultant sum is two.
From Truth table, we can directly write the Boolean functions for each output as
<span class="MathJax" id="MathJax-Element-2-Frame" tabindex="0" data-mathml="C=AB” role=”presentation” style=”box-sizing: border-box; display: inline; font-style: normal; font-weight: normal; line-height: normal; font-size: 15px; text-indent: 0px; text-align: left; text-transform: none; letter-spacing: normal; word-spacing: normal; word-wrap: normal; white-space: nowrap; float: none; direction: ltr; max-width: none; max-height: none; min-width: 0px; min-height: 0px; border: 0px; padding: 0px; margin: 0px; position: relative”>C=AB<span class="MathJax" id="MathJax-Element-2-Frame" tabindex="0" data-mathml="C=AB” role=”presentation” style=”box-sizing: border-box; display: inline; font-style: normal; font-weight: normal; line-height: normal; font-size: 15px; text-indent: 0px; text-align: left; text-transform: none; letter-spacing: normal; word-spacing: normal; word-wrap: normal; white-space: nowrap; float: none; direction: ltr; max-width: none; max-height: none; min-width: 0px; min-height: 0px; border: 0px; padding: 0px; margin: 0px; position: relative”>
We can implement the above functions with 2-input Ex-OR gate & 2-input AND gate. The circuit diagram of Half adder is shown in the following figure.
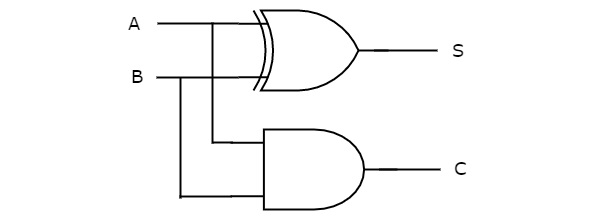
In the above circuit, a two input Ex-OR gate & two input AND gate produces sum, S & carry, C respectively. Therefore, Half-adder performs the addition of two bits.
Full Adder
Full adder is a combinational circuit, which performs the addition of three bits A, B and Cin. Where, A & B are the two parallel significant bits and Cin is the carry bit, which is generated from previous stage. This Full adder also produces two outputs sum, S & carry, Cout, which are similar to Half adder.
The Truth table of Full adder is shown below.
| Inputs | Outputs | |||
|---|---|---|---|---|
| A | B | Cin | Cout | S |
| 0 | 0 | 0 | 0 | 0 |
| 0 | 0 | 1 | 0 | 1 |
| 0 | 1 | 0 | 0 | 1 |
| 0 | 1 | 1 | 1 | 0 |
| 1 | 0 | 0 | 0 | 1 |
| 1 | 0 | 1 | 1 | 0 |
| 1 | 1 | 0 | 1 | 0 |
| 1 | 1 | 1 | 1 | 1 |
When we do the addition of three bits, the resultant sum can have the values ranging from 0 to 3 in decimal. We can represent the decimal digits 0 and 1 with single bit in binary. But, we can’t represent the decimal digits 2 and 3 with single bit in binary. So, we require two bits for representing those two decimal digits in binary.
Let, sum, S is the Least significant bit and carry, Cout is the Most significant bit of resultant sum. It is easy to fill the values of outputs for all combinations of inputs in the truth table. Just count the number of ones present at the inputs and write the equivalent binary number at outputs. If Cin is equal to zero, then Full adder truth table is same as that of Half adder truth table.
We will get the following Boolean functions for each output after simplification.
<span class="MathJax" id="MathJax-Element-4-Frame" tabindex="0" data-mathml="cout=AB+(A⊕B)cin” role=”presentation” style=”box-sizing: border-box; display: inline; font-style: normal; font-weight: normal; line-height: normal; font-size: 15px; text-indent: 0px; text-align: left; text-transform: none; letter-spacing: normal; word-spacing: normal; word-wrap: normal; white-space: nowrap; float: none; direction: ltr; max-width: none; max-height: none; min-width: 0px; min-height: 0px; border: 0px; padding: 0px; margin: 0px; position: relative”>cout=AB+(A⊕B)cin<span class="MathJax" id="MathJax-Element-4-Frame" tabindex="0" data-mathml="cout=AB+(A⊕B)cin” role=”presentation” style=”box-sizing: border-box; display: inline; font-style: normal; font-weight: normal; line-height: normal; font-size: 15px; text-indent: 0px; text-align: left; text-transform: none; letter-spacing: normal; word-spacing: normal; word-wrap: normal; white-space: nowrap; float: none; direction: ltr; max-width: none; max-height: none; min-width: 0px; min-height: 0px; border: 0px; padding: 0px; margin: 0px; position: relative”>
The sum, S is equal to one, when odd number of ones present at the inputs. We know that Ex-OR gate produces an output, which is an odd function. So, we can use either two 2input Ex-OR gates or one 3-input Ex-OR gate in order to produce sum, S. We can implement carry, Cout using two 2-input AND gates & one OR gate. The circuit diagram of Full adder is shown in the following figure.
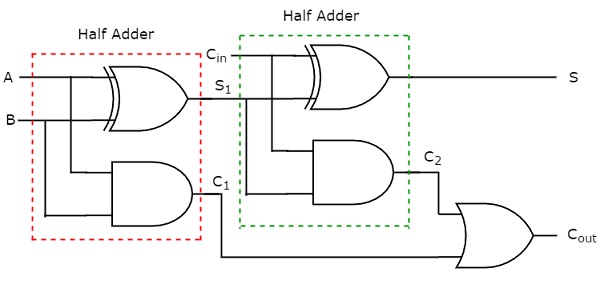
This adder is called as Full adder because for implementing one Full adder, we require two Half adders and one OR gate. If Cin is zero, then Full adder becomes Half adder. We can verify it easily from the above circuit diagram or from the Boolean functions of outputs of Full adder.
4-bit Binary Adder
The 4-bit binary adder performs the addition of two 4-bit numbers. Let the 4-bit binary numbers, <span class="MathJax" id="MathJax-Element-5-Frame" tabindex="0" data-mathml="A=A3A2A1A0″ role=”presentation” style=”box-sizing: border-box; display: inline; font-style: normal; font-weight: normal; line-height: normal; font-size: 15px; text-indent: 0px; text-align: left; text-transform: none; letter-spacing: normal; word-spacing: normal; word-wrap: normal; white-space: nowrap; float: none; direction: ltr; max-width: none; max-height: none; min-width: 0px; min-height: 0px; border: 0px; padding: 0px; margin: 0px; position: relative”>A=A3A2A1A0<span class="MathJax" id="MathJax-Element-5-Frame" tabindex="0" data-mathml="A=A3A2A1A0″ role=”presentation” style=”box-sizing: border-box; display: inline; font-style: normal; font-weight: normal; line-height: normal; font-size: 15px; text-indent: 0px; text-align: left; text-transform: none; letter-spacing: normal; word-spacing: normal; word-wrap: normal; white-space: nowrap; float: none; direction: ltr; max-width: none; max-height: none; min-width: 0px; min-height: 0px; border: 0px; padding: 0px; margin: 0px; position: relative”> and <span class="MathJax" id="MathJax-Element-6-Frame" tabindex="0" data-mathml="B=B3B2B1B0″ role=”presentation” style=”box-sizing: border-box; display: inline; font-style: normal; font-weight: normal; line-height: normal; font-size: 15px; text-indent: 0px; text-align: left; text-transform: none; letter-spacing: normal; word-spacing: normal; word-wrap: normal; white-space: nowrap; float: none; direction: ltr; max-width: none; max-height: none; min-width: 0px; min-height: 0px; border: 0px; padding: 0px; margin: 0px; position: relative”>B=B3B2B1B0<span class="MathJax" id="MathJax-Element-6-Frame" tabindex="0" data-mathml="B=B3B2B1B0″ role=”presentation” style=”box-sizing: border-box; display: inline; font-style: normal; font-weight: normal; line-height: normal; font-size: 15px; text-indent: 0px; text-align: left; text-transform: none; letter-spacing: normal; word-spacing: normal; word-wrap: normal; white-space: nowrap; float: none; direction: ltr; max-width: none; max-height: none; min-width: 0px; min-height: 0px; border: 0px; padding: 0px; margin: 0px; position: relative”>. We can implement 4-bit binary adder in one of the two following ways.
-
Use one Half adder for doing the addition of two Least significant bits and three Full adders for doing the addition of three higher significant bits.
-
Use four Full adders for uniformity. Since, initial carry Cin is zero, the Full adder which is used for adding the least significant bits becomes Half adder.
For the time being, we considered second approach. The block diagram of 4-bit binary adder is shown in the following figure.
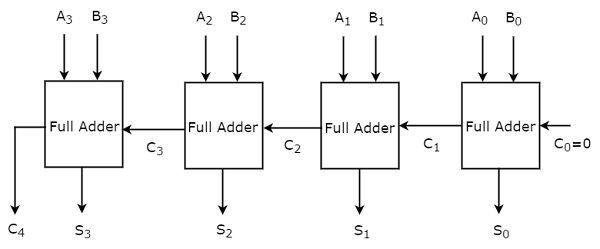
Here, the 4 Full adders are cascaded. Each Full adder is getting the respective bits of two parallel inputs A & B. The carry output of one Full adder will be the carry input of subsequent higher order Full adder. This 4-bit binary adder produces the resultant sum having at most 5 bits. So, carry out of last stage Full adder will be the MSB.
In this way, we can implement any higher order binary adder just by cascading the required number of Full adders. This binary adder is also called as ripple carry (binary) adderbecause the carry propagates (ripples) from one stage to the next stage.
Binary Subtractor
The circuit, which performs the subtraction of two binary numbers is known as Binary subtractor. We can implement Binary subtractor in following two methods.
- Cascade Full subtractors
- 2’s complement method
In first method, we will get an n-bit binary subtractor by cascading ‘n’ Full subtractors. So, first you can implement Half subtractor and Full subtractor, similar to Half adder & Full adder. Then, you can implement an n-bit binary subtractor, by cascading ‘n’ Full subtractors. So, we will be having two separate circuits for binary addition and subtraction of two binary numbers.
In second method, we can use same binary adder for subtracting two binary numbers just by doing some modifications in the second input. So, internally binary addition operation takes place but, the output is resultant subtraction.
We know that the subtraction of two binary numbers A & B can be written as,
<span class="MathJax" id="MathJax-Element-8-Frame" tabindex="0" data-mathml="⇒A−B=A+(1′scomplimentofB)+1″ role=”presentation” style=”box-sizing: border-box; display: inline; font-style: normal; font-weight: normal; line-height: normal; font-size: 15px; text-indent: 0px; text-align: left; text-transform: none; letter-spacing: normal; word-spacing: normal; word-wrap: normal; white-space: nowrap; float: none; direction: ltr; max-width: none; max-height: none; min-width: 0px; min-height: 0px; border: 0px; padding: 0px; margin: 0px; position: relative”>⇒A−B=A+(1′scomplimentofB)+1<span class="MathJax" id="MathJax-Element-8-Frame" tabindex="0" data-mathml="⇒A−B=A+(1′scomplimentofB)+1″ role=”presentation” style=”box-sizing: border-box; display: inline; font-style: normal; font-weight: normal; line-height: normal; font-size: 15px; text-indent: 0px; text-align: left; text-transform: none; letter-spacing: normal; word-spacing: normal; word-wrap: normal; white-space: nowrap; float: none; direction: ltr; max-width: none; max-height: none; min-width: 0px; min-height: 0px; border: 0px; padding: 0px; margin: 0px; position: relative”>
4-bit Binary Subtractor
The 4-bit binary subtractor produces the subtraction of two 4-bit numbers. Let the 4bit binary numbers, <span class="MathJax" id="MathJax-Element-9-Frame" tabindex="0" data-mathml="A=A3A2A1A0″ role=”presentation” style=”box-sizing: border-box; display: inline; font-style: normal; font-weight: normal; line-height: normal; font-size: 15px; text-indent: 0px; text-align: left; text-transform: none; letter-spacing: normal; word-spacing: normal; word-wrap: normal; white-space: nowrap; float: none; direction: ltr; max-width: none; max-height: none; min-width: 0px; min-height: 0px; border: 0px; padding: 0px; margin: 0px; position: relative”>A=A3A2A1A0<span class="MathJax" id="MathJax-Element-9-Frame" tabindex="0" data-mathml="A=A3A2A1A0″ role=”presentation” style=”box-sizing: border-box; display: inline; font-style: normal; font-weight: normal; line-height: normal; font-size: 15px; text-indent: 0px; text-align: left; text-transform: none; letter-spacing: normal; word-spacing: normal; word-wrap: normal; white-space: nowrap; float: none; direction: ltr; max-width: none; max-height: none; min-width: 0px; min-height: 0px; border: 0px; padding: 0px; margin: 0px; position: relative”> and <span class="MathJax" id="MathJax-Element-10-Frame" tabindex="0" data-mathml="B=B3B2B1B0″ role=”presentation” style=”box-sizing: border-box; display: inline; font-style: normal; font-weight: normal; line-height: normal; font-size: 15px; text-indent: 0px; text-align: left; text-transform: none; letter-spacing: normal; word-spacing: normal; word-wrap: normal; white-space: nowrap; float: none; direction: ltr; max-width: none; max-height: none; min-width: 0px; min-height: 0px; border: 0px; padding: 0px; margin: 0px; position: relative”>B=B3B2B1B0<span class="MathJax" id="MathJax-Element-10-Frame" tabindex="0" data-mathml="B=B3B2B1B0″ role=”presentation” style=”box-sizing: border-box; display: inline; font-style: normal; font-weight: normal; line-height: normal; font-size: 15px; text-indent: 0px; text-align: left; text-transform: none; letter-spacing: normal; word-spacing: normal; word-wrap: normal; white-space: nowrap; float: none; direction: ltr; max-width: none; max-height: none; min-width: 0px; min-height: 0px; border: 0px; padding: 0px; margin: 0px; position: relative”>. Internally, the operation of 4-bit Binary subtractor is similar to that of 4-bit Binary adder. If the normal bits of binary number A, complemented bits of binary number B and initial carry (borrow), Cin as one are applied to 4-bit Binary adder, then it becomes 4-bit Binary subtractor. The block diagram of 4-bit binary subtractor is shown in the following figure.
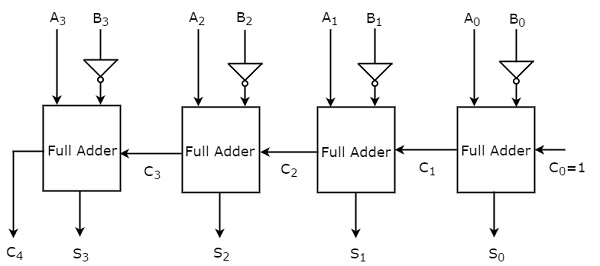
This 4-bit binary subtractor produces an output, which is having at most 5 bits. If Binary number A is greater than Binary number B, then MSB of the output is zero and the remaining bits hold the magnitude of A-B. If Binary number A is less than Binary number B, then MSB of the output is one. So, take the 2’s complement of output in order to get the magnitude of A-B.
In this way, we can implement any higher order binary subtractor just by cascading the required number of Full adders with necessary modifications.
Binary Adder / Subtractor
The circuit, which can be used to perform either addition or subtraction of two binary numbers at any time is known as Binary Adder / subtractor. Both, Binary adder and Binary subtractor contain a set of Full adders, which are cascaded. The input bits of binary number A are directly applied in both Binary adder and Binary subtractor.
There are two differences in the inputs of Full adders that are present in Binary adder and Binary subtractor.
-
The input bits of binary number B are directly applied to Full adders in Binary adder, whereas the complemented bits of binary number B are applied to Full adders in Binary subtractor.
-
The initial carry, C0 = 0 is applied in 4-bit Binary adder, whereas the initial carry (borrow), C0 = 1 is applied in 4-bit Binary subtractor.
We know that a 2-input Ex-OR gate produces an output, which is same as that of first input when other input is zero. Similarly, it produces an output, which is complement of first input when other input is one.
Therefore, we can apply the input bits of binary number B, to 2-input Ex-OR gates. The other input to all these Ex-OR gates is C0. So, based on the value of C0, the Ex-OR gates produce either the normal or complemented bits of binary number B.
4-bit Binary Adder / Subtractor
The 4-bit binary adder / subtractor produces either the addition or the subtraction of two 4-bit numbers based on the value of initial carry or borrow, 𝐶0. Let the 4-bit binary numbers, <span class="MathJax" id="MathJax-Element-11-Frame" tabindex="0" data-mathml="A=A3A2A1A0″ role=”presentation” style=”box-sizing: border-box; display: inline; font-style: normal; font-weight: normal; line-height: normal; font-size: 15px; text-indent: 0px; text-align: left; text-transform: none; letter-spacing: normal; word-spacing: normal; word-wrap: normal; white-space: nowrap; float: none; direction: ltr; max-width: none; max-height: none; min-width: 0px; min-height: 0px; border: 0px; padding: 0px; margin: 0px; position: relative”>A=A3A2A1A0<span class="MathJax" id="MathJax-Element-11-Frame" tabindex="0" data-mathml="A=A3A2A1A0″ role=”presentation” style=”box-sizing: border-box; display: inline; font-style: normal; font-weight: normal; line-height: normal; font-size: 15px; text-indent: 0px; text-align: left; text-transform: none; letter-spacing: normal; word-spacing: normal; word-wrap: normal; white-space: nowrap; float: none; direction: ltr; max-width: none; max-height: none; min-width: 0px; min-height: 0px; border: 0px; padding: 0px; margin: 0px; position: relative”> and <span class="MathJax" id="MathJax-Element-12-Frame" tabindex="0" data-mathml="B=B3B2B1B0″ role=”presentation” style=”box-sizing: border-box; display: inline; font-style: normal; font-weight: normal; line-height: normal; font-size: 15px; text-indent: 0px; text-align: left; text-transform: none; letter-spacing: normal; word-spacing: normal; word-wrap: normal; white-space: nowrap; float: none; direction: ltr; max-width: none; max-height: none; min-width: 0px; min-height: 0px; border: 0px; padding: 0px; margin: 0px; position: relative”>B=B3B2B1B0<span class="MathJax" id="MathJax-Element-12-Frame" tabindex="0" data-mathml="B=B3B2B1B0″ role=”presentation” style=”box-sizing: border-box; display: inline; font-style: normal; font-weight: normal; line-height: normal; font-size: 15px; text-indent: 0px; text-align: left; text-transform: none; letter-spacing: normal; word-spacing: normal; word-wrap: normal; white-space: nowrap; float: none; direction: ltr; max-width: none; max-height: none; min-width: 0px; min-height: 0px; border: 0px; padding: 0px; margin: 0px; position: relative”>. The operation of 4-bit Binary adder / subtractor is similar to that of 4-bit Binary adder and 4-bit Binary subtractor.
Apply the normal bits of binary numbers A and B & initial carry or borrow, C0 from externally to a 4-bit binary adder. The block diagram of 4-bit binary adder / subtractor is shown in the following figure.

If initial carry, 𝐶0 is zero, then each full adder gets the normal bits of binary numbers A & B. So, the 4-bit binary adder / subtractor produces an output, which is the addition of two binary numbers A & B.
If initial borrow, 𝐶0 is one, then each full adder gets the normal bits of binary number A & complemented bits of binary number B. So, the 4-bit binary adder / subtractor produces an output, which is the subtraction of two binary numbers A & B.
Therefore, with the help of additional Ex-OR gates, the same circuit can be used for both addition and subtraction of two binary numbers.
Digital Communication – Analog to Digital
The communication that occurs in our day-to-day life is in the form of signals. These signals, such as sound signals, generally, are analog in nature. When the communication needs to be established over a distance, then the analog signals are sent through wire, using different techniques for effective transmission.
The Necessity of Digitization
The conventional methods of communication used analog signals for long distance communications, which suffer from many losses such as distortion, interference, and other losses including security breach.
In order to overcome these problems, the signals are digitized using different techniques. The digitized signals allow the communication to be more clear and accurate without losses.
The following figure indicates the difference between analog and digital signals. The digital signals consist of 1s and 0s which indicate High and Low values respectively.
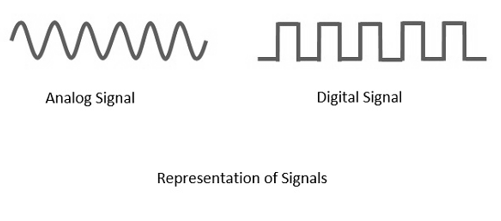
Advantages of Digital Communication
As the signals are digitized, there are many advantages of digital communication over analog communication, such as −
-
The effect of distortion, noise, and interference is much less in digital signals as they are less affected.
-
Digital circuits are more reliable.
-
Digital circuits are easy to design and cheaper than analog circuits.
-
The hardware implementation in digital circuits, is more flexible than analog.
-
The occurrence of cross-talk is very rare in digital communication.
-
The signal is un-altered as the pulse needs a high disturbance to alter its properties, which is very difficult.
-
Signal processing functions such as encryption and compression are employed in digital circuits to maintain the secrecy of the information.
-
The probability of error occurrence is reduced by employing error detecting and error correcting codes.
-
Spread spectrum technique is used to avoid signal jamming.
-
Combining digital signals using Time Division Multiplexing (TDM) is easier than combining analog signals using Frequency Division Multiplexing (FDM).
-
The configuring process of digital signals is easier than analog signals.
-
Digital signals can be saved and retrieved more conveniently than analog signals.
-
Many of the digital circuits have almost common encoding techniques and hence similar devices can be used for a number of purposes.
-
The capacity of the channel is effectively utilized by digital signals.
Elements of Digital Communication
The elements which form a digital communication system is represented by the following block diagram for the ease of understanding.
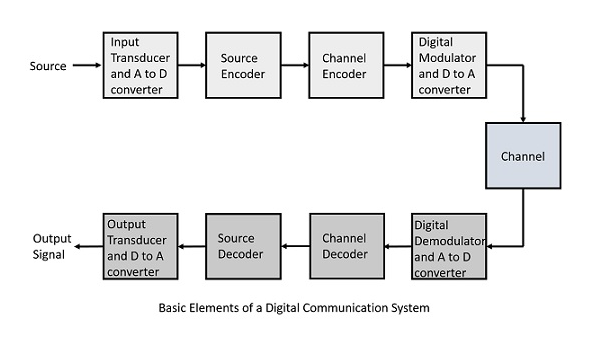
Following are the sections of the digital communication system.
Source
The source can be an analog signal. Example: A Sound signal
Input Transducer
This is a transducer which takes a physical input and converts it to an electrical signal (Example: microphone). This block also consists of an analog to digital converter where a digital signal is needed for further processes.
A digital signal is generally represented by a binary sequence.
Source Encoder
The source encoder compresses the data into minimum number of bits. This process helps in effective utilization of the bandwidth. It removes the redundant bits (unnecessary excess bits, i.e., zeroes).
Channel Encoder
The channel encoder, does the coding for error correction. During the transmission of the signal, due to the noise in the channel, the signal may get altered and hence to avoid this, the channel encoder adds some redundant bits to the transmitted data. These are the error correcting bits.
Digital Modulator
The signal to be transmitted is modulated here by a carrier. The signal is also converted to analog from the digital sequence, in order to make it travel through the channel or medium.
Channel
The channel or a medium, allows the analog signal to transmit from the transmitter end to the receiver end.
Digital Demodulator
This is the first step at the receiver end. The received signal is demodulated as well as converted again from analog to digital. The signal gets reconstructed here.
Channel Decoder
The channel decoder, after detecting the sequence, does some error corrections. The distortions which might occur during the transmission, are corrected by adding some redundant bits. This addition of bits helps in the complete recovery of the original signal.
Source Decoder
The resultant signal is once again digitized by sampling and quantizing so that the pure digital output is obtained without the loss of information. The source decoder recreates the source output.
Output Transducer
This is the last block which converts the signal into the original physical form, which was at the input of the transmitter. It converts the electrical signal into physical output (Example: loud speaker).
Output Signal
This is the output which is produced after the whole process. Example − The sound signal received.
This unit has dealt with the introduction, the digitization of signals, the advantages and the elements of digital communications. In the coming chapters, we will learn about the concepts of Digital communications, in detail.
Question: LEX and YACC.
LEX
- Lex is officially known as a “Lexical Analyser”.
- Its main job is to break up an input stream into more usable elements. Or in, other words, to identify the “interesting bits” in a text file.
- For example, if you are writing a compiler for the C programming language, the symbols { } ( ); all have significance on their own.
- The letter a usually appears as part of a keyword or variable name, and is not interesting on its own.
- Instead, we are interested in the whole word. Spaces and newlines are completely uninteresting, and we want to ignore them completely, unless they appear within quotes “like this”
- All of these things are handled by the Lexical Analyser.
- A tool widely used to specify lexical analyzers for a variety of languages
- We refer to the tool as Lex compiler, and to its input specification as the Lex language.

Lex specifications:
A Lex program (the .l file) consists of three parts:
declarations
%%
translation rules
%%
YACC
- Yacc is officially known as a “parser”.
- It’s job is to analyse the structure of the input stream, and operate of the “big picture”.
- In the course of it’s normal work, the parser also verifies that the input is syntactically sound.
- Consider again the example of a C-compiler. In the C-language, a word can be a function name or a variable, depending on whether it is followed by a (or a = There should be exactly one } for each { in the program.
- YACC stands for “Yet another Compiler Compiler”. This is because this kind of analysis of text files is normally associated with writing compilers.

How does this yacc works?
- yacc is designed for use with C code and generates a parser written in C.
- The parser is configured for use in conjunction with a lex-generated scanner and relies on standard shared features (token types, yylval, etc.) and calls the function yylex as a scanner coroutine.
- You provide a grammar specification file, which is traditionally named using a .y extension.
- You invoke yacc on the .y file and it creates the y.tab.h and y.tab.c files containing a thousand or so lines of intense C code that implements an efficient LALR (1) parser for your grammar, including the code for the actions you specified.
- The file provides an extern function yyparse.y that will attempt to successfully parse a valid sentence.
- You compile that C file normally, link with the rest of your code, and you have a parser! By default, the parser reads from stdin and writes to stdout, just like a lex-generated scanner does.
Difference between LEX and YACC
- Lex is used to split the text into a list of tokens, what text become token can be specified using regular expression in lex file.
- Yacc is used to give some structure to those tokens. For example in Programming languages, we have assignment statements like int a = 1 + 2; and i want to make sure that the left hand side of ‘=’ be an identifier and the right side be an expression [it could be more complex than this]. This can be coded using a CFG rule and this is what you specify in yacc file and this you cannot do using lex (lexcannot handle recursive languages).
- A typical application of lex and yacc is for implementing programming languages.
- Lex tokenizes the input, breaking it up into keywords, constants, punctuation, etc.
- Yacc then implements the actual computer language; recognizing a for statement, for instance, or a function definition.
- Lex and yacc are normally used together. This is how you usually construct an application using both:
- Input Stream (characters) -> Lex (tokens) -> Yacc (Abstract Syntax Tree) -> Your Application
Instruction Formats
These formats are classified by length in bytes, use of the base registers, and object code format. The five instruction classes of use to the general user are listed below.
Format Length Use
Name in bytes
RR 2 Register to register transfers.
RS 4 Register to storage and register from storage
RX 4 Register to indexed storage and register from indexed storage
SI 4 Storage immediate
SS 6 Storage–to–Storage. These have two variants,
each of which we shall discuss soon.
Compiler Design – Phases of Compiler
The compilation process is a sequence of various phases. Each phase takes input from its previous stage, has its own representation of source program, and feeds its output to the next phase of the compiler. Let us understand the phases of a compiler.
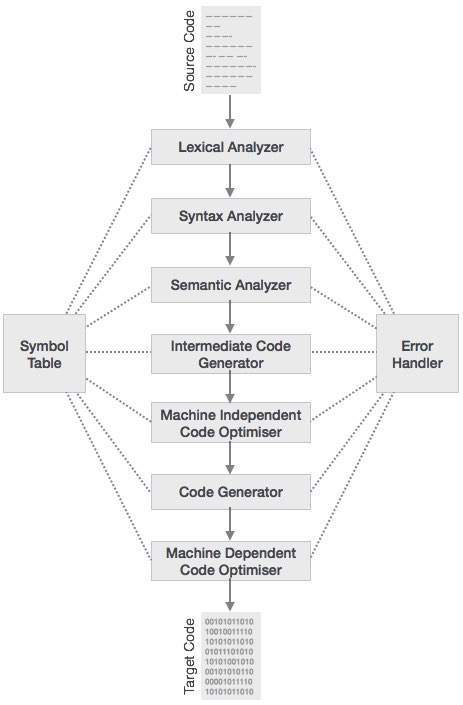
Lexical Analysis
The first phase of scanner works as a text scanner. This phase scans the source code as a stream of characters and converts it into meaningful lexemes. Lexical analyzer represents these lexemes in the form of tokens as:
<token-name, attribute-value>
Syntax Analysis
The next phase is called the syntax analysis or parsing. It takes the token produced by lexical analysis as input and generates a parse tree (or syntax tree). In this phase, token arrangements are checked against the source code grammar, i.e. the parser checks if the expression made by the tokens is syntactically correct.
Semantic Analysis
Semantic analysis checks whether the parse tree constructed follows the rules of language. For example, assignment of values is between compatible data types, and adding string to an integer. Also, the semantic analyzer keeps track of identifiers, their types and expressions; whether identifiers are declared before use or not etc. The semantic analyzer produces an annotated syntax tree as an output.
Intermediate Code Generation
After semantic analysis the compiler generates an intermediate code of the source code for the target machine. It represents a program for some abstract machine. It is in between the high-level language and the machine language. This intermediate code should be generated in such a way that it makes it easier to be translated into the target machine code.
Code Optimization
The next phase does code optimization of the intermediate code. Optimization can be assumed as something that removes unnecessary code lines, and arranges the sequence of statements in order to speed up the program execution without wasting resources (CPU, memory).
Code Generation
In this phase, the code generator takes the optimized representation of the intermediate code and maps it to the target machine language. The code generator translates the intermediate code into a sequence of (generally) re-locatable machine code. Sequence of instructions of machine code performs the task as the intermediate code would do.
Symbol Table
It is a data-structure maintained throughout all the phases of a compiler. All the identifier’s names along with their types are stored here. The symbol table makes it easier for the compiler to quickly search the identifier record and retrieve it. The symbol table is also used
Operating System – Mahesh Kariya
Operating System – Overview
An Operating System (OS) is an interface between a computer user and computer hardware. An operating system is a software which performs all the basic tasks like file management, memory management, process management, handling input and output, and controlling peripheral devices such as disk drives and printers.
Some popular Operating Systems include Linux Operating System, Windows Operating System, VMS, OS/400, AIX, z/OS, etc.
Definition
An operating system is a program that acts as an interface between the user and the computer hardware and controls the execution of all kinds of programs.
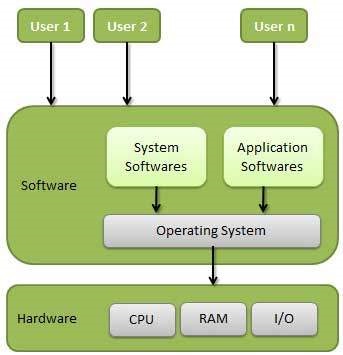
Following are some of important functions of an operating System.
- Memory Management
- Processor Management
- Device Management
- File Management
- Security
- Control over system performance
- Job accounting
- Error detecting aids
- Coordination between other software and users
Memory Management
Memory management refers to management of Primary Memory or Main Memory. Main memory is a large array of words or bytes where each word or byte has its own address.
Main memory provides a fast storage that can be accessed directly by the CPU. For a program to be executed, it must in the main memory. An Operating System does the following activities for memory management −
-
Keeps tracks of primary memory, i.e., what part of it are in use by whom, what part are not in use.
-
In multiprogramming, the OS decides which process will get memory when and how much.
-
Allocates the memory when a process requests it to do so.
-
De-allocates the memory when a process no longer needs it or has been terminated.
Processor Management
In multiprogramming environment, the OS decides which process gets the processor when and for how much time. This function is called process scheduling. An Operating System does the following activities for processor management −
-
Keeps tracks of processor and status of process. The program responsible for this task is known as traffic controller.
-
Allocates the processor (CPU) to a process.
-
De-allocates processor when a process is no longer required.
Device Management
An Operating System manages device communication via their respective drivers. It does the following activities for device management −
-
Keeps tracks of all devices. Program responsible for this task is known as the I/O controller.
-
Decides which process gets the device when and for how much time.
-
Allocates the device in the efficient way.
-
De-allocates devices.
File Management
A file system is normally organized into directories for easy navigation and usage. These directories may contain files and other directions.
An Operating System does the following activities for file management −
-
Keeps track of information, location, uses, status etc. The collective facilities are often known as file system.
-
Decides who gets the resources.
-
Allocates the resources.
-
De-allocates the resources.
Other Important Activities
Following are some of the important activities that an Operating System performs −
-
Security − By means of password and similar other techniques, it prevents unauthorized access to programs and data.
-
Control over system performance − Recording delays between request for a service and response from the system.
-
Job accounting − Keeping track of time and resources used by various jobs and users.
-
Error detecting aids − Production of dumps, traces, error messages, and other debugging and error detecting aids.
-
Coordination between other softwares and users − Coordination and assignment of compilers, interpreters, assemblers and other software to the various users of the computer systems.
Types of Operating System
Operating systems are there from the very first computer generation and they keep evolving with time. In this chapter, we will discuss some of the important types of operating systems which are most commonly used.
Batch operating system
The users of a batch operating system do not interact with the computer directly. Each user prepares his job on an off-line device like punch cards and submits it to the computer operator. To speed up processing, jobs with similar needs are batched together and run as a group. The programmers leave their programs with the operator and the operator then sorts the programs with similar requirements into batches.
The problems with Batch Systems are as follows −
- Lack of interaction between the user and the job.
- CPU is often idle, because the speed of the mechanical I/O devices is slower than the CPU.
- Difficult to provide the desired priority.
Time-sharing operating systems
Time-sharing is a technique which enables many people, located at various terminals, to use a particular computer system at the same time. Time-sharing or multitasking is a logical extension of multiprogramming. Processor’s time which is shared among multiple users simultaneously is termed as time-sharing.
The main difference between Multiprogrammed Batch Systems and Time-Sharing Systems is that in case of Multiprogrammed batch systems, the objective is to maximize processor use, whereas in Time-Sharing Systems, the objective is to minimize response time.
Multiple jobs are executed by the CPU by switching between them, but the switches occur so frequently. Thus, the user can receive an immediate response. For example, in a transaction processing, the processor executes each user program in a short burst or quantum of computation. That is, if n users are present, then each user can get a time quantum. When the user submits the command, the response time is in few seconds at most.
The operating system uses CPU scheduling and multiprogramming to provide each user with a small portion of a time. Computer systems that were designed primarily as batch systems have been modified to time-sharing systems.
Advantages of Timesharing operating systems are as follows −
- Provides the advantage of quick response.
- Avoids duplication of software.
- Reduces CPU idle time.
Disadvantages of Time-sharing operating systems are as follows −
- Problem of reliability.
- Question of security and integrity of user programs and data.
- Problem of data communication.
Distributed operating System
Distributed systems use multiple central processors to serve multiple real-time applications and multiple users. Data processing jobs are distributed among the processors accordingly.
The processors communicate with one another through various communication lines (such as high-speed buses or telephone lines). These are referred as loosely coupled systemsor distributed systems. Processors in a distributed system may vary in size and function. These processors are referred as sites, nodes, computers, and so on.
The advantages of distributed systems are as follows −
- With resource sharing facility, a user at one site may be able to use the resources available at another.
- Speedup the exchange of data with one another via electronic mail.
- If one site fails in a distributed system, the remaining sites can potentially continue operating.
- Better service to the customers.
- Reduction of the load on the host computer.
- Reduction of delays in data processing.
Network operating System
A Network Operating System runs on a server and provides the server the capability to manage data, users, groups, security, applications, and other networking functions. The primary purpose of the network operating system is to allow shared file and printer access among multiple computers in a network, typically a local area network (LAN), a private network or to other networks.
Examples of network operating systems include Microsoft Windows Server 2003, Microsoft Windows Server 2008, UNIX, Linux, Mac OS X, Novell NetWare, and BSD.
The advantages of network operating systems are as follows −
- Centralized servers are highly stable.
- Security is server managed.
- Upgrades to new technologies and hardware can be easily integrated into the system.
- Remote access to servers is possible from different locations and types of systems.
The disadvantages of network operating systems are as follows −
- High cost of buying and running a server.
- Dependency on a central location for most operations.
- Regular maintenance and updates are required.
Real Time operating System
A real-time system is defined as a data processing system in which the time interval required to process and respond to inputs is so small that it controls the environment. The time taken by the system to respond to an input and display of required updated information is termed as the response time. So in this method, the response time is very less as compared to online processing.
Real-time systems are used when there are rigid time requirements on the operation of a processor or the flow of data and real-time systems can be used as a control device in a dedicated application. A real-time operating system must have well-defined, fixed time constraints, otherwise the system will fail. For example, Scientific experiments, medical imaging systems, industrial control systems, weapon systems, robots, air traffic control systems, etc.
There are two types of real-time operating systems.
Hard real-time systems
Hard real-time systems guarantee that critical tasks complete on time. In hard real-time systems, secondary storage is limited or missing and the data is stored in ROM. In these systems, virtual memory is almost never found.
Soft real-time systems
Soft real-time systems are less restrictive. A critical real-time task gets priority over other tasks and retains the priority until it completes. Soft real-time systems have limited utility than hard real-time systems. For example, multimedia, virtual reality, Advanced Scientific Projects like undersea exploration and planetary rovers, etc.
Operating System – Services
An Operating System provides services to both the users and to the programs.
- It provides programs an environment to execute.
- It provides users the services to execute the programs in a convenient manner.
Following are a few common services provided by an operating system −
- Program execution
- I/O operations
- File System manipulation
- Communication
- Error Detection
- Resource Allocation
- Protection
Program execution
Operating systems handle many kinds of activities from user programs to system programs like printer spooler, name servers, file server, etc. Each of these activities is encapsulated as a process.
A process includes the complete execution context (code to execute, data to manipulate, registers, OS resources in use). Following are the major activities of an operating system with respect to program management −
- Loads a program into memory.
- Executes the program.
- Handles program’s execution.
- Provides a mechanism for process synchronization.
- Provides a mechanism for process communication.
- Provides a mechanism for deadlock handling.
I/O Operation
An I/O subsystem comprises of I/O devices and their corresponding driver software. Drivers hide the peculiarities of specific hardware devices from the users.
An Operating System manages the communication between user and device drivers.
- I/O operation means read or write operation with any file or any specific I/O device.
- Operating system provides the access to the required I/O device when required.
File system manipulation
A file represents a collection of related information. Computers can store files on the disk (secondary storage), for long-term storage purpose. Examples of storage media include magnetic tape, magnetic disk and optical disk drives like CD, DVD. Each of these media has its own properties like speed, capacity, data transfer rate and data access methods.
A file system is normally organized into directories for easy navigation and usage. These directories may contain files and other directions. Following are the major activities of an operating system with respect to file management −
- Program needs to read a file or write a file.
- The operating system gives the permission to the program for operation on file.
- Permission varies from read-only, read-write, denied and so on.
- Operating System provides an interface to the user to create/delete files.
- Operating System provides an interface to the user to create/delete directories.
- Operating System provides an interface to create the backup of file system.
Communication
In case of distributed systems which are a collection of processors that do not share memory, peripheral devices, or a clock, the operating system manages communications between all the processes. Multiple processes communicate with one another through communication lines in the network.
The OS handles routing and connection strategies, and the problems of contention and security. Following are the major activities of an operating system with respect to communication −
- Two processes often require data to be transferred between them
- Both the processes can be on one computer or on different computers, but are connected through a computer network.
- Communication may be implemented by two methods, either by Shared Memory or by Message Passing.
Error handling
Errors can occur anytime and anywhere. An error may occur in CPU, in I/O devices or in the memory hardware. Following are the major activities of an operating system with respect to error handling −
- The OS constantly checks for possible errors.
- The OS takes an appropriate action to ensure correct and consistent computing.
Resource Management
In case of multi-user or multi-tasking environment, resources such as main memory, CPU cycles and files storage are to be allocated to each user or job. Following are the major activities of an operating system with respect to resource management −
- The OS manages all kinds of resources using schedulers.
- CPU scheduling algorithms are used for better utilization of CPU.
Protection
Considering a computer system having multiple users and concurrent execution of multiple processes, the various processes must be protected from each other’s activities.
Protection refers to a mechanism or a way to control the access of programs, processes, or users to the resources defined by a computer system. Following are the major activities of an operating system with respect to protection −
- The OS ensures that all access to system resources is controlled.
- The OS ensures that external I/O devices are protected from invalid access attempts.
- The OS provides authentication features for each user by means of passwords.
Operating System – Properties
Batch processing
Batch processing is a technique in which an Operating System collects the programs and data together in a batch before processing starts. An operating system does the following activities related to batch processing −
-
The OS defines a job which has predefined sequence of commands, programs and data as a single unit.
-
The OS keeps a number a jobs in memory and executes them without any manual information.
-
Jobs are processed in the order of submission, i.e., first come first served fashion.
-
When a job completes its execution, its memory is released and the output for the job gets copied into an output spool for later printing or processing.
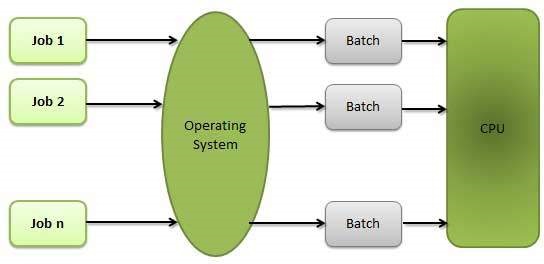
Advantages
-
Batch processing takes much of the work of the operator to the computer.
-
Increased performance as a new job get started as soon as the previous job is finished, without any manual intervention.
Disadvantages
- Difficult to debug program.
- A job could enter an infinite loop.
- Due to lack of protection scheme, one batch job can affect pending jobs.
Multitasking
Multitasking is when multiple jobs are executed by the CPU simultaneously by switching between them. Switches occur so frequently that the users may interact with each program while it is running. An OS does the following activities related to multitasking −
-
The user gives instructions to the operating system or to a program directly, and receives an immediate response.
-
The OS handles multitasking in the way that it can handle multiple operations/executes multiple programs at a time.
-
Multitasking Operating Systems are also known as Time-sharing systems.
-
These Operating Systems were developed to provide interactive use of a computer system at a reasonable cost.
-
A time-shared operating system uses the concept of CPU scheduling and multiprogramming to provide each user with a small portion of a time-shared CPU.
-
Each user has at least one separate program in memory.
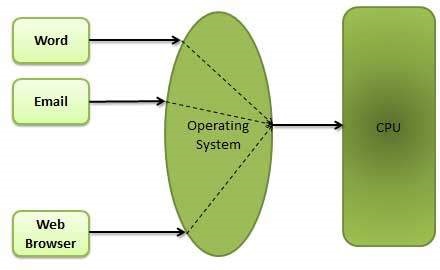
-
A program that is loaded into memory and is executing is commonly referred to as a process.
-
When a process executes, it typically executes for only a very short time before it either finishes or needs to perform I/O.
-
Since interactive I/O typically runs at slower speeds, it may take a long time to complete. During this time, a CPU can be utilized by another process.
-
The operating system allows the users to share the computer simultaneously. Since each action or command in a time-shared system tends to be short, only a little CPU time is needed for each user.
-
As the system switches CPU rapidly from one user/program to the next, each user is given the impression that he/she has his/her own CPU, whereas actually one CPU is being shared among many users.
Multiprogramming
Sharing the processor, when two or more programs reside in memory at the same time, is referred as multiprogramming. Multiprogramming assumes a single shared processor. Multiprogramming increases CPU utilization by organizing jobs so that the CPU always has one to execute.
The following figure shows the memory layout for a multiprogramming system.
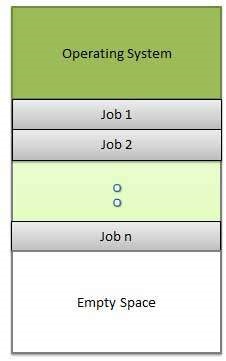
An OS does the following activities related to multiprogramming.
-
The operating system keeps several jobs in memory at a time.
-
This set of jobs is a subset of the jobs kept in the job pool.
-
The operating system picks and begins to execute one of the jobs in the memory.
-
Multiprogramming operating systems monitor the state of all active programs and system resources using memory management programs to ensures that the CPU is never idle, unless there are no jobs to process.
Advantages
- High and efficient CPU utilization.
- User feels that many programs are allotted CPU almost simultaneously.
Disadvantages
- CPU scheduling is required.
- To accommodate many jobs in memory, memory management is required.
Interactivity
Interactivity refers to the ability of users to interact with a computer system. An Operating system does the following activities related to interactivity −
- Provides the user an interface to interact with the system.
- Manages input devices to take inputs from the user. For example, keyboard.
- Manages output devices to show outputs to the user. For example, Monitor.
The response time of the OS needs to be short, since the user submits and waits for the result.
Real Time System
Real-time systems are usually dedicated, embedded systems. An operating system does the following activities related to real-time system activity.
- In such systems, Operating Systems typically read from and react to sensor data.
- The Operating system must guarantee response to events within fixed periods of time to ensure correct performance.
Distributed Environment
A distributed environment refers to multiple independent CPUs or processors in a computer system. An operating system does the following activities related to distributed environment −
-
The OS distributes computation logics among several physical processors.
-
The processors do not share memory or a clock. Instead, each processor has its own local memory.
-
The OS manages the communications between the processors. They communicate with each other through various communication lines.
Spooling
Spooling is an acronym for simultaneous peripheral operations on line. Spooling refers to putting data of various I/O jobs in a buffer. This buffer is a special area in memory or hard disk which is accessible to I/O devices.
An operating system does the following activities related to distributed environment −
-
Handles I/O device data spooling as devices have different data access rates.
-
Maintains the spooling buffer which provides a waiting station where data can rest while the slower device catches up.
-
Maintains parallel computation because of spooling process as a computer can perform I/O in parallel fashion. It becomes possible to have the computer read data from a tape, write data to disk and to write out to a tape printer while it is doing its computing task.
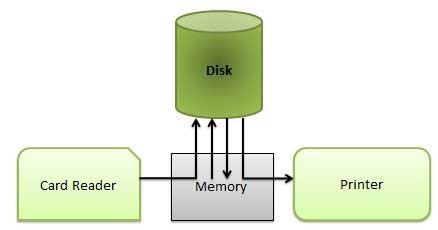
Advantages
- The spooling operation uses a disk as a very large buffer.
- Spooling is capable of overlapping I/O operation for one job with processor operations for another job.
Operating System – Processes
Process
A process is basically a program in execution. The execution of a process must progress in a sequential fashion.
A process is defined as an entity which represents the basic unit of work to be implemented in the system.
To put it in simple terms, we write our computer programs in a text file and when we execute this program, it becomes a process which performs all the tasks mentioned in the program.
When a program is loaded into the memory and it becomes a process, it can be divided into four sections ─ stack, heap, text and data. The following image shows a simplified layout of a process inside main memory −
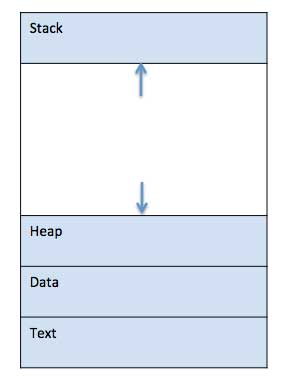
| S.N. | Component & Description |
|---|---|
| 1 |
Stack The process Stack contains the temporary data such as method/function parameters, return address and local variables. |
| 2 |
Heap This is dynamically allocated memory to a process during its run time. |
| 3 |
Text This includes the current activity represented by the value of Program Counter and the contents of the processor’s registers. |
| 4 |
Data This section contains the global and static variables. |
Program
A program is a piece of code which may be a single line or millions of lines. A computer program is usually written by a computer programmer in a programming language. For example, here is a simple program written in C programming language −
#include <stdio.h> int main() { printf("Hello, World! \n"); return 0; }
A computer program is a collection of instructions that performs a specific task when executed by a computer. When we compare a program with a process, we can conclude that a process is a dynamic instance of a computer program.
A part of a computer program that performs a well-defined task is known as an algorithm. A collection of computer programs, libraries and related data are referred to as a software.
Process Life Cycle
When a process executes, it passes through different states. These stages may differ in different operating systems, and the names of these states are also not standardized.
In general, a process can have one of the following five states at a time.
| S.N. | State & Description |
|---|---|
| 1 |
Start This is the initial state when a process is first started/created. |
| 2 |
Ready The process is waiting to be assigned to a processor. Ready processes are waiting to have the processor allocated to them by the operating system so that they can run. Process may come into this state after Start state or while running it by but interrupted by the scheduler to assign CPU to some other process. |
| 3 |
Running Once the process has been assigned to a processor by the OS scheduler, the process state is set to running and the processor executes its instructions. |
| 4 |
Waiting Process moves into the waiting state if it needs to wait for a resource, such as waiting for user input, or waiting for a file to become available. |
| 5 |
Terminated or Exit Once the process finishes its execution, or it is terminated by the operating system, it is moved to the terminated state where it waits to be removed from main memory. |
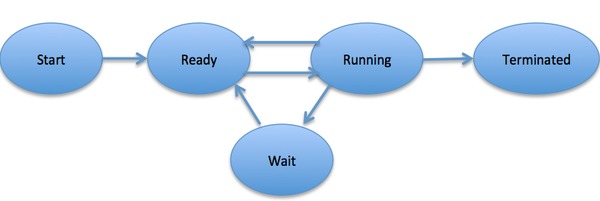
Process Control Block (PCB)
A Process Control Block is a data structure maintained by the Operating System for every process. The PCB is identified by an integer process ID (PID). A PCB keeps all the information needed to keep track of a process as listed below in the table −
| S.N. | Information & Description |
|---|---|
| 1 |
Process State The current state of the process i.e., whether it is ready, running, waiting, or whatever. |
| 2 |
Process privileges This is required to allow/disallow access to system resources. |
| 3 |
Process ID Unique identification for each of the process in the operating system. |
| 4 |
Pointer A pointer to parent process. |
| 5 |
Program Counter Program Counter is a pointer to the address of the next instruction to be executed for this process. |
| 6 |
CPU registers Various CPU registers where process need to be stored for execution for running state. |
| 7 |
CPU Scheduling Information Process priority and other scheduling information which is required to schedule the process. |
| 8 |
Memory management information This includes the information of page table, memory limits, Segment table depending on memory used by the operating system. |
| 9 |
Accounting information This includes the amount of CPU used for process execution, time limits, execution ID etc. |
| 10 |
IO status information This includes a list of I/O devices allocated to the process. |
The architecture of a PCB is completely dependent on Operating System and may contain different information in different operating systems. Here is a simplified diagram of a PCB −
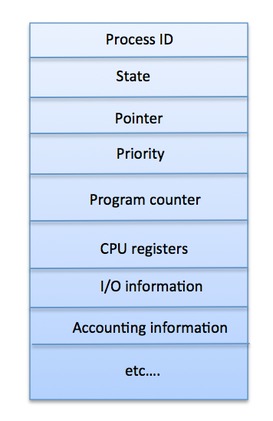
The PCB is maintained for a process throughout its lifetime, and is deleted once the process terminates.
Operating System – Process Scheduling
Definition
The process scheduling is the activity of the process manager that handles the removal of the running process from the CPU and the selection of another process on the basis of a particular strategy.
Process scheduling is an essential part of a Multiprogramming operating systems. Such operating systems allow more than one process to be loaded into the executable memory at a time and the loaded process shares the CPU using time multiplexing.
Process Scheduling Queues
The OS maintains all PCBs in Process Scheduling Queues. The OS maintains a separate queue for each of the process states and PCBs of all processes in the same execution state are placed in the same queue. When the state of a process is changed, its PCB is unlinked from its current queue and moved to its new state queue.
The Operating System maintains the following important process scheduling queues −
-
Job queue − This queue keeps all the processes in the system.
-
Ready queue − This queue keeps a set of all processes residing in main memory, ready and waiting to execute. A new process is always put in this queue.
-
Device queues − The processes which are blocked due to unavailability of an I/O device constitute this queue.
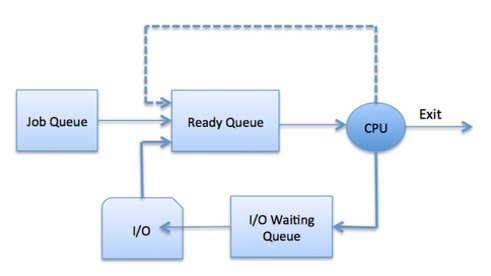
The OS can use different policies to manage each queue (FIFO, Round Robin, Priority, etc.). The OS scheduler determines how to move processes between the ready and run queues which can only have one entry per processor core on the system; in the above diagram, it has been merged with the CPU.
Two-State Process Model
Two-state process model refers to running and non-running states which are described below −
| S.N. | State & Description |
|---|---|
| 1 |
Running When a new process is created, it enters into the system as in the running state. |
| 2 |
Not Running Processes that are not running are kept in queue, waiting for their turn to execute. Each entry in the queue is a pointer to a particular process. Queue is implemented by using linked list. Use of dispatcher is as follows. When a process is interrupted, that process is transferred in the waiting queue. If the process has completed or aborted, the process is discarded. In either case, the dispatcher then selects a process from the queue to execute. |
Schedulers
Schedulers are special system software which handle process scheduling in various ways. Their main task is to select the jobs to be submitted into the system and to decide which process to run. Schedulers are of three types −
- Long-Term Scheduler
- Short-Term Scheduler
- Medium-Term Scheduler
Long Term Scheduler
It is also called a job scheduler. A long-term scheduler determines which programs are admitted to the system for processing. It selects processes from the queue and loads them into memory for execution. Process loads into the memory for CPU scheduling.
The primary objective of the job scheduler is to provide a balanced mix of jobs, such as I/O bound and processor bound. It also controls the degree of multiprogramming. If the degree of multiprogramming is stable, then the average rate of process creation must be equal to the average departure rate of processes leaving the system.
On some systems, the long-term scheduler may not be available or minimal. Time-sharing operating systems have no long term scheduler. When a process changes the state from new to ready, then there is use of long-term scheduler.
Short Term Scheduler
It is also called as CPU scheduler. Its main objective is to increase system performance in accordance with the chosen set of criteria. It is the change of ready state to running state of the process. CPU scheduler selects a process among the processes that are ready to execute and allocates CPU to one of them.
Short-term schedulers, also known as dispatchers, make the decision of which process to execute next. Short-term schedulers are faster than long-term schedulers.
Medium Term Scheduler
Medium-term scheduling is a part of swapping. It removes the processes from the memory. It reduces the degree of multiprogramming. The medium-term scheduler is in-charge of handling the swapped out-processes.
A running process may become suspended if it makes an I/O request. A suspended processes cannot make any progress towards completion. In this condition, to remove the process from memory and make space for other processes, the suspended process is moved to the secondary storage. This process is called swapping, and the process is said to be swapped out or rolled out. Swapping may be necessary to improve the process mix.
Comparison among Scheduler
| S.N. | Long-Term Scheduler | Short-Term Scheduler | Medium-Term Scheduler |
|---|---|---|---|
| 1 | It is a job scheduler | It is a CPU scheduler | It is a process swapping scheduler. |
| 2 | Speed is lesser than short term scheduler | Speed is fastest among other two | Speed is in between both short and long term scheduler. |
| 3 | It controls the degree of multiprogramming | It provides lesser control over degree of multiprogramming | It reduces the degree of multiprogramming. |
| 4 | It is almost absent or minimal in time sharing system | It is also minimal in time sharing system | It is a part of Time sharing systems. |
| 5 | It selects processes from pool and loads them into memory for execution | It selects those processes which are ready to execute | It can re-introduce the process into memory and execution can be continued. |
Context Switch
A context switch is the mechanism to store and restore the state or context of a CPU in Process Control block so that a process execution can be resumed from the same point at a later time. Using this technique, a context switcher enables multiple processes to share a single CPU. Context switching is an essential part of a multitasking operating system features.
When the scheduler switches the CPU from executing one process to execute another, the state from the current running process is stored into the process control block. After this, the state for the process to run next is loaded from its own PCB and used to set the PC, registers, etc. At that point, the second process can start executing.
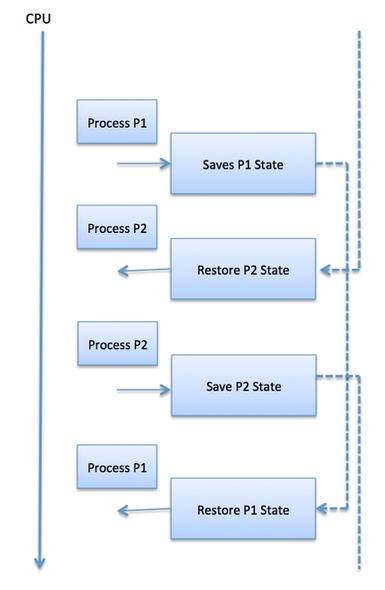
Context switches are computationally intensive since register and memory state must be saved and restored. To avoid the amount of context switching time, some hardware systems employ two or more sets of processor registers. When the process is switched, the following information is stored for later use.
- Program Counter
- Scheduling information
- Base and limit register value
- Currently used register
- Changed State
- I/O State information
- Accounting information
Operating System Scheduling algorithms
A Process Scheduler schedules different processes to be assigned to the CPU based on particular scheduling algorithms. There are six popular process scheduling algorithms which we are going to discuss in this chapter −
- First-Come, First-Served (FCFS) Scheduling
- Shortest-Job-Next (SJN) Scheduling
- Priority Scheduling
- Shortest Remaining Time
- Round Robin(RR) Scheduling
- Multiple-Level Queues Scheduling
These algorithms are either non-preemptive or preemptive. Non-preemptive algorithms are designed so that once a process enters the running state, it cannot be preempted until it completes its allotted time, whereas the preemptive scheduling is based on priority where a scheduler may preempt a low priority running process anytime when a high priority process enters into a ready state.
First Come First Serve (FCFS)
- Jobs are executed on first come, first serve basis.
- It is a non-preemptive, pre-emptive scheduling algorithm.
- Easy to understand and implement.
- Its implementation is based on FIFO queue.
- Poor in performance as average wait time is high.
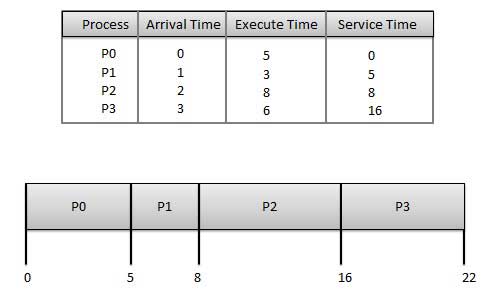
Wait time of each process is as follows −
| Process | Wait Time : Service Time – Arrival Time |
|---|---|
| P0 | 0 – 0 = 0 |
| P1 | 5 – 1 = 4 |
| P2 | 8 – 2 = 6 |
| P3 | 16 – 3 = 13 |
Average Wait Time: (0+4+6+13) / 4 = 5.75
Shortest Job Next (SJN)
-
This is also known as shortest job first, or SJF
-
This is a non-preemptive, pre-emptive scheduling algorithm.
-
Best approach to minimize waiting time.
-
Easy to implement in Batch systems where required CPU time is known in advance.
-
Impossible to implement in interactive systems where required CPU time is not known.
-
The processer should know in advance how much time process will take.
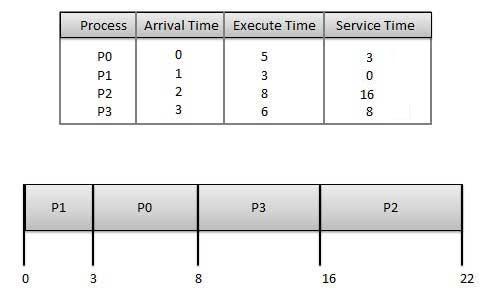
Wait time of each process is as follows −
| Process | Wait Time : Service Time – Arrival Time |
|---|---|
| P0 | 3 – 0 = 3 |
| P1 | 0 – 0 = 0 |
| P2 | 16 – 2 = 14 |
| P3 | 8 – 3 = 5 |
Average Wait Time: (3+0+14+5) / 4 = 5.50
Priority Based Scheduling
-
Priority scheduling is a non-preemptive algorithm and one of the most common scheduling algorithms in batch systems.
-
Each process is assigned a priority. Process with highest priority is to be executed first and so on.
-
Processes with same priority are executed on first come first served basis.
-
Priority can be decided based on memory requirements, time requirements or any other resource requirement.
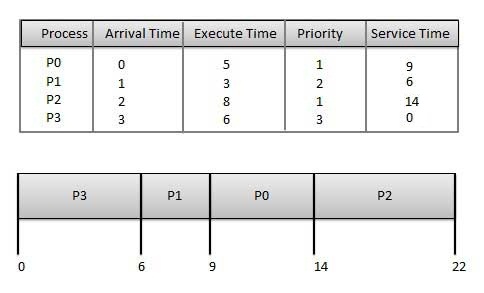
Wait time of each process is as follows −
| Process | Wait Time : Service Time – Arrival Time |
|---|---|
| P0 | 9 – 0 = 9 |
| P1 | 6 – 1 = 5 |
| P2 | 14 – 2 = 12 |
| P3 | 0 – 0 = 0 |
Average Wait Time: (9+5+12+0) / 4 = 6.5
Shortest Remaining Time
-
Shortest remaining time (SRT) is the preemptive version of the SJN algorithm.
-
The processor is allocated to the job closest to completion but it can be preempted by a newer ready job with shorter time to completion.
-
Impossible to implement in interactive systems where required CPU time is not known.
-
It is often used in batch environments where short jobs need to give preference.
Round Robin Scheduling
-
Round Robin is the preemptive process scheduling algorithm.
-
Each process is provided a fix time to execute, it is called a quantum.
-
Once a process is executed for a given time period, it is preempted and other process executes for a given time period.
-
Context switching is used to save states of preempted processes.
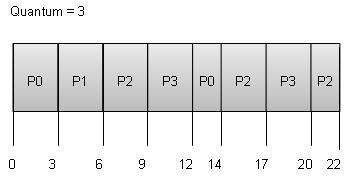
Wait time of each process is as follows −
| Process | Wait Time : Service Time – Arrival Time |
|---|---|
| P0 | (0 – 0) + (12 – 3) = 9 |
| P1 | (3 – 1) = 2 |
| P2 | (6 – 2) + (14 – 9) + (20 – 17) = 12 |
| P3 | (9 – 3) + (17 – 12) = 11 |
Average Wait Time: (9+2+12+11) / 4 = 8.5
Multiple-Level Queues Scheduling
Multiple-level queues are not an independent scheduling algorithm. They make use of other existing algorithms to group and schedule jobs with common characteristics.
- Multiple queues are maintained for processes with common characteristics.
- Each queue can have its own scheduling algorithms.
- Priorities are assigned to each queue.
For example, CPU-bound jobs can be scheduled in one queue and all I/O-bound jobs in another queue. The Process Scheduler then alternately selects jobs from each queue and assigns them to the CPU based on the algorithm assigned to the queue.
Operating System – Multi-Threading
What is Thread?
A thread is a flow of execution through the process code, with its own program counter that keeps track of which instruction to execute next, system registers which hold its current working variables, and a stack which contains the execution history.
A thread shares with its peer threads few information like code segment, data segment and open files. When one thread alters a code segment memory item, all other threads see that.
A thread is also called a lightweight process. Threads provide a way to improve application performance through parallelism. Threads represent a software approach to improving performance of operating system by reducing the overhead thread is equivalent to a classical process.
Each thread belongs to exactly one process and no thread can exist outside a process. Each thread represents a separate flow of control. Threads have been successfully used in implementing network servers and web server. They also provide a suitable foundation for parallel execution of applications on shared memory multiprocessors. The following figure shows the working of a single-threaded and a multithreaded process.
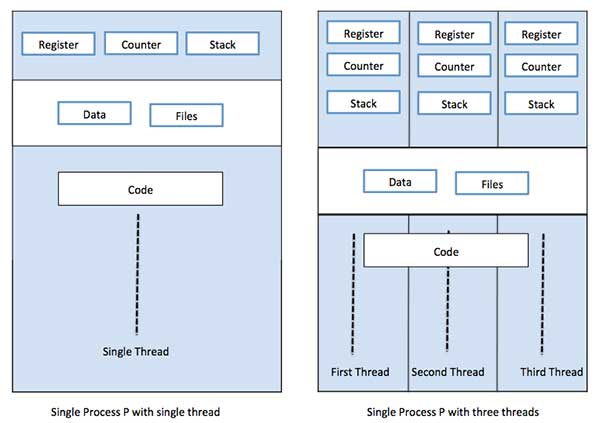
Difference between Process and Thread
| S.N. | Process | Thread |
|---|---|---|
| 1 | Process is heavy weight or resource intensive. | Thread is light weight, taking lesser resources than a process. |
| 2 | Process switching needs interaction with operating system. | Thread switching does not need to interact with operating system. |
| 3 | In multiple processing environments, each process executes the same code but has its own memory and file resources. | All threads can share same set of open files, child processes. |
| 4 | If one process is blocked, then no other process can execute until the first process is unblocked. | While one thread is blocked and waiting, a second thread in the same task can run. |
| 5 | Multiple processes without using threads use more resources. | Multiple threaded processes use fewer resources. |
| 6 | In multiple processes each process operates independently of the others. | One thread can read, write or change another thread’s data. |
Advantages of Thread
- Threads minimize the context switching time.
- Use of threads provides concurrency within a process.
- Efficient communication.
- It is more economical to create and context switch threads.
- Threads allow utilization of multiprocessor architectures to a greater scale and efficiency.
Types of Thread
Threads are implemented in following two ways −
-
User Level Threads − User managed threads.
-
Kernel Level Threads − Operating System managed threads acting on kernel, an operating system core.
User Level Threads
In this case, the thread management kernel is not aware of the existence of threads. The thread library contains code for creating and destroying threads, for passing message and data between threads, for scheduling thread execution and for saving and restoring thread contexts. The application starts with a single thread.
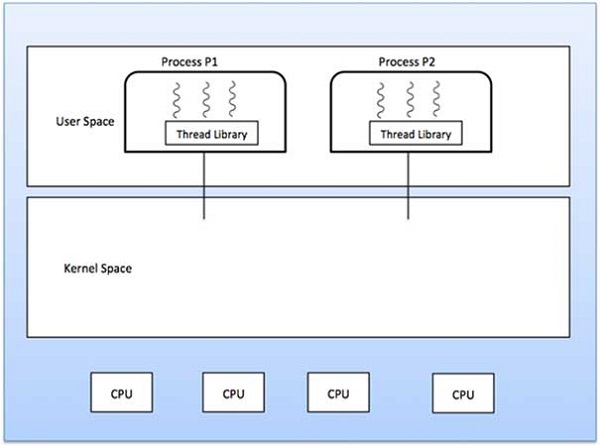
Advantages
- Thread switching does not require Kernel mode privileges.
- User level thread can run on any operating system.
- Scheduling can be application specific in the user level thread.
- User level threads are fast to create and manage.
Disadvantages
- In a typical operating system, most system calls are blocking.
- Multithreaded application cannot take advantage of multiprocessing.
Kernel Level Threads
In this case, thread management is done by the Kernel. There is no thread management code in the application area. Kernel threads are supported directly by the operating system. Any application can be programmed to be multithreaded. All of the threads within an application are supported within a single process.
The Kernel maintains context information for the process as a whole and for individuals threads within the process. Scheduling by the Kernel is done on a thread basis. The Kernel performs thread creation, scheduling and management in Kernel space. Kernel threads are generally slower to create and manage than the user threads.
Advantages
- Kernel can simultaneously schedule multiple threads from the same process on multiple processes.
- If one thread in a process is blocked, the Kernel can schedule another thread of the same process.
- Kernel routines themselves can be multithreaded.
Disadvantages
- Kernel threads are generally slower to create and manage than the user threads.
- Transfer of control from one thread to another within the same process requires a mode switch to the Kernel.
Multithreading Models
Some operating system provide a combined user level thread and Kernel level thread facility. Solaris is a good example of this combined approach. In a combined system, multiple threads within the same application can run in parallel on multiple processors and a blocking system call need not block the entire process. Multithreading models are three types
- Many to many relationship.
- Many to one relationship.
- One to one relationship.
Many to Many Model
The many-to-many model multiplexes any number of user threads onto an equal or smaller number of kernel threads.
The following diagram shows the many-to-many threading model where 6 user level threads are multiplexing with 6 kernel level threads. In this model, developers can create as many user threads as necessary and the corresponding Kernel threads can run in parallel on a multiprocessor machine. This model provides the best accuracy on concurrency and when a thread performs a blocking system call, the kernel can schedule another thread for execution.
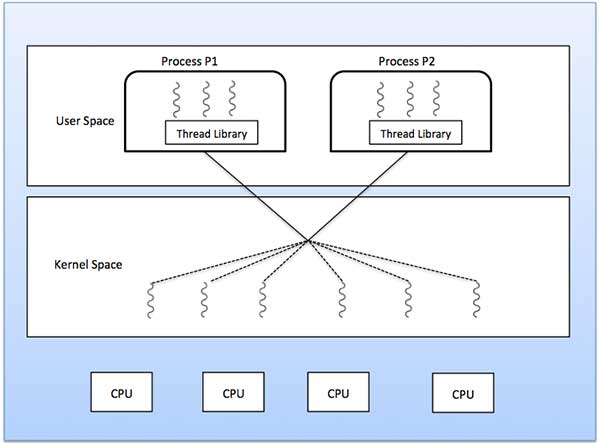
Many to One Model
Many-to-one model maps many user level threads to one Kernel-level thread. Thread management is done in user space by the thread library. When thread makes a blocking system call, the entire process will be blocked. Only one thread can access the Kernel at a time, so multiple threads are unable to run in parallel on multiprocessors.
If the user-level thread libraries are implemented in the operating system in such a way that the system does not support them, then the Kernel threads use the many-to-one relationship modes.
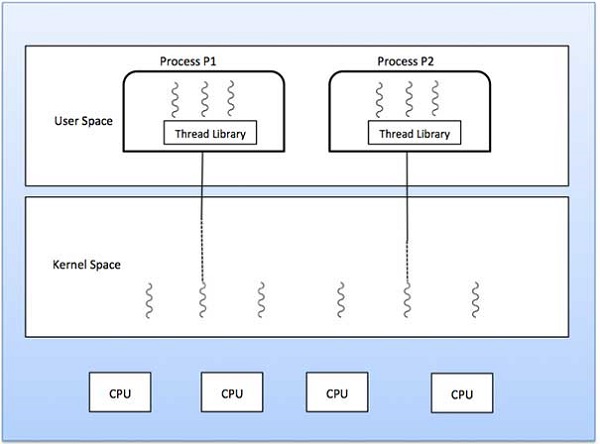
One to One Model
There is one-to-one relationship of user-level thread to the kernel-level thread. This model provides more concurrency than the many-to-one model. It also allows another thread to run when a thread makes a blocking system call. It supports multiple threads to execute in parallel on microprocessors.
Disadvantage of this model is that creating user thread requires the corresponding Kernel thread. OS/2, windows NT and windows 2000 use one to one relationship model.
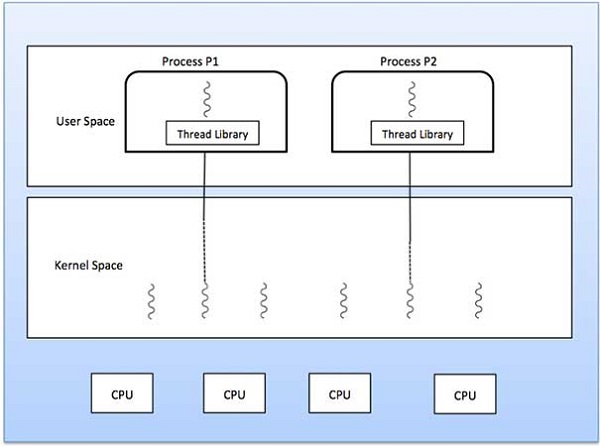
Difference between User-Level & Kernel-Level Thread
| S.N. | User-Level Threads | Kernel-Level Thread |
|---|---|---|
| 1 | User-level threads are faster to create and manage. | Kernel-level threads are slower to create and manage. |
| 2 | Implementation is by a thread library at the user level. | Operating system supports creation of Kernel threads. |
| 3 | User-level thread is generic and can run on any operating system. | Kernel-level thread is specific to the operating system. |
| 4 | Multi-threaded applications cannot take advantage of multiprocessing. | Kernel routines themselves can be multithreaded. |
Operating System – Memory Management
Memory management is the functionality of an operating system which handles or manages primary memory and moves processes back and forth between main memory and disk during execution. Memory management keeps track of each and every memory location, regardless of either it is allocated to some process or it is free. It checks how much memory is to be allocated to processes. It decides which process will get memory at what time. It tracks whenever some memory gets freed or unallocated and correspondingly it updates the status.
This tutorial will teach you basic concepts related to Memory Management.
Process Address Space
The process address space is the set of logical addresses that a process references in its code. For example, when 32-bit addressing is in use, addresses can range from 0 to 0x7fffffff; that is, 2^31 possible numbers, for a total theoretical size of 2 gigabytes.
The operating system takes care of mapping the logical addresses to physical addresses at the time of memory allocation to the program. There are three types of addresses used in a program before and after memory is allocated −
| S.N. | Memory Addresses & Description |
|---|---|
| 1 |
Symbolic addresses The addresses used in a source code. The variable names, constants, and instruction labels are the basic elements of the symbolic address space. |
| 2 |
Relative addresses At the time of compilation, a compiler converts symbolic addresses into relative addresses. |
| 3 |
Physical addresses The loader generates these addresses at the time when a program is loaded into main memory. |
Virtual and physical addresses are the same in compile-time and load-time address-binding schemes. Virtual and physical addresses differ in execution-time address-binding scheme.
The set of all logical addresses generated by a program is referred to as a logical address space. The set of all physical addresses corresponding to these logical addresses is referred to as a physical address space.
The runtime mapping from virtual to physical address is done by the memory management unit (MMU) which is a hardware device. MMU uses following mechanism to convert virtual address to physical address.
-
The value in the base register is added to every address generated by a user process, which is treated as offset at the time it is sent to memory. For example, if the base register value is 10000, then an attempt by the user to use address location 100 will be dynamically reallocated to location 10100.
-
The user program deals with virtual addresses; it never sees the real physical addresses.
Static vs Dynamic Loading
The choice between Static or Dynamic Loading is to be made at the time of computer program being developed. If you have to load your program statically, then at the time of compilation, the complete programs will be compiled and linked without leaving any external program or module dependency. The linker combines the object program with other necessary object modules into an absolute program, which also includes logical addresses.
If you are writing a Dynamically loaded program, then your compiler will compile the program and for all the modules which you want to include dynamically, only references will be provided and rest of the work will be done at the time of execution.
At the time of loading, with static loading, the absolute program (and data) is loaded into memory in order for execution to start.
If you are using dynamic loading, dynamic routines of the library are stored on a disk in relocatable form and are loaded into memory only when they are needed by the program.
Static vs Dynamic Linking
As explained above, when static linking is used, the linker combines all other modules needed by a program into a single executable program to avoid any runtime dependency.
When dynamic linking is used, it is not required to link the actual module or library with the program, rather a reference to the dynamic module is provided at the time of compilation and linking. Dynamic Link Libraries (DLL) in Windows and Shared Objects in Unix are good examples of dynamic libraries.
Swapping
Swapping is a mechanism in which a process can be swapped temporarily out of main memory (or move) to secondary storage (disk) and make that memory available to other processes. At some later time, the system swaps back the process from the secondary storage to main memory.
Though performance is usually affected by swapping process but it helps in running multiple and big processes in parallel and that’s the reason Swapping is also known as a technique for memory compaction.
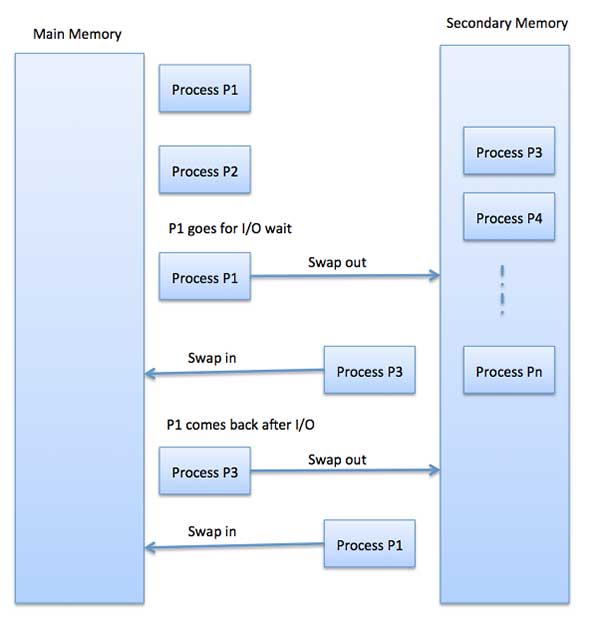
The total time taken by swapping process includes the time it takes to move the entire process to a secondary disk and then to copy the process back to memory, as well as the time the process takes to regain main memory.
Let us assume that the user process is of size 2048KB and on a standard hard disk where swapping will take place has a data transfer rate around 1 MB per second. The actual transfer of the 1000K process to or from memory will take
2048KB / 1024KB per second = 2 seconds = 2000 milliseconds
Now considering in and out time, it will take complete 4000 milliseconds plus other overhead where the process competes to regain main memory.
Memory Allocation
Main memory usually has two partitions −
-
Low Memory − Operating system resides in this memory.
-
High Memory − User processes are held in high memory.
Operating system uses the following memory allocation mechanism.
| S.N. | Memory Allocation & Description |
|---|---|
| 1 |
Single-partition allocation In this type of allocation, relocation-register scheme is used to protect user processes from each other, and from changing operating-system code and data. Relocation register contains value of smallest physical address whereas limit register contains range of logical addresses. Each logical address must be less than the limit register. |
| 2 |
Multiple-partition allocation In this type of allocation, main memory is divided into a number of fixed-sized partitions where each partition should contain only one process. When a partition is free, a process is selected from the input queue and is loaded into the free partition. When the process terminates, the partition becomes available for another process. |
Fragmentation
As processes are loaded and removed from memory, the free memory space is broken into little pieces. It happens after sometimes that processes cannot be allocated to memory blocks considering their small size and memory blocks remains unused. This problem is known as Fragmentation.
Fragmentation is of two types −
| S.N. | Fragmentation & Description |
|---|---|
| 1 |
External fragmentation Total memory space is enough to satisfy a request or to reside a process in it, but it is not contiguous, so it cannot be used. |
| 2 |
Internal fragmentation Memory block assigned to process is bigger. Some portion of memory is left unused, as it cannot be used by another process. |
The following diagram shows how fragmentation can cause waste of memory and a compaction technique can be used to create more free memory out of fragmented memory −
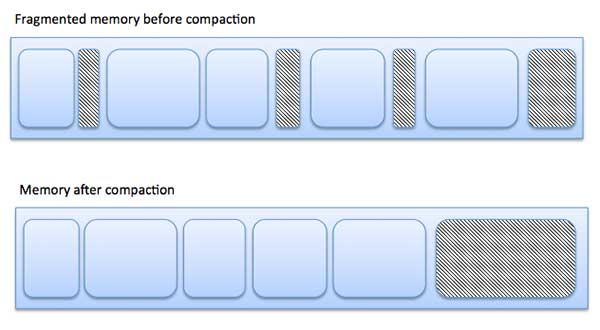
External fragmentation can be reduced by compaction or shuffle memory contents to place all free memory together in one large block. To make compaction feasible, relocation should be dynamic.
The internal fragmentation can be reduced by effectively assigning the smallest partition but large enough for the process.
Paging
A computer can address more memory than the amount physically installed on the system. This extra memory is actually called virtual memory and it is a section of a hard that’s set up to emulate the computer’s RAM. Paging technique plays an important role in implementing virtual memory.
Paging is a memory management technique in which process address space is broken into blocks of the same size called pages (size is power of 2, between 512 bytes and 8192 bytes). The size of the process is measured in the number of pages.
Similarly, main memory is divided into small fixed-sized blocks of (physical) memory called frames and the size of a frame is kept the same as that of a page to have optimum utilization of the main memory and to avoid external fragmentation.
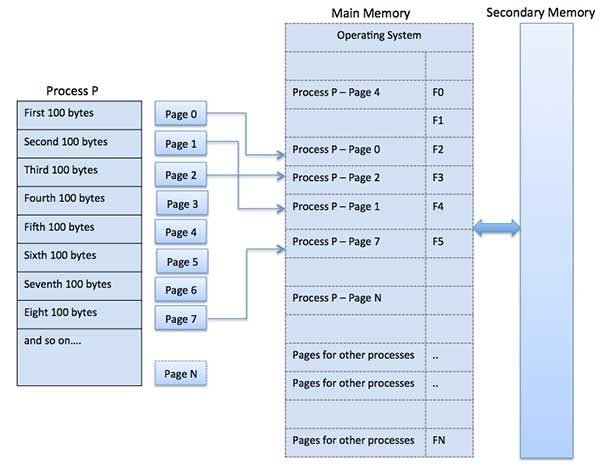
Address Translation
Page address is called logical address and represented by page number and the offset.
Logical Address = Page number + page offset
Frame address is called physical address and represented by a frame number and the offset.
Physical Address = Frame number + page offset
A data structure called page map table is used to keep track of the relation between a page of a process to a frame in physical memory.
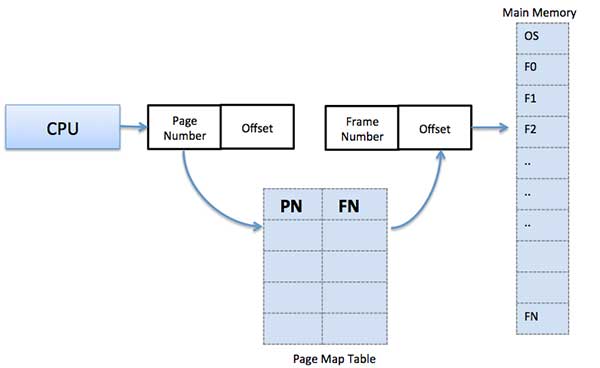
When the system allocates a frame to any page, it translates this logical address into a physical address and create entry into the page table to be used throughout execution of the program.
When a process is to be executed, its corresponding pages are loaded into any available memory frames. Suppose you have a program of 8Kb but your memory can accommodate only 5Kb at a given point in time, then the paging concept will come into picture. When a computer runs out of RAM, the operating system (OS) will move idle or unwanted pages of memory to secondary memory to free up RAM for other processes and brings them back when needed by the program.
This process continues during the whole execution of the program where the OS keeps removing idle pages from the main memory and write them onto the secondary memory and bring them back when required by the program.
Advantages and Disadvantages of Paging
Here is a list of advantages and disadvantages of paging −
-
Paging reduces external fragmentation, but still suffer from internal fragmentation.
-
Paging is simple to implement and assumed as an efficient memory management technique.
-
Due to equal size of the pages and frames, swapping becomes very easy.
-
Page table requires extra memory space, so may not be good for a system having small RAM.
Segmentation
Segmentation is a memory management technique in which each job is divided into several segments of different sizes, one for each module that contains pieces that perform related functions. Each segment is actually a different logical address space of the program.
When a process is to be executed, its corresponding segmentation are loaded into non-contiguous memory though every segment is loaded into a contiguous block of available memory.
Segmentation memory management works very similar to paging but here segments are of variable-length where as in paging pages are of fixed size.
A program segment contains the program’s main function, utility functions, data structures, and so on. The operating system maintains a segment map table for every process and a list of free memory blocks along with segment numbers, their size and corresponding memory locations in main memory. For each segment, the table stores the starting address of the segment and the length of the segment. A reference to a memory location includes a value that identifies a segment and an offset.
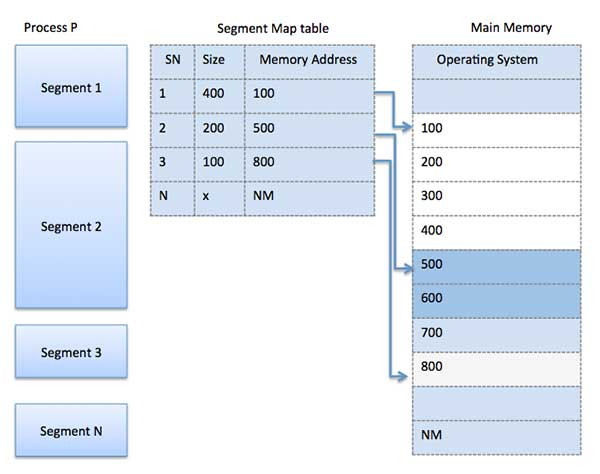
Operating System – Virtual Memory
A computer can address more memory than the amount physically installed on the system. This extra memory is actually called virtual memory and it is a section of a hard disk that’s set up to emulate the computer’s RAM.
The main visible advantage of this scheme is that programs can be larger than physical memory. Virtual memory serves two purposes. First, it allows us to extend the use of physical memory by using disk. Second, it allows us to have memory protection, because each virtual address is translated to a physical address.
Following are the situations, when entire program is not required to be loaded fully in main memory.
-
User written error handling routines are used only when an error occurred in the data or computation.
-
Certain options and features of a program may be used rarely.
-
Many tables are assigned a fixed amount of address space even though only a small amount of the table is actually used.
-
The ability to execute a program that is only partially in memory would counter many benefits.
-
Less number of I/O would be needed to load or swap each user program into memory.
-
A program would no longer be constrained by the amount of physical memory that is available.
-
Each user program could take less physical memory, more programs could be run the same time, with a corresponding increase in CPU utilization and throughput.
Modern microprocessors intended for general-purpose use, a memory management unit, or MMU, is built into the hardware. The MMU’s job is to translate virtual addresses into physical addresses. A basic example is given below −
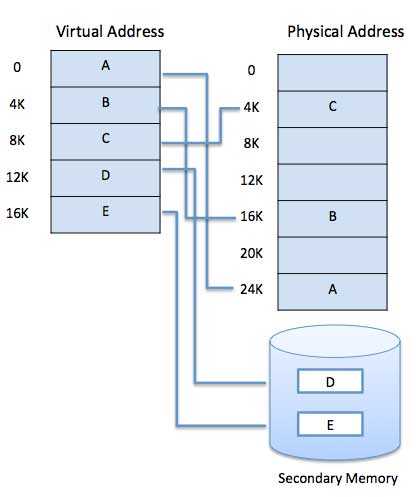
Virtual memory is commonly implemented by demand paging. It can also be implemented in a segmentation system. Demand segmentation can also be used to provide virtual memory.
Demand Paging
A demand paging system is quite similar to a paging system with swapping where processes reside in secondary memory and pages are loaded only on demand, not in advance. When a context switch occurs, the operating system does not copy any of the old program’s pages out to the disk or any of the new program’s pages into the main memory Instead, it just begins executing the new program after loading the first page and fetches that program’s pages as they are referenced.
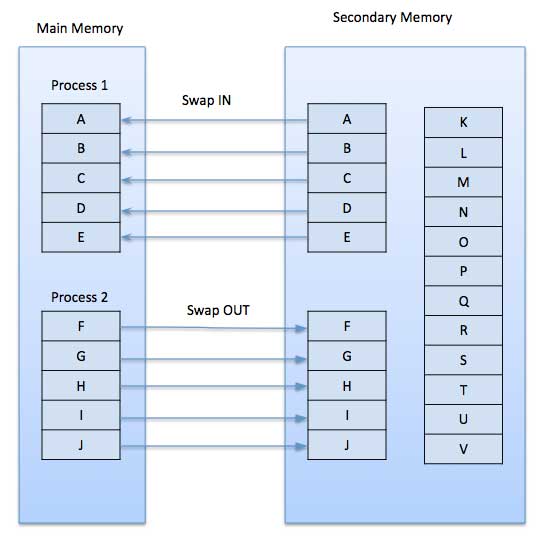
While executing a program, if the program references a page which is not available in the main memory because it was swapped out a little ago, the processor treats this invalid memory reference as a page fault and transfers control from the program to the operating system to demand the page back into the memory.
Advantages
Following are the advantages of Demand Paging −
- Large virtual memory.
- More efficient use of memory.
- There is no limit on degree of multiprogramming.
Disadvantages
-
Number of tables and the amount of processor overhead for handling page interrupts are greater than in the case of the simple paged management techniques.
Page Replacement Algorithm
Page replacement algorithms are the techniques using which an Operating System decides which memory pages to swap out, write to disk when a page of memory needs to be allocated. Paging happens whenever a page fault occurs and a free page cannot be used for allocation purpose accounting to reason that pages are not available or the number of free pages is lower than required pages.
When the page that was selected for replacement and was paged out, is referenced again, it has to read in from disk, and this requires for I/O completion. This process determines the quality of the page replacement algorithm: the lesser the time waiting for page-ins, the better is the algorithm.
A page replacement algorithm looks at the limited information about accessing the pages provided by hardware, and tries to select which pages should be replaced to minimize the total number of page misses, while balancing it with the costs of primary storage and processor time of the algorithm itself. There are many different page replacement algorithms. We evaluate an algorithm by running it on a particular string of memory reference and computing the number of page faults,
Reference String
The string of memory references is called reference string. Reference strings are generated artificially or by tracing a given system and recording the address of each memory reference. The latter choice produces a large number of data, where we note two things.
-
For a given page size, we need to consider only the page number, not the entire address.
-
If we have a reference to a page p, then any immediately following references to page p will never cause a page fault. Page p will be in memory after the first reference; the immediately following references will not fault.
-
For example, consider the following sequence of addresses − 123,215,600,1234,76,96
-
If page size is 100, then the reference string is 1,2,6,12,0,0
First In First Out (FIFO) algorithm
-
Oldest page in main memory is the one which will be selected for replacement.
-
Easy to implement, keep a list, replace pages from the tail and add new pages at the head.
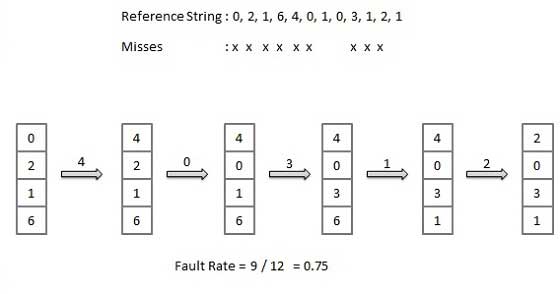
Optimal Page algorithm
-
An optimal page-replacement algorithm has the lowest page-fault rate of all algorithms. An optimal page-replacement algorithm exists, and has been called OPT or MIN.
-
Replace the page that will not be used for the longest period of time. Use the time when a page is to be used.
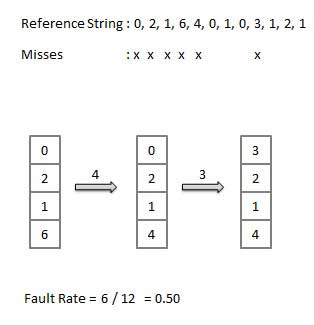
Least Recently Used (LRU) algorithm
-
Page which has not been used for the longest time in main memory is the one which will be selected for replacement.
-
Easy to implement, keep a list, replace pages by looking back into time.

Page Buffering algorithm
- To get a process start quickly, keep a pool of free frames.
- On page fault, select a page to be replaced.
- Write the new page in the frame of free pool, mark the page table and restart the process.
- Now write the dirty page out of disk and place the frame holding replaced page in free pool.
Least frequently Used(LFU) algorithm
-
The page with the smallest count is the one which will be selected for replacement.
-
This algorithm suffers from the situation in which a page is used heavily during the initial phase of a process, but then is never used again.
Most frequently Used(MFU) algorithm
-
This algorithm is based on the argument that the page with the smallest count was probably just brought in and has yet to be used.
Operating System – I/O Hardware
One of the important jobs of an Operating System is to manage various I/O devices including mouse, keyboards, touch pad, disk drives, display adapters, USB devices, Bit-mapped screen, LED, Analog-to-digital converter, On/off switch, network connections, audio I/O, printers etc.
An I/O system is required to take an application I/O request and send it to the physical device, then take whatever response comes back from the device and send it to the application. I/O devices can be divided into two categories −
-
Block devices − A block device is one with which the driver communicates by sending entire blocks of data. For example, Hard disks, USB cameras, Disk-On-Key etc.
-
Character devices − A character device is one with which the driver communicates by sending and receiving single characters (bytes, octets). For example, serial ports, parallel ports, sounds cards etc
Device Controllers
Device drivers are software modules that can be plugged into an OS to handle a particular device. Operating System takes help from device drivers to handle all I/O devices.
The Device Controller works like an interface between a device and a device driver. I/O units (Keyboard, mouse, printer, etc.) typically consist of a mechanical component and an electronic component where electronic component is called the device controller.
There is always a device controller and a device driver for each device to communicate with the Operating Systems. A device controller may be able to handle multiple devices. As an interface its main task is to convert serial bit stream to block of bytes, perform error correction as necessary.
Any device connected to the computer is connected by a plug and socket, and the socket is connected to a device controller. Following is a model for connecting the CPU, memory, controllers, and I/O devices where CPU and device controllers all use a common bus for communication.
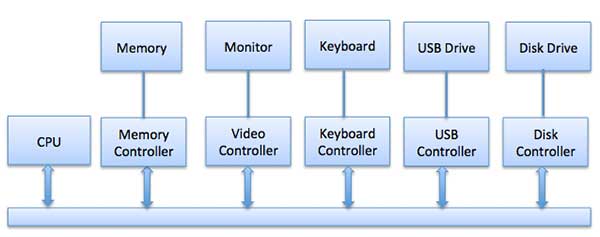
Synchronous vs asynchronous I/O
-
Synchronous I/O − In this scheme CPU execution waits while I/O proceeds
-
Asynchronous I/O − I/O proceeds concurrently with CPU execution
Communication to I/O Devices
The CPU must have a way to pass information to and from an I/O device. There are three approaches available to communicate with the CPU and Device.
- Special Instruction I/O
- Memory-mapped I/O
- Direct memory access (DMA)
Special Instruction I/O
This uses CPU instructions that are specifically made for controlling I/O devices. These instructions typically allow data to be sent to an I/O device or read from an I/O device.
Memory-mapped I/O
When using memory-mapped I/O, the same address space is shared by memory and I/O devices. The device is connected directly to certain main memory locations so that I/O device can transfer block of data to/from memory without going through CPU.
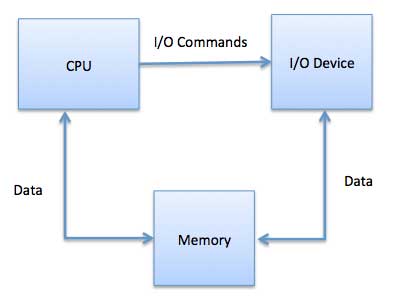
While using memory mapped IO, OS allocates buffer in memory and informs I/O device to use that buffer to send data to the CPU. I/O device operates asynchronously with CPU, interrupts CPU when finished.
The advantage to this method is that every instruction which can access memory can be used to manipulate an I/O device. Memory mapped IO is used for most high-speed I/O devices like disks, communication interfaces.
Direct Memory Access (DMA)
Slow devices like keyboards will generate an interrupt to the main CPU after each byte is transferred. If a fast device such as a disk generated an interrupt for each byte, the operating system would spend most of its time handling these interrupts. So a typical computer uses direct memory access (DMA) hardware to reduce this overhead.
Direct Memory Access (DMA) means CPU grants I/O module authority to read from or write to memory without involvement. DMA module itself controls exchange of data between main memory and the I/O device. CPU is only involved at the beginning and end of the transfer and interrupted only after entire block has been transferred.
Direct Memory Access needs a special hardware called DMA controller (DMAC) that manages the data transfers and arbitrates access to the system bus. The controllers are programmed with source and destination pointers (where to read/write the data), counters to track the number of transferred bytes, and settings, which includes I/O and memory types, interrupts and states for the CPU cycles.
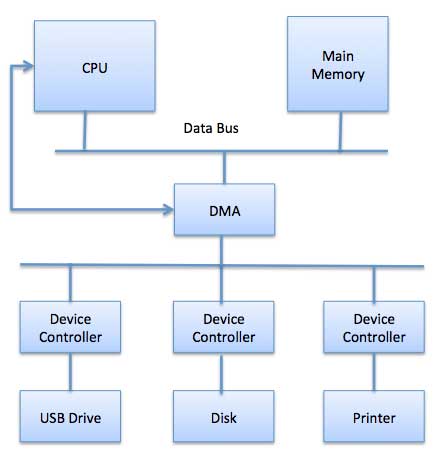
The operating system uses the DMA hardware as follows −
| Step | Description |
|---|---|
| 1 | Device driver is instructed to transfer disk data to a buffer address X. |
| 2 | Device driver then instruct disk controller to transfer data to buffer. |
| 3 | Disk controller starts DMA transfer. |
| 4 | Disk controller sends each byte to DMA controller. |
| 5 | DMA controller transfers bytes to buffer, increases the memory address, decreases the counter C until C becomes zero. |
| 6 | When C becomes zero, DMA interrupts CPU to signal transfer completion. |
Polling vs Interrupts I/O
A computer must have a way of detecting the arrival of any type of input. There are two ways that this can happen, known as polling and interrupts. Both of these techniques allow the processor to deal with events that can happen at any time and that are not related to the process it is currently running.
Polling I/O
Polling is the simplest way for an I/O device to communicate with the processor. The process of periodically checking status of the device to see if it is time for the next I/O operation, is called polling. The I/O device simply puts the information in a Status register, and the processor must come and get the information.
Most of the time, devices will not require attention and when one does it will have to wait until it is next interrogated by the polling program. This is an inefficient method and much of the processors time is wasted on unnecessary polls.
Compare this method to a teacher continually asking every student in a class, one after another, if they need help. Obviously the more efficient method would be for a student to inform the teacher whenever they require assistance.
Interrupts I/O
An alternative scheme for dealing with I/O is the interrupt-driven method. An interrupt is a signal to the microprocessor from a device that requires attention.
A device controller puts an interrupt signal on the bus when it needs CPU’s attention when CPU receives an interrupt, It saves its current state and invokes the appropriate interrupt handler using the interrupt vector (addresses of OS routines to handle various events). When the interrupting device has been dealt with, the CPU continues with its original task as if it had never been interrupted.
Operating System – I/O Softwares
I/O software is often organized in the following layers −
-
User Level Libraries − This provides simple interface to the user program to perform input and output. For example, stdio is a library provided by C and C++ programming languages.
-
Kernel Level Modules − This provides device driver to interact with the device controller and device independent I/O modules used by the device drivers.
-
Hardware − This layer includes actual hardware and hardware controller which interact with the device drivers and makes hardware alive.
A key concept in the design of I/O software is that it should be device independent where it should be possible to write programs that can access any I/O device without having to specify the device in advance. For example, a program that reads a file as input should be able to read a file on a floppy disk, on a hard disk, or on a CD-ROM, without having to modify the program for each different device.

Device Drivers
Device drivers are software modules that can be plugged into an OS to handle a particular device. Operating System takes help from device drivers to handle all I/O devices. Device drivers encapsulate device-dependent code and implement a standard interface in such a way that code contains device-specific register reads/writes. Device driver, is generally written by the device’s manufacturer and delivered along with the device on a CD-ROM.
A device driver performs the following jobs −
- To accept request from the device independent software above to it.
- Interact with the device controller to take and give I/O and perform required error handling
- Making sure that the request is executed successfully
How a device driver handles a request is as follows: Suppose a request comes to read a block N. If the driver is idle at the time a request arrives, it starts carrying out the request immediately. Otherwise, if the driver is already busy with some other request, it places the new request in the queue of pending requests.
Interrupt handlers
An interrupt handler, also known as an interrupt service routine or ISR, is a piece of software or more specifically a callback function in an operating system or more specifically in a device driver, whose execution is triggered by the reception of an interrupt.
When the interrupt happens, the interrupt procedure does whatever it has to in order to handle the interrupt, updates data structures and wakes up process that was waiting for an interrupt to happen.
The interrupt mechanism accepts an address ─ a number that selects a specific interrupt handling routine/function from a small set. In most architectures, this address is an offset stored in a table called the interrupt vector table. This vector contains the memory addresses of specialized interrupt handlers.
Device-Independent I/O Software
The basic function of the device-independent software is to perform the I/O functions that are common to all devices and to provide a uniform interface to the user-level software. Though it is difficult to write completely device independent software but we can write some modules which are common among all the devices. Following is a list of functions of device-independent I/O Software −
- Uniform interfacing for device drivers
- Device naming – Mnemonic names mapped to Major and Minor device numbers
- Device protection
- Providing a device-independent block size
- Buffering because data coming off a device cannot be stored in final destination.
- Storage allocation on block devices
- Allocation and releasing dedicated devices
- Error Reporting
User-Space I/O Software
These are the libraries which provide richer and simplified interface to access the functionality of the kernel or ultimately interactive with the device drivers. Most of the user-level I/O software consists of library procedures with some exception like spooling system which is a way of dealing with dedicated I/O devices in a multiprogramming system.
I/O Libraries (e.g., stdio) are in user-space to provide an interface to the OS resident device-independent I/O SW. For example putchar(), getchar(), printf() and scanf() are example of user level I/O library stdio available in C programming.
Kernel I/O Subsystem
Kernel I/O Subsystem is responsible to provide many services related to I/O. Following are some of the services provided.
-
Scheduling − Kernel schedules a set of I/O requests to determine a good order in which to execute them. When an application issues a blocking I/O system call, the request is placed on the queue for that device. The Kernel I/O scheduler rearranges the order of the queue to improve the overall system efficiency and the average response time experienced by the applications.
-
Buffering − Kernel I/O Subsystem maintains a memory area known as buffer that stores data while they are transferred between two devices or between a device with an application operation. Buffering is done to cope with a speed mismatch between the producer and consumer of a data stream or to adapt between devices that have different data transfer sizes.
-
Caching − Kernel maintains cache memory which is region of fast memory that holds copies of data. Access to the cached copy is more efficient than access to the original.
-
Spooling and Device Reservation − A spool is a buffer that holds output for a device, such as a printer, that cannot accept interleaved data streams. The spooling system copies the queued spool files to the printer one at a time. In some operating systems, spooling is managed by a system daemon process. In other operating systems, it is handled by an in kernel thread.
-
Error Handling − An operating system that uses protected memory can guard against many kinds of hardware and application errors.
Operating System – File System
File
A file is a named collection of related information that is recorded on secondary storage such as magnetic disks, magnetic tapes and optical disks. In general, a file is a sequence of bits, bytes, lines or records whose meaning is defined by the files creator and user.
File Structure
A File Structure should be according to a required format that the operating system can understand.
-
A file has a certain defined structure according to its type.
-
A text file is a sequence of characters organized into lines.
-
A source file is a sequence of procedures and functions.
-
An object file is a sequence of bytes organized into blocks that are understandable by the machine.
-
When operating system defines different file structures, it also contains the code to support these file structure. Unix, MS-DOS support minimum number of file structure.
File Type
File type refers to the ability of the operating system to distinguish different types of file such as text files source files and binary files etc. Many operating systems support many types of files. Operating system like MS-DOS and UNIX have the following types of files −
Ordinary files
- These are the files that contain user information.
- These may have text, databases or executable program.
- The user can apply various operations on such files like add, modify, delete or even remove the entire file.
Directory files
- These files contain list of file names and other information related to these files.
Special files
- These files are also known as device files.
- These files represent physical device like disks, terminals, printers, networks, tape drive etc.
These files are of two types −
-
Character special files − data is handled character by character as in case of terminals or printers.
-
Block special files − data is handled in blocks as in the case of disks and tapes.
File Access Mechanisms
File access mechanism refers to the manner in which the records of a file may be accessed. There are several ways to access files −
- Sequential access
- Direct/Random access
- Indexed sequential access
Sequential access
A sequential access is that in which the records are accessed in some sequence, i.e., the information in the file is processed in order, one record after the other. This access method is the most primitive one. Example: Compilers usually access files in this fashion.
Direct/Random access
-
Random access file organization provides, accessing the records directly.
-
Each record has its own address on the file with by the help of which it can be directly accessed for reading or writing.
-
The records need not be in any sequence within the file and they need not be in adjacent locations on the storage medium.
Indexed sequential access
- This mechanism is built up on base of sequential access.
- An index is created for each file which contains pointers to various blocks.
- Index is searched sequentially and its pointer is used to access the file directly.
Space Allocation
Files are allocated disk spaces by operating system. Operating systems deploy following three main ways to allocate disk space to files.
- Contiguous Allocation
- Linked Allocation
- Indexed Allocation
Contiguous Allocation
- Each file occupies a contiguous address space on disk.
- Assigned disk address is in linear order.
- Easy to implement.
- External fragmentation is a major issue with this type of allocation technique.
Linked Allocation
- Each file carries a list of links to disk blocks.
- Directory contains link / pointer to first block of a file.
- No external fragmentation
- Effectively used in sequential access file.
- Inefficient in case of direct access file.
Indexed Allocation
- Provides solutions to problems of contiguous and linked allocation.
- A index block is created having all pointers to files.
- Each file has its own index block which stores the addresses of disk space occupied by the file.
- Directory contains the addresses of index blocks of files.
Operating System – Security
Security refers to providing a protection system to computer system resources such as CPU, memory, disk, software programs and most importantly data/information stored in the computer system. If a computer program is run by an unauthorized user, then he/she may cause severe damage to computer or data stored in it. So a computer system must be protected against unauthorized access, malicious access to system memory, viruses, worms etc. We’re going to discuss following topics in this chapter.
- Authentication
- One Time passwords
- Program Threats
- System Threats
- Computer Security Classifications
Authentication
Authentication refers to identifying each user of the system and associating the executing programs with those users. It is the responsibility of the Operating System to create a protection system which ensures that a user who is running a particular program is authentic. Operating Systems generally identifies/authenticates users using following three ways −
-
Username / Password − User need to enter a registered username and password with Operating system to login into the system.
-
User card/key − User need to punch card in card slot, or enter key generated by key generator in option provided by operating system to login into the system.
-
User attribute – fingerprint/ eye retina pattern/ signature − User need to pass his/her attribute via designated input device used by operating system to login into the system.
One Time passwords
One-time passwords provide additional security along with normal authentication. In One-Time Password system, a unique password is required every time user tries to login into the system. Once a one-time password is used, then it cannot be used again. One-time password are implemented in various ways.
-
Random numbers − Users are provided cards having numbers printed along with corresponding alphabets. System asks for numbers corresponding to few alphabets randomly chosen.
-
Secret key − User are provided a hardware device which can create a secret id mapped with user id. System asks for such secret id which is to be generated every time prior to login.
-
Network password − Some commercial applications send one-time passwords to user on registered mobile/ email which is required to be entered prior to login.
Program Threats
Operating system’s processes and kernel do the designated task as instructed. If a user program made these process do malicious tasks, then it is known as Program Threats. One of the common example of program threat is a program installed in a computer which can store and send user credentials via network to some hacker. Following is the list of some well-known program threats.
-
Trojan Horse − Such program traps user login credentials and stores them to send to malicious user who can later on login to computer and can access system resources.
-
Trap Door − If a program which is designed to work as required, have a security hole in its code and perform illegal action without knowledge of user then it is called to have a trap door.
-
Logic Bomb − Logic bomb is a situation when a program misbehaves only when certain conditions met otherwise it works as a genuine program. It is harder to detect.
-
Virus − Virus as name suggest can replicate themselves on computer system. They are highly dangerous and can modify/delete user files, crash systems. A virus is generatlly a small code embedded in a program. As user accesses the program, the virus starts getting embedded in other files/ programs and can make system unusable for user
System Threats
System threats refers to misuse of system services and network connections to put user in trouble. System threats can be used to launch program threats on a complete network called as program attack. System threats creates such an environment that operating system resources/ user files are misused. Following is the list of some well-known system threats.
-
Worm − Worm is a process which can choked down a system performance by using system resources to extreme levels. A Worm process generates its multiple copies where each copy uses system resources, prevents all other processes to get required resources. Worms processes can even shut down an entire network.
-
Port Scanning − Port scanning is a mechanism or means by which a hacker can detects system vulnerabilities to make an attack on the system.
-
Denial of Service − Denial of service attacks normally prevents user to make legitimate use of the system. For example, a user may not be able to use internet if denial of service attacks browser’s content settings.
Computer Security Classifications
As per the U.S. Department of Defense Trusted Computer System’s Evaluation Criteria there are four security classifications in computer systems: A, B, C, and D. This is widely used specifications to determine and model the security of systems and of security solutions. Following is the brief description of each classification.
| S.N. | Classification Type & Description |
|---|---|
| 1 |
Type A Highest Level. Uses formal design specifications and verification techniques. Grants a high degree of assurance of process security. |
| 2 |
Type B Provides mandatory protection system. Have all the properties of a class C2 system. Attaches a sensitivity label to each object. It is of three types.
|
| 3 |
Type C Provides protection and user accountability using audit capabilities. It is of two types.
|
| 4 |
Type D Lowest level. Minimum protection. MS-DOS, Window 3.1 fall in this category. |
Operating System – Linux
Linux is one of popular version of UNIX operating System. It is open source as its source code is freely available. It is free to use. Linux was designed considering UNIX compatibility. Its functionality list is quite similar to that of UNIX.
Components of Linux System
Linux Operating System has primarily three components
-
Kernel − Kernel is the core part of Linux. It is responsible for all major activities of this operating system. It consists of various modules and it interacts directly with the underlying hardware. Kernel provides the required abstraction to hide low level hardware details to system or application programs.
-
System Library − System libraries are special functions or programs using which application programs or system utilities accesses Kernel’s features. These libraries implement most of the functionalities of the operating system and do not requires kernel module’s code access rights.
-
System Utility − System Utility programs are responsible to do specialized, individual level tasks.
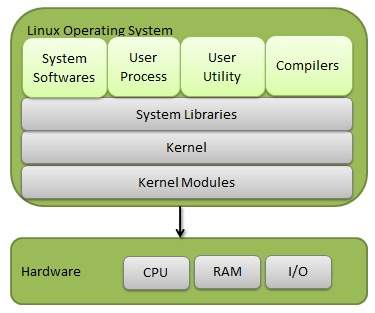
Kernel Mode vs User Mode
Kernel component code executes in a special privileged mode called kernel mode with full access to all resources of the computer. This code represents a single process, executes in single address space and do not require any context switch and hence is very efficient and fast. Kernel runs each processes and provides system services to processes, provides protected access to hardware to processes.
Support code which is not required to run in kernel mode is in System Library. User programs and other system programs works in User Mode which has no access to system hardware and kernel code. User programs/ utilities use System libraries to access Kernel functions to get system’s low level tasks.
Basic Features
Following are some of the important features of Linux Operating System.
-
Portable − Portability means software can works on different types of hardware in same way. Linux kernel and application programs supports their installation on any kind of hardware platform.
-
Open Source − Linux source code is freely available and it is community based development project. Multiple teams work in collaboration to enhance the capability of Linux operating system and it is continuously evolving.
-
Multi-User − Linux is a multiuser system means multiple users can access system resources like memory/ ram/ application programs at same time.
-
Multiprogramming − Linux is a multiprogramming system means multiple applications can run at same time.
-
Hierarchical File System − Linux provides a standard file structure in which system files/ user files are arranged.
-
Shell − Linux provides a special interpreter program which can be used to execute commands of the operating system. It can be used to do various types of operations, call application programs. etc.
-
Security − Linux provides user security using authentication features like password protection/ controlled access to specific files/ encryption of data.
Architecture
The following illustration shows the architecture of a Linux system −
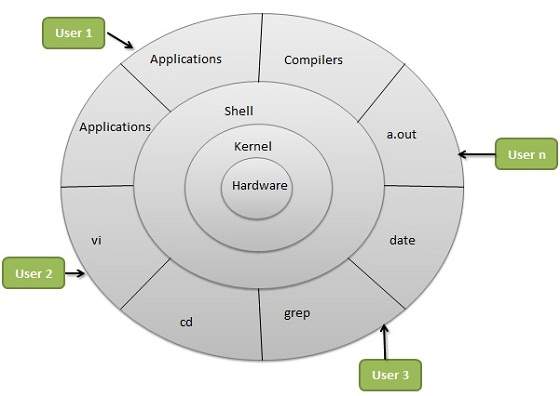
The architecture of a Linux System consists of the following layers −
-
Hardware layer − Hardware consists of all peripheral devices (RAM/ HDD/ CPU etc).
-
Kernel − It is the core component of Operating System, interacts directly with hardware, provides low level services to upper layer components.
-
Shell − An interface to kernel, hiding complexity of kernel’s functions from users. The shell takes commands from the user and executes kernel’s functions.
-
Utilities − Utility programs that provide the user most of the functionalities of an operating systems.
Give essential properties of types of operating system.
Operating systems are there from the very first computer generation and they keep evolving with time. In this chapter, we will discuss some of the important types of operating systems which are most commonly used.
Batch operating system
The users of a batch operating system do not interact with the computer directly. Each user prepares his job on an off-line device like punch cards and submits it to the computer operator. To speed up processing, jobs with similar needs are batched together and run as a group. The programmers leave their programs with the operator and the operator then sorts the programs with similar requirements into batches.
The problems with Batch Systems are as follows −
- Lack of interaction between the user and the job.
- CPU is often idle, because the speed of the mechanical I/O devices is slower than the CPU.
- Difficult to provide the desired priority.
Time-sharing operating systems
Time-sharing is a technique which enables many people, located at various terminals, to use a particular computer system at the same time. Time-sharing or multitasking is a logical extension of multiprogramming. Processor’s time which is shared among multiple users simultaneously is termed as time-sharing.
The main difference between Multiprogrammed Batch Systems and Time-Sharing Systems is that in case of Multiprogrammed batch systems, the objective is to maximize processor use, whereas in Time-Sharing Systems, the objective is to minimize response time.
Multiple jobs are executed by the CPU by switching between them, but the switches occur so frequently. Thus, the user can receive an immediate response. For example, in a transaction processing, the processor executes each user program in a short burst or quantum of computation. That is, if nusers are present, then each user can get a time quantum. When the user submits the command, the response time is in few seconds at most.
The operating system uses CPU scheduling and multiprogramming to provide each user with a small portion of a time. Computer systems that were designed primarily as batch systems have been modified to time-sharing systems.
Advantages of Timesharing operating systems are as follows −
- Provides the advantage of quick response.
- Avoids duplication of software.
- Reduces CPU idle time.
Disadvantages of Time-sharing operating systems are as follows −
- Problem of reliability.
- Question of security and integrity of user programs and data.
- Problem of data communication.
Distributed operating System
Distributed systems use multiple central processors to serve multiple real-time applications and multiple users. Data processing jobs are distributed among the processors accordingly.
The processors communicate with one another through various communication lines (such as high-speed buses or telephone lines). These are referred as loosely coupled systems or distributed systems. Processors in a distributed system may vary in size and function. These processors are referred as sites, nodes, computers, and so on.
The advantages of distributed systems are as follows −
- With resource sharing facility, a user at one site may be able to use the resources available at another.
- Speedup the exchange of data with one another via electronic mail.
- If one site fails in a distributed system, the remaining sites can potentially continue operating.
- Better service to the customers.
- Reduction of the load on the host computer.
- Reduction of delays in data processing.
Network operating System
A Network Operating System runs on a server and provides the server the capability to manage data, users, groups, security, applications, and other networking functions. The primary purpose of the network operating system is to allow shared file and printer access among multiple computers in a network, typically a local area network (LAN), a private network or to other networks.
Examples of network operating systems include Microsoft Windows Server 2003, Microsoft Windows Server 2008, UNIX, Linux, Mac OS X, Novell NetWare, and BSD.
The advantages of network operating systems are as follows −
- Centralized servers are highly stable.
- Security is server managed.
- Upgrades to new technologies and hardware can be easily integrated into the system.
- Remote access to servers is possible from different locations and types of systems.
The disadvantages of network operating systems are as follows −
- High cost of buying and running a server.
- Dependency on a central location for most operations.
- Regular maintenance and updates are required.
Real Time operating System
A real-time system is defined as a data processing system in which the time interval required to process and respond to inputs is so small that it controls the environment. The time taken by the system to respond to an input and display of required updated information is termed as the response time. So in this method, the response time is very less as compared to online processing.
Real-time systems are used when there are rigid time requirements on the operation of a processor or the flow of data and real-time systems can be used as a control device in a dedicated application. A real-time operating system must have well-defined, fixed time constraints, otherwise the system will fail. For example, Scientific experiments, medical imaging systems, industrial control systems, weapon systems, robots, air traffic control systems, etc.
There are two types of real-time operating systems.
Hard real-time systems
Hard real-time systems guarantee that critical tasks complete on time. In hard real-time systems, secondary storage is limited or missing and the data is stored in ROM. In these systems, virtual memory is almost never found.
Soft real-time systems
Soft real-time systems are less restrictive. A critical real-time task gets priority over other tasks and retains the priority until it completes. Soft real-time systems have limited utility than hard real-time systems. For example, multimedia, virtual reality, Advanced Scientific Projects like undersea exploration and planetary rovers, etc.
1. 48% of Technorati’s Top 100 Blogs Are Managed With WordPress
When you consider that there are is an enormous amount of alternative content manage systems available, this statistic speaks volumes about WordPress popularity.
If you decide to go with WordPress, you will definitely be with good company. The New York Times, CNN, Mashable, and eBay all run their blogs on the most popular CMS in the world – WordPress.
2. 74.6 Million Sites Depend on WordPress
Yep, you read that right. 74,652,825 sites out there are depending on good ol’ WordPress. That’s one site per person in Turkey.
Around 50% of this figure (close to 37 million) is hosted on the free WordPress.com. In the realm of self-hosted sites, WordPress accounts for 18.9% of all websites. That’s even more astounding when you consider that over 70% of sites worldwide do not use a CMS.
3. WordPress-Related Keywords Score 37 Million Searches Per Month
The keyword “WordPress” alone receives over 450,000 exact match searches every month. That’s just “WordPress”, not “WordPress help” or “WordPress plugins” or anything of the sort.
When you count the searches of all keywords with WordPress or WP (a common abbreviation for WordPress) in them, the monthly figure is a whopping 37 million searches. Assuming that this figure remains constant, WordPress will get 444 million searches in 2014. That’s nearly one and a half times the population of the U.S.
WordPress is searched five times as much as Joomla and nine times more often than Drupal.
4. 40 Translations of WordPress

While the actual number isn’t half so mind-boggling as the others you’ve just read, it is no less significant. If English isn’t your first language and you would rather have Croatian, Dutch, Estonian, French or Finnish (see full list of WordPress translations) governing your dashboard, you’re in luck.
If you don’t happen to speak one of the forty languages listed and you are more comfortable with something else, hold on tight. The WordPress team is actively updating their list with new language translations all the time.
5. 22% of New U.S. Registered Domains Run on WordPress
Out of every 100 domains registered in the U.S., 22 of them will be run on WordPress. Considering that an average of 120,000 domains are registered worldwide per day, it’s safe to say that WordPress is growing by leaps and bounds.
That “18.9%-of-all-website” figure is increasing all the time.
6. WordPress.com Gets More Unique Visitors Than Amazon (Us)
WordPress.com records an astonishing 126M unique visitors per month, while Amazon falls quite a ways behind, clocking in at 96M uniques per month.
7. WordPress.com Employs Only 229 People
It’s hard to believe but true. The site that receives 130% the unique visits of Amazon employs only 229 people. To keep that in perspective, Amazon.com employs 88,400 people to run their business, 38,603% more than WordPress.com.
That is probably one of the reasons why they’realways looking for new developers to join their team.
8. 6 New WordPress.com Posts Every Second
That’s right. Every second, close to 6 (the actual figure is 5.7) new posts are published on WordPress.com blogs. That averages out to 342 posts per minute. Just above 20,000 per day. And a grand total of 7.49 million annually.
Not only is WordPress.org the world’s most popular self-hosted CMS solution, but the free version is also second in popularity on the list of free blogging platforms, with Google’s own Blogger topping it.
There’s a neat map view on the WordPress.com site that shows you the location of a blogger as he publishes a post in real-time. Check it out.

9. WordPress Developers Charge $50/hr
A 2012 survey revealed that the average rate for a WordPress project clocks in at $50/hr. It’s nothing to write home about, but $50/hour is a decent sum for most.
oDesk, one of the most popular outsourcing sites in the world, lists WordPress development as the fifth most-requested skill. Freelancer.com, a similar website, has thus far recorded over $3.5M in revenue for WordPress developers.
WordPress development is clearly a valuable skill to learn — one that can definitely pay off in the future. The need for it won’t be going anywhere for a while.
10. 29,000 WordPress Plugins and Growing Daily
Without doubt, the number one feature that sets WordPress apart from any other CMS is their plugins. Plugins extend and capitalize on the functionality of WordPress — removing access to them would cripple WordPress users (and that’s one of the reasons why WordPress.com falls second to Blogger).
Fortunately, nothing of the sort is happening. On the contrary, WordPress.org’s database of plugins has recently hit 29K and a new one is added nearly every hour. In total, these plugins have been downloaded 286,000,000+ times. Give it a few years and all you’ll be hearing is “there’s a plugin for that”.
11. 98 Versions of WordPress to Date
There might only be 229 employees, but those 229 sure are kept on their toes. Major updates are rolled out once every few weeks.
In addition to that, the WordPress.com source code is updated 60-80 times per day, pushed out many times throughout the day. These changes are synced with the WordPress.org platform daily.
12. 46 Million Downloads of WordPress.org
The free WordPress.org platform that supports self-hosted websites has been downloaded 46 million times up till July of 2013, which approximates to 100 downloads every day since 2003. You might not have downloaded WordPress and uploaded it to your FTP manager yourself, but when you installed it using Fantastico or the much loved 1-Click, it was counted as a download.
Since it’s only in the recent years that blogging has suddenly become quite a bit more popular, the downloads per day in 2014 are significantly higher (think tens of thousands) than they were in 2003.
13. WordPress Is Most Popular With Business Websites
Of the top 1,000,000 sites in the world, the number of business sites (most popular with WordPress) powered by WordPress is five times the number of WordPress-managed news sites (least popular with WordPress).
This statistic is not all that surprising, as online marketing circles will often discuss WordPress more than any other CMS out there. WordPress also ranks high as one of the most blogged topics in the online marketing niche and nearly all its keywords have very high PPC competition.
14. Akismet Is the Most Popular Plugin
Of all the 19,000 free plugins available for download, Akismet has received the most downloads. The main reason for this is that Akismet comes auto-installed with the newer versions of WordPress.
Akismet has been downloaded a total of 18 million times, a truly mind-blowing figure. The spam protection plugin alone has been responsible for close to .06% of all plugin downloads at WordPress.org. The All in One SEO Pack from Michael Tolbert comes in at a very close second, with a total of 17 million downloads. In third place,with 14 million downloads, is Contact Form 7 , another familiar name to most bloggers.
Wrapping Up
The statistics that make WordPress the world’s most popular CMS are truly mind-numbing.
In its eleven short years of its existence, WordPress had dominated the CMS market. From what we can tell, it isn’t going anywhere,
What’s the Difference Between Ubuntu and Fedora?
New Linux distributions just keep appearing, and for some users it’s becoming tedious trying to keep up. You’ve probably heard someone ask “What’s the point of all those distributions?”. Perhaps you’ve been asked to explain the difference between two Linux distributions. These questions might seem weird at first, but they make sense, especially if the person asking them is a beginner who is still learning about Linux.

Neither Fedora nor Ubuntu are new distributions, but they’ve both had new versions relatively recently. Ubuntu 16.04came out in April, and Fedora 24 Betabecame available a few weeks ago, with the final release scheduled for June 14. This upcoming version of Fedora is bound to attract some attention, so it might be useful to explain how it differs from Ubuntu. We’ve already shown you some differences between Ubuntu and Linux Mint; in this case, the differences will be bigger and more obvious.
History & Development
So much has already been written about Ubuntu that your grandma probably knows its first version was based on Debian’s unstable branch, and came out in October 2004. Fedora is a bit older – the first version was released in November 2003, and the background story is somewhat more complicated.
That very first version of Fedora was called Fedora Core 1, and it was based on Red Hat Linux 9. Fedora was envisioned as a community-oriented alternative to Red Hat, and it had two main repositories: Core, which was maintained by Red Hat developers, and Extras, maintained by the community. However, in late 2003 Red Hat Linux merged with Fedora to become a single community distribution, and Red Hat Enterprise Linux was created as its commercially supported counterpart. Up until 2007 Fedora retained “Core” as part of its name, but with the release of Fedora 7, the Core and Extra repositories were joined, and since then the distribution is called simply Fedora.

The biggest difference here is that the original Red Hat Linux essentially split into Fedora and Red Hat Enterprise Linux, while Debian is still a whole, separate entity from Ubuntu, which imports packages from one of Debian’s branches.
While many think that Fedora is directly based on Red Hat Enterprise Linux (RHEL), that’s not quite true. Rather, it’s the opposite: new versions of RHEL are forks of Fedora which are thoroughly tested for quality and stability before their release. For example, RHEL 7 is based on repositories of Fedora 19 and 20. The Fedora community also provides extra packages for RHEL in a repository called Extra Packages for Enterprise Linux (EPEL).

The structure behind the development of these two distros is relatively similar. Fedora Project (established in 2003) is responsible for coordinating the development of Fedora, and it’s sponsored by Red Hat. The Fedora Council governs this initiative, and the chairperson (Fedora Project Leader) is chosen and employed by Red Hat. There are other governing groups, such as Fedora Engineering Steering Committee and Fedora Ambassadors Steering Committee, where members are elected by the community.

On the other hand, Ubuntu is directly financed and managed by Canonical. The Ubuntu Community is organized around several bigger groups, with the primary ones being the Community Council and the Technical Board. Members of those two are nominated by Mark Shuttleworth, the founder of Canonical. Other groups include the Forums Council, IRC Council, and the Developer Membership Board. Users canapply for Ubuntu membership and volunteer as contributors in various community-organized teams.
Release Cycle & Support
Ubuntu releases a new version every six months – in April and in October. Every fourth version is considered a Long Term Support (LTS) release, which means that LTS releases come out every 2 years. Since 2012, every LTS release receives official support and updates for the next five years. Other, “regular” releases used to be supported for 18 months, but this period has been shortened to nine months in 2013.
Fedora doesn’t have a strict schedule, but new releases usually come out every six months. However, they are supported for 13 months, which is longer than Ubuntu’s support period for regular releases. There are no LTS releases of Fedora.
What’s in a Name?
If you thought Ubuntu’s naming conventions were (needlessly) complicated, wait till you see the rules for Fedora names.
Both distributions include version numbers in their name. Ubuntu has “point releases”, where the first number signifies the year and second the month in which a version was released. This is actually helpful, as you can tell the age of the distribution at a glance – for example, Ubuntu 13.04 was released in April of 2013.Fedora keeps it simple and uses whole numbers, starting with 1 for the first version, and (currently) ending with 23, the latest stable version released in November 2015.
For Ubuntu, the codename itself always contains two words that begin with the same letter. The first word is an adjective, and the second an animal, often an unusual or rare one. Anyone can suggest names for the upcoming versions of Ubuntu, but the final decision is announced by Mark Shuttleworth, along with an explanation or a short anecdote about the name. The next version of Ubuntu, due in October this year,will be called Yakkety Yak.
Fedora 20 Heisenbug from 2013 was the last version with a codename, and all subsequent versions are called just “Fedora X”, where X stands for whichever number follows the previous release. Before that, anyone from the community could suggest a name, but it had to follow a set of rules to qualify for approval from the governing members. Release names were supposed to share a connection, preferably a unusual or novel one, and should not be names of living people or trademarked terms. The relationship between names for Fedora X and Fedora X+1 should match the “is-a” formula, so that the following is true: X is a Y, and so is X+1. To illustrate, Fedora 14 was called Laughlin, and Fedora 15 Lovelock. Both Lovelock and Laughlin are cities in Nevada. However, the relationship for Fedora X and Fedora X+2 should not be the same!
Does this sound like it would cause a massive headache? Well, maybe that’s one of the reasons why the developers decided to drop it.
Editions & Desktop Environments
Fedora has three main editions: Cloud, Server, and Workstation. The first two are self-explanatory, and the Workstation is actually the edition most people use – the one for desktop computers and laptops (either 32- or 64-bit). The Fedora community also provides separate images of the three editions for ARM-based devices. There’s also Fedora Rawhide, a continually updated, development version of Fedora which contains the latest builds of all Fedora packages. Rawhide is a testing ground for new packages, so it’s not 100% stable, but you can still use it as a rolling-release distribution.

Ubuntu beats Fedora here, at least in terms of quantity. Alongside the standard Desktop edition, Ubuntu offers separate products called Cloud, Server, Core (forInternet-of-Things devices), and Ubuntu Touch for mobile devices. The desktop edition supports both 32- and 64-bit systems, and Server images are available for different infrastructures (ARM, LinuxONE, POWER8). There’s also Ubuntu Kylin, a special edition of Ubuntu for Chinese users, which first came out in 2010 as “Ubuntu Chinese Edition”, and was rebranded as an official subproject in 2013.

As for desktop environments, the main Fedora edition uses Gnome 3 with Gnome Shell. Ubuntu’s default DE is Unity, and other options are provided by way of “Ubuntu flavors”, which are variants of Ubuntu with different desktop environments. There’s Kubuntu (with KDE), Ubuntu GNOME, Ubuntu MATE, Xubuntu (with Xfce), Lubuntu (with LXDE), and a new variant called Budgie Remix is in the works, with hopes of becoming an official Ubuntu flavor.

Fedora’s equivalent of flavors are Spins, or “alternative desktops”. There are spins with KDE, Xfce, LXDE, MATE, and Cinnamon desktop environments, and a special spin called Sugar on a Stick with a simplified learning environment. This project is tailored for children and schools, particularly in developing countries.

Fedora also has Labs, or “functional software bundles”. They are collections of specialized software that can be installed on an existing Fedora system, or as a standalone Linux distribution. Available Labs include Design Suite, Games, Robotics Suite, Security Lab, and Scientific. Ubuntu provides something similar in the form of Edubuntu, Mythbuntu, and Ubuntu Studio – subprojects with specialized apps for education, home entertainment systems and multimedia production, respectively.
Packages & Repositories
The most striking differences between Ubuntu and Fedora are found in this domain. First of all, there is the package management system. Fedora uses RPM with .rpm packages, while Ubuntu uses DPKG and .deb packages. This means that packages for Ubuntu are not compatible with Fedora by default, and you won’t be able to install them unless you convert them with something like Alien. Ubuntu has also presented Snappy packages, which are supposed to be much more secure and easier to maintain than .deb packages, but they are not yet widely used among developers.

With the exception of some binary firmware, Fedora does not include any proprietary software in its official repositories. This applies to graphics drivers, codecs, and any other software restricted by patents and legal issues. The direct consequence of this is that Ubuntu has more packages in its repositories than Fedora.
One of the main objectives of Fedora is to provide only free and open source software, and the community encourages users to find alternatives for their non-free apps. If you want to listen to MP3 music or play DVDs on Fedora, you won’t find support for that in the official repositories. There are, however,third-party repositories like RPMFusionwhich contain plenty of free and non-free software that you can install on Fedora.
Ubuntu aims to conform to Debian’s Free Software Guidelines, but it still makes a lot of concessions. Unlike Fedora, Ubuntu includes proprietary drivers in its Restricted branch of official repositories. There’s also the Partner repository which contains proprietary software from Canonical’s partner vendors – Skype and Adobe Flash Player, for instance. It’s possible to buy commercial apps from Ubuntu Software Center, and you can enable support for DVDs, MP3s, and other popular codecs by simply installing a single package (ubuntu-restricted-extras) from the repository.

Fedora’s Copr is a platform similar to Ubuntu’s Personal Package Archives (PPA) – it enables anyone to upload packages and create their own repository. The difference here is the same as with general approach to software licensing – you are not supposed to upload packages that contain non-free components, or anything else that’s explicitly forbidden by the Fedora Project Board.
Target Audience & Goals
Since the beginning, Fedora has been sharply focused on three things: innovation, community, and freedom. It offers and promotes exclusively free and open source software, and emphasizes the importance of every community member. It’s developed by the community, and users are actively encouraged to participate in the project, not only as developers, but also as writers, translators, designers, and public speakers (Fedora Ambassadors). There’s a special project that helps women who want to contribute, with the goal of fighting gender-based prejudice and segregation in tech and FOSS circles.

Furthermore, Fedora is very often the first, or among the first distributions to adopt and showcase new technologies and apps. It was one of the first distributions to ship with SELinux, include the Gnome 3 desktop, use Plymouth as the bootsplash application, adopt systemd as the default init system, and use Wayland instead of Xorg as the default display server.
The developers of Fedora make a point to collaborate with other distributions and upstream projects, and to share their upgrades and contributions with the rest of the Linux ecosystem. Because of this constant experimentation and innovation, Fedora is often (mis)labeled as a bleeding-edge, unstable distribution that’s not suitable for beginners and everyday use. This is one of the most widespread Fedora myths, and the Fedora community is working hard to change this perception.Although developers and advanced users who want to try the latest features are the primary target audience, Fedora can be used by anyone, just like Ubuntu.
Speaking of Ubuntu, some of the goals of this distribution overlap with Fedora. Ubuntu also strives to innovate, but they’re choosing a much more consumer-friendly approach. By providing an operating system for mobile devices, Ubuntu is trying to carve a place for itself on the market, and simultaneously push its major project –convergence.

The community seems somewhat less involved in crucial decisions, which was reflected in the user backlash against changes in past Ubuntu releases. Ubuntu has also been involved in a few controversies, most notably the privacy issue with the Unity shopping lens in Ubuntu 12.10. Despite that, Ubuntu is often proclaimed the most popular Linux distribution, thanks to its strategy of being user-friendly and simple enough for beginners and ex-Windows users.
Still, Fedora has an ace up its sleeve – Linus Torvalds, the creator of Linux, uses Fedora on his computers.
MYSQL VS MYSQLI VS PDO
Summary
| PDO | MySQLi | |
| Database support | 12 different drivers | MySQL only |
| API | OOP | OOP + procedural |
| Connection | Easy | Easy |
| Named parameters | Yes | No |
| Object mapping | Yes | Yes |
| Prepared statements (client side) |
Yes | No |
| Performance | Fast | Fast |
| Stored procedures | Yes | Yes |
Mythbusting – If I enter my PIN backwards will the ATM call the police?
Mythbusting – If I enter my PIN backwards will the ATM call the police?

We’re looking to explain some common banking myths in this new blog series: this time we clear the air around one particular urban legend about ATMs. From time to time we get customers asking us the same question: “If I’m being forced to withdraw money from an ATM and enter my PIN in backwards will the police be dispatched?”
The answer is no. This rumour has existed since the mid-1980s, when some American police departments proposed an ATM PIN system that would do just that, believing it to be an effective way of tracking criminals. It’s been brought into the spotlight again in recent years due to the circulation of an email chain letter hoax in 2006, which has since spread to social networks like Facebook and Tumblr.
There are a number of issues with a system like this. Some people may have reversible PINs such as ‘7667’ or ‘8888’ and these palindromic PINs would become unavailable so that there were no false call outs. Semi-reversible PINs like ‘3783’ or ‘1031’ would also need to be avoided to minimise the risk that someone might accidentally enter their PIN incorrectly (it would only take one number) and call the police. Additionally, if you’re in the stressful situation of being threatened to hand over money at an ATM, it may become difficult to even remember what your PIN is backwards. Even if you did manage to enter your PIN in reverse and the ATM alerted the police it’s highly likely that the criminal would flee the scene as soon as the money is dispensed. The New Zealand Bankers Association and ASB advise against using any of these easy-to-guess PINs on your cards.
Although such technology does exist, it has not been widely rolled out anywhere in the world due to the issues raised above.
Here are some important tips to remember to keep yourself safe when using ATMs:
- Never use an ATM or EFTPOS terminal that looks like it may have been tampered with.
- Be careful when you use an ATM to make sure other people can’t see you enter your PIN.
- Be wary of anyone offering to help – especially if your card has just been retained (eaten) by the ATM.
- If your card has been retained by an ATM go to the nearest branch or call 0800 803 804 immediately.
Reverse PIN software is not present on any major bank ATM in New Zealand. In an emergency please call 111 immediately.
Why does computer command prompt has generally black/dark background?
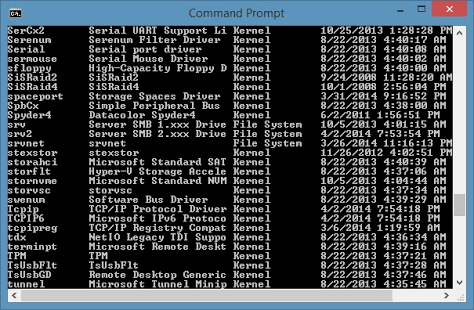
In the early 1970’s, there weren’t any VDTs – RAM was too expensive. We used teletypes, which was like a typewriter with black ink on white paper.
Then there were early VDTs that worked like an oscilloscope or radar tube. With a long-persistance phosphor, you could write on the screen with an electron beam and the image stayed there for a bit. The background was dark where no electrons hit it, the text might be amber or green depending on the phosphor. Later, the Tektronix storage scope technology was used to make graphical terminals where the image stayed there unti it was erased. I think that was green on black.
When RAM became cheap enough to put in a video buffer, you could store an entire screen as bits, so you could choose to have white-on-black or black-on-white (there was no colour). DEC VT100’s had that as a configuration item, swappable by sending an escape sequence. Personally, I preferred black-on-white, and I still do. Many people like to use colours to emphasise different bits of text like commands or parameters, and that works better on black.At least, it’s easier to pick the colours as saturated red will show up nicely on black but saturated cyan not so well on white.
What are the basic differences between PhoneGap, Ionic, Titanium and Cordova?
Cordova can wrap up an app that runs in a WebView that has additional native extentions, which is the definition of a hybrid app. Cordova is the open source platform that the original PhoneGap became.
Ionic Framework is based on Cordova, comes with a set of standard controls that mimic native controls, and Ionic comes with Angular. Using Ionic with Angular can help you organize your app and give it a solid look. Ionic also includes bindings to the Ionic services. See Ionic.io for more information.
PhoneGap at this point is based on Cordova, but is more of a distribution of Cordova with few custom packages and tweaks. Adobe also provides a build service.
Titanium is not, contrary to popular opinion, a hybrid solution. The original Titanium did use a WebView and therefore was hybrid, but they ditched the WebView some time ago. It is a full native solution that is scripted with JavaScript. It’s more like Xamarin, but using JavaScript instead of C#.
To be complete, NativeScript and React Native are cross platform development environments that feel somewhat like hybrid, in that they use web frameworks or view layers (Angular 2 and React), but they don’t rely on a WebView, and are therefore native approaches that simply rely on JavaScript instead of the native language on each platform.
Create your first Cordova app
This guide shows you how to create a JS/HTML Cordova application and deploy them to various native mobile platforms using the cordovacommand-line interface (CLI). For detailed reference on Cordova command-line, review the CLI reference
Installing the Cordova CLI
The Cordova command-line tool is distributed as an npm package.
To install the cordova command-line tool, follow these steps:
-
Download and install Node.js. On installation you should be able to invoke
nodeandnpmon your command line. -
(Optional) Download and install a git client, if you don’t already have one. Following installation, you should be able to invoke
giton your command line. The CLI uses it to download assets when they are referenced using a url to a git repo. -
Install the
cordovamodule usingnpmutility of Node.js. Thecordovamodule will automatically be downloaded by thenpmutility.
-
on OS X and Linux:
$ sudo npm install -g cordovaOn OS X and Linux, prefixing the
npmcommand withsudomay be necessary to install this development utility in otherwise restricted directories such as/usr/local/share. If you are using the optional nvm/nave tool or have write access to the install directory, you may be able to omit thesudoprefix. There are more tips available on usingnpmwithoutsudo, if you desire to do that. -
on Windows:
C:\>npm install -g cordova
The -g flag above tells npm to install cordovaglobally. Otherwise it will be installed in thenode_modules subdirectory of the current working directory.
Following installation, you should be able to runcordova on the command line with no arguments and it should print help text.
Create the App
Go to the directory where you maintain your source code, and create a cordova project:
$ cordova create hello com.example.hello HelloWorld
This creates the required directory structure for your cordova app. By default, the cordova createscript generates a skeletal web-based application whose home page is the project’s www/index.htmlfile.
See Also
- Cordova create command reference documentation
- Cordova project directory structure
- Cordova project templates
Add Platforms
All subsequent commands need to be run within the project’s directory, or any subdirectories:
$ cd hello
Add the platforms that you want to target your app. We will add the ‘ios’ and ‘android’ platform and ensure they get saved to config.xml:
$ cordova platform add ios --save
$ cordova platform add android --save
To check your current set of platforms:
$ cordova platform ls
Running commands to add or remove platforms affects the contents of the project’s platformsdirectory, where each specified platform appears as a subdirectory.
Note: When using the CLI to build your application, you should notedit any files in the
/platforms/directory. The files in this directory are routinely overwritten when preparing applications for building, or when plugins are re-installed.
See Also
Install pre-requisites for building
To build and run apps, you need to install SDKs for each platform you wish to target. Alternatively, if you are using browser for development you can usebrowser platform which does not require any platform SDKs.
To check if you satisfy requirements for building the platform:
$ cordova requirements
Requirements check results for android:
Java JDK: installed .
Android SDK: installed
Android target: installed android-19,android-21,android-22,android-23,Google Inc.:Google APIs:19,Google Inc.:Google APIs (x86 System Image):19,Google Inc.:Google APIs:23
Gradle: installed
Requirements check results for ios:
Apple OS X: not installed
Cordova tooling for iOS requires Apple OS X
Error: Some of requirements check failed
See Also
Build the App
By default, cordova create script generates a skeletal web-based application whose start page is the project’s www/index.html file. Any initialization should be specified as part of the deviceready event handler defined in www/js/index.js.
Run the following command to build the project for all platforms:
$ cordova build
You can optionally limit the scope of each build to specific platforms – ‘ios’ in this case:
$ cordova build ios
See Also
Test the App
SDKs for mobile platforms often come bundled with emulators that execute a device image, so that you can launch the app from the home screen and see how it interacts with many platform features. Run a command such as the following to rebuild the app and view it within a specific platform’s emulator:
$ cordova emulate android
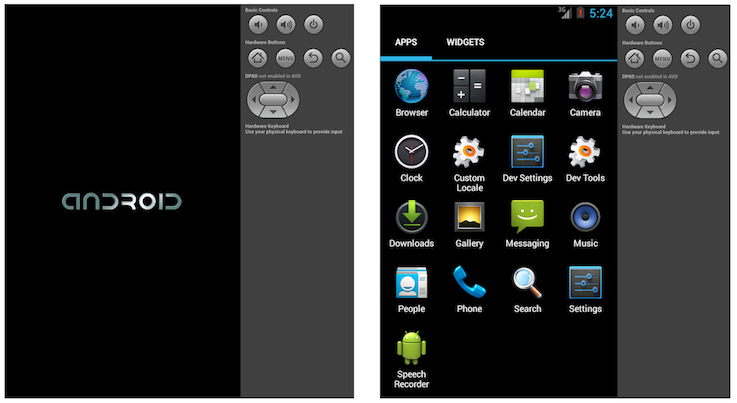
Following up with the cordova emulate command refreshes the emulator image to display the latest application, which is now available for launch from the home screen:
Alternately, you can plug the handset into your computer and test the app directly:
$ cordova run android
Before running this command, you need to set up the device for testing, following procedures that vary for each platform.
See Also
- Setting up Android emulator
- Cordova run command reference documentation
- Cordova emulate command reference documentation
Add Plugins
You can modify the default generated app to take advantage of standard web technologies, but for the app to access device-level features, you need to add plugins.
A plugin exposes a Javascript API for native SDK functionality. Plugins are typically hosted on npm and you can search for them on the plugin search page. Some key APIs are provided by the Apache Cordova open source project and these are referred to as Core Plugin APIs. You can also use the CLI to launch the search page:
$ cordova plugin search camera
To add the camera plugin, we will specify the npm package name for the camera plugin:
$ cordova plugin add cordova-plugin-camera
Fetching plugin "cordova-plugin-camera@~2.1.0" via npm
Installing "cordova-plugin-camera" for android
Installing "cordova-plugin-camera" for ios
Plugins can also be added using a directory or a git repo.
NOTE: The CLI adds plugin code as appropriate for each platform. If you want to develop with lower-level shell tools or platform SDKs as discussed in theOverview, you need to run the Plugman utility to add plugins separately for each platform. (For more information, see Using Plugman to Manage Plugins.)
Use plugin ls (or plugin list, or plugin by itself) to view currently installed plugins. Each displays by its identifier:
$ cordova plugin ls
cordova-plugin-camera 2.1.0 "Camera"
cordova-plugin-whitelist 1.2.1 "Whitelist"
See Also
Using merges to Customize Each Platform
While Cordova allows you to easily deploy an app for many different platforms, sometimes you need to add customizations. In that case, you don’t want to modify the source files in various www directories within the top-level platforms directory, because they’re regularly replaced with the top-level wwwdirectory’s cross-platform source.
Instead, the top-level merges directory offers a place to specify assets to deploy on specific platforms. Each platform-specific subdirectory withinmerges mirrors the directory structure of the wwwsource tree, allowing you to override or add files as needed. For example, here is how you might usesmerges to boost the default font size for Android devices:
-
Edit the
www/index.htmlfile, adding a link to an additional CSS file,overrides.cssin this case:<link rel="stylesheet" type="text/css" href="css/overrides.css" /> -
Optionally create an empty
www/css/overrides.cssfile, which would apply for all non-Android builds, preventing a missing-file error. -
Create a
csssubdirectory withinmerges/android, then add a correspondingoverrides.cssfile. Specify CSS that overrides the 12-point default font size specified withinwww/css/index.css, for example:body { font-size:14px; }
When you rebuild the project, the Android version features the custom font size, while others remain unchanged.
You can also use merges to add files not present in the original www directory. For example, an app can incorporate a back button graphic into the iOS interface, stored inmerges/ios/img/back_button.png, while the Android version can instead capture backbuttonevents from the corresponding hardware button.
Updating Cordova and Your Project
After installing the cordova utility, you can always update it to the latest version by running the following command:
$ sudo npm update -g cordova
Use this syntax to install a specific version:
$ sudo npm install -g cordova@3.1.0-0.2.0
Run cordova -v to see which version is currently running. To find the latest released cordova version, you can run:
$ npm info cordova version
To update platform that you’re targeting:
$ cordova platform update android --save
$ cordova platform update ios --save
...etc.
Internet of Things (IoT)
The IoT links objects to the Internet, enabling data and insights never available before.
Services
Let Us Help
Connecting everything drives positive business results
Create new revenue opportunities and lower operational costs by managing your connected devices.
-
15% reduction in cost
-
58% of execs say the IoT is strategic to their business
-
95% of execs surveyed plan to launch an IoT business within 3 years
See our IoT case studies
IoT Drives Connected Machines Transformation
The Mazak iSMART Factory centers on open connectivity with the highest level of security.
GM changes our relationship with cars
With the connected car, GM is reinventing the experience customers can have with their car.
Industries using the IoT
With one intelligent network infrastructure, you can improve operations. Increase safety and security. And gain valuable data insight to streamline automation.
See solutions for:
See solutions for connecting:
See solutions for connecting:
Products to grow your IoT business
Improve your results with our IoT services
Use our services to quickly transform your operational network to an IP-based industrial network.
Address the challenge of modernizing the electric grid with the Cisco Services Connected Grid architecture methodology.
Work with our strategic and technical advisors to align security, compliance, and threat management with your business goals.
Increase efficiency, lower support costs, and improve network availability with our award-winning product support services.
Learn the hidden costs of delivering IoT services
Gain insight into operational expenses of IoT connected services.
Meet the experts
Keep up with IoT news and trends
Stay ahead of the fast pace of the IoT by connecting to our IoT blogs for news, trends, events, and more.
News
Support IoT Digital Transformation
Enhanced IoT solutions provide connectivity and security from the fog to the cloud.
Experience IoT virtual reality
Cisco IoT makes digital transformation a reality in factories, transportation, and utilities.
Cisco Industrial Network Director
Get full visibility and control of your industrial automation network.
IoT in home security
See how IoT technology can help you profit in home automation.
Google launches two new programming languages — but there’s no knowing if they’ll thrive
Google wants to change the way the world writes software. In recent years, the search giant has unveiled two new programming languages that seek to improve on some of the most widely used languages on the planet.

With a language called Go, it seeks to give the world a replacement for the venerable languages C and C++, providing a more nimble means of building really big software platforms inside data centers. And with Dart, it hopes to replace JavaScript, improving the way we build software that’s run in our web browsers.
But no matter how impressive these new languages are, you have to wonder how long it will take them to really catch on — if they do at all. After all, new programming languages arrive all the time. But few ever reach a wide audience.
At Princeton and the University of California at Berkeley, two researchers are trying to shed some light on why some programming languages hit the big time but most others don’t. In what they call a “side project,” Leo Meyerovich and Ari Rabkin have polled tens of thousands of programmers, and they’re combing through over 300,000 computing projects at the popular code repository SourceForge — all in an effort to determine why old languages still reign supreme. “Why have we not been reliably able to improve on C?” Rabkin asks. In the 35 years since C was popularised, there have been enormous leaps in the design of software and operating systems, he says. But although C has been beefed up and other new languages have been very successful during that time, C is still a mainstay.
Part of the problem, he says, is that language designers don’t always have practical objectives. “There’s a tendency in academics of trying to solve a problem when no one actually ever had that problem,” said Rabkin, who recently received his computer science PhD at Berkeley and is now at Princeton working on a post-doc.
He says that academics are so often determined to build a language that stands out from the crowd, without thinking about what’s needed to actually make it useful. In some cases, he says, they fail with the simplest of things, like documentation for their language. In other cases, he says, designers will keep adding new features to a language and effectively overload the engineers who are trying to use it. “Maybe the solution isn’t entirely technical,” Meyerovich says. “We need to start building more ‘socially aware’ languages.”
Yang Zhang, co-founder of analytics outfit Slice-Data and an MIT PhD dropout, is among that many who have jumped behind a new-age programming language called Scala, but he acknowledges that the language was originally hampered by poor documentation and support from the designers. “I was a much bigger masochist back then,” he says of fighting to learn the language in 2006.
Meyerovich also says the data he and Rabkin are collecting also indicate that programmers aren’t always taking the time to really learn a language when they start using it — and that this trips them up down the road. An example, he says, isActionScript, an object-oriented language developed by Adobe. According to Meyerovich’s data, programmers see ActionScript as easy to use.
But, he says, when they start doing something new with it — moving from, say, media development to game development — they run into problems.
Another issue is complacency. Most programmers learn three to four languages, the researchers say, but then stop. “Over time, you’d expect that as developers get older, they’d get more wisdom; they’d learn more languages,” Meyerovich says. “We’ve found that’s not true. They plateau.”
Part of the problem is that by the time they hit 35 to 40 years old, they’re often moving from hands-on coding to managing other programmers. At that point, there’s little motivation to learn and implement new languages.
Meyerovich believes that the language is an issue that the development community as a whole is still struggling to acknowledge. As he and Rabkin plow through the data — much of which is sortable online — they hope to develop new insights into not only the causes over the problem, but also how to solve it. “This is a hot-button issue I didn’t even think we’d be looking at when we went through this data,” Meyerovich says.
Introduction to GraphQL
Learn about GraphQL, how it works, and how to use it in this series of articles. Looking for documentation on how to build a GraphQL service? There are libraries to help you implement GraphQL in many different languages.
GraphQL is a query language for your API, and a server-side runtime for executing queries by using a type system you define for your data. GraphQL isn’t tied to any specific database or storage engine and is instead backed by your existing code and data.
A GraphQL service is created by defining types and fields on those types, then providing functions for each field on each type. For example, a GraphQL service that tells us who the logged in user is (me) as well as that user’s name might look something like this:
type Query { me: User}type User { id: ID name:String}
Along with functions for each field on each type:
function Query_me(request) { returnrequest.auth.user;}function User_name(user) {return user.getName();}
Once a GraphQL service is running (typically at a URL on a web service), it can be sent GraphQL queries to validate and execute. A received query is first checked to ensure it only refers to the types and fields defined, then runs the provided functions to produce a result.
For example the query:
{ me { name }}
Could produce the JSON result:
{ “me”: { “name”: “Luke Skywalker” }}
Learn more about GraphQL—the query language, type system, how the GraphQL service works, as well as best practices for using GraphQL to solve common problems—in the articles written in this section.
JSON TUTORIALS
|
Data Types
|
Objects
Access object properties
Array of objects
Access array elements
|
Arrays
Access array elements
Nested objects and arrays
Access nested elements
|
Method Overloading in Java with examples
Method Overloading is a feature that allows a class to have two or more methods having same name, if their argument lists are different. In the last tutorial we discussedconstructor overloading that allows a class to have more than one constructors having different argument lists.
Argument lists could differ in –
1. Number of parameters.
2. Data type of parameters.
3. Sequence of Data type of parameters.
Method overloading is also known as Static Polymorphism.
Points to Note:
1. Static Polymorphism is also known as compile time binding or early binding.
2. Static binding happens at compile time. Method overloading is an example of static binding where binding of method call to its definition happens at Compile time.
Method Overloading examples:
As discussed above, method overloading can be done by having different argument list. Lets see examples of each and every case.
Example 1: Overloading – Different Number of parameters in argument list
When methods name are same but number of arguments are different.
class DisplayOverloading { public void disp(char c) { System.out.println(c); } public void disp(char c, int num) { System.out.println(c + " "+num); } } class Sample { public static void main(String args[]) { DisplayOverloading obj = new DisplayOverloading(); obj.disp('a'); obj.disp('a',10); } }
Output:
a a 10
In the above example – methoddisp() has been overloaded based on the number of arguments – We have two definition of methoddisp(), one with one argument and another with two arguments.
Example 2: Overloading – Difference in data type of arguments
In this example, method disp() is overloaded based on the data type of arguments – Like example 1 here also, we have two definition of method disp(), one with char argument and another with int argument.
class DisplayOverloading2 { public void disp(char c) { System.out.println(c); } public void disp(int c) { System.out.println(c ); } } class Sample2 { public static void main(String args[]) { DisplayOverloading2 obj = new DisplayOverloading2(); obj.disp('a'); obj.disp(5); } }
Output:
a 5
Example3: Overloading – Sequence of data type of arguments
Here method disp() is overloaded based on sequence of data type of arguments – Both the methods have different sequence of data type in argument list. First method is having argument list as (char, int) and second is having (int, char). Since the sequence is different, the method can be overloaded without any issues.
class DisplayOverloading3 { public void disp(char c, int num) { System.out.println("I’m the first definition of method disp"); } public void disp(int num, char c) { System.out.println("I’m the second definition of method disp" ); } } class Sample3 { public static void main(String args[]) { DisplayOverloading3 obj = new DisplayOverloading3(); obj.disp('x', 51 ); obj.disp(52, 'y'); } }
Output:
I’m the first definition of method disp I’m the second definition of method disp
Lets see few Valid/invalid cases of method overloading
Case 1:
int mymethod(int a, int b, float c) int mymethod(int var1, int var2, float var3)
Result: Compile time error. Argument lists are exactly same. Both methods are having same number, data types and same sequence of data types in arguments.
Case 2:
int mymethod(int a, int b) int mymethod(float var1, float var2)
Result: Perfectly fine. Valid case for overloading. Here data types of arguments are different.
Case 3:
int mymethod(int a, int b) int mymethod(int num)
Result: Perfectly fine. Valid case for overloading. Here number of arguments are different.
Case 4:
float mymethod(int a, float b) float mymethod(float var1, int var2)
Result: Perfectly fine. Valid case for overloading. Sequence of the data types are different, first method is having (int, float) and second is having (float, int).
Case 5:
int mymethod(int a, int b) float mymethod(int var1, int var2)
Result: Compile time error. Argument lists are exactly same. Even though return type of methods are different, it is not a valid case. Since return type of method doesn’t matter while overloading a method.
Guess the answers before checking it at the end of programs:
Question 1 – return type, method name and argument list same.
class Demo { public int myMethod(int num1, int num2) { System.out.println("First myMethod of class Demo"); return num1+num2; } public int myMethod(int var1, int var2) { System.out.println("Second myMethod of class Demo"); return var1-var2; } } class Sample4 { public static void main(String args[]) { Demo obj1= new Demo(); obj1.myMethod(10,10); obj1.myMethod(20,12); } }
Answer:
It will throw a compilation error: More than one method with same name and argument list cannot be defined in a same class.
Question 2 – return type is different. Method name & argument list same.
class Demo2 { public double myMethod(int num1, int num2) { System.out.println("First myMethod of class Demo"); return num1+num2; } public int myMethod(int var1, int var2) { System.out.println("Second myMethod of class Demo"); return var1-var2; } } class Sample5 { public static void main(String args[]) { Demo2 obj2= new Demo2(); obj2.myMethod(10,10); obj2.myMethod(20,12); } }
Answer:
It will throw a compilation error: More than one method with same name and argument list cannot be given in a class even though their return type is different. Method return type doesn’t matter in case of overloading.
Explain features of Java programming.
Features of Java
There is given many features of java. They are also known as java buzzwords. The Java Features given below are simple and easy to understand.
- Simple
- Object-Oriented
- Platform independent
- Secured
- Robust
- Architecture neutral
- Portable
- Dynamic
- Interpreted
- High Performance
- Multithreaded
- Distributed
Simple
| According to Sun, Java language is simple because: |
| syntax is based on C++ (so easier for programmers to learn it after C++). |
| removed many confusing and/or rarely-used features e.g., explicit pointers, operator overloading etc. |
| No need to remove unreferenced objects because there is Automatic Garbage Collection in java. |
Object-oriented
| Object-oriented means we organize our software as a combination of different types of objects that incorporates both data and behaviour. |
| Object-oriented programming(OOPs) is a methodology that simplify software development and maintenance by providing some rules. |
| Basic concepts of OOPs are: |
|
Platform Independent

A platform is the hardware or software environment in which a program runs.
There are two types of platforms software-based and hardware-based. Java provides software-based platform.
The Java platform differs from most other platforms in the sense that it is a software-based platform that runs on the top of other hardware-based platforms. It has two components:
- Runtime Environment
- API(Application Programming Interface)
Java code can be run on multiple platforms e.g. Windows, Linux, Sun Solaris, Mac/OS etc. Java code is compiled by the compiler and converted into bytecode. This bytecode is a platform-independent code because it can be run on multiple platforms i.e. Write Once and Run Anywhere(WORA).
Secured
Java is secured because:
- No explicit pointer
- Java Programs run inside virtual machine sandbox

- Classloader: adds security by separating the package for the classes of the local file system from those that are imported from network sources.
- Bytecode Verifier: checks the code fragments for illegal code that can violate access right to objects.
- Security Manager: determines what resources a class can access such as reading and writing to the local disk.
These security are provided by java language. Some security can also be provided by application developer through SSL, JAAS, Cryptography etc.
Robust
Robust simply means strong. Java uses strong memory management. There are lack of pointers that avoids security problem. There is automatic garbage collection in java. There is exception handling and type checking mechanism in java. All these points makes java robust.
Architecture-neutral
There is no implementation dependent features e.g. size of primitive types is fixed.
In C programming, int data type occupies 2 bytes of memory for 32-bit architecture and 4 bytes of memory for 64-bit architecture. But in java, it occupies 4 bytes of memory for both 32 and 64 bit architectures.
Portable
We may carry the java bytecode to any platform.
High-performance
| Java is faster than traditional interpretation since byte code is “close” to native code still somewhat slower than a compiled language (e.g., C++) |
Distributed
| We can create distributed applications in java. RMI and EJB are used for creating distributed applications. We may access files by calling the methods from any machine on the internet. |
Multi-threaded
A thread is like a separate program, executing concurrently. We can write Java programs that deal with many tasks at once by defining multiple threads. The main advantage of multi-threading is that it doesn’t occupy memory for each thread. It shares a common memory area. Threads are important for multi-media, Web applications etc.
Java – Numbers Class
Normally, when we work with Numbers, we use primitive data types such as byte, int, long, double, etc.
Example
int i = 5000; float gpa = 13.65; double mask = 0xaf;
However, in development, we come across situations where we need to use objects instead of primitive data types. In order to achieve this, Java provides wrapper classes.
All the wrapper classes (Integer, Long, Byte, Double, Float, Short) are subclasses of the abstract class Number.
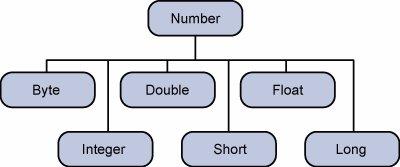
The object of the wrapper class contains or wraps its respective primitive data type. Converting primitive data types into object is called boxing, and this is taken care by the compiler. Therefore, while using a wrapper class you just need to pass the value of the primitive data type to the constructor of the Wrapper class.
And the Wrapper object will be converted back to a primitive data type, and this process is called unboxing. The Number class is part of the java.lang package.
Following is an example of boxing and unboxing −
Example
public class Test { public static void main(String args[]) { Integer x = 5; // boxes int to an Integer object x = x + 10; // unboxes the Integer to a int System.out.println(x); } }
This will produce the following result −
Output
15
When x is assigned an integer value, the compiler boxes the integer because x is integer object. Later, x is unboxed so that they can be added as an integer.
Number Methods
Following is the list of the instance methods that all the subclasses of the Number class implements −
| Sr.No. | Method & Description |
|---|---|
| 1 | xxxValue()
Converts the value of this Number object to the xxx data type and returns it. |
| 2 | compareTo()
Compares this Number object to the argument. |
| 3 | equals()
Determines whether this number object is equal to the argument. |
| 4 | valueOf()
Returns an Integer object holding the value of the specified primitive. |
| 5 | toString()
Returns a String object representing the value of a specified int or Integer. |
| 6 | parseInt()
This method is used to get the primitive data type of a certain String. |
| 7 | abs()
Returns the absolute value of the argument. |
| 8 | ceil()
Returns the smallest integer that is greater than or equal to the argument. Returned as a double. |
| 9 | floor()
Returns the largest integer that is less than or equal to the argument. Returned as a double. |
| 10 | rint()
Returns the integer that is closest in value to the argument. Returned as a double. |
| 11 | round()
Returns the closest long or int, as indicated by the method’s return type to the argument. |
| 12 | min()
Returns the smaller of the two arguments. |
| 13 | max()
Returns the larger of the two arguments. |
| 14 | exp()
Returns the base of the natural logarithms, e, to the power of the argument. |
| 15 | log()
Returns the natural logarithm of the argument. |
| 16 | pow()
Returns the value of the first argument raised to the power of the second argument. |
| 17 | sqrt()
Returns the square root of the argument. |
| 18 | sin()
Returns the sine of the specified double value. |
| 19 | cos()
Returns the cosine of the specified double value. |
| 20 | tan()
Returns the tangent of the specified double value. |
| 21 | asin()
Returns the arcsine of the specified double value. |
| 22 | acos()
Returns the arccosine of the specified double value. |
| 23 | atan()
Returns the arctangent of the specified double value. |
| 24 | atan2()
Converts rectangular coordinates (x, y) to polar coordinate (r, theta) and returns theta. |
| 25 | toDegrees()
Converts the argument to degrees. |
| 26 | toRadians()
Converts the argument to radians. |
| 27 | random()
Returns a random number. |
Java – Decision Making
Decision making structures have one or more conditions to be evaluated or tested by the program, along with a statement or statements that are to be executed if the condition is determined to be true, and optionally, other statements to be executed if the condition is determined to be false.
Following is the general form of a typical decision making structure found in most of the programming languages −
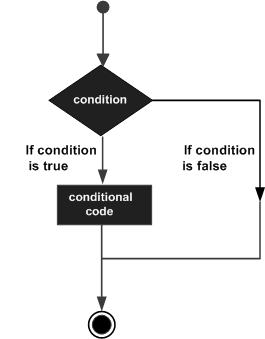
Java programming language provides following types of decision making statements. Click the following links to check their detail.
| Sr.No. | Statement & Description |
|---|---|
| 1 | if statement
An if statement consists of a boolean expression followed by one or more statements. |
| 2 | if…else statement
An if statement can be followed by an optional else statement, which executes when the boolean expression is false. |
| 3 | nested if statement
You can use one if or else if statement inside another if or else if statement(s). |
| 4 | switch statement
A switch statement allows a variable to be tested for equality against a list of values. |
The ? : Operator
We have covered conditional operator ? : in the previous chapter which can be used to replaceif…else statements. It has the following general form −
Exp1 ? Exp2 : Exp3;
Where Exp1, Exp2, and Exp3 are expressions. Notice the use and placement of the colon.
To determine the value of the whole expression, initially exp1 is evaluated.
-
If the value of exp1 is true, then the value of Exp2 will be the value of the whole expression.
-
If the value of exp1 is false, then Exp3 is evaluated and its value becomes the value of the entire expression.
Java – Loop Control
There may be a situation when you need to execute a block of code several number of times. In general, statements are executed sequentially: The first statement in a function is executed first, followed by the second, and so on.
Programming languages provide various control structures that allow for more complicated execution paths.
A loop statement allows us to execute a statement or group of statements multiple times and following is the general form of a loop statement in most of the programming languages −
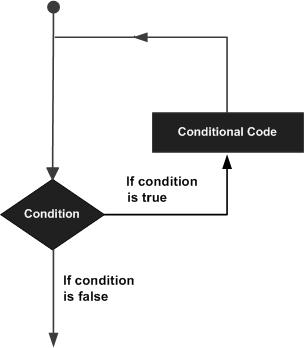
Java programming language provides the following types of loop to handle looping requirements. Click the following links to check their detail.
| Sr.No. | Loop & Description |
|---|---|
| 1 | while loop
Repeats a statement or group of statements while a given condition is true. It tests the condition before executing the loop body. |
| 2 | for loop
Execute a sequence of statements multiple times and abbreviates the code that manages the loop variable. |
| 3 | do…while loop
Like a while statement, except that it tests the condition at the end of the loop body. |
Loop Control Statements
Loop control statements change execution from its normal sequence. When execution leaves a scope, all automatic objects that were created in that scope are destroyed.
Java supports the following control statements. Click the following links to check their detail.
| Sr.No. | Control Statement & Description |
|---|---|
| 1 | break statement
Terminates the loop or switchstatement and transfers execution to the statement immediately following the loop or switch. |
| 2 | continue statement
Causes the loop to skip the remainder of its body and immediately retest its condition prior to reiterating. |
Enhanced for loop in Java
As of Java 5, the enhanced for loop was introduced. This is mainly used to traverse collection of elements including arrays.
Syntax
Following is the syntax of enhanced for loop −
for(declaration : expression) {
// Statements
}
-
Declaration − The newly declared block variable, is of a type compatible with the elements of the array you are accessing. The variable will be available within the for block and its value would be the same as the current array element.
-
Expression − This evaluates to the array you need to loop through. The expression can be an array variable or method call that returns an array.
Example
public class Test { public static void main(String args[]) { int [] numbers = {10, 20, 30, 40, 50}; for(int x : numbers ) { System.out.print( x ); System.out.print(","); } System.out.print("\n"); String [] names = {"James", "Larry", "Tom", "Lacy"}; for( String name : names ) { System.out.print( name ); System.out.print(","); } } }
This will produce the following result −
Output
10, 20, 30, 40, 50, James, Larry, Tom, Lacy,
Java – Basic Operators
Java provides a rich set of operators to manipulate variables. We can divide all the Java operators into the following groups −
- Arithmetic Operators
- Relational Operators
- Bitwise Operators
- Logical Operators
- Assignment Operators
- Misc Operators
The Arithmetic Operators
Arithmetic operators are used in mathematical expressions in the same way that they are used in algebra. The following table lists the arithmetic operators −
Assume integer variable A holds 10 and variable B holds 20, then −
| Operator | Description | Example |
|---|---|---|
| + (Addition) | Adds values on either side of the operator. | A + B will give 30 |
| – (Subtraction) | Subtracts right-hand operand from left-hand operand. | A – B will give -10 |
| * (Multiplication) | Multiplies values on either side of the operator. | A * B will give 200 |
| / (Division) | Divides left-hand operand by right-hand operand. | B / A will give 2 |
| % (Modulus) | Divides left-hand operand by right-hand operand and returns remainder. | B % A will give 0 |
| ++ (Increment) | Increases the value of operand by 1. | B++ gives 21 |
| — (Decrement) | Decreases the value of operand by 1. | B– gives 19 |
The Relational Operators
There are following relational operators supported by Java language.
Assume variable A holds 10 and variable B holds 20, then −
| Operator | Description | Example |
|---|---|---|
| == (equal to) | Checks if the values of two operands are equal or not, if yes then condition becomes true. | (A == B) is not true. |
| != (not equal to) | Checks if the values of two operands are equal or not, if values are not equal then condition becomes true. | (A != B) is true. |
| > (greater than) | Checks if the value of left operand is greater than the value of right operand, if yes then condition becomes true. | (A > B) is not true. |
| < (less than) | Checks if the value of left operand is less than the value of right operand, if yes then condition becomes true. | (A < B) is true. |
| >= (greater than or equal to) | Checks if the value of left operand is greater than or equal to the value of right operand, if yes then condition becomes true. | (A >= B) is not true. |
| <= (less than or equal to) | Checks if the value of left operand is less than or equal to the value of right operand, if yes then condition becomes true. | (A <= B) is true. |
The Bitwise Operators
Java defines several bitwise operators, which can be applied to the integer types, long, int, short, char, and byte.
Bitwise operator works on bits and performs bit-by-bit operation. Assume if a = 60 and b = 13; now in binary format they will be as follows −
a = 0011 1100
b = 0000 1101
—————–
a&b = 0000 1100
a|b = 0011 1101
a^b = 0011 0001
~a = 1100 0011
The following table lists the bitwise operators −
Assume integer variable A holds 60 and variable B holds 13 then −
| Operator | Description | Example |
|---|---|---|
| & (bitwise and) | Binary AND Operator copies a bit to the result if it exists in both operands. | (A & B) will give 12 which is 0000 1100 |
| | (bitwise or) | Binary OR Operator copies a bit if it exists in either operand. | (A | B) will give 61 which is 0011 1101 |
| ^ (bitwise XOR) | Binary XOR Operator copies the bit if it is set in one operand but not both. | (A ^ B) will give 49 which is 0011 0001 |
| ~ (bitwise compliment) | Binary Ones Complement Operator is unary and has the effect of ‘flipping’ bits. | (~A ) will give -61 which is 1100 0011 in 2’s complement form due to a signed binary number. |
| << (left shift) | Binary Left Shift Operator. The left operands value is moved left by the number of bits specified by the right operand. | A << 2 will give 240 which is 1111 0000 |
| >> (right shift) | Binary Right Shift Operator. The left operands value is moved right by the number of bits specified by the right operand. | A >> 2 will give 15 which is 1111 |
| >>> (zero fill right shift) | Shift right zero fill operator. The left operands value is moved right by the number of bits specified by the right operand and shifted values are filled up with zeros. | A >>>2 will give 15 which is 0000 1111 |
The Logical Operators
The following table lists the logical operators −
Assume Boolean variables A holds true and variable B holds false, then −
| Operator | Description | Example |
|---|---|---|
| && (logical and) | Called Logical AND operator. If both the operands are non-zero, then the condition becomes true. | (A && B) is false |
| || (logical or) | Called Logical OR Operator. If any of the two operands are non-zero, then the condition becomes true. | (A || B) is true |
| ! (logical not) | Called Logical NOT Operator. Use to reverses the logical state of its operand. If a condition is true then Logical NOT operator will make false. | !(A && B) is true |
The Assignment Operators
Following are the assignment operators supported by Java language −
| Operator | Description | Example |
|---|---|---|
| = | Simple assignment operator. Assigns values from right side operands to left side operand. | C = A + B will assign value of A + B into C |
| += | Add AND assignment operator. It adds right operand to the left operand and assign the result to left operand. | C += A is equivalent to C = C + A |
| -= | Subtract AND assignment operator. It subtracts right operand from the left operand and assign the result to left operand. | C -= A is equivalent to C = C – A |
| *= | Multiply AND assignment operator. It multiplies right operand with the left operand and assign the result to left operand. | C *= A is equivalent to C = C * A |
| /= | Divide AND assignment operator. It divides left operand with the right operand and assign the result to left operand. | C /= A is equivalent to C = C / A |
| %= | Modulus AND assignment operator. It takes modulus using two operands and assign the result to left operand. | C %= A is equivalent to C = C % A |
| <<= | Left shift AND assignment operator. | C <<= 2 is same as C = C << 2 |
| >>= | Bitwise AND assignment operator. | C >>= 2 is same as C = C >> 2 |
| &= | Right shift AND assignment operator. | C &= 2 is same as C = C & 2 |
| ^= | bitwise exclusive OR and assignment operator. | C ^= 2 is same as C = C ^ 2 |
| |= | bitwise inclusive OR and assignment operator. | C |= 2 is same as C = C | 2 |
Miscellaneous Operators
There are few other operators supported by Java Language.
Conditional Operator ( ? : )
Conditional operator is also known as the ternary operator. This operator consists of three operands and is used to evaluate Boolean expressions. The goal of the operator is to decide, which value should be assigned to the variable. The operator is written as −
variable x = (expression) ? value if true : value if false
Following is an example −
Example
public class Test { public static void main(String args[]) { int a, b; a = 10; b = (a == 1) ? 20: 30; System.out.println( "Value of b is : " + b ); b = (a == 10) ? 20: 30; System.out.println( "Value of b is : " + b ); } }
This will produce the following result −
Output
Value of b is : 30 Value of b is : 20
instanceof Operator
This operator is used only for object reference variables. The operator checks whether the object is of a particular type (class type or interface type). instanceof operator is written as −
( Object reference variable ) instanceof (class/interface type)
If the object referred by the variable on the left side of the operator passes the IS-A check for the class/interface type on the right side, then the result will be true. Following is an example −
Example
public class Test { public static void main(String args[]) { String name = "James"; // following will return true since name is type of String boolean result = name instanceof String; System.out.println( result ); } }
This will produce the following result −
Output
true
This operator will still return true, if the object being compared is the assignment compatible with the type on the right. Following is one more example −
Example
class Vehicle {} public class Car extends Vehicle { public static void main(String args[]) { Vehicle a = new Car(); boolean result = a instanceof Car; System.out.println( result ); } }
This will produce the following result −
Output
true
Precedence of Java Operators
Operator precedence determines the grouping of terms in an expression. This affects how an expression is evaluated. Certain operators have higher precedence than others; for example, the multiplication operator has higher precedence than the addition operator −
For example, x = 7 + 3 * 2; here x is assigned 13, not 20 because operator * has higher precedence than +, so it first gets multiplied with 3 * 2 and then adds into 7.
Here, operators with the highest precedence appear at the top of the table, those with the lowest appear at the bottom. Within an expression, higher precedence operators will be evaluated first.
| Category | Operator | Associativity |
|---|---|---|
| Postfix | >() [] . (dot operator) | Left toright |
| Unary | >++ – – ! ~ | Right to left |
| Multiplicative | >* / | Left to right |
| Additive | >+ – | Left to right |
| Shift | >>> >>> << | Left to right |
| Relational | >> >= < <= | Left to right |
| Equality | >== != | Left to right |
| Bitwise AND | >& | Left to right |
| Bitwise XOR | >^ | Left to right |
| Bitwise OR | >| | Left to right |
| Logical AND | >&& | Left to right |
| Logical OR | >|| | Left to right |
| Conditional | ?: | Right to left |
| Assignment | >= += -= *= /= %= >>= <<= &= ^= |= | Right to left |
Java – Modifier Types
Modifiers are keywords that you add to those definitions to change their meanings. Java language has a wide variety of modifiers, including the following −
To use a modifier, you include its keyword in the definition of a class, method, or variable. The modifier precedes the rest of the statement, as in the following example.
Example
public class className { // ... } private boolean myFlag; static final double weeks = 9.5; protected static final int BOXWIDTH = 42; public static void main(String[] arguments) { // body of method }
Access Control Modifiers
Java provides a number of access modifiers to set access levels for classes, variables, methods and constructors. The four access levels are −
- Visible to the package, the default. No modifiers are needed.
- Visible to the class only (private).
- Visible to the world (public).
- Visible to the package and all subclasses (protected).
Non-Access Modifiers
Java provides a number of non-access modifiers to achieve many other functionality.
-
The static modifier for creating class methods and variables.
-
The final modifier for finalizing the implementations of classes, methods, and variables.
-
The abstract modifier for creating abstract classes and methods.
-
The synchronized and volatile modifiers, which are used for threads.
The Java I/O Package
The Java I/O package, a.k.a. java.io, provides a set of input streams and a set of output streams used to read and write data to files or other input and output sources. There are three categories of classes in java.io: input streams, output streams and everything else.
The pages of this lesson provide overviews of Java’s I/O classes. They give information about what each class does and how you can use them. These pages do not provide any practical examples or details of each class. For more practical information regarding reading and writing data using these classes, see Input and Output Streams ![]() .
.
Input Streams
Input streams read data from an input source. An input source can be a file, a string, or memory–anything that can contain data. All input streams inherit from InputStream–an abstract class that defines the programming interface for all input streams.The InputStream class defines a programming interface for reading bytes or arrays of bytes, marking locations in the stream, skipping bytes of input, finding out the number of bytes that are available for reading, and resetting the current position within the stream. An input stream is automatically opened when you create it. You can explicitly close a stream with the
close()method, or let it be closed implicitly when the object is garbage collected.
Output Streams
Output streams write data to an output source. Similar to input sources, an output source can be anything that can contain data: a file, a string, or memory.The OutputStream class is a sibling to InputStream and is used to write data that can then be read by an input stream. The OutputStream class defines a programming interface for writing bytes or arrays of bytes to the stream and flushiing the stream. Like an input stream, an output stream is automatically opened when you create it. You can explicitly close an output stream with the
close()method, or let it be closed implicitly when the object is garbage collected.
Java I/O Tutorial
Java I/O (Input and Output) is used to process the input and produce the output based on the input.
Java uses the concept of stream to make I/O operation fast. The java.io package contains all the classes required for input and output operations.
We can perform file handling in java by java IO API.
Stream
A stream is a sequence of data.In Java a stream is composed of bytes. It’s called a stream because it’s like a stream of water that continues to flow.
In java, 3 streams are created for us automatically. All these streams are attached with console.
1) System.out: standard output stream
2) System.in: standard input stream
3) System.err: standard error stream
Let’s see the code to print output and error message to the console.
- System.out.println(“simple message”);
- System.err.println(“error message”);
Let’s see the code to get input from console.
- int i=System.in.read();//returns ASCII code of 1st character
- System.out.println((char)i);//will print the character
Difference between AWT and Swing in java
|
AWT |
Swing |
|
AWT stands for Abstract Window Toolkit. &IT TAKES MORE MEMORY |
Swing is a part of Java Foundation Class (JFC). &IT TAKES LESS MEMORY |
|
AWT components are heavy weight. &java.awt package required |
Swing components are light weight. javax.swing package required |
|
AWT components are platform dependent so there look and feel changes according to OS. |
Swing components are platform independent so there look and feel remains constant. |
|
AWT components are not very good in look and feel as compared to Swing components. See the button in below image, its look is not good as button created using Swing.
|
Swing components are better in look and feel as compared to AWT. See the button in below image, its look is better than button created using AWT.
|


Creating an Executable Applet
To create an executable jar file there should be a main class (a class with a main method) inside the jar to run the software.
An applet has no main method since it is usually designed to work inside a web browser.
Executable applet is nothing but the .class file of applet, which is obtained by compiling the source code of the applet.
Compiling the applet is exactly the same as compiling an application using following command.
javac appletname.java
The compiled output file called appletname.class should be placed in the same directory as the source file.
Download for more knowledge
https://play.google.com/store/apps/details?id=ab.java.programming
Life Cycle
init:
This method is intended for whatever initialization is needed for your applet. It is called after the param tags inside the applet tag have been processed.
start:
This method is automatically called after the browser calls the init method. It is also called whenever the user returns to the page containing the applet after having gone off to other pages.
stop:
This method is automatically called when the user moves off the page on which the applet sits. It can, therefore, be called repeatedly in the same applet.
destroy:
This method is only called when the browser shuts down normally. Because applets are meant to live on an HTML page, you should not normally leave resources behind after a user leaves the page that contains the applet.
paint:
Invoked immediately after the start() method, and also any time the applet needs to repaint itself in the browser. The paint() method is actually inherited from the java.awt.
Download for more knowledge
https://play.google.com/store/apps/details?id=ab.java.programming
Introduction applet
An applet is a small Java program that is embedded and ran in some other Java interpreter program such as a Java technology-enabled browser Or Sun’s applet viewer program called appletviewer.
An applet can be a fully functional Java application because it has the entire Java API at its disposal.
Key Points
An applet program is a written as a inheritance of the java.Appletclass
There is no main() method in an Applet.
Applets are designed to be embedded within an HTML page.
An applet uses AWT for graphics
A JVM is required to view an applet. The JVM can be either a plug-in of the Web browser or a separate runtime environment.
Other classes that the applet needs can be downloaded in a single Java Archive (JAR) file.
Advantages
1. Automatically integrated with HTML; hence, resolved virtually all installation issues.
2. Can be accessed from various platforms and various java-enabled web browsers.
3. Can provide dynamic, graphics capabilities and visualizations
4. Implemented in Java, an easy-to-learn OO programming language
5. Alternative to HTML GUI design
6. Safe! Because of the security built into the core Java language and the applet structure, you don’t have to worry about bad code causing damage to someone’s system
7. Can be launched as a standalone web application independent of the host web server
Disadvantages
1. Applets can’t run any local executable programs
2. Applets can’t with any host other than the originating server
3. Applets can’t read/write to local computer’s file system
4. Applets can’t find any information about the local computer
5. All java-created pop-up windows carry a warning message
6. Stability depends on stability of the client’s web server
7. Performance directly depend on client’s machine
Download for more knowledge
https://play.google.com/store/apps/details?id=ab.java.programming
Java Programming
11.3 Custom Exception
Custom exceptions in java are also known as User defined exceptions.
Most of the times when we are developing java program, we often feel a need to use our own exceptions. These exceptions are known as Custom exceptions or User defined.
We can create our own exception sub class simply by extending java Exception class.
We can define a constructor for our Exception sub class (not compulsory) and can override the toString() function to display our customized message on catch.
class MyException extends Exception{
String str;
MyException(String str) {
this.str=str;
}
public String toString(){
return (“message = “+str);
}
}
class CustomException{
public static void main(String args[]){
try{
throw new MyException(“HELLO”);
}
catch(MyException e){
System.out.println(e);
}
}
}
Output:
message= HELLO
Note:
1. User defined exception needs to inherit (extends) Exception class in order to act as an exception.
2. throw keyword is used to throw such exceptions.
3. You can have a Constructor if you want.
4. You can override the toString() function, to display customized message.
Download for more knowledge
https://play.google.com/store/apps/details?id=ab.java.programming
Java Programming
11.2 Try Catch
A method catches an exception using a combination of the try and catch keywords.
A try/catch block is placed around the code that might generate an exception.
Code within a try/catch block is referred to as protected code, and the syntax for using try/catch looks like the following:
try
{
//Protected code
}catch(ExceptionName e1)
{
//Catch block
}
The code which is prone to exceptions is placed in the try block, when an exception occurs, that exception occurred is handled by catch block associated with it.
Every try block should be immediately followed either by a class block or finally block.
Multiple catch Blocks
A try block can be followed by multiple catch blocks. The syntax for multiple catch blocks looks like the following:
try
{
//Protected code
}catch(ExceptionType1 e1)
{
//Catch block
}catch(ExceptionType2 e2)
{
//Catch block
}catch(ExceptionType3 e3)
{
//Catch block
}
this is just an example of 3 catch statements you can have any number of them If an exception occurs in the protected code, the exception is thrown to the first catch block in the list. If the data type of the exception thrown matches ExceptionType1, it gets caught there. If not, the exception passes down to the second catch statement. This continues until the exception either is caught or falls through all catches, in which case the current method stops execution and the exception is thrown down to the previous method on the call stack.
Finally block
Java finally block is a block that is used to execute important code such as closing connection, stream etc.
Java finally block is always executed whether exception is handled or not.
Java finally block must be followed by try or catch block.
Syntax
try
{
//statements that may cause an exception
}
finally
{
//statements to be executed
}
Download for more knowledge
https://play.google.com/store/apps/details?id=ab.java.programming
Java Programming
11.1 Exceptions
An Exception can be anything which interrupts the normal execution of the program. When an exception occurs program processing terminates abnormally. In such cases we get a system generated error message. The good thing about exceptions is that they can be handled.
An exception can occur for many different reasons like Opening a non-existing file, Network connection problem, invalid data entered, class file missing which was supposed to be loaded and so on.
Types of exceptions
Checked exceptions
A checked exception is an exception that occurs at the compile time, these are also called as compile time exceptions.
If these exceptions are not handled/declared in the program, it will give compilation error.
Examples of Checked Exceptions :-
ClassNotFoundException
IllegalAccessException
NoSuchFieldException
EOFException etc.
Unchecked Exceptions
Runtime Exceptions are also known as Unchecked Exceptions as the compiler do not check whether the programmer has handled them or not but it’s the duty of the programmer to handle these exceptions and provide a safe exit.
These exceptions need not be included in any method’s throws list because compiler does not check to see if a method handles or throws these exceptions.
Examples of Unchecked Exceptions:-
ArithmeticException
ArrayIndexOutOfBoundsException
NullPointerException
NegativeArraySizeException etc.
Advantages of Exception Handling
1. Exception handling allows us to control the normal flow of the program by using exception handling in program.
2. It throws an exception whenever a calling method encounters an error providing that the calling method takes care of that error.
3. It also gives us the scope of organizing and differentiating between different error types using a separate block of codes. This is done with the help of try-catch blocks.
Download for more knowledge
https://play.google.com/store/apps/details?id=ab.java.programming
Java Programming
10.5 Synchronization
Thread synchronization is the concurrent execution of two or more threads that share critical resources.
Threads should be synchronized to avoid critical resource use conflicts. Otherwise, conflicts may arise when parallel-running threads attempt to modify a common variable at the same time.
if multiple threads try to write within a same file then they may corrupt the data because one of the threads can overrite data or while one thread is opening the same file at the same time another thread might be closing the same file.
So there is a need to synchronize the action of multiple threads and make sure that only one thread can access the resource at a given point in time. This is implemented using a concept called monitors.
Each object in Java is associated with a monitor, which a thread can lock or unlock. Only one thread at a time may hold a lock on a monitor.
Java programming language provides a very handy way of creating threads and synchronizing their task by using synchronized blocks. You keep shared resources within this block.
Syntax
synchronized (object reference expression)
{
//code block
}
Here, the object identifier is a reference to an object whose lock associates with the monitor that the synchronized statement represents.
Download for more knowledge
https://play.google.com/store/apps/details?id=ab.java.programming
Java Programming
10.4 Exception & priority
Exception
IllegalArgumentException
if the priority is not in the range MIN_PRIORITY to MAX_PRIORITY.
SecurityException
if the current thread cannot modify this thread.
Priority of a Thread (Thread Priority):
Java permits us to set the priority of a thread using the setPriority() method as follows:
ThreadName.setPriority(intNumber);
Each thread have a priority. Priorities are represented by a number between 1 and 10. In most cases, thread schedular schedules the threads according to their priority (known as preemptive scheduling). But it is not guaranteed because it depends on JVM specification that which scheduling it chooses.
3 constants defiend in Thread class:
public static int MIN_PRIORITY
public static int NORM_PRIORITY
public static int MAX_PRIORITY
Default priority of a thread is 5 (NORM_PRIORITY).
The value of MIN_PRIORITY is 1.
The value of MAX_PRIORITY is 10.
Example:
class TestPriority extends Thread{
public void run(){
System.out.println(“running thread name is:”+Thread.currentThread().getName());
System.out.println(“running thread priority is:”+Thread.currentThread().getPriority());
}
public static void main(String args[]){
TestPriority1 m1=new TestPriority1();
TestPriority1 m2=new TestPriority1();
m1.setPriority(Thread.MIN_PRIORITY);
m2.setPriority(Thread.MAX_PRIORITY);
m1.start();
m2.start();
}
}
Output:
running thread name is:Thread-0
running thread priority is:10
running thread name is:Thread-1
running thread priority is:1
Download for more knowledge
https://play.google.com/store/apps/details?id=ab.java.programming
Java Programming
10.3 Life Cycle
The life cycle of the thread in java is controlled by JVM.
A thread can be in one of the five states.
New
Runnable
Running
Non-Runnable (Blocked)
Terminated
1) New
The thread is in new state if you create an instance of Thread class but before the invocation of start() method.
2) Runnable
The thread is in runnable state after invocation of start() method, but the thread scheduler has not selected it to be the running thread.
3) Running
The thread is in running state if the thread scheduler has selected it.
4) Non-Runnable (Blocked)
This is the state when the thread is still alive, but is currently waiting for other thread to finish using thread join or it can be waiting for some resources to available
5) Terminated
A thread is in terminated or dead state when its run() method exits.
Download for more knowledge
https://play.google.com/store/apps/details?id=ab.java.programming
Java Programming
10.2 Stopping & blocking
Stopping a thread:
Whenever we want to stop a thread from running further,we may do so by calling its stop() method, like:
aThread.stop();
This statement cause the thread to move to the dead state.The stop method may used when the premature death of a thread is desired.
Blocking a thread:
A thread can also be temporarily suspended or blocked from entering into the runnable and subsequently running state by using either of the following thread methods:
sleep()
//blocked for a specified time
suspend()
//blocked until further orders
wait()
//blocked until certain condition occurs
These methods cause the thread to go into the blocked(or not-runnable) state.
Download for more knowledge
https://play.google.com/store/apps/details?id=ab.java.programming
Java Programming
10.1 Creating thread
Threads are implemented in the form of objects that contain a method called run().
The run() method is the heart and soul of any thread.
public void run()
{
/* Your implementation of thethread here*/
}
The run() method should be invoked by an object of the concerned thread.This can be achieved by creating the thread and initiating it with the help of another thread method called start().
A new thread can be created in two ways:
1. By creating a thread class:
Define a class that extends Thread class and override its run() method with the code required by the thread.
2. By converting a class to a thread:
Define a class that implements Runnable interface.The runnable interface has only one method, run(), that is to be defined in the method with the code to be executed by the thread.
Download for more knowledge
https://play.google.com/store/apps/details?id=ab.java.programming
Java Programming
9.3 System packages
The package named java contains the package awt,which in turn contains various classes required for implementing graphical user interface.
There are two ways of accessing the classes stored in a package.
The first approach is to use the fully qualified class name of the class that we want to use.
for example, if we want to refer to the class Color in the awt package, then we may do so as follows
java.awt.Colour
Notice that awt is a package within the package java and the hierarchy is represented by separating the levels with dots.
This approach is perhaps the best and easiest one if we need to access the class only once or when we need not have to access any other classes of the package.
But, in many situations, we might want to use a class in a number of places in the program or we may like to use many of the classes contained in a package.
We may achieve this easily as follows:
import packagename.classname;
or
import packagename.*
These are known as import statements and must appear at the top of the file, before any class declarations, import is a keyword.
Download for more knowledge
https://play.google.com/store/apps/details?id=ab.java.programming
Java Programming
9.2 Java API package
An Application Programming Interface (API), in the context of Java, is a collection of prewritten packages, classes, and interfaces with their respective methods, fields and constructors.
Similar to a user interface, which facilitates interaction between humans and computers, an API serves as a software program interface facilitating interaction.
In Java, most basic programming tasks are performed by the API’s classes and packages, which are helpful in minimizing the number of lines written within pieces of code.
Java system packages and their classes:
java.lang
language support classes.They include classes for primitive types, strings,math functions,threads and exceptions.
java.util
Language utility classes such as vectors, hash tables, random numbers, date etc.
java.io
Input/Output support classes. They provides facilities for the input and output of data.
java.awt
Set of classes for implementing graphical user interface.They include classes for windows, buttons, lists, menus and so on.
java.net
classes for networking. They include classes for communicating with local computers as well as with internet servers.
java.applet
Classes for creating and implement?ing applets.
Download for more knowledge
https://play.google.com/store/apps/details?id=ab.java.programming
Java Programming
9.1 Introduction to packages
A java package is a group of similar types of classes, interfaces and sub-packages.
Package in java can be categorized in two form, built-in package and user-defined package.
There are many built-in packages such as java, lang, awt, javax, swing, net, io, util, sql etc.
Advantage of Java Package
1) Java package is used to categorize the classes and interfaces so that they can be easily maintained.
2) Java package provides access protection.
3) Java package removes naming collision.
Example
The package keyword is used to create a package in java.
package mypack;
public class Simple{
public static void main(String args[]){
System.out.println(“Welcome to package”);
}
}
Download for more knowledge
https://play.google.com/store/apps/details?id=ab.java.programming
Java Programming
8.4 Accessing Interface
interfaces can be used to declare a set of constants that can be used in different classes.
This is similar to creating header files in c++ to contain large number of constants.
Since such interfaces do not contain methods,there is no need to worry about implementing any methods.
The constant value will be available to any class that implements the interface.
The values can be used in any method, as part of any variable declaration, or anywhere where we can use a final value.
Example:
interface A
{
int m=10;
int n=50;
}
class B implements A
{
int x=m;
void methodB(int size)
{
…
…
if(size<n)
}
} </n)
Download for more knowledge
https://play.google.com/store/apps/details?id=ab.java.programming
Java Programming
8.3 Implementing Interfaces
A class uses the implements keyword to implement an interface. The implements keyword appears in the class declaration following the extends portion of the declaration.
class classname implements interfacename
{
body of classname
}
here the classname “implements” the interface interfacename. A more general form of implementation may look like this:
class classname extends superclass implements interface1,interface2,…
{
body of classname
}
Example:
interface MyInterface
{
public void method1();
public void method2();
}
class XYZ implements MyInterface
{
public void method1()
{
System.out.println(“implementation of method1”);
}
public void method2()
{
System.out.println(“implementation of method2”);
}
public static void main(String arg[])
{
MyInterface obj = new XYZ();
obj. method1();
}
}
Output:
implementation of method1
Download for more knowledge
https://play.google.com/store/apps/details?id=ab.java.programming
Java Programming
8.2 Extending Interfaces
An interface can extend another interface, similarly to the way that a class can extend another class.
The extends keyword is used to extend an interface, and the child interface inherits the methods of the parent interface.
this is achieved using the keyword extends as shown below:
public class C extends A implements B {
//trying to override doSomthing…
public int myMethod(int x) {
return doSomthingElse(x);
}
}
Example
interface ItemConstants
{
int code=2015;
string name=”Akshay”;
}
interface Item extends ItemConstants
{
void display();
}
Download for more knowledge
https://play.google.com/store/apps/details?id=ab.java.programming
Java Programming
8.1 Defining Interfaces
An interface is a reference type in Java, it is similar to class, it is a collection of abstract methods.
A class implements an interface, thereby inheriting the abstract methods of the interface. Along with abstract methods an interface may also contain constants, default methods, static methods, and nested types. Method bodies exist only for default methods and static methods.
Writing an interface is similar to writing a class. But a class describes the attributes and behaviours of an object. And an interface contains behaviours that a class implements.
Unless the class that implements the interface is abstract, all the methods of the interface need to be defined in the class.
The General form of an interface definition is:
[visibility] interface InterfaceName [extends other interfaces]
{
variables declarations;
abstract method declarations;
}
here, interface is the keyword and InterfaceName is any valid java variable(just like class name).
variables are declared as follows:
static final tyoe VariableName=Value;
example:
interface printable{
void print();
}
class A6 implements printable{
public void print(){System.out.println(“Hello”);}
public static void main(String args[]){
A6 obj = new A6();
obj.print();
}
}
Output: Hello
Download for more knowledge
https://play.google.com/store/apps/details?id=ab.java.programming
Java Programming
7.4 Wrapper Class
As the name says, a wrapper class wraps (encloses) around a data type and gives it an object appearance.
Wherever, the data type is required as an object, this object can be used. Wrapper classes include methods to unwrap the object and give back the data type.
It can be compared with a chocolate. The manufacturer wraps the chocolate with some foil or paper to prevent from pollution. The user takes the chocolate, removes and throws the wrapper and eats it.
The list of eight wrapper classes are given below:
Primitive Type => Wrapper class
boolean => Boolean
char => Character
byte => Byte
short => Short
int => Integer
long => Long
float => Float
double => Double
Creating objects of the Wrapper classes
All the wrapper classes have constructors which can be used to create the corresponding Wrapper class
For example
Integer intObject = new Integer (15);
Retrieving the value wrapped by a wrapper class object
Each of the eight wrapper classes have a method to retrieve the value that was wrapped in the object.
For example, to retrieve the value stored in the Integer object intObject, we use the following statement.
int x = intObject.intValue();
Similarly, we have methods for the other seven wrapper classes: byteValue(), shortValue(), longValue(), floatValue(), doubleValue(), charValue(), booleanValue().
Auto boxing and auto unboxing
Above given method can become quite cumbersome.
As an alternative, there exists auto boxing and autounboxing.
Auto boxing refers to an implicit call to the constructor and auto unboxing refers to an implicit call to the *value() method.
Therefore, a new wrapper object can be created by specifying the value to be wrapped just as we would do for a primitive data type variable. Also, the value can be retrieved and used in a simple way by specifying the object name.
Look at the following code:
Integer intObject = 34;
int x=intObject;
int x = intObject + 7;
The above statements are equivalent to the following set of statements
Integer intObject = new Integer (34);
int x = intObject.intValue();
int x = intObject .intValue()+ 7;
Similarly, auto boxing and auto boxing apply to other wrapper classes also.
Download for more knowledge
https://play.google.com/store/apps/details?id=ab.java.programming
Java Programming
7.3 Vectors
Vector implements List Interface. Like ArrayList it also maintains insertion order but it is rarely used in non-thread environment as it is synchronized and due to which it gives poor performance in searching, adding, delete and update of its elements.
Three ways to create vector class object:
Method 1:
Vector vec = new Vector();
It creates an empty Vector with the default initial capacity of 10. It means the Vector will be re-sized when the 11th elements needs to be inserted into the Vector. Note: By default vector doubles its size.
i.e. In this case the Vector size would remain 10 till 10 insertions and once we try to insert the 11th element It would become 20 (double of default capacity 10).
Method 2:
Vector object= new Vector(int initialCapacity)
Vector vec = new Vector(3);
It will create a Vector of initial capacity of 3.
Method 3:
Vector object= new vector(int initialcapacity, capacityIncrement)
Vector vec= new Vector(4, 6)
Here we have provided two arguments. The initial capacity is 4 and capacityIncrement is 6. It means upon insertion of 5th element the size would be 10 (4+6) and on 11th insertion it would be 16(10+6).
Vector Methods:
void addElement(Object element):
It inserts the element at the end of the Vector.
int capacity():
This method returns the current capacity of the vector.
int size():
It returns the current size of the vector.
void setSize(int size):
It changes the existing size with the specified size.
boolean contains(Object element):
This method checks whether the specified element is present in the Vector. If the element is been found it returns true else false.
boolean containsAll(Collection c):
It returns true if all the elements of collection c are present in the Vector.
Object elementAt(int index):
It returns the element present at the specified location in Vector.
Object firstElement():
It is used for getting the first element of the vector.
Object lastElement():
Returns the last element of the array.
Object get(int index):
Returns the element at the specified index.
boolean isEmpty():
This method returns true if Vector doesn’t have any element.
boolean removeElement(Object element):
Removes the specifed element from vector.
boolean removeAll(Collection c):
It Removes all those elements from vector which are present in the Collection c.
void setElementAt(Object element, int index):
It updates the element of specifed index with the given element.
Download for more knowledge
https://play.google.com/store/apps/details?id=ab.java.programming
Java Programming
7.2 String
In java, string is basically an object that represents sequence of char values. The Java platform provides the String class to create and manipulate strings.
Creating Strings:
1) The most direct way to create a string is to write:
String str1 = “Hello Java!”;
2) Using another String object
String str2 = new String(str1);
3) Using new Keyword
String str3 = new String(“Java”);
4) Using + operator (Concatenation)
String str4 = str1 + str2;
or,
String str5 = “hello”+”Java”;
String Length:
length() method returns the number of characters contained in the string object.
String str1 = “Hello Java”;
int len = str1.length();
System.out.println( “String Length is : ” + len );
Concatenating Strings:
The String class includes a method for concatenating two strings:
string1.concat(string2);
This returns a new string that is string1 with string2 added to it at the end. You can also use the concat() method with string literals, as in:
“Hello “.concat(“Java”);
Strings are more commonly concatenated with the + operator, as in:
“Hello ” + ” Java” + “!”
which results in:
“Hello Java!”
String Methods :
1 char charAt(int index)
returns char value for the particular index
2 int length()
returns string length
3 static String format(String format, Object… args)
returns formatted string
4 static String format(Locale l, String format, Object… args)
returns formatted string with given locale
5 String substring(int beginIndex)
returns substring for given begin index
6 String substring(int beginIndex, int endIndex)
returns substring for given begin index and end index
7 boolean contains(CharSequence s)
returns true or false after matching the sequence of char value
8 static String join(CharSequence delimiter, CharSequence… elements)
returns a joined string
9 static String join(CharSequence delimiter, Iterable elements)
returns a joined string
10 boolean equals(Object another)
checks the equality of string with object
11 boolean isEmpty()
checks if string is empty
12 String concat(String str)
concatinates specified string
13 String replace(char old, char new)
replaces all occurrences of specified char value
14 String replace(CharSequence old, CharSequence new)
replaces all occurrences of specified CharSequence
15 String trim()
returns trimmed string omitting leading and trailing spaces
16 String split(String regex)
returns splitted string matching regex
17 String split(String regex, int limit)
returns splitted string matching regex and limit
18 String intern()
returns interned string
19 int indexOf(int ch)
returns specified char value index
20 int indexOf(int ch, int fromIndex)
returns specified char value index starting with given index
21 int indexOf(String substring)
returns specified substring index
22 int indexOf(String substring, int fromIndex)
returns specified substring index starting with given index
23 String toLowerCase()
returns string in lowercase.
24 String toLowerCase(Locale l)
returns string in lowercase using specified locale.
25 String toUpperCase()
returns string in uppercase.
26 String toUpperCase(Locale l)
returns string in uppercase using specified locale.
Download for more knowledge
https://play.google.com/store/apps/details?id=ab.java.programming
Java Programming
7.1 Arrays
Array is an object the contains elements of similar data type. It is a data structure where we store similar elements. We can store only fixed set of elements in a java array.
Array in java is index based, first element of the array is stored at 0 index.
Types of Array in java
1. Single Dimensional Array
2. Multidimensional Array
1. Single Dimensional Array
Declaring Array Variables:
To use an array in a program, you must declare a variable to reference the array, and you must specify the type of array the variable can reference. Here is the syntax for declaring an array variable:
dataType[] arrayName;
or
dataType arrayName[];
Instantiating Arrays:
You can instantiate an array by using the new operator with the following syntax:
arrayName = new dataType[arraySize];
The above statement does two things:
It creates an array using new dataType[arraySize];
It assigns the reference of the newly created array to the variable arrayName.
2. Multidimensional Array
Syntax to Declare Multidimensional Array in java
dataType[][] arrayName; or
dataType arrayName[][];
Example to instantiate Multidimensional Array
int[][] arr=new int[2][3];
//2 row and 3 column
Example to initialize Multidimensional Array in java
arr[0][0]=1;
arr[0][1]=2;
arr[0][2]=3;
arr[1][0]=4;
arr[1][1]=5;
arr[1][2]=6;
Passing Arrays to Methods:
Just as you can pass primitive type values to methods, you can also pass arrays to methods. For example, the following method displays the elements in an int array:
public static void display(int[] arr) {
for (int i = 0; i < arr.length; i++) {
System.out.print(arr[i] + ” “);
}
}
Returning an Array from a Method:
A method may also return an array. For example, the method shown below returns an array that is the copy of another array:
public static int[] copyarray(int[] list) {
int[] result = new int[list.length];
for (int i = 0; i < list.length – 1 ; i++) {
result[i] = list[i];
}
return result;
}
Arrays Methods :
Arrays.binarySearch(Object[] a, Object key)
Searches the specified array of Object ( Byte, Int , double, etc.) for the specified value using the binary search algorithm. The array must be sorted prior to making this call. This returns index of the search key.
Arrays.equals(long[] a, long[] a2)
Returns true if the two specified arrays of longs are equal to one another. Two arrays are considered equal if both arrays contain the same number of elements, and all corresponding pairs of elements in the two arrays are equal.
Arrays.fill(int[] a, int val)
Assigns the specified int value to each element of the specified array of ints. Same method could be used by all other primitive data types (Byte, short, Int etc.)
Arrays.sort(Object[] a)
Sorts the specified array of objects into ascending order, according to the natural ordering of its elements. Same method could be used by all other primitive data types ( Byte, short, Int, etc.)
Download for more knowledge
https://play.google.com/store/apps/details?id=ab.java.programming
Java Programming
6.10 Abstraction
Abstraction is a process of hiding the implementation details and showing only functionality to the user.
Another way, it shows only important things to the user and hides the internal details for example sending sms, you just type the text and send the message. You don’t know the internal processing about the message delivery.
Abstraction lets you focus on what the object does instead of how it does it.
There are two ways to achieve abstraction in java
– Abstract class (0 to 100%)
– Interface (100%)
Abstract class
A class that is declared as abstract is known as abstract class. It needs to be extended and its method implemented. It cannot be instantiated.
Example abstract class
abstract class A{
}
Abstract method
A method that is declared as abstract and does not have implementation is known as abstract method.
Example abstract method
abstract void printStatus();
//no body and abstract
Download for more knowledge
https://play.google.com/store/apps/details?id=ab.java.programming
Java Programming
6.9 Final keyword
The final keyword in java is used to restrict the user. The java final keyword can be used in many context. Final can be:
– variable
– method
– class
The final keyword can be applied with the variables, a final variable that have no value it is called blank final variable or uninitialized final variable. It can be initialized in the constructor only. The blank final variable can be static also which will be initialized in the static block only.
1) Java final variable
If you make any variable as final, you cannot change the value of final variable(It will be constant).
Example of final variable There is a final variable speedlimit, we are going to change the value of this variable, but It can’t be changed because final variable once assigned a value can never be changed.
class Game{
final int speedlimit=90;//final variable
void run(){
speedlimit=400;
}
public static void main(String args[]){
Game obj=new Game();
obj.run();
}
}//end of class
Output:Compile Time Error
2) Java final method
If you make any method as final, you cannot override it.
Example of final method
class Game{
final void run(){System.out.println(“bowling”);}
}
class Cricket extends Game{
void run(){System.out.println(“bowling safely with 100kmph”);}
public static void main(String args[]){
Cricket cricket= new Cricket();
cricket.run();
}
}
Output:Compile Time Error
3) Java final class
If you make any class as final, you cannot extend it.
Example of final class
final class Game{}
class Cricket extends Game{
void run(){System.out.println(“bowling safely with 100kmph”);}
public static void main(String args[]){
Cricket cricket= new Cricket();
cricket.run();
}
}
Output:Compile Time Error
Download for more knowledge
https://play.google.com/store/apps/details?id=ab.java.programming
Java Programming
6.8 Types of Inheritance
Syntax of Java Inheritance
Single inheritance is damn easy to understand. When a class extends another one class only then we call it a single inheritance. The below example shows that class B extends only one class which is A. Here A is a parent class of B and B would be a child class of A.
class A{
}
class B extends A{
}
2) Multiple Inheritance
”Multiple Inheritance” refers to the concept of one class extending (Or inherits) more than one base class. The inheritance we learnt earlier had the concept of one base class or parent. The problem with ”multiple inheritance” is that the derived class will have to manage the dependency on two base classes.
Most of the new OO languages like Small Talk, Java, C# do not support Multiple inheritance. Multiple Inheritance is supported in C++.
class A{
}
class B{
}
class C extends A,B{
}
3) Multilevel Inheritance
Multilevel inheritance refers to a mechanism in OO technology where one can inherit from a derived class, thereby making this derived class the base class for the new class. As you can see in below example C is subclass or child class of B and B is a child class of A.
class A{
}
class B extends A{
}
class C extends B{
}
4) Hierarchical Inheritance
In such kind of inheritance one class is inherited by many sub classes. In below example class B,C and D inherits the same class A. A is parent class (or base class) of B,C & D.
class A{
}
class B extends A{
}
class C extends A{
}
class D extends A{
}
5) Hybrid Inheritance
In simple terms you can say that Hybrid inheritance is a combination of Single and Multiple inheritance.
A hybrid inheritance can be achieved in the java in a same way as multiple inheritance can be!! Using interfaces. yes you heard it right. By using interfaces you can have multiple as well as hybrid inheritance in Java.
Download for more knowledge
https://play.google.com/store/apps/details?id=ab.java.programming
Java Programming
6.7 Inheritance
Inheritance is one of the key features of Object Oriented Programming.
Inheritance provided mechanism that allowed a class to inherit property of another class. When a Class extends another class it inherits all non-private members including fields and methods.
The class which inherits the properties of other is known as subclass (derived class, child class) and the class whose properties are inherited is known as superclass (base class, parent class).
Inheritance defines is-a relationship between a Super class and its Sub class. extends and implements keywords are used to describe inheritance in Java.
Why use inheritance in java
-For Method Overriding (so runtime polymorphism can be achieved).
-For Code Reusability.
Syntax of Java Inheritance
class Subclass-name extends Superclass-name
{
//methods and fields
}
extends is the keyword used to inherit the properties of a class.
super keyword
In Java, super keyword is used to refer to immediate parent class of a class. In other words super keyword is used by a subclass whenever it need to refer to its immediate super class.
Download for more knowledge
https://play.google.com/store/apps/details?id=ab.java.programming
Java Programming
6.6 Static keyword
The static keyword in java is used for memory management mainly. We can apply java static keyword with variables, methods, blocks and nested class. The static keyword belongs to the class than instance of the class.
The static can be:
1. variable (also known as class variable)
2. method (also known as class method)
3. block
4. nested class
Variables and methods marked static belong to the class rather than to any particular instance of the class. These can be used without having any instances of that class at all. Only the class is sufficient to invoke a static method or access a static variable. A static variable is shared by all the instances of that class i.e only one copy of the static variable is maintained.
class Counter
{
static int animalCount=0;
public Counter()
{
count+=1;
}
public static void main(String[] args)
{
new Counter();
new Counter();
new Counter();
System.out.println(”The Number of Animals is: ”+count);
}
}
Output:
The Number of Animals is: 3.
A static method cannot access non-static/instance variables, because a static method is never associated with any instance. The same applies with the non-static methods as well, a static method can’t directly invoke a non-static method. But static method can access non-static methods by means of declaring instances and using them.
Accessing static variables and methods
In case of instance methods and instance variables, instances of that class are used to access them.
.
.
class Counter
{
static int count=0;
public Counter()
{
count+=1;
}
public static int getCount()
{
return count;
}
}
class TestAnimal
{
public static void main(String[] args)
{
new Counter();
new Counter();
new Counter();
System.out.println(”The Counter is: ”+ Counter.getCount());
/* Notice the way in which the Static method is called using the class name followed by static method. */
}
}
Remember that static methods can’t be overridden. They can be redefined in a subclass, but redifining and overriding aren’t the same thing. Its called as Hiding.
Download for more knowledge
https://play.google.com/store/apps/details?id=ab.java.programming
Java Programming
6.5 Method Overriding
If subclass (child class) has the same method as declared in the parent class, it is known as method overriding in java.
In other words, If subclass provides the specific implementation of the method that has been provided by one of its parent class, it is known as method overriding.
Rules for method overriding:
1. The argument list should be exactly the same as that of the overridden method.
2. The return type should be the same or a subtype of the return type declared in the original overridden method in the superclass.
3. The access level cannot be more restrictive than the overridden method’s access level.
4. Instance methods can be overridden only if they are inherited by the subclass.
5. A method declared final cannot be overridden.
6. A method declared static cannot be overridden but can be re-declared.
7. If a method cannot be inherited, then it cannot be overridden.
8. A subclass within the same package as the instance’s superclass can override any superclass method that is not declared private or final.
9. A subclass in a different package can only override the non-final methods declared public or protected.
10. Constructors cannot be overridden.
Advantage:
The main advantage of method overriding is that the class can give its own specific implementation to a inherited method without even modifying the parent class(base class).
Example:
class Base{
public void display()
{
System.out.println(“this is base class”);
}
}
class Child extends Base{
public void display(){
System.out.println(“this is child class”);
}
public static void main( String args[]) {
Child obj = new Child();
obj.display();
}
}
output
this is child class
Using the super keyword:
When invoking a base class version of an overridden method the super keyword is used. class Base{
public void display()
{
System.out.println(“this is base class”);
}
}
class Child extends Base{
public void display(){
super.display(); // invokes the super class method System.out.println(“this is child class”);
}
public static void main( String args[]) {
Child obj = new Child();
obj.display();
}
}
output
this is base class
this is child class
Download for more knowledge
https://play.google.com/store/apps/details?id=ab.java.programming
Java Programming
6.4 Method Overloading
If a class have multiple methods by same name but different parameters, it is known as Method Overloading.
If we have to perform only one operation, having same name of the methods increases the readability of the program.
Suppose you have to perform addition of the given numbers but there can be any number of arguments, if you write the method such as a(int,int) for two parameters, and b(int,int,int) for three parameters then it may be difficult for you as well as other programmers to understand the behaviour of the method because its name differs.
So, we perform method overloading to figure out the program quickly.
Argument lists could differ in:
1. Number of parameters.
2. Data type of parameters.
3. Sequence of Data type of parameters.
Method overloading is also known as Static Polymorphism.
Points to Note:
1. Static Polymorphism is also known as compile time binding or early binding.
2. Static binding happens at compile time. Method overloading is an example of static binding where binding of method call to its definition happens at Compile time.
There are two ways to overload the method in java
1. By changing number of arguments
2. By changing the data type
1. By changing number of arguments
class DisplayOverloading
{
public void disp(char c)
{
System.out.println(c);
}
public void disp(char c, int num)
{
System.out.println(c + ” “+num);
}
}
class Sample
{
public static void main(String args[])
{
DisplayOverloading obj = new DisplayOverloading();
obj.disp(‘a’);
obj.disp(‘a’,10);
}
}
Output:
a
a 10
2. By changing the data type
class DisplayOverloading
{
public void disp(char c)
{
System.out.println(c);
}
public void disp(int c)
{
System.out.println(c );
}
}
class Sample2
{
public static void main(String args[])
{
DisplayOverloading obj = new DisplayOverloading();
obj.disp(‘a’);
obj.disp(5);
}
}
Output:
a
5
Download for more knowledge
https://play.google.com/store/apps/details?id=ab.java.programming
Java Programming
6.3 Constructors
Constructor in java is a special type of method that is used to initialize the object.
Java constructor is invoked at the time of object creation. It constructs the values i.e. provides data for the object therefore it is known as constructor.
Rules for creating java constructor
There are basically two rules defined for the constructor.
– Constructor name must be same as its class name
– Constructor must have no explicit return type
Types of java constructors
There are two types of constructors:
Default constructor (no-arg constructor)
Parameterized constructor
Java Default Constructor
A constructor that have no parameter is known as default constructor.
Syntax of default constructor:
(){ }
Example
In this example, we are creating the no-arg constructor in the Bike class. It will be invoked at the time of object creation.
class Bike1{
Bike1(){
System.out.println(“Bike is created”);
}
public static void main(String args[]){
Bike1 b=new Bike1();
}
}
Java parameterized constructor
A constructor that have parameters is known as parameterized constructor.
Why use parameterized constructor?
Parameterized constructor is used to provide different values to the distinct objects.
Example
In this example, we have created the constructor of Student class that have two parameters. We can have any number of parameters in the constructor.
class Student4{
int id;
String name;
Student4(int i,String n){
id = i;
name = n;
}
void display(){
System.out.println(id+” “+name);
}
public static void main(String args[]){
Student4 s1 = new Student4(111,”Karan”);
Student4 s2 = new Student4(222,”Aryan”);
s1.display();
s2.display();
}
}
Download for more knowledge
https://play.google.com/store/apps/details?id=ab.java.programming
Java Programming
6.2 Class Objects
As pointed out earlier, an object in java is essentially a block of memory that contains space to store all the instance variables. Creating an object is also referred to as instantiating an object.
In Java, the new keyword is used to create new objects.
There are three steps when creating an object from a class:
Declaration: A variable declaration with a variable name with an object type.
Instantiation: The ‘new’ key word is used to create the object.
Initialization: The ‘new’ keyword is followed by a call to a constructor. This call initializes the new object.
Example of creating an object is given below:
Rectangle rect;
rect = new Rectangle();
In the first statement we declared the object rect. it declares a variable to hold the object reference and in second we instantiated the object which actually assigns the object reference to the variable.
variable rect is now an object of the Rectangle class.
Accessing class members
Now that we have created objects, each containing its own set of variables, we should assign values to those variables in order to use them in our program.
Remember, all variables must be assigned values before they are used.
Since we are outside the class, we cannot access the instance variables and the methods directly. To do this, we must use the concerned object and the dot operator as shown below:
objectname.variablename = value; objectname.methodname(parameter-list);
Here objectname is the name of the object, variablename is the name of the instance variable inside the object that we wish to access, methodname is the method that we wish to call, and parameter-list is a comma separated list of “actual values” (or expressions) that must match in type and number with the Parameter list of the methodname declared in the class.
The instance variables & method of the Rectangle class may be accessed and assigned values as follows:
rect1.width=15
rect1.length=20;
rect2.width=24;
rect2.length=34;
rect1.area();
Download for more knowledge
https://play.google.com/store/apps/details?id=ab.java.programming
Java Programming
6.1 Classes basics
Classes
Java is a true object-oriented language and therefore the underlying structure of all Java programs is classes.
A class is nothing but a blueprint or a template for creating different objects which defines its properties and behaviours. Java class objects exhibit the properties and behaviours defined by its class. A class can contain fields and methods to describe the behaviour of an object.
Defining a class
Once the class type has been defined, we can create ”variables” of that type using declaration that are similar to the basic type declarations. In Java, these variables are termed as instances of classes, which are the actual objects.
The basic form of a class definition is :
class classname [extends superclassname]
{
[ filelds declaration; ]
[ methods declaration; ]
}
Fields
A Java field is a variable inside a class. For instance, in a class representing an employee, the Employee class might contain the following fields:
-name
-position
-salary
-hiredDate
Field Declaration Syntax
A Java field is declared using the following syntax:
[access_modifier] [static] [final] type name [= initial value] ;
The square brackets [ ] around some of the keywords mean that this option is optional. Only type and name are required.
Methods
Methods are nothing but members of a class that provide a service for an object or perform some business logic. Java fields and member functions names are case sensitive. Current states of a class’s corresponding object are stored in the object’s instance variables. Methods define the operations that can be performed in Java programming.
Method Declaration Syntax
type methodname (parameter-list)
{
method body;
}
Below is an example showing the Objects and Classes of the Cube class that defines 3 fields namely length, breadth and height. Also the class contains a member function getVolume().
public class Cube {
int length;
int breadth;
int height;
public int getVolume() {
return (length * breadth * height);
}
}
Download for more knowledge
https://play.google.com/store/apps/details?id=ab.java.programming
Java Programming
5.5 For loop
Java for loop used to repeat execution of statement(s) until a certain condition holds true.
The general form of the for statement can be expressed as follows:
for (initialization; termination; increment)
{
statement(s)…
}
You can initialize multiple variables, test many conditions and perform increments or decrements on many variables according to requirement.
All three components of for loop are optional.
For example, to execute a statement 5 times:
for (i = 0; i < 5; i++) statements…; Another way of doing this is: i = 4; while (i>=0)
statements…;
Download for more knowledge
https://play.google.com/store/apps/details?id=ab.java.programming
Java Programming
5.4 Do While loop
The while loop makes a test condition before the loop is executed.Therefore, the body of the loop may not be executed at all if the condition is not satisfied at the very first attempt.
On some occasions it might be necessary to execute the body of the loop before the test is performed.
Such situations can be handled with the help of the do statement.
SYNTAX
do {
//statement(s)…
} while (condition);
On reaching the do statement, program evaluate the body of loop first.
At the end of the loop, the condition in the while statement is evaluated. If the condition is true, the program continues to evaluate the body of loop again and again till condition becomes false.
int i =0;
do
{
System.out.println(“i is : ” + i);
i++;
}while(i < 5);
Output would be
i is : 0
i is : 1
i is : 2
i is : 3
i is : 4
Download for more knowledge
https://play.google.com/store/apps/details?id=ab.java.programming
Java Programming
5.3 While loop
Java while loop is used to execute statement(s) until a condition holds true.
SYNTAX
while (condition(s)) {
// statements
}
If the condition holds true then the body of loop is executed, after execution of loop body condition is tested again and if the condition is true then body of loop is executed again and the process repeats until condition becomes false.
1. Condition is always evaluated to true or false and if it is a constant, For example while (c) { …} where c is a constant then any non zero value of c is considered true and zero is considered false.
2. You can test multiple conditions such as
while ( a > b && c != 0) {
// statements
}
Loop body is executed till value of a is greater than value of b and c is not equal to zero.
3. Body of loop can contain more than one statement.
For multiple statements you need to place them in a block using {} and if body of loop contain only single statement you can optionally use {}.
It is recommended to use braces always to make your program easily readable and understandable.
Download for more knowledge
https://play.google.com/store/apps/details?id=ab.java.programming
Java Programming
5.2 Switch statement
A switch statement is used instead of nested if…else statements. It is multiple branch decision statement.
A switch statement tests a variable with list of values for equivalence. Each value is called a case. The case value must be a constant i.
SYNTAX
switch(expression){
case constant:
//sequence of optional statements
break; //optional
case constant:
//sequence of optional statements
break; //optional
.
.
.
default : //optional
//sequence of optional statements
}
Individual case keyword and a semi-colon (:) is used for each constant.
Switch tool is used for skipping to particular case, after jumping to that case it will execute all statements from cases beneath that case this is called as ”Fall Through”.
In the example below, for example, if the value 2 is entered, then the program will print two one something else!
switch(i)
{
case 4: System.out.println(”four”);
break;
case 3: System.out.println(”three”);
break;
case 2: System.out.println(”two”);
case 1: System.out.println(”one”);
default: System.out.println(”something else!”);
}
To avoid fall through, the break statements are necessary to exit the switch.
If value 4 is entered, then in case 4 it will just print four and ends the switch.
The default label is non-compulsory, It is used for cases that are not present.
Download for more knowledge
https://play.google.com/store/apps/details?id=ab.java.programming
Java Programming
5.1 If statement
if statement
An if statement contains a Boolean expression and block of statements enclosed within braces.
if(conditional expression)
//statement or compound statement;
else
//optional
//statement or compound statement;
//optional
If the Boolean expression is true then statement block is executed otherwise (if false) program directly goes to next statement without executing Statement block.
if….else
If statement block with else statement is known as as if…else statement. Else portion is non-compulsory.
if ( condition_one )
{
//statements
}
else if ( condition_two )
{
//statements
}
else
{
//statements
}
If the condition is true, then compiler will execute the if block of statements, if false then else block of statements will be executed.
nested if…else
when a series of decisions are involved, we may have to use more than one if…else statement in nested form as follows:
if(test condition1)
{
if(test condition2)
{
//statement1;
}
else
{
//statement2;
}
}
else
{
//statement3;
}
//statement x;
Download for more knowledge
https://play.google.com/store/apps/details?id=ab.java.programming
Java Programming
4.3 Operator precedence
Certain operators have higher priorities than others. Operator precedence determines the grouping of terms in an expression. This affects how an expression is evaluated. for example, the dot operator has higher precedence than the any other operator.
Precedence 15
() Parentheses
[] Array subscript
· Member selection
Precedence 14
++ Unary post-increment
— Unary post-decrement
Precedence 13
+ Unary plus
– Unary minus
++ Unary pre-increment
— Unary pre-decrement
! Unary logical negation
~ Unary bitwise complement
(type) Unary type cast
Precedence 12
* Multiplication
/ Division
% Modulus
Precedence 11
+ Addition
– Subtraction
Precedence 10
<< Bitwise left shift >> Bitwise right shift with sign extension
>>> Bitwise right shift with zero extension
Precedence 9
< Relational less than > Relational greater than
<= Relational less than or equal >= Relational greater than or equal
instanceof Type comparison (objects only)
Precedence 8
== Relational is equal to
!= Relational is not equal to
Precedence 7
& Bitwise AND
Precedence 6
^ Bitwise exclusive OR
Precedence 5
| Bitwise inclusive OR
Precedence 4
&& Logical AND
Precedence 3
|| Logical OR
Precedence 2
? : Ternary conditional
Precedence 1
= Assignment
+= Addition assignment
-= Subtraction assignment
*= Multiplication assignment
/= Division assignment
%= Modulus assignment
Download for more knowledge
https://play.google.com/store/apps/details?id=ab.java.programming
Java Programming
4.2 Expression
Expressions perform operations on data and move data around. Some expressions will be evaluated for their results, some for their side effects, some for both.
An assignment expression has the following form.
variable-expression assignment-operator expression
The variable expression can be just the name of a variable, or it can be an expression that selects a variable using array indices. The value type of the right-hand-side expression must be compatible with the variable type.
An assignment expression is most often used for its side effect: it changes the value of the variable selected by the variable expression to the value of the expression on the right-hand side. The value of the assignment expression is the value that is assigned to the selected variable.
An expression can have three kinds of result:
1. a value, such as the result of: (4 * i)
2. a variable, such as the result of: i = 4
3. nothing (in the case of an invocation of a method declared as void)
In most common assignment expressions, the assignment operator is =. Then the assignment expression has the following form.
variable-expression = expression
The Java arithmetic and bitwise operators can be combined with = to form assignment operators.
For example, the += assignment operator indicates that the right-hand side should be added to the variable, and the *= assignment operator indicates that the right-hand side should be multiplied into the variable.
Download for more knowledge
https://play.google.com/store/apps/details?id=ab.java.programming
Java Programming
4.1 Operators
Java provides a rich set of operators to manipulate variables. We can divide all the Java operators into the following groups:
– Arithmetic Operators
– Relational Operators
– Bitwise Operators
– Logical Operators
– Assignment Operators
– Misc Operators
Arithmetic Operators:
Arithmetic operators are used in mathematical expressions in the same way that they are used in algebra.
arithmetic operators:
+ Additive operator (also used for String concatenation)
– Subtraction operator
* Multiplication operator
/ Division operator
% Remainder operator
Relational Operators:
There are following relational operators supported by Java language
> Greater than
< Less than == Equal to != Not equal to >= Greater than or equal to
<= Less than or equal to
Bitwise Operators:
Java defines several bitwise operators, which can be applied to the integer types, long, int, short, char, and byte.
Bitwise operator works on bits and performs bit-by-bit operation.
~ Unary bitwise complement
<< Signed left shift >> Signed right shift
>>> Unsigned right shift & Bitwise AND
^ Bitwise exclusive OR
| Bitwise inclusive OR
Logical Operators:
The following table lists the logical operators:
&& Conditional-AND
|| Conditional-OR
?: Ternary (shorthand for if-then-else statement)
Assignment Operators:
There are following assignment operators supported by Java language:
= Simple assignment operator
+= Add AND assignment operator
-= Subtract AND assignment operator
*= Multiply AND assignment operator
/= Divide AND assignment operator
%= Modulus AND assignment operator
<<= Left shift AND assignment operator. >>= Right shift AND assignment operator
&= Bitwise AND assignment operator.
^= bitwise exclusive OR and assignment operator.
|= bitwise inclusive OR and assignment operator.
Increment and Decrement Operators
Increment and decrement operators are used to add or subtract 1 from the current value of oprand.
++ increment
— decrement
Increment and Decrement operators can be prefix or postfix.
In the prefix style the value of oprand is changed before the result of expression and in the postfix style the variable is modified after result.
For eg.
a = 9;
b = a++ + 5;
/* a=10 b=14 */
a = 9;
b = ++a + 5;
/* a=10 b=15 */
Miscellaneous Operators
There are few other operators supported by Java Language.
Conditional Operator ( ? : )
Conditional operator is also known as the ternary operator.
The operator is written as:
variable x = (expression) ? value if true : value if false
Instance of Operator:
This operator is used only for object reference variables.
instanceof operator is wriiten as:
( Object reference variable ) instanceof (class/interface type)
Download for more knowledge
https://play.google.com/store/apps/details?id=ab.java.programming
Java Programming
3.4 Typecasting
Casting is an operation that converts a value of one data type into a value of another data type.
The syntax for type casting is to give the target type in parenthesis followed by the variable name.
Example:
float f = (float) 10.1;
Int i = (int)f;
in this case, value of i is 10, the fractional part is discarded, while using type casting there is a chance of lost information that might lead to inaccurate result.
Example:
int i = 10000;
byte s = (short) i;
In this example value of s becomes 10, which is totally distorted, to ensure correctness; you can test if the value is in the correct target type range before using type casting.
Casts that results in no loss of information
byte => short, char, int, long, float, double
short => int, long, float, double
char => int, long, float, double
int => long, float, double
long => float, double
float => double
Download for more knowledge
https://play.google.com/store/apps/details?id=ab.java.programming
Java Programming
3.3 Variable scope
There are three kinds of variables in Java:
Local Variable:
1. A variable that is declared inside the method is called local variable.
2. Local variables are created when the method, constructor or block is entered and the variable will be destroyed once it exits the method, constructor or block.
3. Access modifiers cannot be used for local variables.
4. Local variables are visible only within the declared method, constructor or block.
5. There is no default value for local variables so local variables should be declared and an initial value should be assigned before the first use.
Instance Variable
1. A variable that is declared inside the class but outside the method is called instance variable . It is not declared as static.
2. Instance variables are created when an object is created with the use of the keyword ‘new’ and destroyed when the object is destroyed.
3. Instance variables hold values that must be referenced by more than one method, constructor or block, or essential parts of an object’s state that must be present throughout the class.
4. Instance variables can be declared in class level before or after use.
5. Access modifiers can be given for instance variables.
6. Instance variables have default values. For numbers the default value is 0, for Booleans it is false and for object references it is null. Values can be assigned during the declaration or within the constructor.
7. Instance variables can be accessed directly by calling the variable name inside the class. However within static methods and different class ( when instance variables are given accessibility) should be called using the fully qualified name . ObjectReference.VariableName.
Class/static variables:
1. A variable that is declared as static is called static variable. It cannot be local.
2. Class variables also known as static variables are declared with the static keyword in a class, but outside a method, constructor or a block.
3. There would only be one copy of each class variable per class, regardless of how many objects are created from it.
4. Static variables are stored in static memory.
5. Static variables are created when the program starts and destroyed when the program stops.
6. Visibility is similar to instance variables.
7. Static variables can be accessed by calling with the class name ClassName.VariableName.
Example
class A{
int data=50;
//instance variable
static int m=100;
//static variable
void method(){
int n=90;
//local variable
}
}//end of class A
Download for more knowledge
https://play.google.com/store/apps/details?id=ab.java.programming
Java Programming
3.2 Data type
Every variable in Java has a data type. Data types specify the size and type of values that can be stored.
Data types in Java divided primarily in two tyeps:
Primitive(intrinsic) and Non-primitive.
Primitive types contains Integer, Floating points, Characters, Booleans And Non-primitive types contains Classes, Interface and Arrays.
Integer:This group includes byte, short, int and long, which are whole signed numbers.
Floating-point Numbers: This group includes float and double, which represent number with fraction precision.
Characters: This group includes char, which represents character set like letters and number
Boolean: This group includes Boolean, which is special type of representation of true or false value.
Some data types with their range and size:
byte: -128 to 127 (1 byte)
short: -32,768 to +32,767 (2 bytes)
int: -2,147,483,648 to +2,147,483,647 (4 bytes)
float: 3.4e-038 to 1.7e+0.38 (4 bytes)
double: 3.4e-038 to 1.7e+308 (8 bytes)
char : holds only a single character(2 bytes)
boolean : can take only true or false (1 bytes)
Download for more knowledge
https://play.google.com/store/apps/details?id=ab.java.programming
Java Programming
3.1 Variables
A variable provides us with named storage that our programs can manipulate.
Each variable in Java has a specific type, which determines the size and layout of the variable’s memory; the range of values that can be stored within that memory; and the set of operations that can be applied to the variable.
You must declare all variables before they can be used.
The basic form of a variable declaration is shown here:
data_type variable = value;
Here data type is one of Java’s datatypes and variable is the name of the variable. To declare more than one variable of the specified type, you can use a comma-separated list.
Following are valid examples of variable declaration and initialization in Java:
int a, b, c;
// Declares three ints, a, b, and c.
int a = 10, b = 10;
// Example of initialization
double pi = 3.14159;
// declares and assigns a value of PI.
char a = ‘a’;
// the char variable a iis initialized with value ‘a’
Constant: During the execution of program, value of variable may change. A constant represents permanent data that never changes.
If you want use some value likes p=3.14159; no need to type every time instead you can simply define constant for p, following is the syntax for declaring constant.
Static final datatype ConstantName = value;
Example: static final float PI=3.14159;
Download for more knowledge
https://play.google.com/store/apps/details?id=ab.java.programming
Java Programming
2.2 First Program
class Simple{
public static void main(String args[]){
System.out.println(“Hello Java”);
}
}
save this file as Simple.java
To compile:javac Simple.java
To execute:java Simple
It will give output as Hello Java
Lets see what this is :
class keyword is used to declare a class in java.
public keyword is an access modifier which represents visibility, it means it is visible to all.
static is a keyword, if we declare any method as static, it is known as static method. The main method is executed by the JVM, it doesn’t require to create object to invoke the main method. So it saves memory.
void is the return type of method, it means it doesn’t return any value.
main is a entry point of the program. Execution of programs starts from main. It is called by Runtime System
String[] args is used for command line argument. We will learn it later.
System.out.println() is used print statement.
Download for more knowledge
https://play.google.com/store/apps/details?id=ab.java.programming
Java Programming
2.1 Environment Setup
We need to install the Java Development Toolkit aka JDK, which is bundled with the Java Runtime Environment.
At this moment, the latest JDK versions is JDK 8.
All you have to do is head to the main download page provided by Oracle , and download the latest version that you will find.
Follow the instructions to download java and run the .exe to install Java on your machine. Once you installed Java on your machine, you would need to set environment variables to point to correct installation directories.
Assuming you have installed Java in
c:\Program Files\java\jdk
1. Right-click on ‘My Computer’ and select ‘Properties’.
2. Click on the ‘Environment variables’ button under the ‘Advanced’ tab.
3. Now, alter the ‘Path’ variable so that it also contains the path to the Java executable.
Example, if the path is currently set to
‘C:\WINDOWS\SYSTEM32’,
then change your path to read
‘C:\WINDOWS\SYSTEM32; c:\Program Files\java\jdk\bin’.
Setting up the path for Linux, Ubuntu, UNIX, Solaris
Environment variable PATH should be set to point to where the Java binaries have been installed.
Refer to your shell documentation if you have trouble doing this.
Example, if you use bash as your shell, then you would add the following line to the end of your
‘.bashrc: export PATH=/path/to/java:$PATH’
Up until now we have installed a variety of tools towards setting up our Java Development environment.
Since the JDK is already installed (from step one) we could actually jump to coding just by using our text editor of choice (NotePad++, TextPad, NotePad, Ultra Edit etc) and invoking the javac and java commands from the command line.
Free IDE for Java
Netbeans: NetBeans IDE provides Java developers with all the tools needed to create professional desktop, mobile and enterprise applications.
Eclipse:Eclipse is another free Java IDE for developers and programmers and it is mostly written in Java. Eclipse lets you create various cross platform Java applications for use on mobile, web, desktop and enterprise domains.
Download for more knowledge
https://play.google.com/store/apps/details?id=ab.java.programming
Java Programming 1.3 Pros and Cons
Pros :
1. Java is Simple
2. Java is object-oriented because programming in Java is centered on creating objects, manipulating objects, and making objects work together. This allows you to create modular programs and reusable code.
3. One of the most significant advantages of Java is Platform indenpendence.
4. Java is Secure: Java is one of the first programming languages to consider security as part of its design.
5. Java is Multithreaded: Multithreaded is the capability for a program to perform several tasks simultaneously within a program.
6. Java is Robust: Robust means reliable and no programming language can really assure reliability.
Cons:
1. Java can be perceived as significantly slower and more memory-consuming than natively compiled languages such as C or C++.
2. No local constants. In Java, variables that belong to a class can be made constant by declaring them to be final. Variables that are local to a method cannot be declared final, however.
3. Java is predominantly a single-paradigm language. However, with the addition of static imports in Java 5.0 the procedural paradigm is better accommodated than in earlier versions of Java.
Download for more knowledge
https://play.google.com/store/apps/details?id=ab.java.programming
Java Programming
1.2 Features
1. Simple
Java is easy to learn and its syntax is quite simple and easy to understand.
2. Object-Oriented
In java everything is Object which has some data and behaviour. Java can be easily extended as it is based on Object Model.
3. Platform independent
Unlike other programming languages such as C, C++ etc which are compiled into platform specific machines. Java is guaranteed to be write-once, run-anywhere language.
On compilation Java program is compiled into bytecode. This bytecode is platform independent and can be run on any machine, plus this bytecode format also provide security. Any machine with Java Runtime Environment can run Java Programs.
4. Secured
When it comes to security, Java is always the first choice. With java secure features it enable us to develop virus free, temper free system. Java program always runs in Java runtime environment with almost null interaction with system OS, hence it is more secure.
5. Robust
Java makes an effort to eliminate error prone codes by emphasizing mainly on compile time error checking and runtime checking. But the main areas which Java improved were Memory Management and mishandled Exceptions by introducing automatic Garbage Collector and Exception Handling.
6. Architecture neutral
Compiler generates bytecodes, which have nothing to do with a particular computer architecture, hence a Java program is easy to intrepret on any machine.
7. Portable
Java Bytecode can be carried to any platform. No implementation dependent features. Everything related to storage is predefined, example: size of primitive data types
8. High Performance
Java is an interpreted language, so it will never be as fast as a compiled language like C or C++. But, Java enables high performance with the use of just-in-time compiler.
9. Multithreaded
Java multithreading feature makes it possible to write program that can do many tasks simultaneously. Benefit of multithreading is that it utilizes same memory and other resources to execute multiple threads at the same time, like While typing, grammatical errors are checked along.
10. Distributed
We can create distributed applications in java. RMI and EJB are used for creating distributed applications. We may access files by calling the methods from any machine on the internet.
11. Interpreted
An interpreter is needed in order to run Java programs. The programs are compiled into Java Virtual Machine code called bytecode. The bytecode is machine independent and is able to run on any machine that has a Java interpreter. With Java, the program need only be compiled once, and the bytecode generated by the Java compiler can run on any platform.
Download for more knowledge
https://play.google.com/store/apps/details?id=ab.java.programming
Java Programming
1.1 Introduction
Java is a simple and yet powerful object oriented programming language and it is in many respects similar to C++.
Java is created by James Gosling from Sun Microsystems (Sun) in 1991. The first publicly available version of Java (Java 1.0) was released in 1995.
Java is defined by a specification and consists of a programming language, a compiler, core libraries and a runtime machine(Java virtual machine).
The Java runtime allows software developers to write program code in other languages than the Java programming language which still runs on the Java virtual machine.
The Java platform is usually associated with the Java virtual machine and the Java core libraries.
Java virtual machine
The Java virtual machine (JVM) is a software implementation of a computer that executes programs like a real machine.
Java Runtime Environment vs. Java Development Kit
A Java distribution typically comes in two flavors, the Java Runtime Environment (JRE) and the Java Development Kit (JDK).
The JRE consists of the JVM and the Java class libraries. Those contain the necessary functionality to start Java programs.
The JDK additionally contains the development tools necessary to create Java programs. The JDK therefore consists of a Java compiler, the Java virtual machine and the Java class libraries.
Uses of JAVA
Java is also used as the programming language for many different software programs, games, and add-ons.
Some examples of the more widely used programs written in Java or that use Java include the Android apps, Big Data Technologies, Adobe Creative suite, Eclipse, Lotus Notes, Minecraft, OpenOffice, Runescape, and Vuze.
Download for more knowledge
https://play.google.com/store/apps/details?id=ab.java.programming
Java Programming
13.6 Directory
A directory is a File which can contains a list of other files and directories.
You use File object to create directories, to list down files available in a directory.
For complete detail check a list of all the methods which you can call on File object and what are related to directories.
Creating Directories:
There are two useful File utility methods, which can be used to create directories:
The mkdir( ) method creates a directory, returning true on success and false on failure. Failure indicates that the path specified in the File object already exists, or that the directory cannot be created because the entire path does not exist yet.
The mkdirs() method creates both a directory and all the parents of the directory.
Listing Directories:
You can use list( ) method provided by File object to list down all the files and directories available in a directory
Deleting Directories:
To delete a directory, you can simply use the File.delete(), but the directory must be empty in order to delete it.
Often times, you may require to perform recursive delete in a directory, which means all it’s sub-directories and files should be delete as well.
Download for more knowledge
https://play.google.com/store/apps/details?id=ab.java.programming
Java Programming
13.5 File
– File class is used to support with Files and File systems.
– File class describes properties of itself.
– File class has its objects which is used to handle or get data stored in disk.
– File class has some constructors which is used to describe the file path.
Constructors :
File(String directoryPath)
File(String directoryPath, String filename)
File(File dirObj, String filename)
File(URl uriObj)
FileInputStream:
This stream is used for reading data from the files. Objects can be created using the keyword new and there are several types of constructors available.
Following constructor takes a file name as a string to create an input stream object to read the file.:
InputStream f = new FileInputStream(“C:/java/hello”);
Following constructor takes a file object to create an input stream object to read the file. First we create a file object using File() method as follows:
File f = new File(“C:/java/hello”);
InputStream f = new FileInputStream(f);
FileOutputStream:
FileOutputStream is used to create a file and write data into it. The stream would create a file, if it doesn’t already exist, before opening it for output.
Here are two constructors which can be used to create a FileOutputStream object.
Following constructor takes a file name as a string to create an input stream object to write the file:
OutputStream f = new FileOutputStream(“C:/java/hello”)
Following constructor takes a file object to create an output stream object to write the file. First, we create a file object using File() method as follows:
File f = new File(“C:/java/hello”);
OutputStream f = new FileOutputStream(f);
I/O Exceptions
EOFException
It indicates the signal are reached to end of file during input.
FileNotFoundException
It indicates that the file not found at specified path.
InterruptedIOException
It indicates that an I/O Exception has occurred
I/O Exception
It indicates I/O Exception some sort has occurred.
Download for more knowledge
https://play.google.com/store/apps/details?id=ab.java.programming
Java Programming
13.4 Standard Streams
Java provides following three standard streams
Standard Input:
This is used to feed the data to user’s program and usually a keyboard is used as standard input stream and represented as System.in.
Standard Output:
This is used to output the data produced by the user’s program and usually a computer screen is used to standard output stream and represented as System.out.
Standard Error:
This is used to output the error data produced by the user’s program and usually a computer screen is used to standard error stream and represented as System.err.
Download for more knowledge
https://play.google.com/store/apps/details?id=ab.java.programming
Java Programming
13.3 Character Stream
Java Character streams are used to perform input and output for 16-bit unicode. Though there are many classes related to character streams but the most frequently used classes are , Reader and Writer.
Though internally FileReader uses FileInputStream and FileWriter uses FileOutputStream but here major difference is that FileReader reads two bytes at a time and FileWriter writes two bytes at a time.
Reader
– It is an abstract class used to input character.
– It implements 2 interfaces Closable & Readable.
– Methods in this class throws IO Exception(Except markSupported()).
Writer
– Writer is an abstract class used to output character.
– It implements 3 interfaces Closable, Flushable & Appendable.
methods of Reader abstract class
abstract void close()
close the source of input.
void mark(int numChars)
it marks a point to input stream that will stay valid until numChars are read.
boolean markSupported()
it returns true if mark() support by stream.
int read()
it returns integer of next available character from input
int read(char buffer[])
it read up to the length of byte in buffer
abstract read(byte buffer[], int offset, int numBytes)
it read up to the length of character in buffer starting form offset
void reset()
it reads the input pointer.
long skip(long numBytes)
it returns the character ignored.
boolean ready()
if input request will not wait returns true, otherwise false
methods of Writer abstract class
write append(char ch)
It append the ‘ch’ character at last of output stream
write append(charSequence chars)
append the chars at end of output stream.
write append(charSequence chars, int begin, int end)
append the characters specified in the range.
abstract void close()
close the output stream
abstract void flush()
it flush the output buffer.
void write(char buffer[])
writes array of character to output stream.
abstract void write(char buffer[], int offset, int numChars)
it writes a range of characters from buffer starting form offset
void write(String str)
it writes the str to output stream
void write(String str, int offset, int numChars)
it writes a range of character from the string str starting at offset.
Download for more knowledge
https://play.google.com/store/apps/details?id=ab.java.programming
Java Programming
13.2 Byte Stream
ByteStream classes are to provide an surrounding to handle byte-oriented data or I/O.
ByteStream classes are having 2 abstract class InputStream & OutputStream.
These two abstract classes have several concrete classes that handle various devices such as disk files, network connection etc.
InputStream
– It is an abstract class in which defines an interface known as Closable interface.
– Methods in this class will throw an IOException.
OutputStream
– It is an abstract class in which defines an interface known as Closable & Flushable interface.
– Methods in this class returns void and throws IOException.
methods by InputStream abstract class
int read()
it returns integer of next available input of bye
int read(byte buffer[ ])
it read up to the length of byte in buffer
int read(byte buffer[ ], int offset, int numBytes)
it read up to the length of byte in buffer starting form offset
int available()
It gets the no.of bytes of input available.
void reset()
it reads the input pointer.
long skip(long numBytes)
it returns the bytes ignored.
void close()
close the source of input.
methods by OutputStream abstract class
void write(int b)
it writes a single byte in output.
void write(byte buffer[ ])
it write a full array of bytes to an output stream
void write(byte buffer[ ], int offset, int numBytes)
it writes a range of numBytes from array buffer starting at buffer offset.
void close()
close the source of output
void flush()
it marks a point to input stream that will stay valid until numBytes are read.
Download for more knowledge
https://play.google.com/store/apps/details?id=ab.java.programming
Java Programming
13.1 Stream Classes
The java.io package contains Stream classes which provide capabilities for processing all types of data.
Java performs I/O through Streams. A Stream is linked to a physical layer by java I/O system to make input and output operation in java.
In general, a stream means continuous flow of data. Streams are clean way to deal with input/output without having every part of your code understand the physical. All these streams represent an input source and an output destination. The stream in the java.io package supports many data such as primitives, Object, localized characters, etc.
These classes may be categorized into two groups based on their data type handling capabilities:-
1. Byte Stream
2. Charater Stream
The InputStream & OutputStream class providing support for handling I/O operations on bytes are type of byte stream.
The Reader & Writer class providing support for handling I/O operations on characters are type of char stream. Character stream uses Unicode and therefore can be internationalized.
Download for more knowledge
https://play.google.com/store/apps/details?id=ab.java.programming
Java Programming
12.5 Running an Applet
To execute an applet with an applet viewer, you may also execute the HTML file in which it is enclosed, eg.
c:\>appletviewer RunApp.html
Execute the applet the applet viewer, specifying the name of your applet’s source file.
The applet viewer will encounter the applet tage within the comment and execute your applet.
Download for more knowledge
https://play.google.com/store/apps/details?id=ab.java.programming
Java Programming
12.4 Designing a Web Page
Java applet are programs that reside on web page. A web page is basically made up of text and HTML tags that can be interpreted by a web browser or an applet viewer.
HTML files should be stored in the same directory as the compiled code of the applets.
A web page is marked by an opening HTML tag and closing HTML tag and is divided into the following three major parts:
1. Comment Section
2. Head Section
3. Body Section
Comment Section
This is very first section of any web page containing the comments about the web page functionality. A comment line begins with and the web browsers will ignore the text enclosed between them. The comments are optional and can be included anywhere in the web page.
Head Section
This section contains title, heading and sub heading of the web page. The head section is defined with a starting tag and closing tag.
Hello World Applet
Body Section
The entire information and behaviour of the web page is contained in it, It defines what the data placed and where on to the screen. It describes the color, location, sound etc. of the data or information that is going to be placed in the web page.
Hi, This is My First Java Applet on the Web!
Applet Tag
The tag supplies the name of the applet to be loaded and tells the browser how much space the applet requires.
The tag given below specifies the minimum requirements to place the Hellojava applet on a web page.
This HTML code tells the browser to load the compiled java applet Hellojava.class, which is in the same directory as this HTML file.
It also specifies the display area for the applet output as 400 pixels width and 200 pixels height.
After you create this file, you can execute the HTML file called RunApp.html (say) on the command line.
c:\ appletviewer RunApp.html
Download for more knowledge
https://play.google.com/store/apps/details?id=ab.java.programming
Java Programming
12.3 Creating an Executable Applet
To create an executable jar file there should be a main class (a class with a main method) inside the jar to run the software.
An applet has no main method since it is usually designed to work inside a web browser.
Executable applet is nothing but the .class file of applet, which is obtained by compiling the source code of the applet.
Compiling the applet is exactly the same as compiling an application using following command.
javac appletname.java
The compiled output file called appletname.class should be placed in the same directory as the source file.
Download for more knowledge
https://play.google.com/store/apps/details?id=ab.java.programming
Java Programming
12.2 Life Cycle
init:
This method is intended for whatever initialization is needed for your applet. It is called after the param tags inside the applet tag have been processed.
start:
This method is automatically called after the browser calls the init method. It is also called whenever the user returns to the page containing the applet after having gone off to other pages.
stop:
This method is automatically called when the user moves off the page on which the applet sits. It can, therefore, be called repeatedly in the same applet.
destroy:
This method is only called when the browser shuts down normally. Because applets are meant to live on an HTML page, you should not normally leave resources behind after a user leaves the page that contains the applet.
paint:
Invoked immediately after the start() method, and also any time the applet needs to repaint itself in the browser. The paint() method is actually inherited from the java.awt.
Download for more knowledge
https://play.google.com/store/apps/details?id=ab.java.programming
Java Programming
12.1 Introduction
An applet is a small Java program that is embedded and ran in some other Java interpreter program such as a Java technology-enabled browser Or Sun’s applet viewer program called appletviewer.
An applet can be a fully functional Java application because it has the entire Java API at its disposal.
Key Points
An applet program is a written as a inheritance of the java.Appletclass
There is no main() method in an Applet.
Applets are designed to be embedded within an HTML page.
An applet uses AWT for graphics
A JVM is required to view an applet. The JVM can be either a plug-in of the Web browser or a separate runtime environment.
Other classes that the applet needs can be downloaded in a single Java Archive (JAR) file.
Advantages
1. Automatically integrated with HTML; hence, resolved virtually all installation issues.
2. Can be accessed from various platforms and various java-enabled web browsers.
3. Can provide dynamic, graphics capabilities and visualizations
4. Implemented in Java, an easy-to-learn OO programming language
5. Alternative to HTML GUI design
6. Safe! Because of the security built into the core Java language and the applet structure, you don’t have to worry about bad code causing damage to someone’s system
7. Can be launched as a standalone web application independent of the host web server
Disadvantages
1. Applets can’t run any local executable programs
2. Applets can’t with any host other than the originating server
3. Applets can’t read/write to local computer’s file system
4. Applets can’t find any information about the local computer
5. All java-created pop-up windows carry a warning message
6. Stability depends on stability of the client’s web server
7. Performance directly depend on client’s machine
Download for more knowledge
https://play.google.com/store/apps/details?id=ab.java.programming
How to set up a company with roots both in the US and India
Recently a former colleague asked me about setting up office in India and San Francisco. Compiling these tidbits made me realize how reusable this database is. A part of it is useful for any foreigner setting up shop in the Valley.
Cucumbertown is a network for cooks. Think Tumblr for cooks. We are a platform with users from around 162 countries but we haven’t generated revenue yet. Our lead investors are from the Valley and by virtue of that we setup shop in the United States with a subsidiary company in India. Fortunately or not we don’t have to deal with payments in India.
I have met quite a few entrepreneurs building SaaS products billed both in the US and in India. If that happens to be your case, reach out to a CPA in the US and a CA in India. This post is not going to help you much.

Legal
Ryan Roberts is Cucumbertown’s attorney. I picked up Ryan’s details from this Freshdesk post. Ryan’s been instrumental in setting up everything from the registration to convertible notes and privacy policies and generally responds to emails in a day. Super fast with output and advice.
Finances – Managing US accounts and finances
Amina Khan at Jino Joseph associates. Amina is extremely good to work with and already service a number of startups. Amina & Jino are very fairly priced too
Finances – Chartered Accountant in India
Umesh Hegde is the choice and most startups I know in Bangalore already use his service. Umesh does everything from company registrations to audits. Umesh also handles Indian tax.
Taxes in the US
Jino Joseph. Jino is reasonable and you only need to talk to him via email. Jino’s services don’t just limit to Indian clients.
US – India company relations
This is actually a simple concept that can get complicated if not addressed right. To set things clear, there are two primary scenarios:
- Business in the US, operations in India (fairly common)
- Business in the US and in India (revenues in both the countries)
Cucumbertown falls under the first. And that makes the case for the Indian company to be a wholly owned subsidiary of the American firm.
If you are building a company for international markets and your investors are from the valley, register your firm as a Delaware entity. Then register the Indian subsidiary. I have friends who had to go through complex acquisition process (American firm acquiring the Indian entity) just to solve tax issues in India. Umesh Hegde can help (more details above). Talk to Ryan Roberts for Delaware setup.
Banking – US
Silicon Valley Bank. This is by far the simplest choice. SVB will help create an account without any hassles. But the banking website is near unusable. There aren’t many alternatives that are as easy as SVB.
Investments and Network – 500 Startups
Raise funds from 500. We did this at Cucumbertown. The 500 alumni have become a powerful vehicle to build your network on. Cucumbertown was not part of the accelerator but the resources and people we have access to is an unfair advantage. We even have a food founder’s get-together once a year. Besides, 500 has a strong international community and the Indian family’s pretty strong too.
Investments and Network – Meet Mukund
Mukund is the among the most connected and reliable angel investor/advisor/mentor to bank on. I can’t emphasize how much Mukund extends his network to help an entrepreneur. Mukund is well connected with the Valley and heads Microsoft’s entrepreneurship wing.
Logistics – Flight travel
Cathay Pacific offers the best value. No Lufthansa please. And Emirates is expensive. Book directly from the Cathay site. The site is a mess of a design but re-booking is 50-75 USD in comparison to the extra tax and commission you need to pay the agent or the booking site. You always reschedule.
If you need an agent’s help reach out to Debjani at Sunnyvaletravel.
Logistics – Get Founders Card
I got this via YEC. FoundersCard gives you great upgrades and entitlements. I have a Cathay Marco Polo membership via this.
Logistics – Cash transfer
Always, always transfer directly to your bank in India. Transfer the cash in USD and let the receiving bank do the conversion. We were screwed up twice over for transferring cash in INR, converted by our bank in the US. India has a system for accepting incoming funds. If this does not apply to you, AFEX is my next option. Jon Wolfe from AFEX is pretty prompt.
Logistics – Getting things done
Use TaskRabbit if you need things done. Sometimes when I need help transporting or cleaning up an an Airbnb’ed apartment, TaskRabbit is my choice.
Logistics – Cellphone connection
T-mobiles 50 dollar prepaid plan are the most value-for. Unlimited calls and Internet.
Logistics – Car rentals in the US
Hotwires offers the most economical deals. If you are in SF Uber and Lyft are the default choices.
Logistics – Cash
We bank with HDFC in India and every time I travel we get the prepaid credit cards. They are more than convenient.
Logistics – Storage
If you are like me and move back and forth every 6-7 months I’d suggest you store furniture, mattress and other stuff in a storage space.Colisieum storage is the best solution in the Bay Area. See reddit thread.
I hope this helps. Please feel free to correct/add to this.
This was originally posted on Cherian’s blog
Line Generation Algorithm
A line connects two points. It is a basic element in graphics. To draw a line, you need two points between which you can draw a line. In the following three algorithms, we refer the one point of line as
<span class="MathJax" id="MathJax-Element-1-Frame" tabindex="0" data-mathml="X0,Y0″ role=”presentation” style=”box-sizing: border-box; display: inline; line-height: normal; text-align: left; word-spacing: normal; word-wrap: normal; white-space: nowrap; float: none; direction: ltr; max-width: none; max-height: none; min-width: 0px; min-height: 0px; border: 0px; padding: 0px; margin: 0px; position: relative;”>X0,Y0 and the second point of line as <span class="MathJax" id="MathJax-Element-2-Frame" tabindex="0" data-mathml="X1,Y1″ role=”presentation” style=”box-sizing: border-box; display: inline; line-height: normal; text-align: left; word-spacing: normal; word-wrap: normal; white-space: nowrap; float: none; direction: ltr; max-width: none; max-height: none; min-width: 0px; min-height: 0px; border: 0px; padding: 0px; margin: 0px; position: relative;”>X1,Y1.
DDA Algorithm
Digital Differential Analyzer (DDA) algorithm is the simple line generation algorithm which is explained step by step here.
Step 1 − Get the input of two end points <span class="MathJax" id="MathJax-Element-3-Frame" tabindex="0" data-mathml="(X0,Y0)” role=”presentation” style=”box-sizing: border-box; display: inline; line-height: normal; text-align: left; word-spacing: normal; word-wrap: normal; white-space: nowrap; float: none; direction: ltr; max-width: none; max-height: none; min-width: 0px; min-height: 0px; border: 0px; padding: 0px; margin: 0px; position: relative;”>(X0,Y0)and <span class="MathJax" id="MathJax-Element-4-Frame" tabindex="0" data-mathml="(X1,Y1)” role=”presentation” style=”box-sizing: border-box; display: inline; line-height: normal; text-align: left; word-spacing: normal; word-wrap: normal; white-space: nowrap; float: none; direction: ltr; max-width: none; max-height: none; min-width: 0px; min-height: 0px; border: 0px; padding: 0px; margin: 0px; position: relative;”>(X1,Y1).
Step 2 − Calculate the difference between two end points.
dx = X1 - X0 dy = Y1 - Y0
Step 3 − Based on the calculated difference in step-2, you need to identify the number of steps to put pixel. If dx > dy, then you need more steps in x coordinate; otherwise in y coordinate.
if (absolute(dx) > absolute(dy)) Steps = absolute(dx); else Steps = absolute(dy);
Step 4 − Calculate the increment in x coordinate and y coordinate.
Xincrement = dx / (float) steps; Yincrement = dy / (float) steps;
Step 5 − Put the pixel by successfully incrementing x and y coordinates accordingly and complete the drawing of the line.
for(int v=0; v < Steps; v++) { x = x + Xincrement; y = y + Yincrement; putpixel(Round(x), Round(y)); }
Bresenham’s Line Generation
The Bresenham algorithm is another incremental scan conversion algorithm. The big advantage of this algorithm is that, it uses only integer calculations. Moving across the x axis in unit intervals and at each step choose between two different y coordinates.
For example, as shown in the following illustration, from position (2, 3) you need to choose between (3, 3) and (3, 4). You would like the point that is closer to the original line.
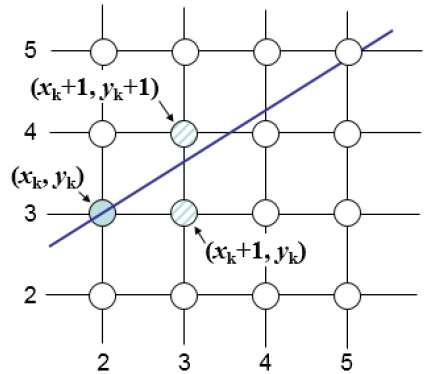
At sample position <span class="MathJax" id="MathJax-Element-5-Frame" tabindex="0" data-mathml="Xk+1,” role=”presentation” style=”box-sizing: border-box; display: inline; line-height: normal; text-align: left; word-spacing: normal; word-wrap: normal; white-space: nowrap; float: none; direction: ltr; max-width: none; max-height: none; min-width: 0px; min-height: 0px; border: 0px; padding: 0px; margin: 0px; position: relative;”>Xk+1, the vertical separations from the mathematical line are labelled as <span class="MathJax" id="MathJax-Element-6-Frame" tabindex="0" data-mathml="dupper” role=”presentation” style=”box-sizing: border-box; display: inline; line-height: normal; text-align: left; word-spacing: normal; word-wrap: normal; white-space: nowrap; float: none; direction: ltr; max-width: none; max-height: none; min-width: 0px; min-height: 0px; border: 0px; padding: 0px; margin: 0px; position: relative;”>dupper and <span class="MathJax" id="MathJax-Element-7-Frame" tabindex="0" data-mathml="dlower” role=”presentation” style=”box-sizing: border-box; display: inline; line-height: normal; text-align: left; word-spacing: normal; word-wrap: normal; white-space: nowrap; float: none; direction: ltr; max-width: none; max-height: none; min-width: 0px; min-height: 0px; border: 0px; padding: 0px; margin: 0px; position: relative;”>dlower.d
<span class="MathJax" id="MathJax-Element-7-Frame" tabindex="0" data-mathml="dlower” role=”presentation” style=”box-sizing: border-box; display: inline; line-height: normal; text-align: left; word-spacing: normal; word-wrap: normal; white-space: nowrap; float: none; direction: ltr; max-width: none; max-height: none; min-width: 0px; min-height: 0px; border: 0px; padding: 0px; margin: 0px; position: relative;”>lower.
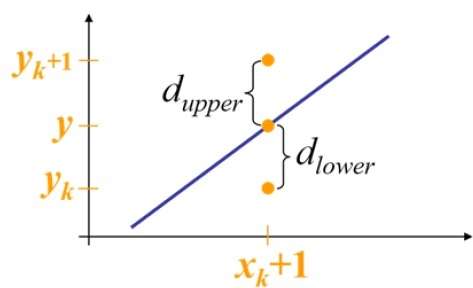
From the above illustration, the y coordinate on the mathematical line at <span class="MathJax" id="MathJax-Element-8-Frame" tabindex="0" data-mathml="xk+1″ role=”presentation” style=”box-sizing: border-box; display: inline; line-height: normal; text-align: left; word-spacing: normal; word-wrap: normal; white-space: nowrap; float: none; direction: ltr; max-width: none; max-height: none; min-width: 0px; min-height: 0px; border: 0px; padding: 0px; margin: 0px; position: relative;”>xk+1 is −
Y = m(<span class="MathJax" id="MathJax-Element-9-Frame" tabindex="0" data-mathml="Xk” role=”presentation” style=”box-sizing: border-box; display: inline; line-height: normal; text-align: left; word-spacing: normal; word-wrap: normal; white-space: nowrap; float: none; direction: ltr; max-width: none; max-height: none; min-width: 0px; min-height: 0px; border: 0px; padding: 0px; margin: 0px; position: relative;”>Xk+1) + b
So, <span class="MathJax" id="MathJax-Element-10-Frame" tabindex="0" data-mathml="dupper” role=”presentation” style=”box-sizing: border-box; display: inline; line-height: normal; text-align: left; word-spacing: normal; word-wrap: normal; white-space: nowrap; float: none; direction: ltr; max-width: none; max-height: none; min-width: 0px; min-height: 0px; border: 0px; padding: 0px; margin: 0px; position: relative;”>dupper and <span class="MathJax" id="MathJax-Element-11-Frame" tabindex="0" data-mathml="dlower” role=”presentation” style=”box-sizing: border-box; display: inline; line-height: normal; text-align: left; word-spacing: normal; word-wrap: normal; white-space: nowrap; float: none; direction: ltr; max-width: none; max-height: none; min-width: 0px; min-height: 0px; border: 0px; padding: 0px; margin: 0px; position: relative;”>dlower are given as follows −
<span class="MathJax" id="MathJax-Element-12-Frame" tabindex="0" data-mathml="dlower=y−yk” role=”presentation” style=”box-sizing: border-box; display: inline; line-height: normal; font-size: 15px; word-spacing: normal; word-wrap: normal; white-space: nowrap; float: none; direction: ltr; max-width: none; max-height: none; min-width: 0px; min-height: 0px; border: 0px; padding: 0px; margin: 0px; position: relative;”>dlower=y−yk
<span class="MathJax" id="MathJax-Element-13-Frame" tabindex="0" data-mathml="=m(Xk+1)+b−Yk” role=”presentation” style=”box-sizing: border-box; display: inline; line-height: normal; font-size: 15px; word-spacing: normal; word-wrap: normal; white-space: nowrap; float: none; direction: ltr; max-width: none; max-height: none; min-width: 0px; min-height: 0px; border: 0px; padding: 0px; margin: 0px; position: relative;”>=m(Xk+1)+b−Yk
and
<span class="MathJax" id="MathJax-Element-14-Frame" tabindex="0" data-mathml="dupper=(yk+1)−y” role=”presentation” style=”box-sizing: border-box; display: inline; line-height: normal; font-size: 15px; word-spacing: normal; word-wrap: normal; white-space: nowrap; float: none; direction: ltr; max-width: none; max-height: none; min-width: 0px; min-height: 0px; border: 0px; padding: 0px; margin: 0px; position: relative;”>dupper=(yk+1)−y
<span class="MathJax" id="MathJax-Element-15-Frame" tabindex="0" data-mathml="=Yk+1−m(Xk+1)−b” role=”presentation” style=”box-sizing: border-box; display: inline; line-height: normal; text-align: left; word-spacing: normal; word-wrap: normal; white-space: nowrap; float: none; direction: ltr; max-width: none; max-height: none; min-width: 0px; min-height: 0px; border: 0px; padding: 0px; margin: 0px; position: relative;”>=Yk+1−m(Xk+1)−b
You can use these to make a simple decision about which pixel is closer to the mathematical line. This simple decision is based on the difference between the two pixel positions.
<span class="MathJax MathJax_FullWidth" id="MathJax-Element-16-Frame" tabindex="0" data-mathml="dlower−dupper=2m(xk+1)−2yk+2b−1″ role=”presentation” style=”box-sizing: border-box; line-height: normal; font-size: 15px; word-spacing: normal; word-wrap: normal; white-space: nowrap; float: none; direction: ltr; max-width: none; max-height: none; min-width: 0px; min-height: 0px; border: 0px; padding: 0px; margin: 0px; position: relative; display: table-cell !important; width: 10000em !important;”>dlower−dupper=2m(xk+1)−2yk+2b−1
Let us substitute m with dy/dx where dx and dy are the differences between the end-points.
<span class="MathJax MathJax_FullWidth" id="MathJax-Element-17-Frame" tabindex="0" data-mathml="dx(dlower−dupper)=dx(2dydx(xk+1)−2yk+2b−1)” role=”presentation” style=”box-sizing: border-box; line-height: normal; font-size: 15px; word-spacing: normal; word-wrap: normal; white-space: nowrap; float: none; direction: ltr; max-width: none; max-height: none; min-width: 0px; min-height: 0px; border: 0px; padding: 0px; margin: 0px; position: relative; display: table-cell !important; width: 10000em !important;”>dx(dlower−dupper)=dx(2dydx(xk+1)−2yk+2b−1)
<span class="MathJax MathJax_FullWidth" id="MathJax-Element-18-Frame" tabindex="0" data-mathml="=2dy.xk−2dx.yk+2dy+2dx(2b−1)” role=”presentation” style=”box-sizing: border-box; line-height: normal; font-size: 15px; word-spacing: normal; word-wrap: normal; white-space: nowrap; float: none; direction: ltr; max-width: none; max-height: none; min-width: 0px; min-height: 0px; border: 0px; padding: 0px; margin: 0px; position: relative; display: table-cell !important; width: 10000em !important;”>=2dy.xk−2dx.yk+2dy+2dx(2b−1)
<span class="MathJax" id="MathJax-Element-19-Frame" tabindex="0" data-mathml="=2dy.xk−2dx.yk+C” role=”presentation” style=”box-sizing: border-box; display: inline; line-height: normal; font-size: 15px; word-spacing: normal; word-wrap: normal; white-space: nowrap; float: none; direction: ltr; max-width: none; max-height: none; min-width: 0px; min-height: 0px; border: 0px; padding: 0px; margin: 0px; position: relative;”>=2dy.xk−2dx.yk+C
So, a decision parameter <span class="MathJax" id="MathJax-Element-20-Frame" tabindex="0" data-mathml="Pk” role=”presentation” style=”box-sizing: border-box; display: inline; line-height: normal; text-align: left; word-spacing: normal; word-wrap: normal; white-space: nowrap; float: none; direction: ltr; max-width: none; max-height: none; min-width: 0px; min-height: 0px; border: 0px; padding: 0px; margin: 0px; position: relative;”>Pk for the kth step along a line is given by −
<span class="MathJax" id="MathJax-Element-21-Frame" tabindex="0" data-mathml="pk=dx(dlower−dupper)” role=”presentation” style=”box-sizing: border-box; display: inline; line-height: normal; font-size: 15px; word-spacing: normal; word-wrap: normal; white-space: nowrap; float: none; direction: ltr; max-width: none; max-height: none; min-width: 0px; min-height: 0px; border: 0px; padding: 0px; margin: 0px; position: relative;”>pk=dx(dlower−dupper)
<span class="MathJax" id="MathJax-Element-22-Frame" tabindex="0" data-mathml="=2dy.xk−2dx.yk+C” role=”presentation” style=”box-sizing: border-box; display: inline; line-height: normal; font-size: 15px; word-spacing: normal; word-wrap: normal; white-space: nowrap; float: none; direction: ltr; max-width: none; max-height: none; min-width: 0px; min-height: 0px; border: 0px; padding: 0px; margin: 0px; position: relative;”>=2dy.xk−2dx.yk+C
The sign of the decision parameter <span class="MathJax" id="MathJax-Element-23-Frame" tabindex="0" data-mathml="Pk” role=”presentation” style=”box-sizing: border-box; display: inline; line-height: normal; text-align: left; word-spacing: normal; word-wrap: normal; white-space: nowrap; float: none; direction: ltr; max-width: none; max-height: none; min-width: 0px; min-height: 0px; border: 0px; padding: 0px; margin: 0px; position: relative;”>Pk is the same as that of <span class="MathJax" id="MathJax-Element-24-Frame" tabindex="0" data-mathml="dlower−dupper” role=”presentation” style=”box-sizing: border-box; display: inline; line-height: normal; text-align: left; word-spacing: normal; word-wrap: normal; white-space: nowrap; float: none; direction: ltr; max-width: none; max-height: none; min-width: 0px; min-height: 0px; border: 0px; padding: 0px; margin: 0px; position: relative;”>dlower−dupper.
If <span class="MathJax" id="MathJax-Element-25-Frame" tabindex="0" data-mathml="pk” role=”presentation” style=”box-sizing: border-box; display: inline; line-height: normal; text-align: left; word-spacing: normal; word-wrap: normal; white-space: nowrap; float: none; direction: ltr; max-width: none; max-height: none; min-width: 0px; min-height: 0px; border: 0px; padding: 0px; margin: 0px; position: relative;”>pk is negative, then choose the lower pixel, otherwise choose the upper pixel.
Remember, the coordinate changes occur along the x axis in unit steps, so you can do everything with integer calculations. At step k+1, the decision parameter is given as −
<span class="MathJax" id="MathJax-Element-26-Frame" tabindex="0" data-mathml="pk+1=2dy.xk+1−2dx.yk+1+C” role=”presentation” style=”box-sizing: border-box; display: inline; line-height: normal; font-size: 15px; word-spacing: normal; word-wrap: normal; white-space: nowrap; float: none; direction: ltr; max-width: none; max-height: none; min-width: 0px; min-height: 0px; border: 0px; padding: 0px; margin: 0px; position: relative;”>pk+1=2dy.xk+1−2dx.yk+1+C
Subtracting <span class="MathJax" id="MathJax-Element-27-Frame" tabindex="0" data-mathml="pk” role=”presentation” style=”box-sizing: border-box; display: inline; line-height: normal; text-align: left; word-spacing: normal; word-wrap: normal; white-space: nowrap; float: none; direction: ltr; max-width: none; max-height: none; min-width: 0px; min-height: 0px; border: 0px; padding: 0px; margin: 0px; position: relative;”>pk from this we get −
<span class="MathJax MathJax_FullWidth" id="MathJax-Element-28-Frame" tabindex="0" data-mathml="pk+1−pk=2dy(xk+1−xk)−2dx(yk+1−yk)” role=”presentation” style=”box-sizing: border-box; line-height: normal; font-size: 15px; word-spacing: normal; word-wrap: normal; white-space: nowrap; float: none; direction: ltr; max-width: none; max-height: none; min-width: 0px; min-height: 0px; border: 0px; padding: 0px; margin: 0px; position: relative; display: table-cell !important; width: 10000em !important;”>pk+1−pk=2dy(xk+1−xk)−2dx(yk+1−yk)
But, <span class="MathJax" id="MathJax-Element-29-Frame" tabindex="0" data-mathml="xk+1″ role=”presentation” style=”box-sizing: border-box; display: inline; line-height: normal; text-align: left; word-spacing: normal; word-wrap: normal; white-space: nowrap; float: none; direction: ltr; max-width: none; max-height: none; min-width: 0px; min-height: 0px; border: 0px; padding: 0px; margin: 0px; position: relative;”>xk+1 is the same as <span class="MathJax" id="MathJax-Element-30-Frame" tabindex="0" data-mathml="(xk)+1″ role=”presentation” style=”box-sizing: border-box; display: inline; line-height: normal; text-align: left; word-spacing: normal; word-wrap: normal; white-space: nowrap; float: none; direction: ltr; max-width: none; max-height: none; min-width: 0px; min-height: 0px; border: 0px; padding: 0px; margin: 0px; position: relative;”>(xk)+1. So −
<span class="MathJax" id="MathJax-Element-31-Frame" tabindex="0" data-mathml="pk+1=pk+2dy−2dx(yk+1−yk)” role=”presentation” style=”box-sizing: border-box; display: inline; line-height: normal; font-size: 15px; word-spacing: normal; word-wrap: normal; white-space: nowrap; float: none; direction: ltr; max-width: none; max-height: none; min-width: 0px; min-height: 0px; border: 0px; padding: 0px; margin: 0px; position: relative;”>pk+1=pk+2dy−2dx(yk+1−yk)
Where, <span class="MathJax" id="MathJax-Element-32-Frame" tabindex="0" data-mathml="Yk+1–Yk” role=”presentation” style=”box-sizing: border-box; display: inline; line-height: normal; text-align: left; word-spacing: normal; word-wrap: normal; white-space: nowrap; float: none; direction: ltr; max-width: none; max-height: none; min-width: 0px; min-height: 0px; border: 0px; padding: 0px; margin: 0px; position: relative;”>Yk+1–Yk is either 0 or 1 depending on the sign of <span class="MathJax" id="MathJax-Element-33-Frame" tabindex="0" data-mathml="Pk” role=”presentation” style=”box-sizing: border-box; display: inline; line-height: normal; text-align: left; word-spacing: normal; word-wrap: normal; white-space: nowrap; float: none; direction: ltr; max-width: none; max-height: none; min-width: 0px; min-height: 0px; border: 0px; padding: 0px; margin: 0px; position: relative;”>Pk.
The first decision parameter <span class="MathJax" id="MathJax-Element-34-Frame" tabindex="0" data-mathml="p0″ role=”presentation” style=”box-sizing: border-box; display: inline; line-height: normal; text-align: left; word-spacing: normal; word-wrap: normal; white-space: nowrap; float: none; direction: ltr; max-width: none; max-height: none; min-width: 0px; min-height: 0px; border: 0px; padding: 0px; margin: 0px; position: relative;”>p0 is evaluated at <span class="MathJax" id="MathJax-Element-35-Frame" tabindex="0" data-mathml="(x0,y0)” role=”presentation” style=”box-sizing: border-box; display: inline; line-height: normal; text-align: left; word-spacing: normal; word-wrap: normal; white-space: nowrap; float: none; direction: ltr; max-width: none; max-height: none; min-width: 0px; min-height: 0px; border: 0px; padding: 0px; margin: 0px; position: relative;”>(x0,y0) is given as −
<span class="MathJax" id="MathJax-Element-36-Frame" tabindex="0" data-mathml="p0=2dy−dx” role=”presentation” style=”box-sizing: border-box; display: inline; line-height: normal; font-size: 15px; word-spacing: normal; word-wrap: normal; white-space: nowrap; float: none; direction: ltr; max-width: none; max-height: none; min-width: 0px; min-height: 0px; border: 0px; padding: 0px; margin: 0px; position: relative;”>p0=2dy−dx
Now, keeping in mind all the above points and calculations, here is the Bresenham algorithm for slope m < 1 −
Step 1 − Input the two end-points of line, storing the left end-point in <span class="MathJax" id="MathJax-Element-37-Frame" tabindex="0" data-mathml="(x0,y0)” role=”presentation” style=”box-sizing: border-box; display: inline; line-height: normal; text-align: left; word-spacing: normal; word-wrap: normal; white-space: nowrap; float: none; direction: ltr; max-width: none; max-height: none; min-width: 0px; min-height: 0px; border: 0px; padding: 0px; margin: 0px; position: relative;”>(x0,y0).
Step 2 − Plot the point <span class="MathJax" id="MathJax-Element-38-Frame" tabindex="0" data-mathml="(x0,y0)” role=”presentation” style=”box-sizing: border-box; display: inline; line-height: normal; text-align: left; word-spacing: normal; word-wrap: normal; white-space: nowrap; float: none; direction: ltr; max-width: none; max-height: none; min-width: 0px; min-height: 0px; border: 0px; padding: 0px; margin: 0px; position: relative;”>(x0,y0).
Step 3 − Calculate the constants dx, dy, 2dy, and (2dy – 2dx) and get the first value for the decision parameter as −
<span class="MathJax" id="MathJax-Element-39-Frame" tabindex="0" data-mathml="p0=2dy−dx” role=”presentation” style=”box-sizing: border-box; display: inline; line-height: normal; font-size: 15px; word-spacing: normal; word-wrap: normal; white-space: nowrap; float: none; direction: ltr; max-width: none; max-height: none; min-width: 0px; min-height: 0px; border: 0px; padding: 0px; margin: 0px; position: relative;”>p0=2dy−dx
Step 4 − At each <span class="MathJax" id="MathJax-Element-40-Frame" tabindex="0" data-mathml="Xk” role=”presentation” style=”box-sizing: border-box; display: inline; line-height: normal; text-align: left; word-spacing: normal; word-wrap: normal; white-space: nowrap; float: none; direction: ltr; max-width: none; max-height: none; min-width: 0px; min-height: 0px; border: 0px; padding: 0px; margin: 0px; position: relative;”>Xk along the line, starting at k = 0, perform the following test −
If <span class="MathJax" id="MathJax-Element-41-Frame" tabindex="0" data-mathml="pk” role=”presentation” style=”box-sizing: border-box; display: inline; line-height: normal; text-align: left; word-spacing: normal; word-wrap: normal; white-space: nowrap; float: none; direction: ltr; max-width: none; max-height: none; min-width: 0px; min-height: 0px; border: 0px; padding: 0px; margin: 0px; position: relative;”>pk < 0, the next point to plot is <span class="MathJax" id="MathJax-Element-42-Frame" tabindex="0" data-mathml="(xk+1,yk)” role=”presentation” style=”box-sizing: border-box; display: inline; line-height: normal; text-align: left; word-spacing: normal; word-wrap: normal; white-space: nowrap; float: none; direction: ltr; max-width: none; max-height: none; min-width: 0px; min-height: 0px; border: 0px; padding: 0px; margin: 0px; position: relative;”>(xk+1,yk) and
<span class="MathJax" id="MathJax-Element-43-Frame" tabindex="0" data-mathml="pk+1=pk+2dy” role=”presentation” style=”box-sizing: border-box; display: inline; line-height: normal; font-size: 15px; word-spacing: normal; word-wrap: normal; white-space: nowrap; float: none; direction: ltr; max-width: none; max-height: none; min-width: 0px; min-height: 0px; border: 0px; padding: 0px; margin: 0px; position: relative;”>pk+1=pk+2dy
Otherwise,
<span class="MathJax" id="MathJax-Element-44-Frame" tabindex="0" data-mathml="pk+1=pk+2dy−2dx” role=”presentation” style=”box-sizing: border-box; display: inline; line-height: normal; font-size: 15px; word-spacing: normal; word-wrap: normal; white-space: nowrap; float: none; direction: ltr; max-width: none; max-height: none; min-width: 0px; min-height: 0px; border: 0px; padding: 0px; margin: 0px; position: relative;”>pk+1=pk+2dy−2dx
Step 5 − Repeat step 4 (dx – 1) times.
For m > 1, find out whether you need to increment x while incrementing y each time.
After solving, the equation for decision parameter <span class="MathJax" id="MathJax-Element-45-Frame" tabindex="0" data-mathml="Pk” role=”presentation” style=”box-sizing: border-box; display: inline; line-height: normal; text-align: left; word-spacing: normal; word-wrap: normal; white-space: nowrap; float: none; direction: ltr; max-width: none; max-height: none; min-width: 0px; min-height: 0px; border: 0px; padding: 0px; margin: 0px; position: relative;”>Pk will be very similar, just the x and y in the equation gets interchanged.
3D Transformation
Rotation
3D rotation is not same as 2D rotation. In 3D rotation, we have to specify the angle of rotation along with the axis of rotation. We can perform 3D rotation about X, Y, and Z axes. They are represented in the matrix form as below −
<span class="MathJax MathJax_FullWidth" id="MathJax-Element-1-Frame" tabindex="0" data-mathml="Rx(θ)=[10000cosθ−sinθ00sinθcosθ00001]Ry(θ)=[cosθ0sinθ00100−sinθ0cosθ00001]Rz(θ)=[cosθ−sinθ00sinθcosθ0000100001]” role=”presentation” style=”box-sizing: border-box; line-height: normal; font-size: 15px; word-spacing: normal; word-wrap: normal; white-space: nowrap; float: none; direction: ltr; max-width: none; max-height: none; min-width: 0px; min-height: 0px; border: 0px; padding: 0px; margin: 0px; position: relative; display: table-cell !important; width: 10000em !important;”>Rx(θ)=⎡⎣⎢⎢⎢10000cosθsinθ00−sinθcosθ00001⎤⎦⎥⎥⎥Ry(θ)=⎡⎣⎢⎢⎢cosθ0−sinθ00100sinθ0cosθ00001⎤⎦⎥⎥⎥Rz(θ)=⎡⎣⎢⎢⎢cosθsinθ00−sinθcosθ0000100001⎤⎦⎥⎥⎥
The following figure explains the rotation about various axes −
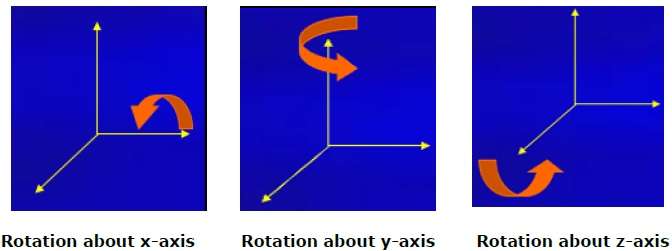
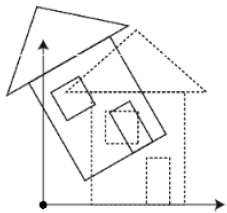
Scaling
You can change the size of an object using scaling transformation. In the scaling process, you either expand or compress the dimensions of the object. Scaling can be achieved by multiplying the original coordinates of the object with the scaling factor to get the desired result. The following figure shows the effect of 3D scaling −
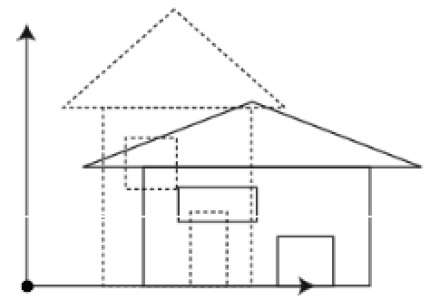
In 3D scaling operation, three coordinates are used. Let us assume that the original coordinates are (X, Y, Z), scaling factors are <span class="MathJax" id="MathJax-Element-2-Frame" tabindex="0" data-mathml="(SX,SY,Sz)” role=”presentation” style=”box-sizing: border-box; display: inline; line-height: normal; text-align: left; word-spacing: normal; word-wrap: normal; white-space: nowrap; float: none; direction: ltr; max-width: none; max-height: none; min-width: 0px; min-height: 0px; border: 0px; padding: 0px; margin: 0px; position: relative;”>(SX,SY,Sz) respectively, and the produced coordinates are (X’, Y’, Z’). This can be mathematically represented as shown below −
<span class="MathJax" id="MathJax-Element-3-Frame" tabindex="0" data-mathml="S=[Sx0000Sy0000Sz00001]” role=”presentation” style=”box-sizing: border-box; display: inline; line-height: normal; text-align: left; word-spacing: normal; word-wrap: normal; white-space: nowrap; float: none; direction: ltr; max-width: none; max-height: none; min-width: 0px; min-height: 0px; border: 0px; padding: 0px; margin: 0px; position: relative;”>S=⎡⎣⎢⎢⎢⎢Sx0000Sy0000Sz00001⎤⎦⎥⎥⎥⎥
P’ = P∙S
<span class="MathJax" id="MathJax-Element-4-Frame" tabindex="0" data-mathml="[X′Y′Z′1]=[XYZ1][Sx0000Sy0000Sz00001]” role=”presentation” style=”box-sizing: border-box; display: inline; line-height: normal; text-align: left; word-spacing: normal; word-wrap: normal; white-space: nowrap; float: none; direction: ltr; max-width: none; max-height: none; min-width: 0px; min-height: 0px; border: 0px; padding: 0px; margin: 0px; position: relative;”>[X′Y′Z′1]=[XYZ1]⎡⎣⎢⎢⎢⎢Sx0000Sy0000Sz00001⎤⎦⎥⎥⎥⎥
<span class="MathJax" id="MathJax-Element-5-Frame" tabindex="0" data-mathml="=[X.SxY.SyZ.Sz1]” role=”presentation” style=”box-sizing: border-box; display: inline; line-height: normal; text-align: left; word-spacing: normal; word-wrap: normal; white-space: nowrap; float: none; direction: ltr; max-width: none; max-height: none; min-width: 0px; min-height: 0px; border: 0px; padding: 0px; margin: 0px; position: relative;”>=[X.SxY.SyZ.Sz1]
Shear
A transformation that slants the shape of an object is called the shear transformation. Like in 2D shear, we can shear an object along the X-axis, Y-axis, or Z-axis in 3D.
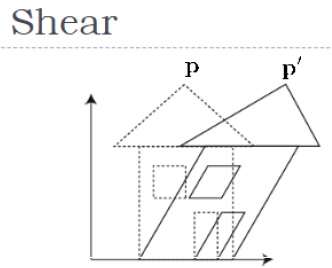
As shown in the above figure, there is a coordinate P. You can shear it to get a new coordinate P’, which can be represented in 3D matrix form as below −
<span class="MathJax" id="MathJax-Element-6-Frame" tabindex="0" data-mathml="Sh=[1shxyshxz0shyx1shyz0shzxshzy100001]” role=”presentation” style=”box-sizing: border-box; display: inline; line-height: normal; text-align: left; word-spacing: normal; word-wrap: normal; white-space: nowrap; float: none; direction: ltr; max-width: none; max-height: none; min-width: 0px; min-height: 0px; border: 0px; padding: 0px; margin: 0px; position: relative;”>Sh=⎡⎣⎢⎢⎢⎢1shxyshxz0shyx1shyz0shzxshzy100001⎤⎦⎥⎥⎥⎥
P’ = P ∙ Sh
<span class="MathJax" id="MathJax-Element-7-Frame" tabindex="0" data-mathml="X′=X+ShxyY+ShxzZ” role=”presentation” style=”box-sizing: border-box; display: inline; line-height: normal; text-align: left; word-spacing: normal; word-wrap: normal; white-space: nowrap; float: none; direction: ltr; max-width: none; max-height: none; min-width: 0px; min-height: 0px; border: 0px; padding: 0px; margin: 0px; position: relative;”>X′=X+ShyxY+ShzxZ
<span class="MathJax" id="MathJax-Element-8-Frame" tabindex="0" data-mathml="Y′=ShyxX+Y+shyzZ” role=”presentation” style=”box-sizing: border-box; display: inline; line-height: normal; text-align: left; word-spacing: normal; word-wrap: normal; white-space: nowrap; float: none; direction: ltr; max-width: none; max-height: none; min-width: 0px; min-height: 0px; border: 0px; padding: 0px; margin: 0px; position: relative;”>Y′=ShxyX+Y+shzyZ
<span class="MathJax" id="MathJax-Element-9-Frame" tabindex="0" data-mathml="Z′=ShzxX+ShzyY+Z” role=”presentation” style=”box-sizing: border-box; display: inline; line-height: normal; text-align: left; word-spacing: normal; word-wrap: normal; white-space: nowrap; float: none; direction: ltr; max-width: none; max-height: none; min-width: 0px; min-height: 0px; border: 0px; padding: 0px; margin: 0px; position: relative;”>Z′=ShxzX+ShyzY+Z
Transformation Matrices
Transformation matrix is a basic tool for transformation. A matrix with n x m dimensions is multiplied with the coordinate of objects. Usually 3 x 3 or 4 x 4 matrices are used for transformation. For example, consider the following matrix for various operation.
Computer Graphics Surfaces
Polygon Surfaces
Objects are represented as a collection of surfaces. 3D object representation is divided into two categories.
-
Boundary Representations (B-reps) − It describes a 3D object as a set of surfaces that separates the object interior from the environment.
-
Space–partitioning representations − It is used to describe interior properties, by partitioning the spatial region containing an object into a set of small, non-overlapping, contiguous solids (usually cubes).
The most commonly used boundary representation for a 3D graphics object is a set of surface polygons that enclose the object interior. Many graphics system use this method. Set of polygons are stored for object description. This simplifies and speeds up the surface rendering and display of object since all surfaces can be described with linear equations.
The polygon surfaces are common in design and solid-modeling applications, since their wireframe display can be done quickly to give general indication of surface structure. Then realistic scenes are produced by interpolating shading patterns across polygon surface to illuminate.
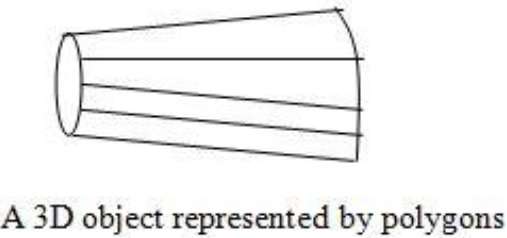
Polygon Tables
In this method, the surface is specified by the set of vertex coordinates and associated attributes. As shown in the following figure, there are five vertices, from v1 to v5.
-
Each vertex stores x, y, and z coordinate information which is represented in the table as v1: x1, y1, z1.
-
The Edge table is used to store the edge information of polygon. In the following figure, edge E1 lies between vertex v1 and v2 which is represented in the table as E1: v1, v2.
-
Polygon surface table stores the number of surfaces present in the polygon. From the following figure, surface S1 is covered by edges E1, E2 and E3 which can be represented in the polygon surface table as S1: E1, E2, and E3.
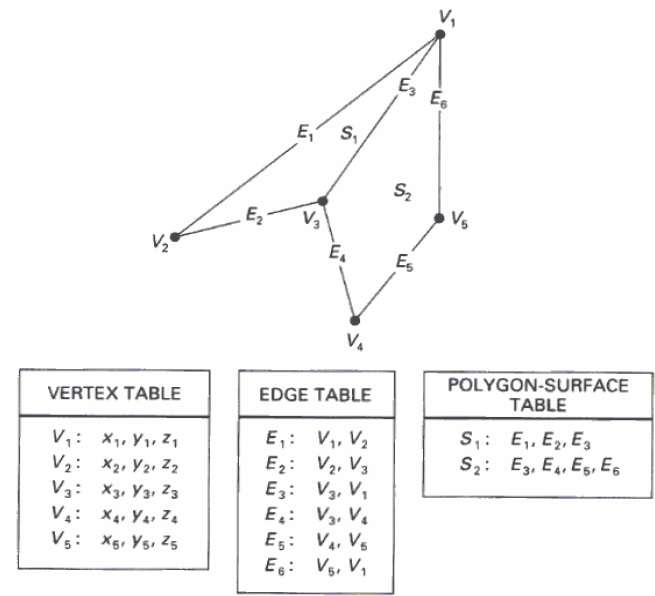
Plane Equations
The equation for plane surface can be expressed as −
Ax + By + Cz + D = 0
Where (x, y, z) is any point on the plane, and the coefficients A, B, C, and D are constants describing the spatial properties of the plane. We can obtain the values of A, B, C, and D by solving a set of three plane equations using the coordinate values for three non collinear points in the plane. Let us assume that three vertices of the plane are (x1, y1, z1), (x2, y2, z2) and (x3, y3, z3).
Let us solve the following simultaneous equations for ratios A/D, B/D, and C/D. You get the values of A, B, C, and D.
(A/D) x1 + (B/D) y1 + (C/D) z1 = -1
(A/D) x2 + (B/D) y2 + (C/D) z2 = -1
(A/D) x3 + (B/D) y3 + (C/D) z3 = -1
To obtain the above equations in determinant form, apply Cramer’s rule to the above equations.
<span class="MathJax" id="MathJax-Element-1-Frame" tabindex="0" data-mathml="A=[1y1z11y2z21y3z3]B=[x11z1x21z2x31z3]C=[x1y11x2y21x3y31]D=−[x1y1z1x2y2z2x3y3z3]” role=”presentation” style=”box-sizing: border-box; display: inline; line-height: normal; font-size: 15px; text-align: left; word-spacing: normal; word-wrap: normal; white-space: nowrap; float: none; direction: ltr; max-width: none; max-height: none; min-width: 0px; min-height: 0px; border: 0px; padding: 0px; margin: 0px; position: relative;”>A=⎡⎣⎢111y1y2y3z1z2z3⎤⎦⎥B=⎡⎣⎢x1x2x3111z1z2z3⎤⎦⎥C=⎡⎣⎢x1x2x3y1y2y3111⎤⎦⎥D=−⎡⎣⎢x1x2x3y1y2y3z1z2z3⎤⎦⎥
For any point (x, y, z) with parameters A, B, C, and D, we can say that −
-
Ax + By + Cz + D ≠ 0 means the point is not on the plane.
-
Ax + By + Cz + D < 0 means the point is inside the surface.
-
Ax + By + Cz + D > 0 means the point is outside the surface.
Polygon Meshes
3D surfaces and solids can be approximated by a set of polygonal and line elements. Such surfaces are called polygonal meshes. In polygon mesh, each edge is shared by at most two polygons. The set of polygons or faces, together form the “skin” of the object.
This method can be used to represent a broad class of solids/surfaces in graphics. A polygonal mesh can be rendered using hidden surface removal algorithms. The polygon mesh can be represented by three ways −
- Explicit representation
- Pointers to a vertex list
- Pointers to an edge list
Advantages
- It can be used to model almost any object.
- They are easy to represent as a collection of vertices.
- They are easy to transform.
- They are easy to draw on computer screen.
Disadvantages
- Curved surfaces can only be approximately described.
- It is difficult to simulate some type of objects like hair or liquid.
Visible Surface Detection
When we view a picture containing non-transparent objects and surfaces, then we cannot see those objects from view which are behind from objects closer to eye. We must remove these hidden surfaces to get a realistic screen image. The identification and removal of these surfaces is called Hidden-surface problem.
There are two approaches for removing hidden surface problems − Object-Space method andImage-space method. The Object-space method is implemented in physical coordinate system and image-space method is implemented in screen coordinate system.
When we want to display a 3D object on a 2D screen, we need to identify those parts of a screen that are visible from a chosen viewing position.
Depth Buffer (Z-Buffer) Method
This method is developed by Cutmull. It is an image-space approach. The basic idea is to test the Z-depth of each surface to determine the closest (visible) surface.
In this method each surface is processed separately one pixel position at a time across the surface. The depth values for a pixel are compared and the closest (smallest z) surface determines the color to be displayed in the frame buffer.
It is applied very efficiently on surfaces of polygon. Surfaces can be processed in any order. To override the closer polygons from the far ones, two buffers named frame buffer and depth buffer, are used.
Depth buffer is used to store depth values for (x, y) position, as surfaces are processed (0 ≤ depth ≤ 1).
The frame buffer is used to store the intensity value of color value at each position (x, y).
The z-coordinates are usually normalized to the range [0, 1]. The 0 value for z-coordinate indicates back clipping pane and 1 value for z-coordinates indicates front clipping pane.
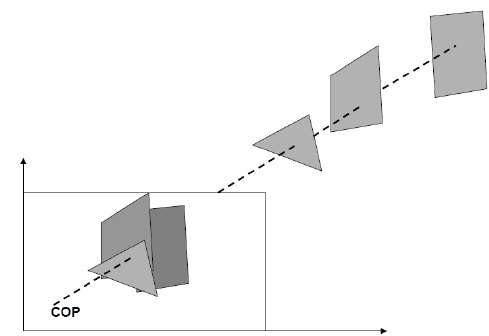
Algorithm
Step-1 − Set the buffer values −
Depthbuffer (x, y) = 0
Framebuffer (x, y) = background color
Step-2 − Process each polygon (One at a time)
For each projected (x, y) pixel position of a polygon, calculate depth z.
If Z > depthbuffer (x, y)
Compute surface color,
set depthbuffer (x, y) = z,
framebuffer (x, y) = surfacecolor (x, y)
Advantages
- It is easy to implement.
- It reduces the speed problem if implemented in hardware.
- It processes one object at a time.
Disadvantages
- It requires large memory.
- It is time consuming process.
Scan-Line Method
It is an image-space method to identify visible surface. This method has a depth information for only single scan-line. In order to require one scan-line of depth values, we must group and process all polygons intersecting a given scan-line at the same time before processing the next scan-line. Two important tables, edge table and polygon table, are maintained for this.
The Edge Table − It contains coordinate endpoints of each line in the scene, the inverse slope of each line, and pointers into the polygon table to connect edges to surfaces.
The Polygon Table − It contains the plane coefficients, surface material properties, other surface data, and may be pointers to the edge table.
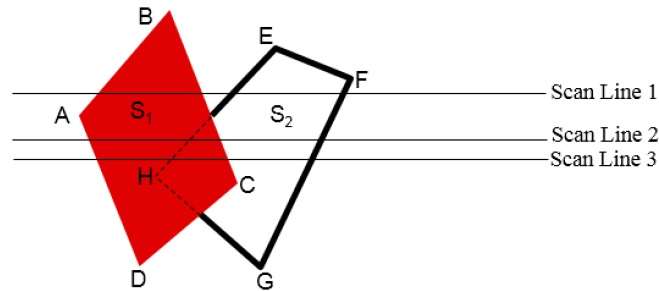
To facilitate the search for surfaces crossing a given scan-line, an active list of edges is formed. The active list stores only those edges that cross the scan-line in order of increasing x. Also a flag is set for each surface to indicate whether a position along a scan-line is either inside or outside the surface.
Pixel positions across each scan-line are processed from left to right. At the left intersection with a surface, the surface flag is turned on and at the right, the flag is turned off. You only need to perform depth calculations when multiple surfaces have their flags turned on at a certain scan-line position.
Area-Subdivision Method
The area-subdivision method takes advantage by locating those view areas that represent part of a single surface. Divide the total viewing area into smaller and smaller rectangles until each small area is the projection of part of a single visible surface or no surface at all.
Continue this process until the subdivisions are easily analyzed as belonging to a single surface or until they are reduced to the size of a single pixel. An easy way to do this is to successively divide the area into four equal parts at each step. There are four possible relationships that a surface can have with a specified area boundary.
-
Surrounding surface − One that completely encloses the area.
-
Overlapping surface − One that is partly inside and partly outside the area.
-
Inside surface − One that is completely inside the area.
-
Outside surface − One that is completely outside the area.
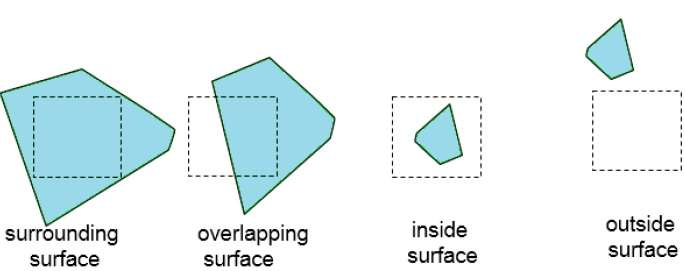
The tests for determining surface visibility within an area can be stated in terms of these four classifications. No further subdivisions of a specified area are needed if one of the following conditions is true −
- All surfaces are outside surfaces with respect to the area.
- Only one inside, overlapping or surrounding surface is in the area.
- A surrounding surface obscures all other surfaces within the area boundaries.
Back-Face Detection
A fast and simple object-space method for identifying the back faces of a polyhedron is based on the “inside-outside” tests. A point (x, y, z) is “inside” a polygon surface with plane parameters A, B, C, and D if When an inside point is along the line of sight to the surface, the polygon must be a back face (we are inside that face and cannot see the front of it from our viewing position).
We can simplify this test by considering the normal vector N to a polygon surface, which has Cartesian components (A, B, C).
In general, if V is a vector in the viewing direction from the eye (or “camera”) position, then this polygon is a back face if
V.N > 0
Furthermore, if object descriptions are converted to projection coordinates and your viewing direction is parallel to the viewing z-axis, then −
V = (0, 0, Vz) and V.N = VZC
So that we only need to consider the sign of C the component of the normal vector N.
In a right-handed viewing system with viewing direction along the negative <span class="MathJax" id="MathJax-Element-1-Frame" tabindex="0" data-mathml="ZV” role=”presentation” style=”box-sizing: border-box; display: inline; line-height: normal; text-align: left; word-spacing: normal; word-wrap: normal; white-space: nowrap; float: none; direction: ltr; max-width: none; max-height: none; min-width: 0px; min-height: 0px; border: 0px; padding: 0px; margin: 0px; position: relative;”>ZV axis, the polygon is a back face if C < 0. Also, we cannot see any face whose normal has z component C = 0, since your viewing direction is towards that polygon. Thus, in general, we can label any polygon as a back face if its normal vector has a z component value −
C <= 0
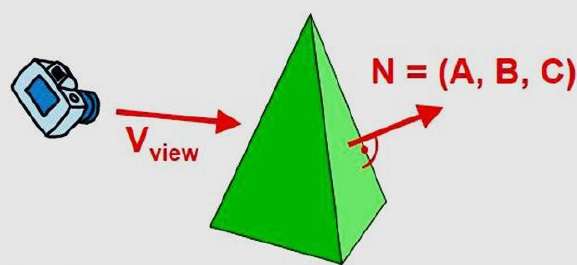
Similar methods can be used in packages that employ a left-handed viewing system. In these packages, plane parameters A, B, C and D can be calculated from polygon vertex coordinates specified in a clockwise direction (unlike the counterclockwise direction used in a right-handed system).
Also, back faces have normal vectors that point away from the viewing position and are identified by C >= 0 when the viewing direction is along the positive <span class="MathJax" id="MathJax-Element-2-Frame" tabindex="0" data-mathml="Zv” role=”presentation” style=”box-sizing: border-box; display: inline; line-height: normal; text-align: left; word-spacing: normal; word-wrap: normal; white-space: nowrap; float: none; direction: ltr; max-width: none; max-height: none; min-width: 0px; min-height: 0px; border: 0px; padding: 0px; margin: 0px; position: relative;”>Zv axis. By examining parameter C for the different planes defining an object, we can immediately identify all the back faces.
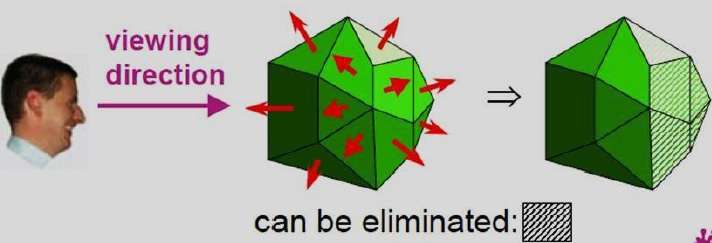
A-Buffer Method
The A-buffer method is an extension of the depth-buffer method. The A-buffer method is a visibility detection method developed at Lucas film Studios for the rendering system Renders Everything You Ever Saw (REYES).
The A-buffer expands on the depth buffer method to allow transparencies. The key data structure in the A-buffer is the accumulation buffer.
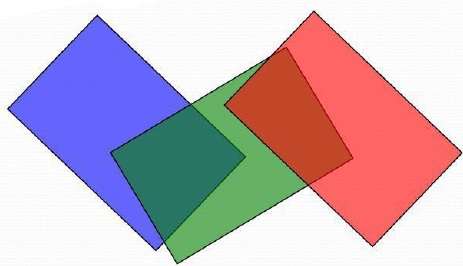
Each position in the A-buffer has two fields −
-
Depth field − It stores a positive or negative real number
-
Intensity field − It stores surface-intensity information or a pointer value

If depth >= 0, the number stored at that position is the depth of a single surface overlapping the corresponding pixel area. The intensity field then stores the RGB components of the surface color at that point and the percent of pixel coverage.
If depth < 0, it indicates multiple-surface contributions to the pixel intensity. The intensity field then stores a pointer to a linked list of surface data. The surface buffer in the A-buffer includes −
- RGB intensity components
- Opacity Parameter
- Depth
- Percent of area coverage
- Surface identifier
The algorithm proceeds just like the depth buffer algorithm. The depth and opacity values are used to determine the final color of a pixel.
Depth Sorting Method
Depth sorting method uses both image space and object-space operations. The depth-sorting method performs two basic functions −
-
First, the surfaces are sorted in order of decreasing depth.
-
Second, the surfaces are scan-converted in order, starting with the surface of greatest depth.
The scan conversion of the polygon surfaces is performed in image space. This method for solving the hidden-surface problem is often referred to as the painter’s algorithm. The following figure shows the effect of depth sorting −
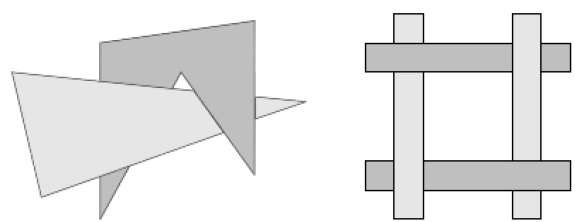
The algorithm begins by sorting by depth. For example, the initial “depth” estimate of a polygon may be taken to be the closest z value of any vertex of the polygon.
Let us take the polygon P at the end of the list. Consider all polygons Q whose z-extents overlap P’s. Before drawing P, we make the following tests. If any of the following tests is positive, then we can assume P can be drawn before Q.
- Do the x-extents not overlap?
- Do the y-extents not overlap?
- Is P entirely on the opposite side of Q’s plane from the viewpoint?
- Is Q entirely on the same side of P’s plane as the viewpoint?
- Do the projections of the polygons not overlap?
If all the tests fail, then we split either P or Q using the plane of the other. The new cut polygons are inserting into the depth order and the process continues. Theoretically, this partitioning could generate O(n2) individual polygons, but in practice, the number of polygons is much smaller.
Binary Space Partition (BSP) Trees
Binary space partitioning is used to calculate visibility. To build the BSP trees, one should start with polygons and label all the edges. Dealing with only one edge at a time, extend each edge so that it splits the plane in two. Place the first edge in the tree as root. Add subsequent edges based on whether they are inside or outside. Edges that span the extension of an edge that is already in the tree are split into two and both are added to the tree.

-
From the above figure, first take A as a root.
-
Make a list of all nodes in figure (a).
-
Put all the nodes that are in front of root Ato the left side of node A and put all those nodes that are behind the root A to the right side as shown in figure (b).
-
Process all the front nodes first and then the nodes at the back.
-
As shown in figure (c), we will first process the node B. As there is nothing in front of the node B, we have put NIL. However, we have node C at back of nodeB, so node C will go to the right side of node B.
-
Repeat the same process for the node D.
Computer Animation
Animation means giving life to any object in computer graphics. It has the power of injecting energy and emotions into the most seemingly inanimate objects. Computer-assisted animation and computer-generated animation are two categories of computer animation. It can be presented via film or video.
The basic idea behind animation is to play back the recorded images at the rates fast enough to fool the human eye into interpreting them as continuous motion. Animation can make a series of dead images come alive. Animation can be used in many areas like entertainment, computer aided-design, scientific visualization, training, education, e-commerce, and computer art.
Animation Techniques
Animators have invented and used a variety of different animation techniques. Basically there are six animation technique which we would discuss one by one in this section.
Traditional Animation (frame by frame)
Traditionally most of the animation was done by hand. All the frames in an animation had to be drawn by hand. Since each second of animation requires 24 frames (film), the amount of efforts required to create even the shortest of movies can be tremendous.
Keyframing
In this technique, a storyboard is laid out and then the artists draw the major frames of the animation. Major frames are the ones in which prominent changes take place. They are the key points of animation. Keyframing requires that the animator specifies critical or key positions for the objects. The computer then automatically fills in the missing frames by smoothly interpolating between those positions.
Procedural
In a procedural animation, the objects are animated by a procedure − a set of rules − not by keyframing. The animator specifies rules and initial conditions and runs simulation. Rules are often based on physical rules of the real world expressed by mathematical equations.
Behavioral
In behavioral animation, an autonomous character determines its own actions, at least to a certain extent. This gives the character some ability to improvise, and frees the animator from the need to specify each detail of every character’s motion.
Performance Based (Motion Capture)
Another technique is Motion Capture, in which magnetic or vision-based sensors record the actions of a human or animal object in three dimensions. A computer then uses these data to animate the object.
This technology has enabled a number of famous athletes to supply the actions for characters in sports video games. Motion capture is pretty popular with the animators mainly because some of the commonplace human actions can be captured with relative ease. However, there can be serious discrepancies between the shapes or dimensions of the subject and the graphical character and this may lead to problems of exact execution.
Physically Based (Dynamics)
Unlike key framing and motion picture, simulation uses the laws of physics to generate motion of pictures and other objects. Simulations can be easily used to produce slightly different sequences while maintaining physical realism. Secondly, real-time simulations allow a higher degree of interactivity where the real person can maneuver the actions of the simulated character.
In contrast the applications based on key-framing and motion select and modify motions form a pre-computed library of motions. One drawback that simulation suffers from is the expertise and time required to handcraft the appropriate controls systems.
Key Framing
A keyframe is a frame where we define changes in animation. Every frame is a keyframe when we create frame by frame animation. When someone creates a 3D animation on a computer, they usually don’t specify the exact position of any given object on every single frame. They create keyframes.
Keyframes are important frames during which an object changes its size, direction, shape or other properties. The computer then figures out all the in-between frames and saves an extreme amount of time for the animator. The following illustrations depict the frames drawn by user and the frames generated by computer.


Morphing
The transformation of object shapes from one form to another form is called morphing. It is one of the most complicated transformations.

A morph looks as if two images melt into each other with a very fluid motion. In technical terms, two images are distorted and a fade occurs between them.
Computer Graphics Fractals
A French/American mathematician Dr Benoit Mandelbrot discovered Fractals. The word fractal was derived from a Latin word fractus which means broken.
What are Fractals?
Fractals are very complex pictures generated by a computer from a single formula. They are created using iterations. This means one formula is repeated with slightly different values over and over again, taking into account the results from the previous iteration.
Fractals are used in many areas such as −
-
Astronomy − For analyzing galaxies, rings of Saturn, etc.
-
Biology/Chemistry − For depicting bacteria cultures, Chemical reactions, human anatomy, molecules, plants,
-
Others − For depicting clouds, coastline and borderlines, data compression, diffusion, economy, fractal art, fractal music, landscapes, special effect, etc.

Generation of Fractals
Fractals can be generated by repeating the same shape over and over again as shown in the following figure. In figure (a) shows an equilateral triangle. In figure (b), we can see that the triangle is repeated to create a star-like shape. In figure (c), we can see that the star shape in figure (b) is repeated again and again to create a new shape.
We can do unlimited number of iteration to create a desired shape. In programming terms, recursion is used to create such shapes.
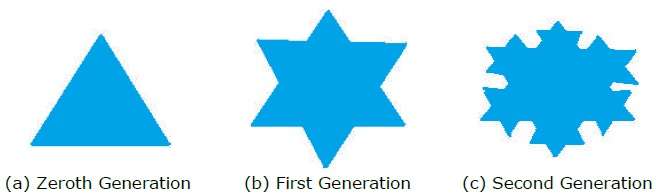
Geometric Fractals
Geometric fractals deal with shapes found in nature that have non-integer or fractal dimensions. To geometrically construct a deterministic (nonrandom) self-similar fractal, we start with a given geometric shape, called the initiator. Subparts of the initiator are then replaced with a pattern, called the generator.
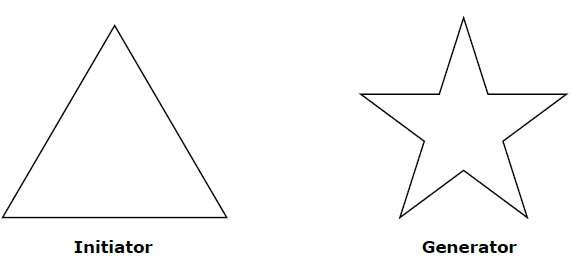
As an example, if we use the initiator and generator shown in the above figure, we can construct good pattern by repeating it. Each straight-line segment in the initiator is replaced with four equal-length line segments at each step. The scaling factor is 1/3, so the fractal dimension is D = ln 4/ln 3 ≈ 1.2619.
Also, the length of each line segment in the initiator increases by a factor of 4/3 at each step, so that the length of the fractal curve tends to infinity as more detail is added to the curve as shown in the following figure −
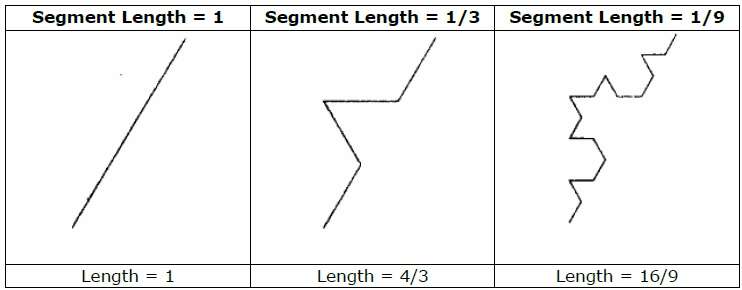
Computer Graphics Curves
In computer graphics, we often need to draw different types of objects onto the screen. Objects are not flat all the time and we need to draw curves many times to draw an object.
Types of Curves
A curve is an infinitely large set of points. Each point has two neighbors except endpoints. Curves can be broadly classified into three categories −explicit, implicit, and parametric curves.
Implicit Curves
Implicit curve representations define the set of points on a curve by employing a procedure that can test to see if a point in on the curve. Usually, an implicit curve is defined by an implicit function of the form −
f(x, y) = 0
It can represent multivalued curves (multiple y values for an x value). A common example is the circle, whose implicit representation is
x2 + y2 – R2 = 0
Explicit Curves
A mathematical function y = f(x) can be plotted as a curve. Such a function is the explicit representation of the curve. The explicit representation is not general, since it cannot represent vertical lines and is also single-valued. For each value of x, only a single value of y is normally computed by the function.
Parametric Curves
Curves having parametric form are called parametric curves. The explicit and implicit curve representations can be used only when the function is known. In practice the parametric curves are used. A two-dimensional parametric curve has the following form −
P(t) = f(t), g(t) or P(t) = x(t), y(t)
The functions f and g become the (x, y) coordinates of any point on the curve, and the points are obtained when the parameter t is varied over a certain interval [a, b], normally [0, 1].
Bezier Curves
Bezier curve is discovered by the French engineerPierre Bézier. These curves can be generated under the control of other points. Approximate tangents by using control points are used to generate curve. The Bezier curve can be represented mathematically as −
<span class="MathJax" id="MathJax-Element-1-Frame" tabindex="0" data-mathml="∑k=0nPiBin(t)” role=”presentation” style=”box-sizing: border-box; display: inline; line-height: normal; font-size: 15px; word-spacing: normal; word-wrap: normal; white-space: nowrap; float: none; direction: ltr; max-width: none; max-height: none; min-width: 0px; min-height: 0px; border: 0px; padding: 0px; margin: 0px; position: relative;”>∑k=0nPiBni(t)
Where <span class="MathJax" id="MathJax-Element-2-Frame" tabindex="0" data-mathml="pi” role=”presentation” style=”box-sizing: border-box; display: inline; line-height: normal; text-align: left; word-spacing: normal; word-wrap: normal; white-space: nowrap; float: none; direction: ltr; max-width: none; max-height: none; min-width: 0px; min-height: 0px; border: 0px; padding: 0px; margin: 0px; position: relative;”>pi is the set of points and <span class="MathJax" id="MathJax-Element-3-Frame" tabindex="0" data-mathml="Bin(t)” role=”presentation” style=”box-sizing: border-box; display: inline; line-height: normal; text-align: left; word-spacing: normal; word-wrap: normal; white-space: nowrap; float: none; direction: ltr; max-width: none; max-height: none; min-width: 0px; min-height: 0px; border: 0px; padding: 0px; margin: 0px; position: relative;”>Bni(t) represents the Bernstein polynomials which are given by −
<span class="MathJax" id="MathJax-Element-4-Frame" tabindex="0" data-mathml="Bin(t)=(ni)(1−t)n−iti” role=”presentation” style=”box-sizing: border-box; display: inline; line-height: normal; font-size: 15px; word-spacing: normal; word-wrap: normal; white-space: nowrap; float: none; direction: ltr; max-width: none; max-height: none; min-width: 0px; min-height: 0px; border: 0px; padding: 0px; margin: 0px; position: relative;”>Bni(t)=(ni)(1−t)n−iti
Where n is the polynomial degree, i is the index, and t is the variable.
The simplest Bézier curve is the straight line from the point <span class="MathJax" id="MathJax-Element-5-Frame" tabindex="0" data-mathml="P0″ role=”presentation” style=”box-sizing: border-box; display: inline; line-height: normal; text-align: left; word-spacing: normal; word-wrap: normal; white-space: nowrap; float: none; direction: ltr; max-width: none; max-height: none; min-width: 0px; min-height: 0px; border: 0px; padding: 0px; margin: 0px; position: relative;”>P0 to <span class="MathJax" id="MathJax-Element-6-Frame" tabindex="0" data-mathml="P1″ role=”presentation” style=”box-sizing: border-box; display: inline; line-height: normal; text-align: left; word-spacing: normal; word-wrap: normal; white-space: nowrap; float: none; direction: ltr; max-width: none; max-height: none; min-width: 0px; min-height: 0px; border: 0px; padding: 0px; margin: 0px; position: relative;”>P1. A quadratic Bezier curve is determined by three control points. A cubic Bezier curve is determined by four control points.

Properties of Bezier Curves
Bezier curves have the following properties −
-
They generally follow the shape of the control polygon, which consists of the segments joining the control points.
-
They always pass through the first and last control points.
-
They are contained in the convex hull of their defining control points.
-
The degree of the polynomial defining the curve segment is one less that the number of defining polygon point. Therefore, for 4 control points, the degree of the polynomial is 3, i.e. cubic polynomial.
-
A Bezier curve generally follows the shape of the defining polygon.
-
The direction of the tangent vector at the end points is same as that of the vector determined by first and last segments.
-
The convex hull property for a Bezier curve ensures that the polynomial smoothly follows the control points.
-
No straight line intersects a Bezier curve more times than it intersects its control polygon.
-
They are invariant under an affine transformation.
-
Bezier curves exhibit global control means moving a control point alters the shape of the whole curve.
-
A given Bezier curve can be subdivided at a point t=t0 into two Bezier segments which join together at the point corresponding to the parameter value t=t0.
B-Spline Curves
The Bezier-curve produced by the Bernstein basis function has limited flexibility.
-
First, the number of specified polygon vertices fixes the order of the resulting polynomial which defines the curve.
-
The second limiting characteristic is that the value of the blending function is nonzero for all parameter values over the entire curve.
The B-spline basis contains the Bernstein basis as the special case. The B-spline basis is non-global.
A B-spline curve is defined as a linear combination of control points Pi and B-spline basis function <span class="MathJax" id="MathJax-Element-7-Frame" tabindex="0" data-mathml="Ni,” role=”presentation” style=”box-sizing: border-box; display: inline; line-height: normal; text-align: left; word-spacing: normal; word-wrap: normal; white-space: nowrap; float: none; direction: ltr; max-width: none; max-height: none; min-width: 0px; min-height: 0px; border: 0px; padding: 0px; margin: 0px; position: relative;”>Ni,k (t) given by
<span class="MathJax" id="MathJax-Element-8-Frame" tabindex="0" data-mathml="C(t)=∑i=0nPiNi,k(t),” role=”presentation” style=”box-sizing: border-box; display: inline; line-height: normal; text-align: left; word-spacing: normal; word-wrap: normal; white-space: nowrap; float: none; direction: ltr; max-width: none; max-height: none; min-width: 0px; min-height: 0px; border: 0px; padding: 0px; margin: 0px; position: relative;”>C(t)=∑ni=0PiNi,k(t), <span class="MathJax" id="MathJax-Element-9-Frame" tabindex="0" data-mathml="n≥k−1,” role=”presentation” style=”box-sizing: border-box; display: inline; line-height: normal; text-align: left; word-spacing: normal; word-wrap: normal; white-space: nowrap; float: none; direction: ltr; max-width: none; max-height: none; min-width: 0px; min-height: 0px; border: 0px; padding: 0px; margin: 0px; position: relative;”>n≥k−1, <span class="MathJax" id="MathJax-Element-10-Frame" tabindex="0" data-mathml="tϵ[tk−1,tn+1]” role=”presentation” style=”box-sizing: border-box; display: inline; line-height: normal; text-align: left; word-spacing: normal; word-wrap: normal; white-space: nowrap; float: none; direction: ltr; max-width: none; max-height: none; min-width: 0px; min-height: 0px; border: 0px; padding: 0px; margin: 0px; position: relative;”>tϵ[tk−1,tn+1]
Where,
-
{<span class="MathJax" id="MathJax-Element-11-Frame" tabindex="0" data-mathml="pi” role=”presentation” style=”box-sizing: border-box; display: inline; line-height: normal; text-align: left; word-spacing: normal; word-wrap: normal; white-space: nowrap; float: none; direction: ltr; max-width: none; max-height: none; min-width: 0px; min-height: 0px; border: 0px; padding: 0px; margin: 0px; position: relative;”>pi: i=0, 1, 2….n} are the control points
-
k is the order of the polynomial segments of the B-spline curve. Order k means that the curve is made up of piecewise polynomial segments of degree k – 1,
-
the <span class="MathJax" id="MathJax-Element-12-Frame" tabindex="0" data-mathml="Ni,k(t)” role=”presentation” style=”box-sizing: border-box; display: inline; line-height: normal; text-align: left; word-spacing: normal; word-wrap: normal; white-space: nowrap; float: none; direction: ltr; max-width: none; max-height: none; min-width: 0px; min-height: 0px; border: 0px; padding: 0px; margin: 0px; position: relative;”>Ni,k(t) are the “normalized B-spline blending functions”. They are described by the order k and by a non-decreasing sequence of real numbers normally called the “knot sequence”.
<span class="MathJax" id="MathJax-Element-13-Frame" tabindex="0" data-mathml="ti:i=0,…n+K” role=”presentation” style=”box-sizing: border-box; display: inline; line-height: normal; font-size: 15px; word-spacing: normal; word-wrap: normal; white-space: nowrap; float: none; direction: ltr; max-width: none; max-height: none; min-width: 0px; min-height: 0px; border: 0px; padding: 0px; margin: 0px; position: relative;”>ti:i=0,...n+K
The Ni, k functions are described as follows −
<span class="MathJax" id="MathJax-Element-14-Frame" tabindex="0" data-mathml="Ni,1(t)={1,ifuϵ[ti,ti+1)0,Otherwise” role=”presentation” style=”box-sizing: border-box; display: inline; line-height: normal; font-size: 15px; word-spacing: normal; word-wrap: normal; white-space: nowrap; float: none; direction: ltr; max-width: none; max-height: none; min-width: 0px; min-height: 0px; border: 0px; padding: 0px; margin: 0px; position: relative;”>Ni,1(t)={1,0,ifuϵ[ti,ti+1)Otherwise
and if k > 1,
<span class="MathJax MathJax_FullWidth" id="MathJax-Element-15-Frame" tabindex="0" data-mathml="Ni,k(t)=t−titi+k−1Ni,k−1(t)+ti+k−tti+k−ti+1Ni+1,k−1(t)” role=”presentation” style=”box-sizing: border-box; line-height: normal; font-size: 15px; word-spacing: normal; word-wrap: normal; white-space: nowrap; float: none; direction: ltr; max-width: none; max-height: none; min-width: 0px; min-height: 0px; border: 0px; padding: 0px; margin: 0px; position: relative; display: table-cell !important; width: 10000em !important;”>Ni,k(t)=t−titi+k−1Ni,k−1(t)+ti+k−tti+k−ti+1Ni+1,k−1(t)
and
<span class="MathJax" id="MathJax-Element-16-Frame" tabindex="0" data-mathml="tϵ[tk−1,tn+1)” role=”presentation” style=”box-sizing: border-box; display: inline; line-height: normal; font-size: 15px; word-spacing: normal; word-wrap: normal; white-space: nowrap; float: none; direction: ltr; max-width: none; max-height: none; min-width: 0px; min-height: 0px; border: 0px; padding: 0px; margin: 0px; position: relative;”>tϵ[tk−1,tn+1)
Properties of B-spline Curve
B-spline curves have the following properties −
-
The sum of the B-spline basis functions for any parameter value is 1.
-
Each basis function is positive or zero for all parameter values.
-
Each basis function has precisely one maximum value, except for k=1.
-
The maximum order of the curve is equal to the number of vertices of defining polygon.
-
The degree of B-spline polynomial is independent on the number of vertices of defining polygon.
-
B-spline allows the local control over the curve surface because each vertex affects the shape of a curve only over a range of parameter values where its associated basis function is nonzero.
-
The curve exhibits the variation diminishing property.
-
The curve generally follows the shape of defining polygon.
-
Any affine transformation can be applied to the curve by applying it to the vertices of defining polygon.
-
The curve line within the convex hull of its defining polygon.
3D Computer Graphics
In the 2D system, we use only two coordinates X and Y but in 3D, an extra coordinate Z is added. 3D graphics techniques and their application are fundamental to the entertainment, games, and computer-aided design industries. It is a continuing area of research in scientific visualization.
Furthermore, 3D graphics components are now a part of almost every personal computer and, although traditionally intended for graphics-intensive software such as games, they are increasingly being used by other applications.
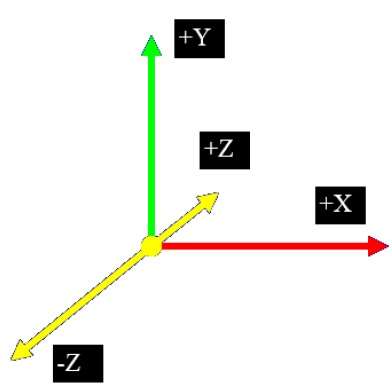
Parallel Projection
Parallel projection discards z-coordinate and parallel lines from each vertex on the object are extended until they intersect the view plane. In parallel projection, we specify a direction of projection instead of center of projection.
In parallel projection, the distance from the center of projection to project plane is infinite. In this type of projection, we connect the projected vertices by line segments which correspond to connections on the original object.
Parallel projections are less realistic, but they are good for exact measurements. In this type of projections, parallel lines remain parallel and angles are not preserved. Various types of parallel projections are shown in the following hierarchy.
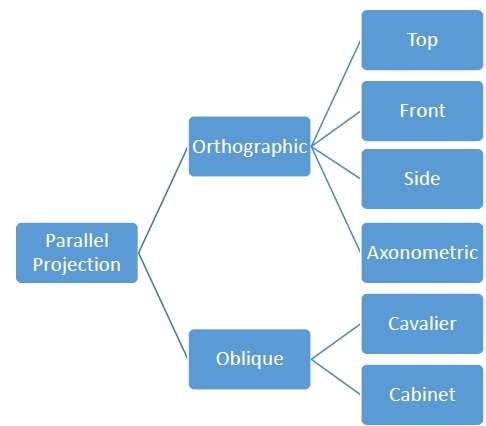
Orthographic Projection
In orthographic projection the direction of projection is normal to the projection of the plane. There are three types of orthographic projections −
- Front Projection
- Top Projection
- Side Projection
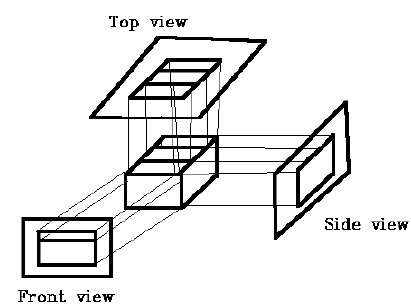
Oblique Projection
In orthographic projection, the direction of projection is not normal to the projection of plane. In oblique projection, we can view the object better than orthographic projection.
There are two types of oblique projections −Cavalier and Cabinet. The Cavalier projection makes 45° angle with the projection plane. The projection of a line perpendicular to the view plane has the same length as the line itself in Cavalier projection. In a cavalier projection, the foreshortening factors for all three principal directions are equal.
The Cabinet projection makes 63.4° angle with the projection plane. In Cabinet projection, lines perpendicular to the viewing surface are projected at ½ their actual length. Both the projections are shown in the following figure −
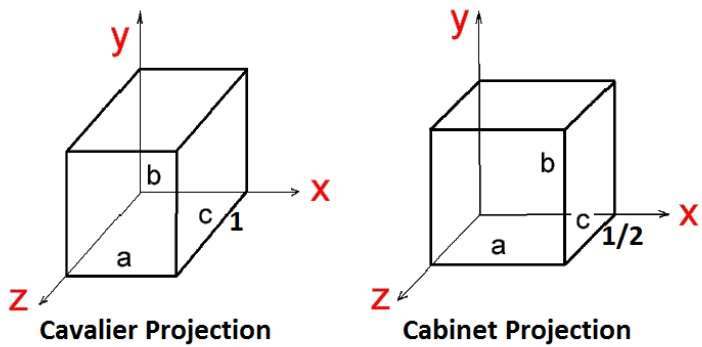
Isometric Projections
Orthographic projections that show more than one side of an object are called axonometric orthographic projections. The most common axonometric projection is an isometric projectionwhere the projection plane intersects each coordinate axis in the model coordinate system at an equal distance. In this projection parallelism of lines are preserved but angles are not preserved. The following figure shows isometric projection −
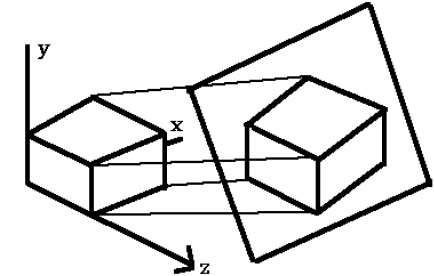
Perspective Projection
In perspective projection, the distance from the center of projection to project plane is finite and the size of the object varies inversely with distance which looks more realistic.
The distance and angles are not preserved and parallel lines do not remain parallel. Instead, they all converge at a single point called center of projection or projection reference point. There are 3 types of perspective projections which are shown in the following chart.
-
One point perspective projection is simple to draw.
-
Two point perspective projection gives better impression of depth.
-
Three point perspective projection is most difficult to draw.
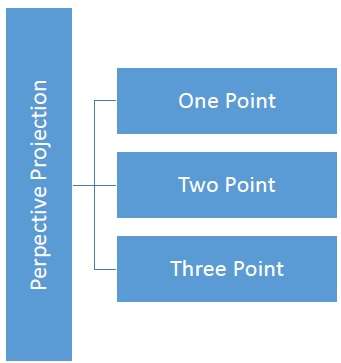
The following figure shows all the three types of perspective projection −
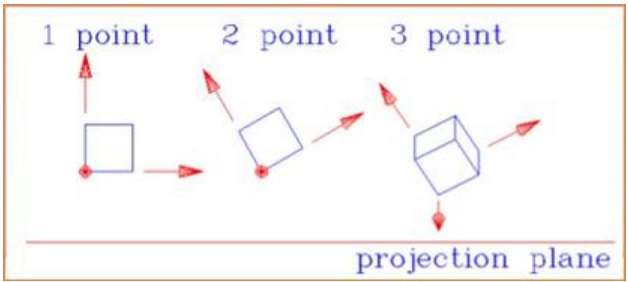
Translation
In 3D translation, we transfer the Z coordinate along with the X and Y coordinates. The process for translation in 3D is similar to 2D translation. A translation moves an object into a different position on the screen.
The following figure shows the effect of translation −
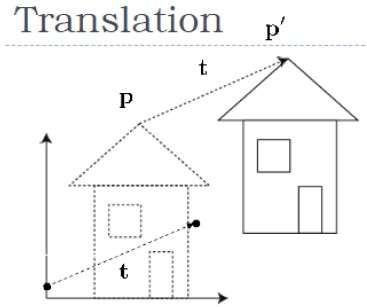
A point can be translated in 3D by adding translation coordinate <span class="MathJax" id="MathJax-Element-1-Frame" tabindex="0" data-mathml="(tx,ty,tz)” role=”presentation” style=”box-sizing: border-box; display: inline; line-height: normal; text-align: left; word-spacing: normal; word-wrap: normal; white-space: nowrap; float: none; direction: ltr; max-width: none; max-height: none; min-width: 0px; min-height: 0px; border: 0px; padding: 0px; margin: 0px; position: relative;”>(tx,ty,tz) to the original coordinate (X, Y, Z) to get the new coordinate (X’, Y’, Z’).
<span class="MathJax" id="MathJax-Element-2-Frame" tabindex="0" data-mathml="T=[100001000010txtytz1]” role=”presentation” style=”box-sizing: border-box; display: inline; line-height: normal; text-align: left; word-spacing: normal; word-wrap: normal; white-space: nowrap; float: none; direction: ltr; max-width: none; max-height: none; min-width: 0px; min-height: 0px; border: 0px; padding: 0px; margin: 0px; position: relative;”>T=⎡⎣⎢⎢⎢⎢100tx010ty001tz0001⎤⎦⎥⎥⎥⎥
P’ = P∙T
<span class="MathJax" id="MathJax-Element-3-Frame" tabindex="0" data-mathml="[X′Y′Z′1]=[XYZ1][100001000010txtytz1]” role=”presentation” style=”box-sizing: border-box; display: inline; line-height: normal; text-align: left; word-spacing: normal; word-wrap: normal; white-space: nowrap; float: none; direction: ltr; max-width: none; max-height: none; min-width: 0px; min-height: 0px; border: 0px; padding: 0px; margin: 0px; position: relative;”>[X‘Y‘Z‘1]=[XYZ1]⎡⎣⎢⎢⎢⎢100tx010ty001tz0001⎤⎦⎥⎥⎥⎥
<span class="MathJax" id="MathJax-Element-4-Frame" tabindex="0" data-mathml="=[X+txY+tyZ+tz1]” role=”presentation” style=”box-sizing: border-box; display: inline; line-height: normal; text-align: left; word-spacing: normal; word-wrap: normal; white-space: nowrap; float: none; direction: ltr; max-width: none; max-height: none; min-width: 0px; min-height: 0px; border: 0px; padding: 0px; margin: 0px; position: relative;”>=[X+txY+tyZ+tz1]
Viewing & Clipping
The primary use of clipping in computer graphics is to remove objects, lines, or line segments that are outside the viewing pane. The viewing transformation is insensitive to the position of points relative to the viewing volume − especially those points behind the viewer − and it is necessary to remove these points before generating the view.
Point Clipping
Clipping a point from a given window is very easy. Consider the following figure, where the rectangle indicates the window. Point clipping tells us whether the given point (X, Y) is within the given window or not; and decides whether we will use the minimum and maximum coordinates of the window.
The X-coordinate of the given point is inside the window, if X lies in between Wx1 ≤ X ≤ Wx2. Same way, Y coordinate of the given point is inside the window, if Y lies in between Wy1 ≤ Y ≤ Wy2.
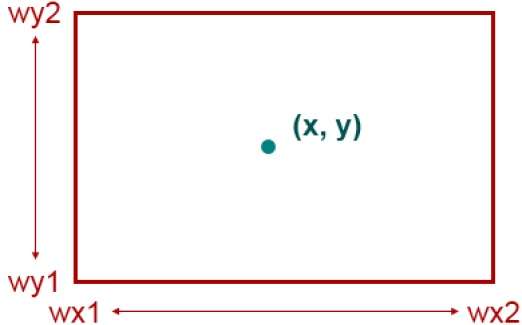
Line Clipping
The concept of line clipping is same as point clipping. In line clipping, we will cut the portion of line which is outside of window and keep only the portion that is inside the window.
Cohen-Sutherland Line Clippings
This algorithm uses the clipping window as shown in the following figure. The minimum coordinate for the clipping region is <span class="MathJax" id="MathJax-Element-1-Frame" tabindex="0" data-mathml="(XWmin,YWmin)” role=”presentation” style=”box-sizing: border-box; display: inline; line-height: normal; text-align: left; word-spacing: normal; word-wrap: normal; white-space: nowrap; float: none; direction: ltr; max-width: none; max-height: none; min-width: 0px; min-height: 0px; border: 0px; padding: 0px; margin: 0px; position: relative;”>(XWmin,YWmin) and the maximum coordinate for the clipping region is <span class="MathJax" id="MathJax-Element-2-Frame" tabindex="0" data-mathml="(XWmax,YWmax)” role=”presentation” style=”box-sizing: border-box; display: inline; line-height: normal; text-align: left; word-spacing: normal; word-wrap: normal; white-space: nowrap; float: none; direction: ltr; max-width: none; max-height: none; min-width: 0px; min-height: 0px; border: 0px; padding: 0px; margin: 0px; position: relative;”>(XWmax,YWmax).
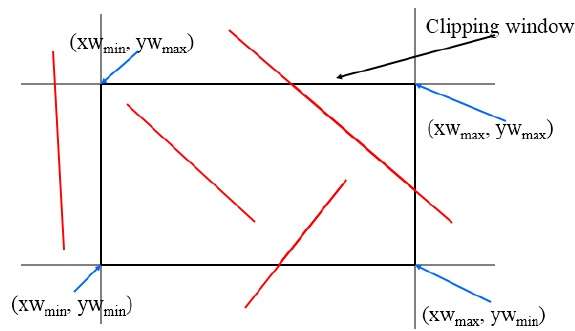
We will use 4-bits to divide the entire region. These 4 bits represent the Top, Bottom, Right, and Left of the region as shown in the following figure. Here, the TOP and LEFT bit is set to 1 because it is theTOP-LEFT corner.
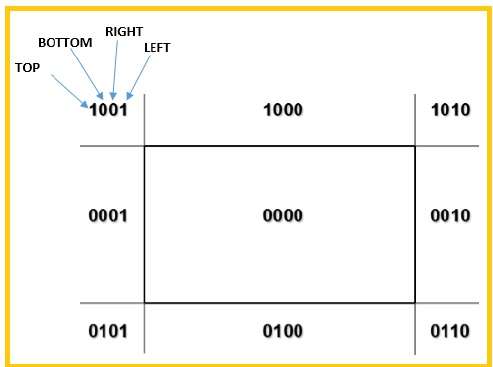
There are 3 possibilities for the line −
-
Line can be completely inside the window (The line will be completely print).
-
Line can be completely outside of the window (This line will be completely removed from the region).
-
Line can be partially inside the window (We will find intersection point and draw only that portion of line that is inside region).
Algorithm
Step 1 − Assign a region code for each endpoints.
Step 2 − If both endpoints have a region code 0000then accept this line.
Step 3 − Else, perform the logical ANDoperation for both region codes.
Step 3.1 − If the result is not 0000, then reject the line.
Step 3.2 − Else you need clipping.
Step 3.2.1 − Choose an endpoint of the line that is outside the window.
Step 3.2.2 − Find the intersection point at the window boundary (base on region code).
Step 3.2.3 − Replace endpoint with the intersection point and update the region code.
Step 3.2.4 − Repeat step 2 until we find a clipped line either trivially accepted or trivially rejected.
Step 4 − Repeat step 1 for other lines.
Cyrus-Beck Line Clipping Algorithm
This algorithm is more efficient than Cohen-Sutherland algorithm. It employs parametric line representation and simple dot products.
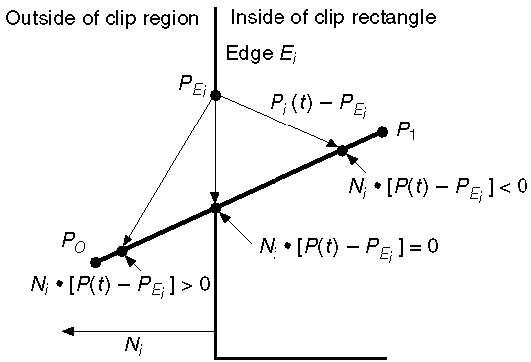
Parametric equation of line is −
P0P1:P(t) = P0 + t(P1 - P0)
Let Ni be the outward normal edge Ei. Now pick any arbitrary point PEi on edge Ei then the dot product Ni.[P(t) – PEi] determines whether the point P(t) is “inside the clip edge” or “outside” the clip edge or “on” the clip edge.
The point P(t) is inside if Ni.[P(t) – PEi] < 0
The point P(t) is outside if Ni.[P(t) – PEi] > 0
The point P(t) is on the edge if Ni.[P(t) – PEi] = 0 (Intersection point)
Ni.[P(t) – PEi] = 0
Ni.[ P0 + t(P1 – P0) – PEi] = 0 (Replacing P(t) with P0 + t(P1 – P0))
Ni.[P0 – PEi] + Ni.t[P1 – P0] = 0
Ni.[P0 – PEi] + Ni∙tD = 0 (substituting D for [P1 – P0])
Ni.[P0 – PEi] = – Ni∙tD
The equation for t becomes,
<span class="MathJax" id="MathJax-Element-3-Frame" tabindex="0" data-mathml="t=Ni.[Po−PEi]−Ni.D” role=”presentation” style=”box-sizing: border-box; display: inline; line-height: normal; font-size: 15px; word-spacing: normal; word-wrap: normal; white-space: nowrap; float: none; direction: ltr; max-width: none; max-height: none; min-width: 0px; min-height: 0px; border: 0px; padding: 0px; margin: 0px; position: relative;”>t=Ni.[Po−PEi]−Ni.D
It is valid for the following conditions −
- Ni ≠ 0 (error cannot happen)
- D ≠ 0 (P1 ≠ P0)
- Ni∙D ≠ 0 (P0P1 not parallel to Ei)
Polygon Clipping (Sutherland Hodgman Algorithm)
A polygon can also be clipped by specifying the clipping window. Sutherland Hodgeman polygon clipping algorithm is used for polygon clipping. In this algorithm, all the vertices of the polygon are clipped against each edge of the clipping window.
First the polygon is clipped against the left edge of the polygon window to get new vertices of the polygon. These new vertices are used to clip the polygon against right edge, top edge, bottom edge, of the clipping window as shown in the following figure.
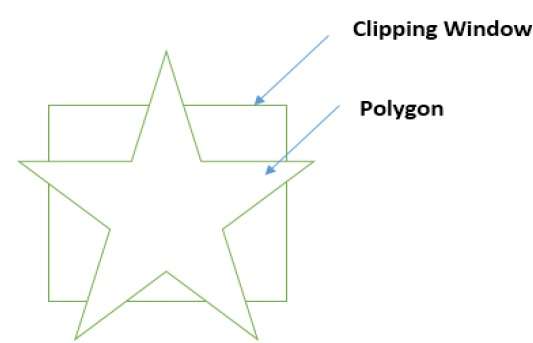
While processing an edge of a polygon with clipping window, an intersection point is found if edge is not completely inside clipping window and the a partial edge from the intersection point to the outside edge is clipped. The following figures show left, right, top and bottom edge clippings −
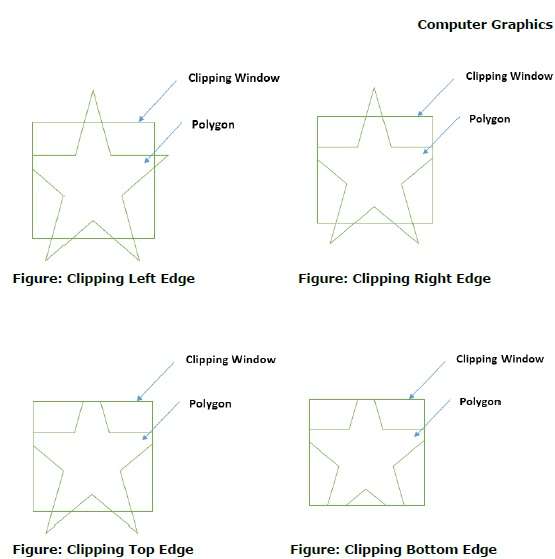
Text Clipping
Various techniques are used to provide text clipping in a computer graphics. It depends on the methods used to generate characters and the requirements of a particular application. There are three methods for text clipping which are listed below −
- All or none string clipping
- All or none character clipping
- Text clipping
The following figure shows all or none string clipping −
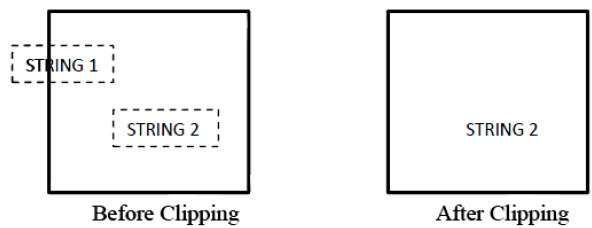
In all or none string clipping method, either we keep the entire string or we reject entire string based on the clipping window. As shown in the above figure, STRING2 is entirely inside the clipping window so we keep it and STRING1 being only partially inside the window, we reject.
The following figure shows all or none character clipping −
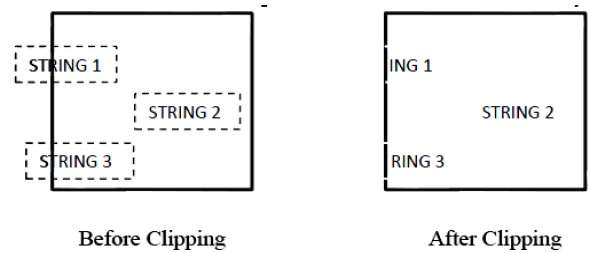
This clipping method is based on characters rather than entire string. In this method if the string is entirely inside the clipping window, then we keep it. If it is partially outside the window, then −
-
You reject only the portion of the string being outside
-
If the character is on the boundary of the clipping window, then we discard that entire character and keep the rest string.
The following figure shows text clipping −

This clipping method is based on characters rather than the entire string. In this method if the string is entirely inside the clipping window, then we keep it. If it is partially outside the window, then
-
You reject only the portion of string being outside.
-
If the character is on the boundary of the clipping window, then we discard only that portion of character that is outside of the clipping window.
Bitmap Graphics
A bitmap is a collection of pixels that describes an image. It is a type of computer graphics that the computer uses to store and display pictures. In this type of graphics, images are stored bit by bit and hence it is named Bit-map graphics. For better understanding let us consider the following example where we draw a smiley face using bit-map graphics.

Now we will see how this smiley face is stored bit by bit in computer graphics.

By observing the original smiley face closely, we can see that there are two blue lines which are represented as B1, B2 and E1, E2 in the above figure.
In the same way, the smiley is represented using the combination bits of A4, B5, C6, D6, E5, and F4 respectively.
The main disadvantages of bitmap graphics are −
-
We cannot resize the bitmap image. If you try to resize, the pixels get blurred.
-
Colored bitmaps can be very large
Polygon Filling Algorithm
Polygon is an ordered list of vertices as shown in the following figure. For filling polygons with particular colors, you need to determine the pixels falling on the border of the polygon and those which fall inside the polygon. In this chapter, we will see how we can fill polygons using different techniques.
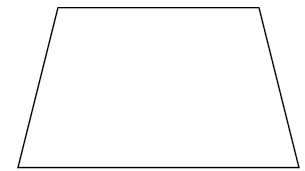
Scan Line Algorithm
This algorithm works by intersecting scanline with polygon edges and fills the polygon between pairs of intersections. The following steps depict how this algorithm works.
Step 1 − Find out the Ymin and Ymax from the given polygon.
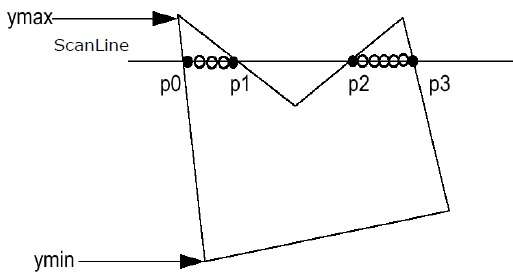
Step 2 − ScanLine intersects with each edge of the polygon from Ymin to Ymax. Name each intersection point of the polygon. As per the figure shown above, they are named as p0, p1, p2, p3.
Step 3 − Sort the intersection point in the increasing order of X coordinate i.e. (p0, p1), (p1, p2), and (p2, p3).
Step 4 − Fill all those pair of coordinates that are inside polygons and ignore the alternate pairs.
Flood Fill Algorithm
Sometimes we come across an object where we want to fill the area and its boundary with different colors. We can paint such objects with a specified interior color instead of searching for particular boundary color as in boundary filling algorithm.
Instead of relying on the boundary of the object, it relies on the fill color. In other words, it replaces the interior color of the object with the fill color. When no more pixels of the original interior color exist, the algorithm is completed.
Once again, this algorithm relies on the Four-connect or Eight-connect method of filling in the pixels. But instead of looking for the boundary color, it is looking for all adjacent pixels that are a part of the interior.
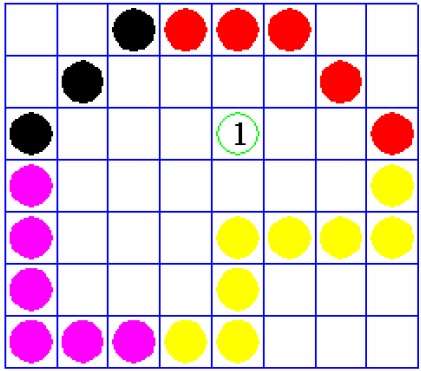
Boundary Fill Algorithm
The boundary fill algorithm works as its name. This algorithm picks a point inside an object and starts to fill until it hits the boundary of the object. The color of the boundary and the color that we fill should be different for this algorithm to work.
In this algorithm, we assume that color of the boundary is same for the entire object. The boundary fill algorithm can be implemented by 4-connected pixels or 8-connected pixels.
4-Connected Polygon
In this technique 4-connected pixels are used as shown in the figure. We are putting the pixels above, below, to the right, and to the left side of the current pixels and this process will continue until we find a boundary with different color.

Algorithm
Step 1 − Initialize the value of seed point (seedx, seedy), fcolor and dcol.
Step 2 − Define the boundary values of the polygon.
Step 3 − Check if the current seed point is of default color, then repeat the steps 4 and 5 till the boundary pixels reached.
If getpixel(x, y) = dcol then repeat step 4 and 5
Step 4 − Change the default color with the fill color at the seed point.
setPixel(seedx, seedy, fcol)
Step 5 − Recursively follow the procedure with four neighborhood points.
FloodFill (seedx – 1, seedy, fcol, dcol) FloodFill (seedx + 1, seedy, fcol, dcol) FloodFill (seedx, seedy - 1, fcol, dcol) FloodFill (seedx – 1, seedy + 1, fcol, dcol)
Step 6 − Exit
There is a problem with this technique. Consider the case as shown below where we tried to fill the entire region. Here, the image is filled only partially. In such cases, 4-connected pixels technique cannot be used.
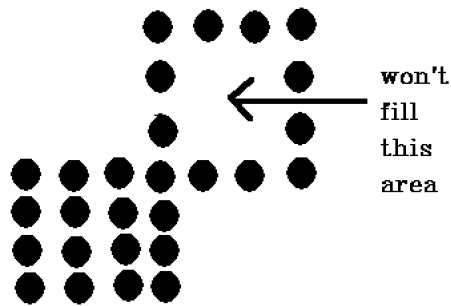
8-Connected Polygon
In this technique 8-connected pixels are used as shown in the figure. We are putting pixels above, below, right and left side of the current pixels as we were doing in 4-connected technique.
In addition to this, we are also putting pixels in diagonals so that entire area of the current pixel is covered. This process will continue until we find a boundary with different color.

Algorithm
Step 1 − Initialize the value of seed point (seedx, seedy), fcolor and dcol.
Step 2 − Define the boundary values of the polygon.
Step 3 − Check if the current seed point is of default color then repeat the steps 4 and 5 till the boundary pixels reached
If getpixel(x,y) = dcol then repeat step 4 and 5
Step 4 − Change the default color with the fill color at the seed point.
setPixel(seedx, seedy, fcol)
Step 5 − Recursively follow the procedure with four neighbourhood points
FloodFill (seedx – 1, seedy, fcol, dcol) FloodFill (seedx + 1, seedy, fcol, dcol) FloodFill (seedx, seedy - 1, fcol, dcol) FloodFill (seedx, seedy + 1, fcol, dcol) FloodFill (seedx – 1, seedy + 1, fcol, dcol) FloodFill (seedx + 1, seedy + 1, fcol, dcol) FloodFill (seedx + 1, seedy - 1, fcol, dcol) FloodFill (seedx – 1, seedy - 1, fcol, dcol)
Step 6 − Exit
The 4-connected pixel technique failed to fill the area as marked in the following figure which won’t happen with the 8-connected technique.
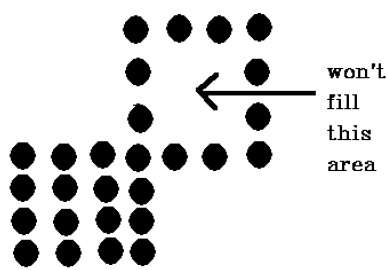
Inside-outside Test
This method is also known as counting number method. While filling an object, we often need to identify whether particular point is inside the object or outside it. There are two methods by which we can identify whether particular point is inside an object or outside.
- Odd-Even Rule
- Nonzero winding number rule
Odd-Even Rule
In this technique, we will count the edge crossing along the line from any point (x,y) to infinity. If the number of interactions is odd, then the point (x,y) is an interior point; and if the number of interactions is even, then the point (x,y) is an exterior point. The following example depicts this concept.
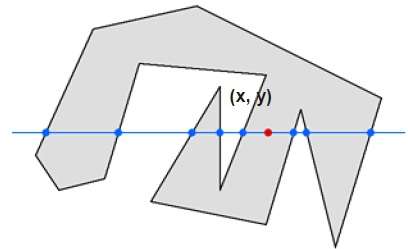
From the above figure, we can see that from the point (x,y), the number of interactions point on the left side is 5 and on the right side is 3. From both ends, the number of interaction points is odd, so the point is considered within the object.
Nonzero Winding Number Rule
This method is also used with the simple polygons to test the given point is interior or not. It can be simply understood with the help of a pin and a rubber band. Fix up the pin on one of the edge of the polygon and tie-up the rubber band in it and then stretch the rubber band along the edges of the polygon.
When all the edges of the polygon are covered by the rubber band, check out the pin which has been fixed up at the point to be test. If we find at least one wind at the point consider it within the polygon, else we can say that the point is not inside the polygon.

In another alternative method, give directions to all the edges of the polygon. Draw a scan line from the point to be test towards the left most of X direction.
-
Give the value 1 to all the edges which are going to upward direction and all other -1 as direction values.
-
Check the edge direction values from which the scan line is passing and sum up them.
-
If the total sum of this direction value is non-zero, then this point to be tested is aninterior point, otherwise it is an exterior point.
-
In the above figure, we sum up the direction values from which the scan line is passing then the total is 1 – 1 + 1 = 1; which is non-zero. So the point is said to be an interior point.
Circle Generation Algorithm
Drawing a circle on the screen is a little complex than drawing a line. There are two popular algorithms for generating a circle − Bresenham’s Algorithm and Midpoint Circle Algorithm. These algorithms are based on the idea of determining the subsequent points required to draw the circle. Let us discuss the algorithms in detail −
The equation of circle is <span class="MathJax" id="MathJax-Element-1-Frame" tabindex="0" data-mathml="X2+Y2=r2,” role=”presentation” style=”box-sizing: border-box; display: inline; line-height: normal; text-align: left; word-spacing: normal; word-wrap: normal; white-space: nowrap; float: none; direction: ltr; max-width: none; max-height: none; min-width: 0px; min-height: 0px; border: 0px; padding: 0px; margin: 0px; position: relative;”>X2+Y2=r2, where r is radius.
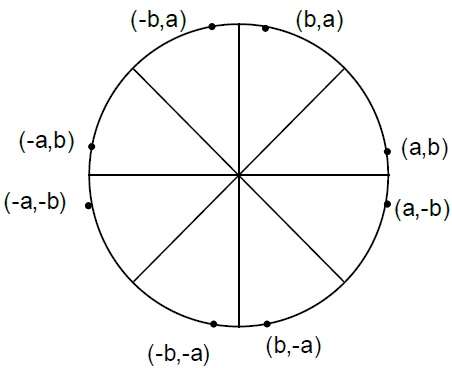
Bresenham’s Algorithm
We cannot display a continuous arc on the raster display. Instead, we have to choose the nearest pixel position to complete the arc.
From the following illustration, you can see that we have put the pixel at (X, Y) location and now need to decide where to put the next pixel − at N (X+1, Y) or at S (X+1, Y-1).
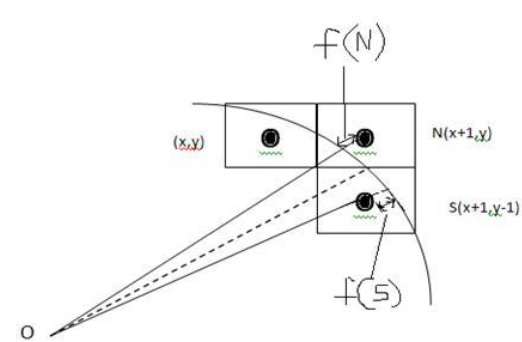
This can be decided by the decision parameter d.
- If d <= 0, then N(X+1, Y) is to be chosen as next pixel.
- If d > 0, then S(X+1, Y-1) is to be chosen as the next pixel.
Algorithm
Step 1 − Get the coordinates of the center of the circle and radius, and store them in x, y, and R respectively. Set P=0 and Q=R.
Step 2 − Set decision parameter D = 3 – 2R.
Step 3 − Repeat through step-8 while X < Y.
Step 4 − Call Draw Circle (X, Y, P, Q).
Step 5 − Increment the value of P.
Step 6 − If D < 0 then D = D + 4x + 6.
Step 7 − Else Set Y = Y + 1, D = D + 4(X-Y) + 10.
Step 8 − Call Draw Circle (X, Y, P, Q).
Draw Circle Method(X, Y, P, Q). Call Putpixel (X + P, Y + Q). Call Putpixel (X - P, Y + Q). Call Putpixel (X + P, Y - Q). Call Putpixel (X - P, Y - Q). Call Putpixel (X + Q, Y + X). Call Putpixel (X - Q, Y + X). Call Putpixel (X + Q, Y - X). Call Putpixel (X - Q, Y - X).
Mid Point Algorithm
Step 1 − Input radius r and circle center <span class="MathJax" id="MathJax-Element-2-Frame" tabindex="0" data-mathml="(xc,yc)” role=”presentation” style=”box-sizing: border-box; display: inline; line-height: normal; text-align: left; word-spacing: normal; word-wrap: normal; white-space: nowrap; float: none; direction: ltr; max-width: none; max-height: none; min-width: 0px; min-height: 0px; border: 0px; padding: 0px; margin: 0px; position: relative;”>(xc,yc)and obtain the first point on the circumference of the circle centered on the origin as
(x0, y0) = (0, r)
Step 2 − Calculate the initial value of decision parameter as
<span class="MathJax" id="MathJax-Element-3-Frame" tabindex="0" data-mathml="P0″ role=”presentation” style=”box-sizing: border-box; display: inline; line-height: normal; text-align: left; word-spacing: normal; word-wrap: normal; white-space: nowrap; float: none; direction: ltr; max-width: none; max-height: none; min-width: 0px; min-height: 0px; border: 0px; padding: 0px; margin: 0px; position: relative;”>P0 = 5/4 – r (See the following description for simplification of this equation.)
f(x, y) = x2 + y2 - r2 = 0 f(xi - 1/2 + e, yi + 1) = (xi - 1/2 + e)2 + (yi + 1)2 - r2 = (xi- 1/2)2 + (yi + 1)2 - r2 + 2(xi - 1/2)e + e2 = f(xi - 1/2, yi + 1) + 2(xi - 1/2)e + e2 = 0
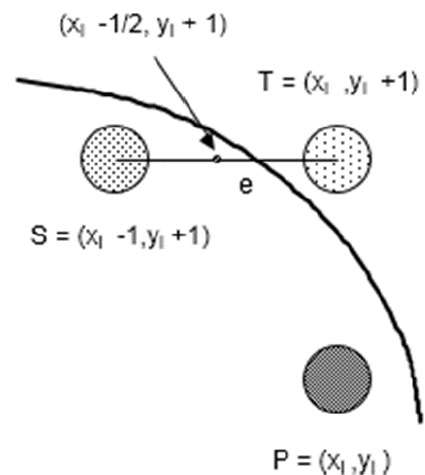
Let di = f(xi - 1/2, yi + 1) = -2(xi - 1/2)e - e2 Thus, If e < 0 then di > 0 so choose point S = (xi - 1, yi + 1). di+1 = f(xi - 1 - 1/2, yi + 1 + 1) = ((xi - 1/2) - 1)2 + ((yi + 1) + 1)2 - r2 = di - 2(xi - 1) + 2(yi + 1) + 1 = di + 2(yi + 1 - xi + 1) + 1 If e >= 0 then di <= 0 so choose point T = (xi, yi + 1) di+1 = f(xi - 1/2, yi + 1 + 1) = di + 2yi+1 + 1 The initial value of di is d0 = f(r - 1/2, 0 + 1) = (r - 1/2)2 + 12 - r2 = 5/4 - r {1-r can be used if r is an integer} When point S = (xi - 1, yi + 1) is chosen then di+1 = di + -2xi+1 + 2yi+1 + 1 When point T = (xi, yi + 1) is chosen then di+1 = di + 2yi+1 + 1
Step 3 − At each <span class="MathJax" id="MathJax-Element-4-Frame" tabindex="0" data-mathml="XK” role=”presentation” style=”box-sizing: border-box; display: inline; line-height: normal; text-align: left; word-spacing: normal; word-wrap: normal; white-space: nowrap; float: none; direction: ltr; max-width: none; max-height: none; min-width: 0px; min-height: 0px; border: 0px; padding: 0px; margin: 0px; position: relative;”>XK position starting at K=0, perform the following test −
If PK < 0 then next point on circle (0,0) is (XK+1,YK) and PK+1 = PK + 2XK+1 + 1 Else PK+1 = PK + 2XK+1 + 1 – 2YK+1 Where, 2XK+1 = 2XK+2 and 2YK+1 = 2YK-2.
Step 4 − Determine the symmetry points in other seven octants.
Step 5 − Move each calculate pixel position (X, Y) onto the circular path centered on <span class="MathJax" id="MathJax-Element-5-Frame" tabindex="0" data-mathml="(XC,YC)” role=”presentation” style=”box-sizing: border-box; display: inline; line-height: normal; text-align: left; word-spacing: normal; word-wrap: normal; white-space: nowrap; float: none; direction: ltr; max-width: none; max-height: none; min-width: 0px; min-height: 0px; border: 0px; padding: 0px; margin: 0px; position: relative;”>(XC,YC) and plot the coordinate values.
X = X + XC, Y = Y + YC
Step 6 − Repeat step-3 through 5 until X >= Y.
Computer Graphics Basics
Computer graphics is an art of drawing pictures on computer screens with the help of programming. It involves computations, creation, and manipulation of data. In other words, we can say that computer graphics is a rendering tool for the generation and manipulation of images.
Cathode Ray Tube
The primary output device in a graphical system is the video monitor. The main element of a video monitor is the Cathode Ray Tube (CRT), shown in the following illustration.
The operation of CRT is very simple −
-
The electron gun emits a beam of electrons (cathode rays).
-
The electron beam passes through focusing and deflection systems that direct it towards specified positions on the phosphor-coated screen.
-
When the beam hits the screen, the phosphor emits a small spot of light at each position contacted by the electron beam.
-
It redraws the picture by directing the electron beam back over the same screen points quickly.
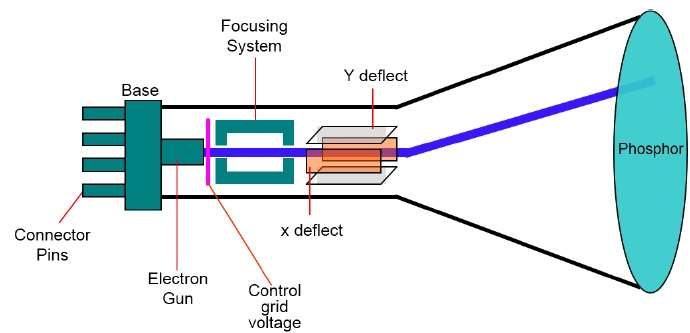
There are two ways (Random scan and Raster scan) by which we can display an object on the screen.
Raster Scan
In a raster scan system, the electron beam is swept across the screen, one row at a time from top to bottom. As the electron beam moves across each row, the beam intensity is turned on and off to create a pattern of illuminated spots.
Picture definition is stored in memory area called the Refresh Buffer or Frame Buffer. This memory area holds the set of intensity values for all the screen points. Stored intensity values are then retrieved from the refresh buffer and “painted” on the screen one row (scan line) at a time as shown in the following illustration.
Each screen point is referred to as a pixel (picture element) or pel. At the end of each scan line, the electron beam returns to the left side of the screen to begin displaying the next scan line.
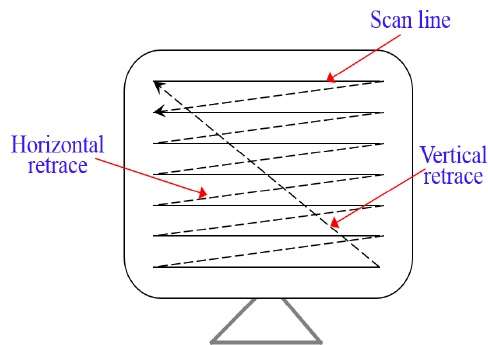
Random Scan (Vector Scan)
In this technique, the electron beam is directed only to the part of the screen where the picture is to be drawn rather than scanning from left to right and top to bottom as in raster scan. It is also calledvector display, stroke-writing display, orcalligraphic display.
Picture definition is stored as a set of line-drawing commands in an area of memory referred to as therefresh display file. To display a specified picture, the system cycles through the set of commands in the display file, drawing each component line in turn. After all the line-drawing commands are processed, the system cycles back to the first line command in the list.
Random-scan displays are designed to draw all the component lines of a picture 30 to 60 times each second.
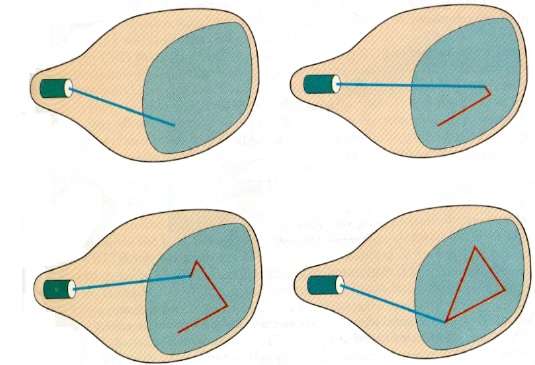
Application of Computer Graphics
Computer Graphics has numerous applications, some of which are listed below −
-
Computer graphics user interfaces (GUIs)− A graphic, mouse-oriented paradigm which allows the user to interact with a computer.
-
Business presentation graphics − “A picture is worth a thousand words”.
-
Cartography − Drawing maps.
-
Weather Maps − Real-time mapping, symbolic representations.
-
Satellite Imaging − Geodesic images.
-
Photo Enhancement − Sharpening blurred photos.
-
Medical imaging − MRIs, CAT scans, etc. – Non-invasive internal examination.
-
Engineering drawings − mechanical, electrical, civil, etc. – Replacing the blueprints of the past.
-
Typography − The use of character images in publishing – replacing the hard type of the past.
-
Architecture − Construction plans, exterior sketches – replacing the blueprints and hand drawings of the past.
-
Art − Computers provide a new medium for artists.
-
Training − Flight simulators, computer aided instruction, etc.
-
Entertainment − Movies and games.
-
Simulation and modeling − Replacing physical modeling and enactments
Computer Graphics Tutorial
To display a picture of any size on a computer screen is a difficult process. Computer graphics are used to simplify this process. Various algorithms and techniques are used to generate graphics in computers. This tutorial will help you understand how all these are processed by the computer to give a rich visual experience to the user.
Audience
This tutorial has been prepared for students who don’t know how graphics are used in computers. It explains the basics of graphics and how they are implemented in computers to generate various visuals.
Prerequisites
Before you start proceeding with this tutorial, we assume that you are already aware of the basic concepts of C programming language and basic mathematics.
SQA
SQA helps ensure the development of high-quality software. SQA practices are implemented in most types of software development, regardless of the underlying software development model being used. In a broader sense, SQA incorporates and implements software testing methodologies to test software. Rather than checking for quality after completion, SQA processes tests for quality in each phase of development until the software is complete. With SQA, the software development process moves into the next phase only once the current/previous phase complies with the required quality standards. SQA generally works on one or more industry standards that help in building software quality guidelines and implementation strategies. These standards include the ISO 9000 and capability maturity model integration (CMMI).
10 Android stories we handpicked for you
OnePlus 3T review The OnePlus 3T brings a few key improvements to the table. What does the latest OnePlus flagship have to offer? We find out, in this OnePlus 3T review!
LeEco Le Pro3 review Does an affordable flagship from LeEco – that prioritizes streaming services – represent great value for consumers? Find out in our LeEco Le Pro3 review!
Android 7.1 Nougat Developer Preview 2 goes live Google has just announced the secondAndroid 7.1 Nougat developer preview for theNexus 6P, Nexus 5X, Nexus 9, and Pixel C.
5 things Nokia, and HMD Global, need to do for a successful 2017 Android phone launch Nokia and HMD Global are partnering to launch new Android smartphones in 2017 and there are some things they need to have for a successful release.
Snapdragon 835 tipped for the Galaxy S8, but what about Exynos? According to a recent leak, the Galaxy S8 will be powered by the Snapdragon 835 processor, but the company appears to be working on an Exynos chip too.
Hot tech gifts under $25 for the holiday season Looking for a hot tech gift for your loved one this season? Have only $25 or less to spend? Android Authority has your back!
Best Black Friday Android game deals Black Friday might be over, but a lot of these deals are still live. Head to this roundup to save big on some popular games.
ASUS ZenFone 3 review Does ASUS deliver on its marketing pitch of a ‘premium’ mid-range smartphone with the ZenFone 3? Find out, in our full ASUS ZenFone 3 review.
Beyond phones: Why Qualcomm is betting big machine learning, VR and 5G Qualcomm may be best known for its Snapdragon processors, but the company is also investing heavily in machine learning, 5G modems, and augmented reality platforms.
BLU Vivo 6 hands-on and first impressions A quick first look at BLU’s Vivo 6 – a very affordable smartphone with a solid specs list and functional design that hopes to be on your Christmas wish list!
Don’t miss these videos
Watch more Android videos on our YouTube channel.
Java – Networking
The term network programming refers to writing programs that execute across multiple devices (computers), in which the devices are all connected to each other using a network.
The java.net package of the J2SE APIs contains a collection of classes and interfaces that provide the low-level communication details, allowing you to write programs that focus on solving the problem at hand.
The java.net package provides support for the two common network protocols −
-
TCP − TCP stands for Transmission Control Protocol, which allows for reliable communication between two applications. TCP is typically used over the Internet Protocol, which is referred to as TCP/IP.
-
UDP − UDP stands for User Datagram Protocol, a connection-less protocol that allows for packets of data to be transmitted between applications.
This chapter gives a good understanding on the following two subjects −
-
Socket Programming − This is the most widely used concept in Networking and it has been explained in very detail.
-
URL Processing − This would be covered separately. Click here to learn about URL Processing
in Java language.
Socket Programming
Sockets provide the communication mechanism between two computers using TCP. A client program creates a socket on its end of the communication and attempts to connect that socket to a server.
When the connection is made, the server creates a socket object on its end of the communication. The client and the server can now communicate by writing to and reading from the socket.
The java.net.Socket class represents a socket, and the java.net.ServerSocket class provides a mechanism for the server program to listen for clients and establish connections with them.
The following steps occur when establishing a TCP connection between two computers using sockets −
-
The server instantiates a ServerSocket object, denoting which port number communication is to occur on.
-
The server invokes the accept() method of the ServerSocket class. This method waits until a client connects to the server on the given port.
-
After the server is waiting, a client instantiates a Socket object, specifying the server name and the port number to connect to.
-
The constructor of the Socket class attempts to connect the client to the specified server and the port number. If communication is established, the client now has a Socket object capable of communicating with the server.
-
On the server side, the accept() method returns a reference to a new socket on the server that is connected to the client’s socket.
After the connections are established, communication can occur using I/O streams. Each socket has both an OutputStream and an InputStream. The client’s OutputStream is connected to the server’s InputStream, and the client’s InputStream is connected to the server’s OutputStream.
TCP is a two-way communication protocol, hence data can be sent across both streams at the same time. Following are the useful classes providing complete set of methods to implement sockets.
ServerSocket Class Methods
The java.net.ServerSocket class is used by server applications to obtain a port and listen for client requests.
The ServerSocket class has four constructors −
| Sr.No. | Method & Description |
|---|---|
| 1 |
public ServerSocket(int port) throws IOException Attempts to create a server socket bound to the specified port. An exception occurs if the port is already bound by another application. |
| 2 |
public ServerSocket(int port, int backlog) throws IOException Similar to the previous constructor, the backlog parameter specifies how many incoming clients to store in a wait queue. |
| 3 |
public ServerSocket(int port, int backlog, InetAddress address) throws IOException Similar to the previous constructor, the InetAddress parameter specifies the local IP address to bind to. The InetAddress is used for servers that may have multiple IP addresses, allowing the server to specify which of its IP addresses to accept client requests on. |
| 4 |
public ServerSocket() throws IOException Creates an unbound server socket. When using this constructor, use the bind() method when you are ready to bind the server socket. |
If the ServerSocket constructor does not throw an exception, it means that your application has successfully bound to the specified port and is ready for client requests.
Following are some of the common methods of the ServerSocket class −
| Sr.No. | Method & Description |
|---|---|
| 1 |
public int getLocalPort() Returns the port that the server socket is listening on. This method is useful if you passed in 0 as the port number in a constructor and let the server find a port for you. |
| 2 |
public Socket accept() throws IOException Waits for an incoming client. This method blocks until either a client connects to the server on the specified port or the socket times out, assuming that the time-out value has been set using the setSoTimeout() method. Otherwise, this method blocks indefinitely. |
| 3 |
public void setSoTimeout(int timeout) Sets the time-out value for how long the server socket waits for a client during the accept(). |
| 4 |
public void bind(SocketAddress host, int backlog) Binds the socket to the specified server and port in the SocketAddress object. Use this method if you have instantiated the ServerSocket using the no-argument constructor. |
When the ServerSocket invokes accept(), the method does not return until a client connects. After a client does connect, the ServerSocket creates a new Socket on an unspecified port and returns a reference to this new Socket. A TCP connection now exists between the client and the server, and communication can begin.
Socket Class Methods
The java.net.Socket class represents the socket that both the client and the server use to communicate with each other. The client obtains a Socket object by instantiating one, whereas the server obtains a Socket object from the return value of the accept() method.
The Socket class has five constructors that a client uses to connect to a server −
| Sr.No. | Method & Description |
|---|---|
| 1 |
public Socket(String host, int port) throws UnknownHostException, IOException. This method attempts to connect to the specified server at the specified port. If this constructor does not throw an exception, the connection is successful and the client is connected to the server. |
| 2 |
public Socket(InetAddress host, int port) throws IOException This method is identical to the previous constructor, except that the host is denoted by an InetAddress object. |
| 3 |
public Socket(String host, int port, InetAddress localAddress, int localPort) throws IOException. Connects to the specified host and port, creating a socket on the local host at the specified address and port. |
| 4 |
public Socket(InetAddress host, int port, InetAddress localAddress, int localPort) throws IOException. This method is identical to the previous constructor, except that the host is denoted by an InetAddress object instead of a String. |
| 5 |
public Socket() Creates an unconnected socket. Use the connect() method to connect this socket to a server. |
When the Socket constructor returns, it does not simply instantiate a Socket object but it actually attempts to connect to the specified server and port.
Some methods of interest in the Socket class are listed here. Notice that both the client and the server have a Socket object, so these methods can be invoked by both the client and the server.
| Sr.No. | Method & Description |
|---|---|
| 1 |
public void connect(SocketAddress host, int timeout) throws IOException This method connects the socket to the specified host. This method is needed only when you instantiate the Socket using the no-argument constructor. |
| 2 |
public InetAddress getInetAddress() This method returns the address of the other computer that this socket is connected to. |
| 3 |
public int getPort() Returns the port the socket is bound to on the remote machine. |
| 4 |
public int getLocalPort() Returns the port the socket is bound to on the local machine. |
| 5 |
public SocketAddress getRemoteSocketAddress() Returns the address of the remote socket. |
| 6 |
public InputStream getInputStream() throws IOException Returns the input stream of the socket. The input stream is connected to the output stream of the remote socket. |
| 7 |
public OutputStream getOutputStream() throws IOException Returns the output stream of the socket. The output stream is connected to the input stream of the remote socket. |
| 8 |
public void close() throws IOException Closes the socket, which makes this Socket object no longer capable of connecting again to any server. |
InetAddress Class Methods
This class represents an Internet Protocol (IP) address. Here are following usefull methods which you would need while doing socket programming −
| Sr.No. | Method & Description |
|---|---|
| 1 |
static InetAddress getByAddress(byte[] addr) Returns an InetAddress object given the raw IP address. |
| 2 |
static InetAddress getByAddress(String host, byte[] addr) Creates an InetAddress based on the provided host name and IP address. |
| 3 |
static InetAddress getByName(String host) Determines the IP address of a host, given the host’s name. |
| 4 |
String getHostAddress() Returns the IP address string in textual presentation. |
| 5 |
String getHostName() Gets the host name for this IP address. |
| 6 |
static InetAddress InetAddress getLocalHost() Returns the local host. |
| 7 |
String toString() Converts this IP address to a String. |
Socket Client Example
The following GreetingClient is a client program that connects to a server by using a socket and sends a greeting, and then waits for a response.
Example
// File Name GreetingClient.javaimport java.net.*;import java.io.*;publicclassGreetingClient{publicstaticvoid main(String[] args){String serverName = args[0];int port =Integer.parseInt(args[1]);try{System.out.println("Connecting to "+ serverName +" on port "+ port);Socket client =newSocket(serverName, port);System.out.println("Just connected to "+ client.getRemoteSocketAddress());OutputStream outToServer = client.getOutputStream();DataOutputStreamout=newDataOutputStream(outToServer);out.writeUTF("Hello from "+ client.getLocalSocketAddress());InputStream inFromServer = client.getInputStream();DataInputStreamin=newDataInputStream(inFromServer);System.out.println("Server says "+in.readUTF()); client.close();}catch(IOException e){ e.printStackTrace();}}}
Socket Server Example
The following GreetingServer program is an example of a server application that uses the Socket class to listen for clients on a port number specified by a command-line argument −
Example
// File Name GreetingServer.javaimport java.net.*;import java.io.*;publicclassGreetingServerextendsThread{privateServerSocket serverSocket;publicGreetingServer(int port)throwsIOException{ serverSocket =newServerSocket(port); serverSocket.setSoTimeout(10000);}publicvoid run(){while(true){try{System.out.println("Waiting for client on port "+ serverSocket.getLocalPort()+"...");Socket server = serverSocket.accept();System.out.println("Just connected to "+ server.getRemoteSocketAddress());DataInputStreamin=newDataInputStream(server.getInputStream());System.out.println(in.readUTF());DataOutputStreamout=newDataOutputStream(server.getOutputStream());out.writeUTF("Thank you for connecting to "+ server.getLocalSocketAddress()+"\nGoodbye!"); server.close();}catch(SocketTimeoutException s){System.out.println("Socket timed out!");break;}catch(IOException e){ e.printStackTrace();break;}}}publicstaticvoid main(String[] args){int port =Integer.parseInt(args[0]);try{Thread t =newGreetingServer(port); t.start();}catch(IOException e){ e.printStackTrace();}}}
Compile the client and the server and then start the server as follows −
$ java GreetingServer 6066 Waiting for client on port 6066...
Check the client program as follows −
Output
$ java GreetingClient localhost 6066 Connecting to localhost on port 6066 Just connected to localhost/127.0.0.1:6066 Server says Thank you for connecting to /127.0.0.1:6066 Goodbye!
Java – Applet Basics
An applet is a Java program that runs in a Web browser. An applet can be a fully functional Java application because it has the entire Java API at its disposal.
There are some important differences between an applet and a standalone Java application, including the following −
-
An applet is a Java class that extends the java.applet.Applet class.
-
A main() method is not invoked on an applet, and an applet class will not define main().
-
Applets are designed to be embedded within an HTML page.
-
When a user views an HTML page that contains an applet, the code for the applet is downloaded to the user’s machine.
-
A JVM is required to view an applet. The JVM can be either a plug-in of the Web browser or a separate runtime environment.
-
The JVM on the user’s machine creates an instance of the applet class and invokes various methods during the applet’s lifetime.
-
Applets have strict security rules that are enforced by the Web browser. The security of an applet is often referred to as sandbox security, comparing the applet to a child playing in a sandbox with various rules that must be followed.
-
Other classes that the applet needs can be downloaded in a single Java Archive (JAR) file.
Life Cycle of an Applet
Four methods in the Applet class gives you the framework on which you build any serious applet −
-
init − This method is intended for whatever initialization is needed for your applet. It is called after the param tags inside the applet tag have been processed.
-
start − This method is automatically called after the browser calls the init method. It is also called whenever the user returns to the page containing the applet after having gone off to other pages.
-
stop − This method is automatically called when the user moves off the page on which the applet sits. It can, therefore, be called repeatedly in the same applet.
-
destroy − This method is only called when the browser shuts down normally. Because applets are meant to live on an HTML page, you should not normally leave resources behind after a user leaves the page that contains the applet.
-
paint − Invoked immediately after the start() method, and also any time the applet needs to repaint itself in the browser. The paint() method is actually inherited from the java.awt.
A “Hello, World” Applet
Following is a simple applet named HelloWorldApplet.java −
import java.applet.*;import java.awt.*;publicclassHelloWorldAppletextendsApplet{publicvoid paint (Graphics g){ g.drawString ("Hello World",25,50);}}
These import statements bring the classes into the scope of our applet class −
- java.applet.Applet
- java.awt.Graphics
Without those import statements, the Java compiler would not recognize the classes Applet and Graphics, which the applet class refers to.
The Applet Class
Every applet is an extension of thejava.applet.Applet class. The base Applet class provides methods that a derived Applet class may call to obtain information and services from the browser context.
These include methods that do the following −
- Get applet parameters
- Get the network location of the HTML file that contains the applet
- Get the network location of the applet class directory
- Print a status message in the browser
- Fetch an image
- Fetch an audio clip
- Play an audio clip
- Resize the applet
Additionally, the Applet class provides an interface by which the viewer or browser obtains information about the applet and controls the applet’s execution. The viewer may −
- Request information about the author, version, and copyright of the applet
- Request a description of the parameters the applet recognizes
- Initialize the applet
- Destroy the applet
- Start the applet’s execution
- Stop the applet’s execution
The Applet class provides default implementations of each of these methods. Those implementations may be overridden as necessary.
The “Hello, World” applet is complete as it stands. The only method overridden is the paint method.
Invoking an Applet
An applet may be invoked by embedding directives in an HTML file and viewing the file through an applet viewer or Java-enabled browser.
The <applet> tag is the basis for embedding an applet in an HTML file. Following is an example that invokes the “Hello, World” applet −
<html><title>The Hello, World Applet</title><hr><appletcode="HelloWorldApplet.class"width="320"height="120"> If your browser was Java-enabled, a "Hello, World" message would appear here. </applet><hr></html>
Note − You can refer to HTML Applet Tagto understand more about calling applet from HTML.
The code attribute of the <applet> tag is required. It specifies the Applet class to run. Width and height are also required to specify the initial size of the panel in which an applet runs. The applet directive must be closed with an </applet> tag.
If an applet takes parameters, values may be passed for the parameters by adding <param> tags between <applet> and </applet>. The browser ignores text and other tags between the applet tags.
Non-Java-enabled browsers do not process <applet> and </applet>. Therefore, anything that appears between the tags, not related to the applet, is visible in non-Java-enabled browsers.
The viewer or browser looks for the compiled Java code at the location of the document. To specify otherwise, use the codebase attribute of the <applet> tag as shown −
<applet codebase = "https://amrood.com/applets" code = "HelloWorldApplet.class" width = "320" height = "120">
If an applet resides in a package other than the default, the holding package must be specified in the code attribute using the period character (.) to separate package/class components. For example −
<applet = "mypackage.subpackage.TestApplet.class" width = "320" height = "120">
Getting Applet Parameters
The following example demonstrates how to make an applet respond to setup parameters specified in the document. This applet displays a checkerboard pattern of black and a second color.
The second color and the size of each square may be specified as parameters to the applet within the document.
CheckerApplet gets its parameters in the init() method. It may also get its parameters in the paint() method. However, getting the values and saving the settings once at the start of the applet, instead of at every refresh, is convenient and efficient.
The applet viewer or browser calls the init() method of each applet it runs. The viewer calls init() once, immediately after loading the applet. (Applet.init() is implemented to do nothing.) Override the default implementation to insert custom initialization code.
The Applet.getParameter() method fetches a parameter given the parameter’s name (the value of a parameter is always a string). If the value is numeric or other non-character data, the string must be parsed.
The following is a skeleton of CheckerApplet.java −
import java.applet.*;import java.awt.*;publicclassCheckerAppletextendsApplet{int squareSize =50;// initialized to default sizepublicvoid init(){}privatevoid parseSquareSize (String param){}privateColor parseColor (String param){}publicvoid paint (Graphics g){}}
Here are CheckerApplet’s init() and private parseSquareSize() methods −
publicvoid init (){String squareSizeParam = getParameter ("squareSize"); parseSquareSize (squareSizeParam);String colorParam = getParameter ("color");Color fg = parseColor (colorParam); setBackground (Color.black); setForeground (fg);}privatevoid parseSquareSize (String param){if(param ==null)return;try{ squareSize =Integer.parseInt (param);}catch(Exception e){// Let default value remain}}
The applet calls parseSquareSize() to parse the squareSize parameter. parseSquareSize() calls the library method Integer.parseInt(), which parses a string and returns an integer. Integer.parseInt() throws an exception whenever its argument is invalid.
Therefore, parseSquareSize() catches exceptions, rather than allowing the applet to fail on bad input.
The applet calls parseColor() to parse the color parameter into a Color value. parseColor() does a series of string comparisons to match the parameter value to the name of a predefined color. You need to implement these methods to make this applet work.
Specifying Applet Parameters
The following is an example of an HTML file with a CheckerApplet embedded in it. The HTML file specifies both parameters to the applet by means of the <param> tag.
<html><title>Checkerboard Applet</title><hr><appletcode="CheckerApplet.class"width="480"height="320"><paramname="color"value="blue"><paramname="squaresize"value="30"></applet><hr></html>
Note − Parameter names are not case sensitive.
Application Conversion to Applets
It is easy to convert a graphical Java application (that is, an application that uses the AWT and that you can start with the Java program launcher) into an applet that you can embed in a web page.
Following are the specific steps for converting an application to an applet.
-
Make an HTML page with the appropriate tag to load the applet code.
-
Supply a subclass of the JApplet class. Make this class public. Otherwise, the applet cannot be loaded.
-
Eliminate the main method in the application. Do not construct a frame window for the application. Your application will be displayed inside the browser.
-
Move any initialization code from the frame window constructor to the init method of the applet. You don’t need to explicitly construct the applet object. The browser instantiates it for you and calls the init method.
-
Remove the call to setSize; for applets, sizing is done with the width and height parameters in the HTML file.
-
Remove the call to setDefaultCloseOperation. An applet cannot be closed; it terminates when the browser exits.
-
If the application calls setTitle, eliminate the call to the method. Applets cannot have title bars. (You can, of course, title the web page itself, using the HTML title tag.)
-
Don’t call setVisible(true). The applet is displayed automatically.
Event Handling
Applets inherit a group of event-handling methods from the Container class. The Container class defines several methods, such as processKeyEvent and processMouseEvent, for handling particular types of events, and then one catch-all method called processEvent.
In order to react to an event, an applet must override the appropriate event-specific method.
import java.awt.event.MouseListener;import java.awt.event.MouseEvent;import java.applet.Applet;import java.awt.Graphics;publicclassExampleEventHandlingextendsAppletimplementsMouseListener{StringBuffer strBuffer;publicvoid init(){ addMouseListener(this); strBuffer =newStringBuffer(); addItem("initializing the apple ");}publicvoid start(){ addItem("starting the applet ");}publicvoid stop(){ addItem("stopping the applet ");}publicvoid destroy(){ addItem("unloading the applet");}void addItem(String word){System.out.println(word); strBuffer.append(word); repaint();}publicvoid paint(Graphics g){// Draw a Rectangle around the applet's display area. g.drawRect(0,0, getWidth()-1, getHeight()-1);// display the string inside the rectangle. g.drawString(strBuffer.toString(),10,20);}publicvoid mouseEntered(MouseEventevent){}publicvoid mouseExited(MouseEventevent){}publicvoid mousePressed(MouseEventevent){}publicvoid mouseReleased(MouseEventevent){}publicvoid mouseClicked(MouseEventevent){ addItem("mouse clicked! ");}}
Now, let us call this applet as follows −
<html><title>Event Handling</title><hr><appletcode="ExampleEventHandling.class"width="300"height="300"></applet><hr></html>
Initially, the applet will display “initializing the applet. Starting the applet.” Then once you click inside the rectangle, “mouse clicked” will be displayed as well.
Displaying Images
An applet can display images of the format GIF, JPEG, BMP, and others. To display an image within the applet, you use the drawImage() method found in the java.awt.Graphics class.
Following is an example illustrating all the steps to show images −
import java.applet.*;import java.awt.*;import java.net.*;publicclassImageDemoextendsApplet{privateImage image;privateAppletContext context;publicvoid init(){ context =this.getAppletContext();String imageURL =this.getParameter("image");if(imageURL ==null){ imageURL ="java.jpg";}try{ URL url =new URL(this.getDocumentBase(), imageURL); image = context.getImage(url);}catch(MalformedURLException e){ e.printStackTrace();// Display in browser status bar context.showStatus("Could not load image!");}}publicvoid paint(Graphics g){ context.showStatus("Displaying image"); g.drawImage(image,0,0,200,84,null); g.drawString("www.javalicense.com",35,100);}}
Now, let us call this applet as follows −
<html><title>The ImageDemo applet</title><hr><appletcode="ImageDemo.class"width="300"height="200"><paramname="image"value="java.jpg"></applet><hr></html>
Playing Audio
An applet can play an audio file represented by the AudioClip interface in the java.applet package. The AudioClip interface has three methods, including −
-
public void play() − Plays the audio clip one time, from the beginning.
-
public void loop() − Causes the audio clip to replay continually.
-
public void stop() − Stops playing the audio clip.
To obtain an AudioClip object, you must invoke the getAudioClip() method of the Applet class. The getAudioClip() method returns immediately, whether or not the URL resolves to an actual audio file. The audio file is not downloaded until an attempt is made to play the audio clip.
Following is an example illustrating all the steps to play an audio −
import java.applet.*;import java.awt.*;import java.net.*;publicclassAudioDemoextendsApplet{privateAudioClip clip;privateAppletContext context;publicvoid init(){ context =this.getAppletContext();String audioURL =this.getParameter("audio");if(audioURL ==null){ audioURL ="default.au";}try{ URL url =new URL(this.getDocumentBase(), audioURL); clip = context.getAudioClip(url);}catch(MalformedURLException e){ e.printStackTrace(); context.showStatus("Could not load audio file!");}}publicvoid start(){if(clip !=null){ clip.loop();}}publicvoid stop(){if(clip !=null){ clip.stop();}}}
Now, let us call this applet as follows −
<html><title>The ImageDemo applet</title><hr><appletcode="ImageDemo.class"width="0"height="0"><paramname="audio"value="test.wav"></applet><hr></html>
You can use test.wav on your PC to test the above example.
Java – Documentation Comments
The Java language supports three types of comments −
| Sr.No. | Comment & Description |
|---|---|
| 1 |
/* text */ The compiler ignores everything from /* to */. |
| 2 |
//text The compiler ignores everything from // to the end of the line. |
| 3 |
/** documentation */ This is a documentation comment and in general its called doc comment. The JDK javadoc tool usesdoc comments when preparing automatically generated documentation. |
This chapter is all about explaining Javadoc. We will see how we can make use of Javadoc to generate useful documentation for Java code.
What is Javadoc?
Javadoc is a tool which comes with JDK and it is used for generating Java code documentation in HTML format from Java source code, which requires documentation in a predefined format.
Following is a simple example where the lines inside /*….*/ are Java multi-line comments. Similarly, the line which preceeds // is Java single-line comment.
Example
/** * The HelloWorld program implements an application that * simply displays "Hello World!" to the standard output. * * @author Zara Ali * @version 1.0 * @since 2014-03-31 */publicclassHelloWorld{publicstaticvoid main(String[] args){/* Prints Hello, World! on standard output. System.out.println("Hello World!"); } }
You can include required HTML tags inside the description part. For instance, the following example makes use of <h1>….</h1> for heading and <p> has been used for creating paragraph break −
Example
/** * <h1>Hello, World!</h1> * The HelloWorld program implements an application that * simply displays "Hello World!" to the standard output. * <p> * Giving proper comments in your program makes it more * user friendly and it is assumed as a high quality code. * * * @author Zara Ali * @version 1.0 * @since 2014-03-31 */publicclassHelloWorld{publicstaticvoid main(String[] args){/* Prints Hello, World! on standard output. System.out.println("Hello World!"); } }
The javadoc Tags
The javadoc tool recognizes the following tags −
| Tag | Description | Syntax |
|---|---|---|
| @author | Adds the author of a class. | @author name-text |
| {@code} | Displays text in code font without interpreting the text as HTML markup or nested javadoc tags. | {@code text} |
| {@docRoot} | Represents the relative path to the generated document’s root directory from any generated page. | {@docRoot} |
| @deprecated | Adds a comment indicating that this API should no longer be used. | @deprecated deprecatedtext |
| @exception | Adds a Throwssubheading to the generated documentation, with the classname and description text. | @exception class-name description |
| {@inheritDoc} | Inherits a comment from the nearestinheritable class or implementable interface. | Inherits a comment from the immediate surperclass. |
| {@link} | Inserts an in-line link with the visible text label that points to the documentation for the specified package, class, or member name of a referenced class. | {@link package.class#member label} |
| {@linkplain} | Identical to {@link}, except the link’s label is displayed in plain text than code font. | {@linkplain package.class#member label} |
| @param | Adds a parameter with the specified parameter-name followed by the specified description to the “Parameters” section. | @param parameter-name description |
| @return | Adds a “Returns” section with the description text. | @return description |
| @see | Adds a “See Also” heading with a link or text entry that points to reference. | @see reference |
| @serial | Used in the doc comment for a default serializable field. | @serial field-description | include | exclude |
| @serialData | Documents the data written by the writeObject( ) or writeExternal( ) methods. | @serialData data-description |
| @serialField | Documents an ObjectStreamField component. | @serialField field-name field-type field-description |
| @since | Adds a “Since” heading with the specified since-text to the generated documentation. | @since release |
| @throws | The @throws and @exception tags are synonyms. | @throws class-name description |
| {@value} | When {@value} is used in the doc comment of a static field, it displays the value of that constant. | {@value package.class#field} |
| @version | Adds a “Version” subheading with the specified version-text to the generated docs when the -version option is used. | @version version-text |
Example
Following program uses few of the important tags available for documentation comments. You can make use of other tags based on your requirements.
The documentation about the AddNum class will be produced in HTML file AddNum.html but at the same time a master file with a name index.html will also be created.
importjava.io.*;/** * <h1>Add Two Numbers!</h1> * The AddNum program implements an application that * simply adds two given integer numbers and Prints * the output on the screen. * <p> * <b>Note:</b> Giving proper comments in your program makes it more * user friendly and it is assumed as a high quality code. * * @author Zara Ali * @version 1.0 * @since 2014-03-31 */publicclassAddNum{/** * This method is used to add two integers. This is * a the simplest form of a class method, just to * show the usage of various javadoc Tags. * @param numA This is the first paramter to addNum method * @param numB This is the second parameter to addNum method * @return int This returns sum of numA and numB. */publicintaddNum(intnumA,intnumB){returnnumA+numB;}/** * This is the main method which makes use of addNum method. * @param args Unused. * @return Nothing. * @exception IOException On input error. * @see IOException */publicstaticvoidmain(Stringargs[])throwsIOException{AddNumobj=newAddNum();intsum=obj.addNum(10,20);System.out.println("Sum of 10 and 20 is :"+sum);}}
Now, process the above AddNum.java file using javadoc utility as follows −
$ javadoc AddNum.java Loading source file AddNum.java... Constructing Javadoc information... Standard Doclet version 1.7.0_51 Building tree for all the packages and classes... Generating /AddNum.html... AddNum.java:36: warning - @return tag cannot be used in method with void return type. Generating /package-frame.html... Generating /package-summary.html... Generating /package-tree.html... Generating /constant-values.html... Building index for all the packages and classes... Generating /overview-tree.html... Generating /index-all.html... Generating /deprecated-list.html... Building index for all classes... Generating /allclasses-frame.html... Generating /allclasses-noframe.html... Generating /index.html... Generating /help-doc.html... 1 warning $
Java – Multithreading
Java is a multi-threaded programming languagewhich means we can develop multi-threaded program using Java. A multi-threaded program contains two or more parts that can run concurrently and each part can handle a different task at the same time making optimal use of the available resources specially when your computer has multiple CPUs.
By definition, multitasking is when multiple processes share common processing resources such as a CPU. Multi-threading extends the idea of multitasking into applications where you can subdivide specific operations within a single application into individual threads. Each of the threads can run in parallel. The OS divides processing time not only among different applications, but also among each thread within an application.
Multi-threading enables you to write in a way where multiple activities can proceed concurrently in the same program.
Life Cycle of a Thread
A thread goes through various stages in its life cycle. For example, a thread is born, started, runs, and then dies. The following diagram shows the complete life cycle of a thread.
Following are the stages of the life cycle −
-
New − A new thread begins its life cycle in the new state. It remains in this state until the program starts the thread. It is also referred to as a born thread.
-
Runnable − After a newly born thread is started, the thread becomes runnable. A thread in this state is considered to be executing its task.
-
Waiting − Sometimes, a thread transitions to the waiting state while the thread waits for another thread to perform a task. A thread transitions back to the runnable state only when another thread signals the waiting thread to continue executing.
-
Timed Waiting − A runnable thread can enter the timed waiting state for a specified interval of time. A thread in this state transitions back to the runnable state when that time interval expires or when the event it is waiting for occurs.
-
Terminated (Dead) − A runnable thread enters the terminated state when it completes its task or otherwise terminates.
Thread Priorities
Every Java thread has a priority that helps the operating system determine the order in which threads are scheduled.
Java thread priorities are in the range between MIN_PRIORITY (a constant of 1) and MAX_PRIORITY (a constant of 10). By default, every thread is given priority NORM_PRIORITY (a constant of 5).
Threads with higher priority are more important to a program and should be allocated processor time before lower-priority threads. However, thread priorities cannot guarantee the order in which threads execute and are very much platform dependent.
Create a Thread by Implementing a Runnable Interface
If your class is intended to be executed as a thread then you can achieve this by implementing a Runnable interface. You will need to follow three basic steps −
Step 1
As a first step, you need to implement a run() method provided by a Runnable interface. This method provides an entry point for the thread and you will put your complete business logic inside this method. Following is a simple syntax of the run() method −
public void run( )
Step 2
As a second step, you will instantiate a Threadobject using the following constructor −
Thread(Runnable threadObj, String threadName);
Where, threadObj is an instance of a class that implements the Runnable interface andthreadName is the name given to the new thread.
Step 3
Once a Thread object is created, you can start it by calling start() method, which executes a call to run( ) method. Following is a simple syntax of start() method −
void start();
Example
Here is an example that creates a new thread and starts running it −
classRunnableDemoimplementsRunnable{privateThread t;privateString threadName;RunnableDemo(String name){ threadName = name;System.out.println("Creating "+ threadName );}publicvoid run(){System.out.println("Running "+ threadName );try{for(int i =4; i >0; i--){System.out.println("Thread: "+ threadName +", "+ i);// Let the thread sleep for a while.Thread.sleep(50);}}catch(InterruptedException e){System.out.println("Thread "+ threadName +" interrupted.");}System.out.println("Thread "+ threadName +" exiting.");}publicvoid start (){System.out.println("Starting "+ threadName );if(t ==null){ t =newThread(this, threadName); t.start ();}}}publicclassTestThread{publicstaticvoid main(String args[]){RunnableDemo R1 =newRunnableDemo("Thread-1"); R1.start();RunnableDemo R2 =newRunnableDemo("Thread-2"); R2.start();}}
This will produce the following result −
Output
Creating Thread-1 Starting Thread-1 Creating Thread-2 Starting Thread-2 Running Thread-1 Thread: Thread-1, 4 Running Thread-2 Thread: Thread-2, 4 Thread: Thread-1, 3 Thread: Thread-2, 3 Thread: Thread-1, 2 Thread: Thread-2, 2 Thread: Thread-1, 1 Thread: Thread-2, 1 Thread Thread-1 exiting. Thread Thread-2 exiting.
Create a Thread by Extending a Thread Class
The second way to create a thread is to create a new class that extends Thread class using the following two simple steps. This approach provides more flexibility in handling multiple threads created using available methods in Thread class.
Step 1
You will need to override run( ) method available in Thread class. This method provides an entry point for the thread and you will put your complete business logic inside this method. Following is a simple syntax of run() method −
public void run( )
Step 2
Once Thread object is created, you can start it by calling start() method, which executes a call to run( ) method. Following is a simple syntax of start() method −
void start( );
Example
Here is the preceding program rewritten to extend the Thread −
classThreadDemoextendsThread{privateThread t;privateString threadName;ThreadDemo(String name){ threadName = name;System.out.println("Creating "+ threadName );}publicvoid run(){System.out.println("Running "+ threadName );try{for(int i =4; i >0; i--){System.out.println("Thread: "+ threadName +", "+ i);// Let the thread sleep for a while.Thread.sleep(50);}}catch(InterruptedException e){System.out.println("Thread "+ threadName +" interrupted.");}System.out.println("Thread "+ threadName +" exiting.");}publicvoid start (){System.out.println("Starting "+ threadName );if(t ==null){ t =newThread(this, threadName); t.start ();}}}publicclassTestThread{publicstaticvoid main(String args[]){ThreadDemo T1 =newThreadDemo("Thread-1"); T1.start();ThreadDemo T2 =newThreadDemo("Thread-2"); T2.start();}}
This will produce the following result −
Output
Creating Thread-1 Starting Thread-1 Creating Thread-2 Starting Thread-2 Running Thread-1 Thread: Thread-1, 4 Running Thread-2 Thread: Thread-2, 4 Thread: Thread-1, 3 Thread: Thread-2, 3 Thread: Thread-1, 2 Thread: Thread-2, 2 Thread: Thread-1, 1 Thread: Thread-2, 1 Thread Thread-1 exiting. Thread Thread-2 exiting.
Thread Methods
Following is the list of important methods available in the Thread class.
| Sr.No. | Method & Description |
|---|---|
| 1 |
public void start() Starts the thread in a separate path of execution, then invokes the run() method on this Thread object. |
| 2 |
public void run() If this Thread object was instantiated using a separate Runnable target, the run() method is invoked on that Runnable object. |
| 3 |
public final void setName(String name) Changes the name of the Thread object. There is also a getName() method for retrieving the name. |
| 4 |
public final void setPriority(int priority) Sets the priority of this Thread object. The possible values are between 1 and 10. |
| 5 |
public final void setDaemon(boolean on) A parameter of true denotes this Thread as a daemon thread. |
| 6 |
public final void join(long millisec) The current thread invokes this method on a second thread, causing the current thread to block until the second thread terminates or the specified number of milliseconds passes. |
| 7 |
public void interrupt() Interrupts this thread, causing it to continue execution if it was blocked for any reason. |
| 8 |
public final boolean isAlive() Returns true if the thread is alive, which is any time after the thread has been started but before it runs to completion. |
The previous methods are invoked on a particular Thread object. The following methods in the Thread class are static. Invoking one of the static methods performs the operation on the currently running thread.
| Sr.No. | Method & Description |
|---|---|
| 1 |
public static void yield() Causes the currently running thread to yield to any other threads of the same priority that are waiting to be scheduled. |
| 2 |
public static void sleep(long millisec) Causes the currently running thread to block for at least the specified number of milliseconds. |
| 3 |
public static boolean holdsLock(Object x) Returns true if the current thread holds the lock on the given Object. |
| 4 |
public static Thread currentThread() Returns a reference to the currently running thread, which is the thread that invokes this method. |
| 5 |
public static void dumpStack() Prints the stack trace for the currently running thread, which is useful when debugging a multithreaded application. |
Example
The following ThreadClassDemo program demonstrates some of these methods of the Thread class. Consider a class DisplayMessagewhich implements Runnable −
// File Name : DisplayMessage.java// Create a thread to implement RunnablepublicclassDisplayMessageimplementsRunnable{privateString message;publicDisplayMessage(String message){this.message = message;}publicvoid run(){while(true){System.out.println(message);}}}
Following is another class which extends the Thread class −
// File Name : GuessANumber.java// Create a thread to extentd ThreadpublicclassGuessANumberextendsThread{privateint number;publicGuessANumber(int number){this.number = number;}publicvoid run(){int counter =0;int guess =0;do{ guess =(int)(Math.random()*100+1);System.out.println(this.getName()+" guesses "+ guess); counter++;}while(guess != number);System.out.println("** Correct!"+this.getName()+"in"+ counter +"guesses.**");}}
Following is the main program, which makes use of the above-defined classes −
// File Name : ThreadClassDemo.javapublicclassThreadClassDemo{publicstaticvoid main(String[] args){Runnable hello =newDisplayMessage("Hello");Thread thread1 =newThread(hello); thread1.setDaemon(true); thread1.setName("hello");System.out.println("Starting hello thread..."); thread1.start();Runnable bye =newDisplayMessage("Goodbye");Thread thread2 =newThread(bye); thread2.setPriority(Thread.MIN_PRIORITY); thread2.setDaemon(true);System.out.println("Starting goodbye thread..."); thread2.start();System.out.println("Starting thread3...");Thread thread3 =newGuessANumber(27); thread3.start();try{ thread3.join();}catch(InterruptedException e){System.out.println("Thread interrupted.");}System.out.println("Starting thread4...");Thread thread4 =newGuessANumber(75); thread4.start();System.out.println("main() is ending...");}}
This will produce the following result. You can try this example again and again and you will get a different result every time.
Output
Starting hello thread... Starting goodbye thread... Hello Hello Hello Hello Hello Hello Goodbye Goodbye Goodbye Goodbye Goodbye .......
Major Java Multithreading Concepts
While doing Multithreading programming in Java, you would need to have the following concepts very handy −
Java – Sending Email
To send an e-mail using your Java Application is simple enough but to start with you should haveJavaMail API and Java Activation Framework (JAF) installed on your machine.
-
You can download latest version ofJavaMail (Version 1.2)
-
You can download latest version of JAF (Version 1.1.1)
Download and unzip these files, in the newly created top level directories you will find a number of jar files for both the applications. You need to add mail.jar and activation.jar files in your CLASSPATH.
Send a Simple E-mail
Here is an example to send a simple e-mail from your machine. It is assumed that your localhost is connected to the Internet and capable enough to send an e-mail.
Example
// File Name SendEmail.javaimport java.util.*;import javax.mail.*;import javax.mail.internet.*;import javax.activation.*;publicclassSendEmail{publicstaticvoid main(String[] args){// Recipient's email ID needs to be mentioned.String to ="abcd@gmail.com";// Sender's email ID needs to be mentionedStringfrom="web@gmail.com";// Assuming you are sending email from localhostString host ="localhost";// Get system propertiesProperties properties =System.getProperties();// Setup mail server properties.setProperty("mail.smtp.host", host);// Get the default Session object.Session session =Session.getDefaultInstance(properties);try{// Create a default MimeMessage object.MimeMessage message =newMimeMessage(session);// Set From: header field of the header. message.setFrom(newInternetAddress(from));// Set To: header field of the header. message.addRecipient(Message.RecipientType.TO,newInternetAddress(to));// Set Subject: header field message.setSubject("This is the Subject Line!");// Now set the actual message message.setText("This is actual message");// Send messageTransport.send(message);System.out.println("Sent message successfully....");}catch(MessagingException mex){ mex.printStackTrace();}}}
Compile and run this program to send a simple e-mail −
Output
$ java SendEmail Sent message successfully....
If you want to send an e-mail to multiple recipients then the following methods would be used to specify multiple e-mail IDs −
void addRecipients(Message.RecipientType type, Address[] addresses) throws MessagingException
Here is the description of the parameters −
-
type − This would be set to TO, CC or BCC. Here CC represents Carbon Copy and BCC represents Black Carbon Copy. Example:Message.RecipientType.TO
-
addresses − This is an array of e-mail ID. You would need to use InternetAddress() method while specifying email IDs.
Send an HTML E-mail
Here is an example to send an HTML e-mail from your machine. Here it is assumed that yourlocalhost is connected to the Internet and capable enough to send an e-mail.
This example is very similar to the previous one, except here we are using setContent() method to set content whose second argument is “text/html” to specify that the HTML content is included in the message.
Using this example, you can send as big as HTML content you like.
Example
// File Name SendHTMLEmail.javaimport java.util.*;import javax.mail.*;import javax.mail.internet.*;import javax.activation.*;publicclassSendHTMLEmail{publicstaticvoid main(String[] args){// Recipient's email ID needs to be mentioned.String to ="abcd@gmail.com";// Sender's email ID needs to be mentionedStringfrom="web@gmail.com";// Assuming you are sending email from localhostString host ="localhost";// Get system propertiesProperties properties =System.getProperties();// Setup mail server properties.setProperty("mail.smtp.host", host);// Get the default Session object.Session session =Session.getDefaultInstance(properties);try{// Create a default MimeMessage object.MimeMessage message =newMimeMessage(session);// Set From: header field of the header. message.setFrom(newInternetAddress(from));// Set To: header field of the header. message.addRecipient(Message.RecipientType.TO,newInternetAddress(to));// Set Subject: header field message.setSubject("This is the Subject Line!");// Send the actual HTML message, as big as you like message.setContent("<h1>This is actual message</h1>","text/html");// Send messageTransport.send(message);System.out.println("Sent message successfully....");}catch(MessagingException mex){ mex.printStackTrace();}}}
Compile and run this program to send an HTML e-mail −
Output
$ java SendHTMLEmail Sent message successfully....
Send Attachment in E-mail
Here is an example to send an e-mail with attachment from your machine. Here it is assumed that your localhost is connected to the internet and capable enough to send an e-mail.
Example
// File Name SendFileEmail.javaimport java.util.*;import javax.mail.*;import javax.mail.internet.*;import javax.activation.*;publicclassSendFileEmail{publicstaticvoid main(String[] args){// Recipient's email ID needs to be mentioned.String to ="abcd@gmail.com";// Sender's email ID needs to be mentionedStringfrom="web@gmail.com";// Assuming you are sending email from localhostString host ="localhost";// Get system propertiesProperties properties =System.getProperties();// Setup mail server properties.setProperty("mail.smtp.host", host);// Get the default Session object.Session session =Session.getDefaultInstance(properties);try{// Create a default MimeMessage object.MimeMessage message =newMimeMessage(session);// Set From: header field of the header. message.setFrom(newInternetAddress(from));// Set To: header field of the header. message.addRecipient(Message.RecipientType.TO,newInternetAddress(to));// Set Subject: header field message.setSubject("This is the Subject Line!");// Create the message part BodyPart messageBodyPart =newMimeBodyPart();// Fill the message messageBodyPart.setText("This is message body");// Create a multipar messageMultipart multipart =newMimeMultipart();// Set text message part multipart.addBodyPart(messageBodyPart);// Part two is attachment messageBodyPart =newMimeBodyPart();String filename ="file.txt";DataSource source =newFileDataSource(filename); messageBodyPart.setDataHandler(newDataHandler(source)); messageBodyPart.setFileName(filename); multipart.addBodyPart(messageBodyPart);// Send the complete message parts message.setContent(multipart );// Send messageTransport.send(message);System.out.println("Sent message successfully....");}catch(MessagingException mex){ mex.printStackTrace();}}}
Compile and run this program to send an HTML e-mail −
Output
$ java SendFileEmail Sent message successfully....
User Authentication Part
If it is required to provide user ID and Password to the e-mail server for authentication purpose, then you can set these properties as follows −
props.setProperty("mail.user", "myuser");
props.setProperty("mail.password", "mypwd");
Rest of the e-mail sending mechanism would remain as explained above.
Java – Serialization
Java provides a mechanism, called object serialization where an object can be represented as a sequence of bytes that includes the object’s data as well as information about the object’s type and the types of data stored in the object.
After a serialized object has been written into a file, it can be read from the file and deserialized that is, the type information and bytes that represent the object and its data can be used to recreate the object in memory.
Most impressive is that the entire process is JVM independent, meaning an object can be serialized on one platform and deserialized on an entirely different platform.
Classes ObjectInputStream andObjectOutputStream are high-level streams that contain the methods for serializing and deserializing an object.
The ObjectOutputStream class contains many write methods for writing various data types, but one method in particular stands out −
public final void writeObject(Object x) throws IOException
The above method serializes an Object and sends it to the output stream. Similarly, the ObjectInputStream class contains the following method for deserializing an object −
public final Object readObject() throws IOException, ClassNotFoundException
This method retrieves the next Object out of the stream and deserializes it. The return value is Object, so you will need to cast it to its appropriate data type.
To demonstrate how serialization works in Java, I am going to use the Employee class that we discussed early on in the book. Suppose that we have the following Employee class, which implements the Serializable interface −
Example
publicclassEmployeeimplementsjava.io.Serializable{publicStringname;publicStringaddress;publictransientintSSN;publicintnumber;publicvoidmailCheck(){System.out.println("Mailing a check to "+name+" "+address);}}
Notice that for a class to be serialized successfully, two conditions must be met −
-
The class must implement the java.io.Serializable interface.
-
All of the fields in the class must be serializable. If a field is not serializable, it must be marked transient.
If you are curious to know if a Java Standard Class is serializable or not, check the documentation for the class. The test is simple: If the class implements java.io.Serializable, then it is serializable; otherwise, it’s not.
Serializing an Object
The ObjectOutputStream class is used to serialize an Object. The following SerializeDemo program instantiates an Employee object and serializes it to a file.
When the program is done executing, a file named employee.ser is created. The program does not generate any output, but study the code and try to determine what the program is doing.
Note − When serializing an object to a file, the standard convention in Java is to give the file a.ser extension.
Example
import java.io.*;publicclassSerializeDemo{publicstaticvoid main(String[] args){Employee e =newEmployee(); e.name ="Reyan Ali"; e.address ="Phokka Kuan, Ambehta Peer"; e.SSN =11122333; e.number =101;try{FileOutputStream fileOut =newFileOutputStream("/tmp/employee.ser");ObjectOutputStreamout=newObjectOutputStream(fileOut);out.writeObject(e);out.close(); fileOut.close();System.out.printf("Serialized data is saved in /tmp/employee.ser");}catch(IOException i){ i.printStackTrace();}}}
Deserializing an Object
The following DeserializeDemo program deserializes the Employee object created in the SerializeDemo program. Study the program and try to determine its output −
Example
import java.io.*;publicclassDeserializeDemo{publicstaticvoid main(String[] args){Employee e =null;try{FileInputStream fileIn =newFileInputStream("/tmp/employee.ser");ObjectInputStreamin=newObjectInputStream(fileIn); e =(Employee)in.readObject();in.close(); fileIn.close();}catch(IOException i){ i.printStackTrace();return;}catch(ClassNotFoundException c){System.out.println("Employee class not found"); c.printStackTrace();return;}System.out.println("Deserialized Employee...");System.out.println("Name: "+ e.name);System.out.println("Address: "+ e.address);System.out.println("SSN: "+ e.SSN);System.out.println("Number: "+ e.number);}}
This will produce the following result −
Output
Deserialized Employee... Name: Reyan Ali Address:Phokka Kuan, Ambehta Peer SSN: 0 Number:101
Here are following important points to be noted −
-
The try/catch block tries to catch a ClassNotFoundException, which is declared by the readObject() method. For a JVM to be able to deserialize an object, it must be able to find the bytecode for the class. If the JVM can’t find a class during the deserialization of an object, it throws a ClassNotFoundException.
-
Notice that the return value of readObject() is cast to an Employee reference.
-
The value of the SSN field was 11122333 when the object was serialized, but because the field is transient, this value was not sent to the output stream. The SSN field of the deserialized Employee object is 0.
Java – Data Structures
The data structures provided by the Java utility package are very powerful and perform a wide range of functions. These data structures consist of the following interface and classes −
- Enumeration
- BitSet
- Vector
- Stack
- Dictionary
- Hashtable
- Properties
All these classes are now legacy and Java-2 has introduced a new framework called Collections Framework, which is discussed in the next chapter. −
The Enumeration
The Enumeration interface isn’t itself a data structure, but it is very important within the context of other data structures. The Enumeration interface defines a means to retrieve successive elements from a data structure.
For example, Enumeration defines a method called nextElement that is used to get the next element in a data structure that contains multiple elements.
To have more detail about this interface, checkThe Enumeration.
The BitSet
The BitSet class implements a group of bits or flags that can be set and cleared individually.
This class is very useful in cases where you need to keep up with a set of Boolean values; you just assign a bit to each value and set or clear it as appropriate.
For more details about this class, check The BitSet.
The Vector
The Vector class is similar to a traditional Java array, except that it can grow as necessary to accommodate new elements.
Like an array, elements of a Vector object can be accessed via an index into the vector.
The nice thing about using the Vector class is that you don’t have to worry about setting it to a specific size upon creation; it shrinks and grows automatically when necessary.
For more details about this class, check The Vector.
The Stack
The Stack class implements a last-in-first-out (LIFO) stack of elements.
You can think of a stack literally as a vertical stack of objects; when you add a new element, it gets stacked on top of the others.
When you pull an element off the stack, it comes off the top. In other words, the last element you added to the stack is the first one to come back off.
For more details about this class, check The Stack.
The Dictionary
The Dictionary class is an abstract class that defines a data structure for mapping keys to values.
This is useful in cases where you want to be able to access data via a particular key rather than an integer index.
Since the Dictionary class is abstract, it provides only the framework for a key-mapped data structure rather than a specific implementation.
For more details about this class, check The Dictionary.
The Hashtable
The Hashtable class provides a means of organizing data based on some user-defined key structure.
For example, in an address list hash table you could store and sort data based on a key such as ZIP code rather than on a person’s name.
The specific meaning of keys with regard to hash tables is totally dependent on the usage of the hash table and the data it contains.
For more detail about this class, check The Hashtable.
The Properties
Properties is a subclass of Hashtable. It is used to maintain lists of values in which the key is a String and the value is also a String.
The Properties class is used by many other Java classes. For example, it is the type of object returned by System.getProperties( ) when obtaining environmental values.
For more detail about this class, check The Properties.
Java – Collections Framework
Prior to Java 2, Java provided ad hoc classes such as Dictionary, Vector, Stack, and Propertiesto store and manipulate groups of objects. Although these classes were quite useful, they lacked a central, unifying theme. Thus, the way that you used Vector was different from the way that you used Properties.
The collections framework was designed to meet several goals, such as −
-
The framework had to be high-performance. The implementations for the fundamental collections (dynamic arrays, linked lists, trees, and hashtables) were to be highly efficient.
-
The framework had to allow different types of collections to work in a similar manner and with a high degree of interoperability.
-
The framework had to extend and/or adapt a collection easily.
Towards this end, the entire collections framework is designed around a set of standard interfaces. Several standard implementations such as LinkedList, HashSet, and TreeSet, of these interfaces are provided that you may use as-is and you may also implement your own collection, if you choose.
A collections framework is a unified architecture for representing and manipulating collections. All collections frameworks contain the following −
-
Interfaces − These are abstract data types that represent collections. Interfaces allow collections to be manipulated independently of the details of their representation. In object-oriented languages, interfaces generally form a hierarchy.
-
Implementations, i.e., Classes − These are the concrete implementations of the collection interfaces. In essence, they are reusable data structures.
-
Algorithms − These are the methods that perform useful computations, such as searching and sorting, on objects that implement collection interfaces. The algorithms are said to be polymorphic: that is, the same method can be used on many different implementations of the appropriate collection interface.
In addition to collections, the framework defines several map interfaces and classes. Maps store key/value pairs. Although maps are notcollections in the proper use of the term, but they are fully integrated with collections.
The Collection Interfaces
The collections framework defines several interfaces. This section provides an overview of each interface −
| Sr.No. | Interface & Description |
|---|---|
| 1 | The Collection Interface This enables you to work with groups of objects; it is at the top of the collections hierarchy. |
| 2 | The List Interface This extends Collection and an instance of List stores an ordered collection of elements. |
| 3 | The Set This extends Collection to handle sets, which must contain unique elements. |
| 4 | The SortedSet This extends Set to handle sorted sets. |
| 5 | The Map This maps unique keys to values. |
| 6 | The Map.Entry This describes an element (a key/value pair) in a map. This is an inner class of Map. |
| 7 | The SortedMap This extends Map so that the keys are maintained in an ascending order. |
| 8 | The Enumeration This is legacy interface defines the methods by which you can enumerate (obtain one at a time) the elements in a collection of objects. This legacy interface has been superceded by Iterator. |
The Collection Classes
Java provides a set of standard collection classes that implement Collection interfaces. Some of the classes provide full implementations that can be used as-is and others are abstract class, providing skeletal implementations that are used as starting points for creating concrete collections.
The standard collection classes are summarized in the following table −
| Sr.No. | Class & Description |
|---|---|
| 1 |
AbstractCollection Implements most of the Collection interface. |
| 2 |
AbstractList Extends AbstractCollection and implements most of the List interface. |
| 3 |
AbstractSequentialList Extends AbstractList for use by a collection that uses sequential rather than random access of its elements. |
| 4 | LinkedList Implements a linked list by extending AbstractSequentialList. |
| 5 | ArrayList Implements a dynamic array by extending AbstractList. |
| 6 |
AbstractSet Extends AbstractCollection and implements most of the Set interface. |
| 7 | HashSet Extends AbstractSet for use with a hash table. |
| 8 | LinkedHashSet Extends HashSet to allow insertion-order iterations. |
| 9 | TreeSet Implements a set stored in a tree. Extends AbstractSet. |
| 10 |
AbstractMap Implements most of the Map interface. |
| 11 | HashMap Extends AbstractMap to use a hash table. |
| 12 | TreeMap Extends AbstractMap to use a tree. |
| 13 | WeakHashMap Extends AbstractMap to use a hash table with weak keys. |
| 14 | LinkedHashMap Extends HashMap to allow insertion-order iterations. |
| 15 | IdentityHashMap Extends AbstractMap and uses reference equality when comparing documents. |
The AbstractCollection, AbstractSet, AbstractList, AbstractSequentialList and AbstractMap classes provide skeletal implementations of the core collection interfaces, to minimize the effort required to implement them.
The following legacy classes defined by java.util have been discussed in the previous chapter −
| Sr.No. | Class & Description |
|---|---|
| 1 | Vector This implements a dynamic array. It is similar to ArrayList, but with some differences. |
| 2 | Stack Stack is a subclass of Vector that implements a standard last-in, first-out stack. |
| 3 | Dictionary Dictionary is an abstract class that represents a key/value storage repository and operates much like Map. |
| 4 | Hashtable Hashtable was part of the original java.util and is a concrete implementation of a Dictionary. |
| 5 | Properties Properties is a subclass of Hashtable. It is used to maintain lists of values in which the key is a String and the value is also a String. |
| 6 | BitSet A BitSet class creates a special type of array that holds bit values. This array can increase in size as needed. |
The Collection Algorithms
The collections framework defines several algorithms that can be applied to collections and maps. These algorithms are defined as static methods within the Collections class.
Several of the methods can throw aClassCastException, which occurs when an attempt is made to compare incompatible types, or an UnsupportedOperationException, which occurs when an attempt is made to modify an unmodifiable collection.
Collections define three static variables: EMPTY_SET, EMPTY_LIST, and EMPTY_MAP. All are immutable.
| Sr.No. | Algorithm & Description |
|---|---|
| 1 | The Collection Algorithms Here is a list of all the algorithm implementation. |
How to Use an Iterator ?
Often, you will want to cycle through the elements in a collection. For example, you might want to display each element.
The easiest way to do this is to employ an iterator, which is an object that implements either the Iterator or the ListIterator interface.
Iterator enables you to cycle through a collection, obtaining or removing elements. ListIterator extends Iterator to allow bidirectional traversal of a list and the modification of elements.
| Sr.No. | Iterator Method & Description |
|---|---|
| 1 | Using Java Iterator Here is a list of all the methods with examples provided by Iterator and ListIterator interfaces. |
How to Use a Comparator ?
Both TreeSet and TreeMap store elements in a sorted order. However, it is the comparator that defines precisely what sorted order means.
This interface lets us sort a given collection any number of different ways. Also this interface can be used to sort any instances of any class (even classes we cannot modify).
| Sr.No. | Iterator Method & Description |
|---|---|
| 1 | Using Java Comparator Here is a list of all the methods with examples provided by Comparator Interface. |
Summary
The Java collections framework gives the programmer access to prepackaged data structures as well as to algorithms for manipulating them.
A collection is an object that can hold references to other objects. The collection interfaces declare the operations that can be performed on each type of collection.
The classes and interfaces of the collections framework are in package java.util.
Java – Generics
It would be nice if we could write a single sort method that could sort the elements in an Integer array, a String array, or an array of any type that supports ordering.
Java Generic methods and generic classes enable programmers to specify, with a single method declaration, a set of related methods, or with a single class declaration, a set of related types, respectively.
Generics also provide compile-time type safety that allows programmers to catch invalid types at compile time.
Using Java Generic concept, we might write a generic method for sorting an array of objects, then invoke the generic method with Integer arrays, Double arrays, String arrays and so on, to sort the array elements.
Generic Methods
You can write a single generic method declaration that can be called with arguments of different types. Based on the types of the arguments passed to the generic method, the compiler handles each method call appropriately. Following are the rules to define Generic Methods −
-
All generic method declarations have a type parameter section delimited by angle brackets (< and >) that precedes the method’s return type ( < E > in the next example).
-
Each type parameter section contains one or more type parameters separated by commas. A type parameter, also known as a type variable, is an identifier that specifies a generic type name.
-
The type parameters can be used to declare the return type and act as placeholders for the types of the arguments passed to the generic method, which are known as actual type arguments.
-
A generic method’s body is declared like that of any other method. Note that type parameters can represent only reference types, not primitive types (like int, double and char).
Example
Following example illustrates how we can print an array of different type using a single Generic method −
publicclassGenericMethodTest{// generic method printArraypublicstatic< E >void printArray( E[] inputArray ){// Display array elementsfor(E element : inputArray){System.out.printf("%s ", element);}System.out.println();}publicstaticvoid main(String args[]){// Create arrays of Integer, Double and CharacterInteger[] intArray ={1,2,3,4,5};Double[] doubleArray ={1.1,2.2,3.3,4.4};Character[] charArray ={'H','E','L','L','O'};System.out.println("Array integerArray contains:"); printArray(intArray);// pass an Integer arraySystem.out.println("\nArray doubleArray contains:"); printArray(doubleArray);// pass a Double arraySystem.out.println("\nArray characterArray contains:"); printArray(charArray);// pass a Character array}}
This will produce the following result −
Output
Array integerArray contains: 1 2 3 4 5 Array doubleArray contains: 1.1 2.2 3.3 4.4 Array characterArray contains: H E L L O
Bounded Type Parameters
There may be times when you’ll want to restrict the kinds of types that are allowed to be passed to a type parameter. For example, a method that operates on numbers might only want to accept instances of Number or its subclasses. This is what bounded type parameters are for.
To declare a bounded type parameter, list the type parameter’s name, followed by the extends keyword, followed by its upper bound.
Example
Following example illustrates how extends is used in a general sense to mean either “extends” (as in classes) or “implements” (as in interfaces). This example is Generic method to return the largest of three Comparable objects −
publicclassMaximumTest{// determines the largest of three Comparable objectspublicstatic<T extendsComparable<T>> T maximum(T x, T y, T z){ T max = x;// assume x is initially the largestif(y.compareTo(max)>0){ max = y;// y is the largest so far}if(z.compareTo(max)>0){ max = z;// z is the largest now }return max;// returns the largest object }publicstaticvoid main(String args[]){System.out.printf("Max of %d, %d and %d is %d\n\n",3,4,5, maximum(3,4,5));System.out.printf("Max of %.1f,%.1f and %.1f is %.1f\n\n",6.6,8.8,7.7, maximum(6.6,8.8,7.7));System.out.printf("Max of %s, %s and %s is %s\n","pear","apple","orange", maximum("pear","apple","orange"));}}
This will produce the following result −
Output
Max of 3, 4 and 5 is 5 Max of 6.6,8.8 and 7.7 is 8.8 Max of pear, apple and orange is pear
Generic Classes
A generic class declaration looks like a non-generic class declaration, except that the class name is followed by a type parameter section.
As with generic methods, the type parameter section of a generic class can have one or more type parameters separated by commas. These classes are known as parameterized classes or parameterized types because they accept one or more parameters.
Example
Following example illustrates how we can define a generic class −
publicclassBox<T>{private T t;publicvoid add(T t){this.t = t;}public T get(){return t;}publicstaticvoid main(String[] args){Box<Integer> integerBox =newBox<Integer>();Box<String> stringBox =newBox<String>(); integerBox.add(newInteger(10)); stringBox.add(newString("Hello World"));System.out.printf("Integer Value :%d\n\n", integerBox.get());System.out.printf("String Value :%s\n", stringBox.get());}}
This will produce the following result −
Output
Integer Value :10 String Value :Hello World
Java – Packages
Packages are used in Java in order to prevent naming conflicts, to control access, to make searching/locating and usage of classes, interfaces, enumerations and annotations easier, etc.
A Package can be defined as a grouping of related types (classes, interfaces, enumerations and annotations ) providing access protection and namespace management.
Some of the existing packages in Java are −
-
java.lang − bundles the fundamental classes
-
java.io − classes for input , output functions are bundled in this package
Programmers can define their own packages to bundle group of classes/interfaces, etc. It is a good practice to group related classes implemented by you so that a programmer can easily determine that the classes, interfaces, enumerations, and annotations are related.
Since the package creates a new namespace there won’t be any name conflicts with names in other packages. Using packages, it is easier to provide access control and it is also easier to locate the related classes.
Creating a Package
While creating a package, you should choose a name for the package and include a packagestatement along with that name at the top of every source file that contains the classes, interfaces, enumerations, and annotation types that you want to include in the package.
The package statement should be the first line in the source file. There can be only one package statement in each source file, and it applies to all types in the file.
If a package statement is not used then the class, interfaces, enumerations, and annotation types will be placed in the current default package.
To compile the Java programs with package statements, you have to use -d option as shown below.
javac -d Destination_folder file_name.java
Then a folder with the given package name is created in the specified destination, and the compiled class files will be placed in that folder.
Example
Let us look at an example that creates a package called animals. It is a good practice to use names of packages with lower case letters to avoid any conflicts with the names of classes and interfaces.
Following package example contains interface named animals −
/* File name : Animal.java */package animals;interfaceAnimal{publicvoid eat();publicvoid travel();}
Now, let us implement the above interface in the same package animals −
package animals;/* File name : MammalInt.java */publicclassMammalIntimplementsAnimal{publicvoid eat(){System.out.println("Mammal eats");}publicvoid travel(){System.out.println("Mammal travels");}publicint noOfLegs(){return0;}publicstaticvoid main(String args[]){MammalInt m =newMammalInt(); m.eat(); m.travel();}}
Now compile the java files as shown below −
$ javac -d . Animal.java $ javac -d . MammalInt.java
Now a package/folder with the name animals will be created in the current directory and these class files will be placed in it as shown below.
You can execute the class file within the package and get the result as shown below.
Mammal eats Mammal travels
The import Keyword
If a class wants to use another class in the same package, the package name need not be used. Classes in the same package find each other without any special syntax.
Example
Here, a class named Boss is added to the payroll package that already contains Employee. The Boss can then refer to the Employee class without using the payroll prefix, as demonstrated by the following Boss class.
package payroll;publicclassBoss{publicvoid payEmployee(Employee e){ e.mailCheck();}}
What happens if the Employee class is not in the payroll package? The Boss class must then use one of the following techniques for referring to a class in a different package.
- The fully qualified name of the class can be used. For example −
payroll.Employee
-
The package can be imported using the import keyword and the wild card (*). For example −
import payroll.*;
- The class itself can be imported using the import keyword. For example −
import payroll.Employee;
Note − A class file can contain any number of import statements. The import statements must appear after the package statement and before the class declaration.
The Directory Structure of Packages
Two major results occur when a class is placed in a package −
-
The name of the package becomes a part of the name of the class, as we just discussed in the previous section.
-
The name of the package must match the directory structure where the corresponding bytecode resides.
Here is simple way of managing your files in Java −
Put the source code for a class, interface, enumeration, or annotation type in a text file whose name is the simple name of the type and whose extension is .java.
For example −
// File Name : Car.javapackage vehicle;publicclassCar{// Class implementation. }
Now, put the source file in a directory whose name reflects the name of the package to which the class belongs −
....\vehicle\Car.java
Now, the qualified class name and pathname would be as follows −
- Class name → vehicle.Car
- Path name → vehicle\Car.java (in windows)
In general, a company uses its reversed Internet domain name for its package names.
Example − A company’s Internet domain name is apple.com, then all its package names would start with com.apple. Each component of the package name corresponds to a subdirectory.
Example − The company had a com.apple.computers package that contained a Dell.java source file, it would be contained in a series of subdirectories like this −
....\com\apple\computers\Dell.java
At the time of compilation, the compiler creates a different output file for each class, interface and enumeration defined in it. The base name of the output file is the name of the type, and its extension is .class.
For example −
// File Name: Dell.javapackage com.apple.computers;publicclassDell{}classUps{}
Now, compile this file as follows using -d option −
$javac -d . Dell.java
The files will be compiled as follows −
.\com\apple\computers\Dell.class .\com\apple\computers\Ups.class
You can import all the classes or interfaces defined in \com\apple\computers\ as follows −
import com.apple.computers.*;
Like the .java source files, the compiled .class files should be in a series of directories that reflect the package name. However, the path to the .class files does not have to be the same as the path to the .java source files. You can arrange your source and class directories separately, as −
<path-one>\sources\com\apple\computers\Dell.java <path-two>\classes\com\apple\computers\Dell.class
By doing this, it is possible to give access to the classes directory to other programmers without revealing your sources. You also need to manage source and class files in this manner so that the compiler and the Java Virtual Machine (JVM) can find all the types your program uses.
The full path to the classes directory, <path-two>\classes, is called the class path, and is set with the CLASSPATH system variable. Both the compiler and the JVM construct the path to your .class files by adding the package name to the class path.
Say <path-two>\classes is the class path, and the package name is com.apple.computers, then the compiler and JVM will look for .class files in <path-two>\classes\com\apple\computers.
A class path may include several paths. Multiple paths should be separated by a semicolon (Windows) or colon (Unix). By default, the compiler and the JVM search the current directory and the JAR file containing the Java platform classes so that these directories are automatically in the class path.
Set CLASSPATH System Variable
To display the current CLASSPATH variable, use the following commands in Windows and UNIX (Bourne shell) −
- In Windows → C:\> set CLASSPATH
- In UNIX → % echo $CLASSPATH
To delete the current contents of the CLASSPATH variable, use −
- In Windows → C:\> set CLASSPATH =
- In UNIX → % unset CLASSPATH; export CLASSPATH
To set the CLASSPATH variable −
- In Windows → set CLASSPATH = C:\users\jack\java\classes
- In UNIX → % CLASSPATH = /home/jack/java/classes; export CLASSPATH
Java – Encapsulation
Encapsulation is one of the four fundamental OOP concepts. The other three are inheritance, polymorphism, and abstraction.
Encapsulation in Java is a mechanism of wrapping the data (variables) and code acting on the data (methods) together as a single unit. In encapsulation, the variables of a class will be hidden from other classes, and can be accessed only through the methods of their current class. Therefore, it is also known as data hiding.
To achieve encapsulation in Java −
-
Declare the variables of a class as private.
-
Provide public setter and getter methods to modify and view the variables values.
Example
Following is an example that demonstrates how to achieve Encapsulation in Java −
/* File name : EncapTest.java */publicclassEncapTest{privateString name;privateString idNum;privateint age;publicint getAge(){return age;}publicString getName(){return name;}publicString getIdNum(){return idNum;}publicvoid setAge(int newAge){ age = newAge;}publicvoid setName(String newName){ name = newName;}publicvoid setIdNum(String newId){ idNum = newId;}}
The public setXXX() and getXXX() methods are the access points of the instance variables of the EncapTest class. Normally, these methods are referred as getters and setters. Therefore, any class that wants to access the variables should access them through these getters and setters.
The variables of the EncapTest class can be accessed using the following program −
/* File name : RunEncap.java */publicclassRunEncap{publicstaticvoid main(String args[]){EncapTest encap =newEncapTest(); encap.setName("James"); encap.setAge(20); encap.setIdNum("12343ms");System.out.print("Name : "+ encap.getName()+" Age : "+ encap.getAge());}}
This will produce the following result −
Output
Name : James Age : 20
Benefits of Encapsulation
-
The fields of a class can be made read-only or write-only.
-
A class can have total control over what is stored in its fields.
-
The users of a class do not know how the class stores its data. A class can change the data type of a field and users of the class do not need to change any of their code.
Java – Interfaces
An interface is a reference type in Java. It is similar to class. It is a collection of abstract methods. A class implements an interface, thereby inheriting the abstract methods of the interface.
Along with abstract methods, an interface may also contain constants, default methods, static methods, and nested types. Method bodies exist only for default methods and static methods.
Writing an interface is similar to writing a class. But a class describes the attributes and behaviors of an object. And an interface contains behaviors that a class implements.
Unless the class that implements the interface is abstract, all the methods of the interface need to be defined in the class.
An interface is similar to a class in the following ways −
-
An interface can contain any number of methods.
-
An interface is written in a file with a .javaextension, with the name of the interface matching the name of the file.
-
The byte code of an interface appears in a.class file.
-
Interfaces appear in packages, and their corresponding bytecode file must be in a directory structure that matches the package name.
However, an interface is different from a class in several ways, including −
-
You cannot instantiate an interface.
-
An interface does not contain any constructors.
-
All of the methods in an interface are abstract.
-
An interface cannot contain instance fields. The only fields that can appear in an interface must be declared both static and final.
-
An interface is not extended by a class; it is implemented by a class.
-
An interface can extend multiple interfaces.
Declaring Interfaces
The interface keyword is used to declare an interface. Here is a simple example to declare an interface −
Example
Following is an example of an interface −
/* File name : NameOfInterface.java */import java.lang.*;// Any number of import statementspublicinterfaceNameOfInterface{// Any number of final, static fields// Any number of abstract method declarations\}
Interfaces have the following properties −
-
An interface is implicitly abstract. You do not need to use the abstract keyword while declaring an interface.
-
Each method in an interface is also implicitly abstract, so the abstract keyword is not needed.
-
Methods in an interface are implicitly public.
Example
/* File name : Animal.java */interfaceAnimal{publicvoid eat();publicvoid travel();}
Implementing Interfaces
When a class implements an interface, you can think of the class as signing a contract, agreeing to perform the specific behaviors of the interface. If a class does not perform all the behaviors of the interface, the class must declare itself as abstract.
A class uses the implements keyword to implement an interface. The implements keyword appears in the class declaration following the extends portion of the declaration.
Example
/* File name : MammalInt.java */publicclassMammalIntimplementsAnimal{publicvoid eat(){System.out.println("Mammal eats");}publicvoid travel(){System.out.println("Mammal travels");}publicint noOfLegs(){return0;}publicstaticvoid main(String args[]){MammalInt m =newMammalInt(); m.eat(); m.travel();}}
This will produce the following result −
Output
Mammal eats Mammal travels
When overriding methods defined in interfaces, there are several rules to be followed −
-
Checked exceptions should not be declared on implementation methods other than the ones declared by the interface method or subclasses of those declared by the interface method.
-
The signature of the interface method and the same return type or subtype should be maintained when overriding the methods.
-
An implementation class itself can be abstract and if so, interface methods need not be implemented.
When implementation interfaces, there are several rules −
-
A class can implement more than one interface at a time.
-
A class can extend only one class, but implement many interfaces.
-
An interface can extend another interface, in a similar way as a class can extend another class.
Extending Interfaces
An interface can extend another interface in the same way that a class can extend another class. The extends keyword is used to extend an interface, and the child interface inherits the methods of the parent interface.
The following Sports interface is extended by Hockey and Football interfaces.
Example
// Filename: Sports.javapublicinterfaceSports{publicvoid setHomeTeam(String name);publicvoid setVisitingTeam(String name);}// Filename: Football.javapublicinterfaceFootballextendsSports{publicvoid homeTeamScored(int points);publicvoid visitingTeamScored(int points);publicvoid endOfQuarter(int quarter);}// Filename: Hockey.javapublicinterfaceHockeyextendsSports{publicvoid homeGoalScored();publicvoid visitingGoalScored();publicvoid endOfPeriod(int period);publicvoid overtimePeriod(int ot);}
The Hockey interface has four methods, but it inherits two from Sports; thus, a class that implements Hockey needs to implement all six methods. Similarly, a class that implements Football needs to define the three methods from Football and the two methods from Sports.
Extending Multiple Interfaces
A Java class can only extend one parent class. Multiple inheritance is not allowed. Interfaces are not classes, however, and an interface can extend more than one parent interface.
The extends keyword is used once, and the parent interfaces are declared in a comma-separated list.
For example, if the Hockey interface extended both Sports and Event, it would be declared as −
Example
publicinterfaceHockeyextendsSports,Event
Tagging Interfaces
The most common use of extending interfaces occurs when the parent interface does not contain any methods. For example, the MouseListener interface in the java.awt.event package extended java.util.EventListener, which is defined as −
Example
package java.util;publicinterfaceEventListener{}
An interface with no methods in it is referred to as a tagging interface. There are two basic design purposes of tagging interfaces −
Creates a common parent − As with the EventListener interface, which is extended by dozens of other interfaces in the Java API, you can use a tagging interface to create a common parent among a group of interfaces. For example, when an interface extends EventListener, the JVM knows that this particular interface is going to be used in an event delegation scenario.
Adds a data type to a class − This situation is where the term, tagging comes from. A class that implements a tagging interface does not need to define any methods (since the interface does not have any), but the class becomes an interface type through polymorphism.
Java – Abstraction
As per dictionary, abstraction is the quality of dealing with ideas rather than events. For example, when you consider the case of e-mail, complex details such as what happens as soon as you send an e-mail, the protocol your e-mail server uses are hidden from the user. Therefore, to send an e-mail you just need to type the content, mention the address of the receiver, and click send.
Likewise in Object-oriented programming, abstraction is a process of hiding the implementation details from the user, only the functionality will be provided to the user. In other words, the user will have the information on what the object does instead of how it does it.
In Java, abstraction is achieved using Abstract classes and interfaces.
Abstract Class
A class which contains the abstract keyword in its declaration is known as abstract class.
-
Abstract classes may or may not containabstract methods, i.e., methods without body ( public void get(); )
-
But, if a class has at least one abstract method, then the class must be declared abstract.
-
If a class is declared abstract, it cannot be instantiated.
-
To use an abstract class, you have to inherit it from another class, provide implementations to the abstract methods in it.
-
If you inherit an abstract class, you have to provide implementations to all the abstract methods in it.
Example
This section provides you an example of the abstract class. To create an abstract class, just use the abstract keyword before the class keyword, in the class declaration.
/* File name : Employee.java */publicabstractclassEmployee{privateString name;privateString address;privateint number;publicEmployee(String name,String address,int number){System.out.println("Constructing an Employee");this.name = name;this.address = address;this.number = number;}publicdouble computePay(){System.out.println("Inside Employee computePay");return0.0;}publicvoid mailCheck(){System.out.println("Mailing a check to "+this.name +" "+this.address);}publicString toString(){return name +" "+ address +" "+ number;}publicString getName(){return name;}publicString getAddress(){return address;}publicvoid setAddress(String newAddress){ address = newAddress;}publicint getNumber(){return number;}}
You can observe that except abstract methods the Employee class is same as normal class in Java. The class is now abstract, but it still has three fields, seven methods, and one constructor.
Now you can try to instantiate the Employee class in the following way −
/* File name : AbstractDemo.java */publicclassAbstractDemo{publicstaticvoid main(String[] args){/* Following is not allowed and would raise error */Employee e =newEmployee("George W.","Houston, TX",43);System.out.println("\n Call mailCheck using Employee reference--"); e.mailCheck();}}
When you compile the above class, it gives you the following error −
Employee.java:46: Employee is abstract; cannot be instantiated
Employee e = new Employee("George W.", "Houston, TX", 43);
^
1 error
Inheriting the Abstract Class
We can inherit the properties of Employee class just like concrete class in the following way −
Example
/* File name : Salary.java */publicclassSalaryextendsEmployee{privatedouble salary;// Annual salarypublicSalary(String name,String address,int number,double salary){super(name, address, number); setSalary(salary);}publicvoid mailCheck(){System.out.println("Within mailCheck of Salary class ");System.out.println("Mailing check to "+ getName()+" with salary "+ salary);}publicdouble getSalary(){return salary;}publicvoid setSalary(double newSalary){if(newSalary >=0.0){ salary = newSalary;}}publicdouble computePay(){System.out.println("Computing salary pay for "+ getName());return salary/52;}}
Here, you cannot instantiate the Employee class, but you can instantiate the Salary Class, and using this instance you can access all the three fields and seven methods of Employee class as shown below.
/* File name : AbstractDemo.java */publicclassAbstractDemo{publicstaticvoid main(String[] args){Salary s =newSalary("Mohd Mohtashim","Ambehta, UP",3,3600.00);Employee e =newSalary("John Adams","Boston, MA",2,2400.00);System.out.println("Call mailCheck using Salary reference --"); s.mailCheck();System.out.println("\n Call mailCheck using Employee reference--"); e.mailCheck();}}
This produces the following result −
Output
Constructing an Employee Constructing an Employee Call mailCheck using Salary reference -- Within mailCheck of Salary class Mailing check to Mohd Mohtashim with salary 3600.0 Call mailCheck using Employee reference-- Within mailCheck of Salary class Mailing check to John Adams with salary 2400.0
Abstract Methods
If you want a class to contain a particular method but you want the actual implementation of that method to be determined by child classes, you can declare the method in the parent class as an abstract.
-
abstract keyword is used to declare the method as abstract.
-
You have to place the abstract keyword before the method name in the method declaration.
-
An abstract method contains a method signature, but no method body.
-
Instead of curly braces, an abstract method will have a semoi colon (;) at the end.
Following is an example of the abstract method.
Example
publicabstractclassEmployee{privateString name;privateString address;privateint number;publicabstractdouble computePay();// Remainder of class definition}
Declaring a method as abstract has two consequences −
-
The class containing it must be declared as abstract.
-
Any class inheriting the current class must either override the abstract method or declare itself as abstract.
Note − Eventually, a descendant class has to implement the abstract method; otherwise, you would have a hierarchy of abstract classes that cannot be instantiated.
Suppose Salary class inherits the Employee class, then it should implement the computePay()method as shown below −
/* File name : Salary.java */publicclassSalaryextendsEmployee{privatedouble salary;// Annual salarypublicdouble computePay(){System.out.println("Computing salary pay for "+ getName());return salary/52;}// Remainder of class definition}
Java – Polymorphism
Polymorphism is the ability of an object to take on many forms. The most common use of polymorphism in OOP occurs when a parent class reference is used to refer to a child class object.
Any Java object that can pass more than one IS-A test is considered to be polymorphic. In Java, all Java objects are polymorphic since any object will pass the IS-A test for their own type and for the class Object.
It is important to know that the only possible way to access an object is through a reference variable. A reference variable can be of only one type. Once declared, the type of a reference variable cannot be changed.
The reference variable can be reassigned to other objects provided that it is not declared final. The type of the reference variable would determine the methods that it can invoke on the object.
A reference variable can refer to any object of its declared type or any subtype of its declared type. A reference variable can be declared as a class or interface type.
Example
Let us look at an example.
publicinterfaceVegetarian{}publicclassAnimal{}publicclassDeerextendsAnimalimplementsVegetarian{}
Now, the Deer class is considered to be polymorphic since this has multiple inheritance. Following are true for the above examples −
- A Deer IS-A Animal
- A Deer IS-A Vegetarian
- A Deer IS-A Deer
- A Deer IS-A Object
When we apply the reference variable facts to a Deer object reference, the following declarations are legal −
Example
Deer d =newDeer();Animal a = d;Vegetarian v = d;Object o = d;
All the reference variables d, a, v, o refer to the same Deer object in the heap.
Virtual Methods
In this section, I will show you how the behavior of overridden methods in Java allows you to take advantage of polymorphism when designing your classes.
We already have discussed method overriding, where a child class can override a method in its parent. An overridden method is essentially hidden in the parent class, and is not invoked unless the child class uses the super keyword within the overriding method.
Example
/* File name : Employee.java */publicclassEmployee{privateString name;privateString address;privateint number;publicEmployee(String name,String address,int number){System.out.println("Constructing an Employee");this.name = name;this.address = address;this.number = number;}publicvoid mailCheck(){System.out.println("Mailing a check to "+this.name +" "+this.address);}publicString toString(){return name +" "+ address +" "+ number;}publicString getName(){return name;}publicString getAddress(){return address;}publicvoid setAddress(String newAddress){ address = newAddress;}publicint getNumber(){return number;}}
Now suppose we extend Employee class as follows −
/* File name : Salary.java */publicclassSalaryextendsEmployee{privatedouble salary;// Annual salarypublicSalary(String name,String address,int number,double salary){super(name, address, number); setSalary(salary);}publicvoid mailCheck(){System.out.println("Within mailCheck of Salary class ");System.out.println("Mailing check to "+ getName()+" with salary "+ salary);}publicdouble getSalary(){return salary;}publicvoid setSalary(double newSalary){if(newSalary >=0.0){ salary = newSalary;}}publicdouble computePay(){System.out.println("Computing salary pay for "+ getName());return salary/52;}}
Now, you study the following program carefully and try to determine its output −
/* File name : VirtualDemo.java */publicclassVirtualDemo{publicstaticvoid main(String[] args){Salary s =newSalary("Mohd Mohtashim","Ambehta, UP",3,3600.00);Employee e =newSalary("John Adams","Boston, MA",2,2400.00);System.out.println("Call mailCheck using Salary reference --"); s.mailCheck();System.out.println("\n Call mailCheck using Employee reference--"); e.mailCheck();}}
This will produce the following result −
Output
Constructing an Employee Constructing an Employee Call mailCheck using Salary reference -- Within mailCheck of Salary class ailing check to Mohd Mohtashim with salary 3600.0 Call mailCheck using Employee reference-- Within mailCheck of Salary class ailing check to John Adams with salary 2400.0
Here, we instantiate two Salary objects. One using a Salary reference s, and the other using an Employee reference e.
While invoking s.mailCheck(), the compiler sees mailCheck() in the Salary class at compile time, and the JVM invokes mailCheck() in the Salary class at run time.
mailCheck() on e is quite different because e is an Employee reference. When the compiler seese.mailCheck(), the compiler sees the mailCheck() method in the Employee class.
Here, at compile time, the compiler used mailCheck() in Employee to validate this statement. At run time, however, the JVM invokes mailCheck() in the Salary class.
This behavior is referred to as virtual method invocation, and these methods are referred to as virtual methods. An overridden method is invoked at run time, no matter what data type the reference is that was used in the source code at compile time.
Java – Overriding
In the previous chapter, we talked about superclasses and subclasses. If a class inherits a method from its superclass, then there is a chance to override the method provided that it is not marked final.
The benefit of overriding is: ability to define a behavior that’s specific to the subclass type, which means a subclass can implement a parent class method based on its requirement.
In object-oriented terms, overriding means to override the functionality of an existing method.
Example
Let us look at an example.
classAnimal{publicvoid move(){System.out.println("Animals can move");}}classDogextendsAnimal{publicvoid move(){System.out.println("Dogs can walk and run");}}publicclassTestDog{publicstaticvoid main(String args[]){Animal a =newAnimal();// Animal reference and objectAnimal b =newDog();// Animal reference but Dog object a.move();// runs the method in Animal class b.move();// runs the method in Dog class}}
This will produce the following result −
Output
Animals can move Dogs can walk and run
In the above example, you can see that even though b is a type of Animal it runs the move method in the Dog class. The reason for this is: In compile time, the check is made on the reference type. However, in the runtime, JVM figures out the object type and would run the method that belongs to that particular object.
Therefore, in the above example, the program will compile properly since Animal class has the method move. Then, at the runtime, it runs the method specific for that object.
Consider the following example −
Example
classAnimal{publicvoid move(){System.out.println("Animals can move");}}classDogextendsAnimal{publicvoid move(){System.out.println("Dogs can walk and run");}publicvoid bark(){System.out.println("Dogs can bark");}}publicclassTestDog{publicstaticvoid main(String args[]){Animal a =newAnimal();// Animal reference and objectAnimal b =newDog();// Animal reference but Dog object a.move();// runs the method in Animal class b.move();// runs the method in Dog class b.bark();}}
This will produce the following result −
Output
TestDog.java:26: error: cannot find symbol
b.bark();
^
symbol: method bark()
location: variable b of type Animal
1 error
This program will throw a compile time error since b’s reference type Animal doesn’t have a method by the name of bark.
Rules for Method Overriding
-
The argument list should be exactly the same as that of the overridden method.
-
The return type should be the same or a subtype of the return type declared in the original overridden method in the superclass.
-
The access level cannot be more restrictive than the overridden method’s access level. For example: If the superclass method is declared public then the overridding method in the sub class cannot be either private or protected.
-
Instance methods can be overridden only if they are inherited by the subclass.
-
A method declared final cannot be overridden.
-
A method declared static cannot be overridden but can be re-declared.
-
If a method cannot be inherited, then it cannot be overridden.
-
A subclass within the same package as the instance’s superclass can override any superclass method that is not declared private or final.
-
A subclass in a different package can only override the non-final methods declared public or protected.
-
An overriding method can throw any uncheck exceptions, regardless of whether the overridden method throws exceptions or not. However, the overriding method should not throw checked exceptions that are new or broader than the ones declared by the overridden method. The overriding method can throw narrower or fewer exceptions than the overridden method.
-
Constructors cannot be overridden.
Using the super Keyword
When invoking a superclass version of an overridden method the super keyword is used.
Example
classAnimal{publicvoid move(){System.out.println("Animals can move");}}classDogextendsAnimal{publicvoid move(){super.move();// invokes the super class methodSystem.out.println("Dogs can walk and run");}}publicclassTestDog{publicstaticvoid main(String args[]){Animal b =newDog();// Animal reference but Dog object b.move();// runs the method in Dog class}}
This will produce the following result −
Output
Animals can move Dogs can walk and run
The super keyword
The super keyword is similar to this keyword. Following are the scenarios where the super keyword is used.
-
It is used to differentiate the members of superclass from the members of subclass, if they have same names.
-
It is used to invoke the superclassconstructor from subclass.
Differentiating the Members
If a class is inheriting the properties of another class. And if the members of the superclass have the names same as the sub class, to differentiate these variables we use super keyword as shown below.
super.variable super.method();
Sample Code
This section provides you a program that demonstrates the usage of the super keyword.
In the given program, you have two classes namely Sub_class and Super_class, both have a method named display() with different implementations, and a variable named num with different values. We are invoking display() method of both classes and printing the value of the variable num of both classes. Here you can observe that we have used super keyword to differentiate the members of superclass from subclass.
Copy and paste the program in a file with name Sub_class.java.
Example
classSuper_class{int num =20;// display method of superclasspublicvoid display(){System.out.println("This is the display method of superclass");}}publicclassSub_classextendsSuper_class{int num =10;// display method of sub classpublicvoid display(){System.out.println("This is the display method of subclass");}publicvoid my_method(){// Instantiating subclassSub_classsub=newSub_class();// Invoking the display() method of sub classsub.display();// Invoking the display() method of superclasssuper.display();// printing the value of variable num of subclassSystem.out.println("value of the variable named num in sub class:"+sub.num);// printing the value of variable num of superclassSystem.out.println("value of the variable named num in super class:"+super.num);}publicstaticvoid main(String args[]){Sub_class obj =newSub_class(); obj.my_method();}}
Compile and execute the above code using the following syntax.
javac Super_Demo java Super
On executing the program, you will get the following result −
Output
This is the display method of subclass This is the display method of superclass value of the variable named num in sub class:10 value of the variable named num in super class:20
Invoking Superclass Constructor
If a class is inheriting the properties of another class, the subclass automatically acquires the default constructor of the superclass. But if you want to call a parameterized constructor of the superclass, you need to use the super keyword as shown below.
super(values);
Sample Code
The program given in this section demonstrates how to use the super keyword to invoke the parametrized constructor of the superclass. This program contains a superclass and a subclass, where the superclass contains a parameterized constructor which accepts a string value, and we used the super keyword to invoke the parameterized constructor of the superclass.
Copy and paste the following program in a file with the name Subclass.java
Example
classSuperclass{int age;Superclass(int age){this.age = age;}publicvoid getAge(){System.out.println("The value of the variable named age in super class is: "+age);}}publicclassSubclassextendsSuperclass{Subclass(int age){super(age);}publicstaticvoid main(String argd[]){Subclass s =newSubclass(24); s.getAge();}}
Compile and execute the above code using the following syntax.
javac Subclass java Subclass
On executing the program, you will get the following result −
Output
The value of the variable named age in super class is: 24
IS-A Relationship
IS-A is a way of saying: This object is a type of that object. Let us see how the extends keyword is used to achieve inheritance.
publicclassAnimal{}publicclassMammalextendsAnimal{}publicclassReptileextendsAnimal{}publicclassDogextendsMammal{}
Now, based on the above example, in Object-Oriented terms, the following are true −
- Animal is the superclass of Mammal class.
- Animal is the superclass of Reptile class.
- Mammal and Reptile are subclasses of Animal class.
- Dog is the subclass of both Mammal and Animal classes.
Now, if we consider the IS-A relationship, we can say −
- Mammal IS-A Animal
- Reptile IS-A Animal
- Dog IS-A Mammal
- Hence: Dog IS-A Animal as well
With the use of the extends keyword, the subclasses will be able to inherit all the properties of the superclass except for the private properties of the superclass.
We can assure that Mammal is actually an Animal with the use of the instance operator.
Example
classAnimal{}classMammalextendsAnimal{}classReptileextendsAnimal{}publicclassDogextendsMammal{publicstaticvoid main(String args[]){Animal a =newAnimal();Mammal m =newMammal();Dog d =newDog();System.out.println(m instanceofAnimal);System.out.println(d instanceofMammal);System.out.println(d instanceofAnimal);}}
This will produce the following result −
Output
true true true
Since we have a good understanding of theextends keyword, let us look into how theimplements keyword is used to get the IS-A relationship.
Generally, the implements keyword is used with classes to inherit the properties of an interface. Interfaces can never be extended by a class.
Example
publicinterfaceAnimal{}publicclassMammalimplementsAnimal{}publicclassDogextendsMammal{}
The instanceof Keyword
Let us use the instanceof operator to check determine whether Mammal is actually an Animal, and dog is actually an Animal.
Example
interfaceAnimal{}classMammalimplementsAnimal{}publicclassDogextendsMammal{publicstaticvoid main(String args[]){Mammal m =newMammal();Dog d =newDog();System.out.println(m instanceofAnimal);System.out.println(d instanceofMammal);System.out.println(d instanceofAnimal);}}
This will produce the following result −
Output
true true true
HAS-A relationship
These relationships are mainly based on the usage. This determines whether a certain classHAS-A certain thing. This relationship helps to reduce duplication of code as well as bugs.
Lets look into an example −
Example
publicclassVehicle{}publicclassSpeed{}publicclassVanextendsVehicle{privateSpeed sp;}
This shows that class Van HAS-A Speed. By having a separate class for Speed, we do not have to put the entire code that belongs to speed inside the Van class, which makes it possible to reuse the Speed class in multiple applications.
In Object-Oriented feature, the users do not need to bother about which object is doing the real work. To achieve this, the Van class hides the implementation details from the users of the Van class. So, basically what happens is the users would ask the Van class to do a certain action and the Van class will either do the work by itself or ask another class to perform the action.
Types of Inheritance
There are various types of inheritance as demonstrated below.
A very important fact to remember is that Java does not support multiple inheritance. This means that a class cannot extend more than one class. Therefore following is illegal −
Example
publicclassextendsAnimal,Mammal{}
However, a class can implement one or more interfaces, which has helped Java get rid of the impossibility of multiple inheritance.
Java – Inheritance
Inheritance can be defined as the process where one class acquires the properties (methods and fields) of another. With the use of inheritance the information is made manageable in a hierarchical order.
The class which inherits the properties of other is known as subclass (derived class, child class) and the class whose properties are inherited is known as superclass (base class, parent class).
extends Keyword
extends is the keyword used to inherit the properties of a class. Following is the syntax of extends keyword.
Syntax
class Super {
.....
.....
}
class Sub extends Super {
.....
.....
}
Sample Code
Following is an example demonstrating Java inheritance. In this example, you can observe two classes namely Calculation and My_Calculation.
Using extends keyword, the My_Calculation inherits the methods addition() and Subtraction() of Calculation class.
Copy and paste the following program in a file with name My_Calculation.java
Example
classCalculation{int z;publicvoid addition(int x,int y){ z = x + y;System.out.println("The sum of the given numbers:"+z);}publicvoidSubtraction(int x,int y){ z = x - y;System.out.println("The difference between the given numbers:"+z);}}publicclassMy_CalculationextendsCalculation{publicvoid multiplication(int x,int y){ z = x * y;System.out.println("The product of the given numbers:"+z);}publicstaticvoid main(String args[]){int a =20, b =10;My_Calculation demo =newMy_Calculation(); demo.addition(a, b); demo.Subtraction(a, b); demo.multiplication(a, b);}}
Compile and execute the above code as shown below.
javac My_Calculation.java java My_Calculation
After executing the program, it will produce the following result −
Output
The sum of the given numbers:30 The difference between the given numbers:10 The product of the given numbers:200
In the given program, when an object toMy_Calculation class is created, a copy of the contents of the superclass is made within it. That is why, using the object of the subclass you can access the members of a superclass.
The Superclass reference variable can hold the subclass object, but using that variable you can access only the members of the superclass, so to access the members of both classes it is recommended to always create reference variable to the subclass.
If you consider the above program, you can instantiate the class as given below. But using the superclass reference variable ( cal in this case) you cannot call the method multiplication(), which belongs to the subclass My_Calculation.
Calculation cal =newMy_Calculation(); demo.addition(a, b); demo.Subtraction(a, b);
Note − A subclass inherits all the members (fields, methods, and nested classes) from its superclass. Constructors are not members, so they are not inherited by subclasses, but the constructor of the superclass can be invoked from the subclass.
Java – Inner classes
In this chapter, we will discuss inner classes of Java.
Nested Classes
In Java, just like methods, variables of a class too can have another class as its member. Writing a class within another is allowed in Java. The class written within is called the nested class, and the class that holds the inner class is called the outer class.
Syntax
Following is the syntax to write a nested class. Here, the class Outer_Demo is the outer class and the class Inner_Demo is the nested class.
class Outer_Demo {
class Nested_Demo {
}
}
Nested classes are divided into two types −
-
Non-static nested classes − These are the non-static members of a class.
-
Static nested classes − These are the static members of a class.
Inner Classes (Non-static Nested Classes)
Inner classes are a security mechanism in Java. We know a class cannot be associated with the access modifier private, but if we have the class as a member of other class, then the inner class can be made private. And this is also used to access the private members of a class.
Inner classes are of three types depending on how and where you define them. They are −
- Inner Class
- Method-local Inner Class
- Anonymous Inner Class
Inner Class
Creating an inner class is quite simple. You just need to write a class within a class. Unlike a class, an inner class can be private and once you declare an inner class private, it cannot be accessed from an object outside the class.
Following is the program to create an inner class and access it. In the given example, we make the inner class private and access the class through a method.
Example
classOuter_Demo{int num;// inner classprivateclassInner_Demo{publicvoidprint(){System.out.println("This is an inner class");}}// Accessing he inner class from the method withinvoid display_Inner(){Inner_Demo inner =newInner_Demo(); inner.print();}}publicclassMy_class{publicstaticvoid main(String args[]){// Instantiating the outer class Outer_Demo outer =newOuter_Demo();// Accessing the display_Inner() method. outer.display_Inner();}}
Here you can observe that Outer_Demo is the outer class, Inner_Demo is the inner class,display_Inner() is the method inside which we are instantiating the inner class, and this method is invoked from the main method.
If you compile and execute the above program, you will get the following result −
Output
This is an inner class.
Accessing the Private Members
As mentioned earlier, inner classes are also used to access the private members of a class. Suppose, a class is having private members to access them. Write an inner class in it, return the private members from a method within the inner class, say, getValue(), and finally from another class (from which you want to access the private members) call the getValue() method of the inner class.
To instantiate the inner class, initially you have to instantiate the outer class. Thereafter, using the object of the outer class, following is the way in which you can instantiate the inner class.
Outer_Demo outer = new Outer_Demo(); Outer_Demo.Inner_Demo inner = outer.new Inner_Demo();
The following program shows how to access the private members of a class using inner class.
Example
classOuter_Demo{// private variable of the outer classprivateint num =175;// inner classpublicclassInner_Demo{publicint getNum(){System.out.println("This is the getnum method of the inner class");return num;}}}publicclassMy_class2{publicstaticvoid main(String args[]){// Instantiating the outer classOuter_Demo outer =newOuter_Demo();// Instantiating the inner classOuter_Demo.Inner_Demo inner = outer.newInner_Demo();System.out.println(inner.getNum());}}
If you compile and execute the above program, you will get the following result −
Output
The value of num in the class Test is: 175
Method-local Inner Class
In Java, we can write a class within a method and this will be a local type. Like local variables, the scope of the inner class is restricted within the method.
A method-local inner class can be instantiated only within the method where the inner class is defined. The following program shows how to use a method-local inner class.
Example
publicclassOuterclass{// instance method of the outer class void my_Method(){int num =23;// method-local inner classclassMethodInner_Demo{publicvoidprint(){System.out.println("This is method inner class "+num);}}// end of inner class// Accessing the inner classMethodInner_Demo inner =newMethodInner_Demo(); inner.print();}publicstaticvoid main(String args[]){Outerclass outer =newOuterclass(); outer.my_Method();}}
If you compile and execute the above program, you will get the following result −
Output
This is method inner class 23
Anonymous Inner Class
An inner class declared without a class name is known as an anonymous inner class. In case of anonymous inner classes, we declare and instantiate them at the same time. Generally, they are used whenever you need to override the method of a class or an interface. The syntax of an anonymous inner class is as follows −
Syntax
AnonymousInner an_inner = new AnonymousInner() {
public void my_method() {
........
........
}
};
The following program shows how to override the method of a class using anonymous inner class.
Example
abstractclassAnonymousInner{publicabstractvoid mymethod();}publicclassOuter_class{publicstaticvoid main(String args[]){AnonymousInner inner =newAnonymousInner(){publicvoid mymethod(){System.out.println("This is an example of anonymous inner class");}}; inner.mymethod();}}
If you compile and execute the above program, you will get the following result −
Output
This is an example of anonymous inner class
In the same way, you can override the methods of the concrete class as well as the interface using an anonymous inner class.
Anonymous Inner Class as Argument
Generally, if a method accepts an object of an interface, an abstract class, or a concrete class, then we can implement the interface, extend the abstract class, and pass the object to the method. If it is a class, then we can directly pass it to the method.
But in all the three cases, you can pass an anonymous inner class to the method. Here is the syntax of passing an anonymous inner class as a method argument −
obj.my_Method(new My_Class() {
public void Do() {
.....
.....
}
});
The following program shows how to pass an anonymous inner class as a method argument.
Example
// interfaceinterfaceMessage{String greet();}publicclassMy_class{// method which accepts the object of interface Messagepublicvoid displayMessage(Message m){System.out.println(m.greet()+", This is an example of anonymous inner class as an argument");}publicstaticvoid main(String args[]){// Instantiating the classMy_class obj =newMy_class();// Passing an anonymous inner class as an argument obj.displayMessage(newMessage(){publicString greet(){return"Hello";}});}}
If you compile and execute the above program, it gives you the following result −
Output
Hello This is an example of anonymous inner class as an argument
Static Nested Class
A static inner class is a nested class which is a static member of the outer class. It can be accessed without instantiating the outer class, using other static members. Just like static members, a static nested class does not have access to the instance variables and methods of the outer class. The syntax of static nested class is as follows −
Syntax
class MyOuter {
static class Nested_Demo {
}
}
Instantiating a static nested class is a bit different from instantiating an inner class. The following program shows how to use a static nested class.
Example
publicclassOuter{staticclassNested_Demo{publicvoid my_method(){System.out.println("This is my nested class");}}publicstaticvoid main(String args[]){Outer.Nested_Demo nested =newOuter.Nested_Demo(); nested.my_method();}}
If you compile and execute the above program, you will get the following result −
Output
This is my nested class
Java – Exceptions
An exception (or exceptional event) is a problem that arises during the execution of a program. When an Exception occurs the normal flow of the program is disrupted and the program/Application terminates abnormally, which is not recommended, therefore, these exceptions are to be handled.
An exception can occur for many different reasons. Following are some scenarios where an exception occurs.
-
A user has entered an invalid data.
-
A file that needs to be opened cannot be found.
-
A network connection has been lost in the middle of communications or the JVM has run out of memory.
Some of these exceptions are caused by user error, others by programmer error, and others by physical resources that have failed in some manner.
Based on these, we have three categories of Exceptions. You need to understand them to know how exception handling works in Java.
-
Checked exceptions − A checked exception is an exception that occurs at the compile time, these are also called as compile time exceptions. These exceptions cannot simply be ignored at the time of compilation, the programmer should take care of (handle) these exceptions.
For example, if you use FileReader class in your program to read data from a file, if the file specified in its constructor doesn’t exist, then aFileNotFoundException occurs, and the compiler prompts the programmer to handle the exception.
Example
import java.io.File;import java.io.FileReader;publicclassFilenotFound_Demo{publicstaticvoid main(String args[]){File file =newFile("E://file.txt");FileReader fr =newFileReader(file);}}
If you try to compile the above program, you will get the following exceptions.
Output
C:\>javac FilenotFound_Demo.java
FilenotFound_Demo.java:8: error: unreported exception FileNotFoundException; must be caught or declared to be thrown
FileReader fr = new FileReader(file);
^
1 error
Note − Since the methods read() and close() of FileReader class throws IOException, you can observe that the compiler notifies to handle IOException, along with FileNotFoundException.
-
Unchecked exceptions − An unchecked exception is an exception that occurs at the time of execution. These are also called asRuntime Exceptions. These include programming bugs, such as logic errors or improper use of an API. Runtime exceptions are ignored at the time of compilation.
For example, if you have declared an array of size 5 in your program, and trying to call the 6thelement of the array then anArrayIndexOutOfBoundsExceptionexceptionoccurs.
Example
publicclassUnchecked_Demo{publicstaticvoid main(String args[]){int num[]={1,2,3,4};System.out.println(num[5]);}}
If you compile and execute the above program, you will get the following exception.
Output
Exception in thread "main" java.lang.ArrayIndexOutOfBoundsException: 5 at Exceptions.Unchecked_Demo.main(Unchecked_Demo.java:8)
-
Errors − These are not exceptions at all, but problems that arise beyond the control of the user or the programmer. Errors are typically ignored in your code because you can rarely do anything about an error. For example, if a stack overflow occurs, an error will arise. They are also ignored at the time of compilation.
Exception Hierarchy
All exception classes are subtypes of the java.lang.Exception class. The exception class is a subclass of the Throwable class. Other than the exception class there is another subclass called Error which is derived from the Throwable class.
Errors are abnormal conditions that happen in case of severe failures, these are not handled by the Java programs. Errors are generated to indicate errors generated by the runtime environment. Example: JVM is out of memory. Normally, programs cannot recover from errors.
The Exception class has two main subclasses: IOException class and RuntimeException Class.
Following is a list of most common checked and unchecked Java’s Built-in Exceptions.
Exceptions Methods
Following is the list of important methods available in the Throwable class.
| Sr.No. | Method & Description |
|---|---|
| 1 |
public String getMessage() Returns a detailed message about the exception that has occurred. This message is initialized in the Throwable constructor. |
| 2 |
public Throwable getCause() Returns the cause of the exception as represented by a Throwable object. |
| 3 |
public String toString() Returns the name of the class concatenated with the result of getMessage(). |
| 4 |
public void printStackTrace() Prints the result of toString() along with the stack trace to System.err, the error output stream. |
| 5 |
public StackTraceElement [] getStackTrace() Returns an array containing each element on the stack trace. The element at index 0 represents the top of the call stack, and the last element in the array represents the method at the bottom of the call stack. |
| 6 |
public Throwable fillInStackTrace() Fills the stack trace of this Throwable object with the current stack trace, adding to any previous information in the stack trace. |
Catching Exceptions
A method catches an exception using a combination of the try and catch keywords. A try/catch block is placed around the code that might generate an exception. Code within a try/catch block is referred to as protected code, and the syntax for using try/catch looks like the following −
Syntax
try {
// Protected code
}catch(ExceptionName e1) {
// Catch block
}
The code which is prone to exceptions is placed in the try block. When an exception occurs, that exception occurred is handled by catch block associated with it. Every try block should be immediately followed either by a catch block or finally block.
A catch statement involves declaring the type of exception you are trying to catch. If an exception occurs in protected code, the catch block (or blocks) that follows the try is checked. If the type of exception that occurred is listed in a catch block, the exception is passed to the catch block much as an argument is passed into a method parameter.
Example
The following is an array declared with 2 elements. Then the code tries to access the 3rdelement of the array which throws an exception.
// File Name : ExcepTest.javaimport java.io.*;publicclassExcepTest{publicstaticvoid main(String args[]){try{int a[]=newint[2];System.out.println("Access element three :"+ a[3]);}catch(ArrayIndexOutOfBoundsException e){System.out.println("Exception thrown :"+ e);}System.out.println("Out of the block");}}
This will produce the following result −
Output
Exception thrown :java.lang.ArrayIndexOutOfBoundsException: 3 Out of the block
Multiple Catch Blocks
A try block can be followed by multiple catch blocks. The syntax for multiple catch blocks looks like the following −
Syntax
try {
// Protected code
}catch(ExceptionType1 e1) {
// Catch block
}catch(ExceptionType2 e2) {
// Catch block
}catch(ExceptionType3 e3) {
// Catch block
}
The previous statements demonstrate three catch blocks, but you can have any number of them after a single try. If an exception occurs in the protected code, the exception is thrown to the first catch block in the list. If the data type of the exception thrown matches ExceptionType1, it gets caught there. If not, the exception passes down to the second catch statement. This continues until the exception either is caught or falls through all catches, in which case the current method stops execution and the exception is thrown down to the previous method on the call stack.
Example
Here is code segment showing how to use multiple try/catch statements.
try{ file =newFileInputStream(fileName); x =(byte) file.read();}catch(IOException i){ i.printStackTrace();return-1;}catch(FileNotFoundException f)// Not valid! { f.printStackTrace();return-1;}
Catching Multiple Type of Exceptions
Since Java 7, you can handle more than one exception using a single catch block, this feature simplifies the code. Here is how you would do it −
catch (IOException|FileNotFoundException ex) {
logger.log(ex);
throw ex;
The Throws/Throw Keywords
If a method does not handle a checked exception, the method must declare it using the throwskeyword. The throws keyword appears at the end of a method’s signature.
You can throw an exception, either a newly instantiated one or an exception that you just caught, by using the throw keyword.
Try to understand the difference between throws and throw keywords, throws is used to postpone the handling of a checked exception and throw is used to invoke an exception explicitly.
The following method declares that it throws a RemoteException −
Example
import java.io.*;publicclass className {publicvoid deposit(double amount)throwsRemoteException{// Method implementationthrownewRemoteException();}// Remainder of class definition}
A method can declare that it throws more than one exception, in which case the exceptions are declared in a list separated by commas. For example, the following method declares that it throws a RemoteException and an InsufficientFundsException −
Example
import java.io.*;publicclass className {publicvoid withdraw(double amount)throwsRemoteException,InsufficientFundsException{// Method implementation}// Remainder of class definition}
The Finally Block
The finally block follows a try block or a catch block. A finally block of code always executes, irrespective of occurrence of an Exception.
Using a finally block allows you to run any cleanup-type statements that you want to execute, no matter what happens in the protected code.
A finally block appears at the end of the catch blocks and has the following syntax −
Syntax
try {
// Protected code
}catch(ExceptionType1 e1) {
// Catch block
}catch(ExceptionType2 e2) {
// Catch block
}catch(ExceptionType3 e3) {
// Catch block
}finally {
// The finally block always executes.
}
Example
publicclassExcepTest{publicstaticvoid main(String args[]){int a[]=newint[2];try{System.out.println("Access element three :"+ a[3]);}catch(ArrayIndexOutOfBoundsException e){System.out.println("Exception thrown :"+ e);}finally{ a[0]=6;System.out.println("First element value: "+ a[0]);System.out.println("The finally statement is executed");}}}
This will produce the following result −
Output
Exception thrown :java.lang.ArrayIndexOutOfBoundsException: 3 First element value: 6 The finally statement is executed
Note the following −
-
A catch clause cannot exist without a try statement.
-
It is not compulsory to have finally clauses whenever a try/catch block is present.
-
The try block cannot be present without either catch clause or finally clause.
-
Any code cannot be present in between the try, catch, finally blocks.
The try-with-resources
Generally, when we use any resources like streams, connections, etc. we have to close them explicitly using finally block. In the following program, we are reading data from a file usingFileReader and we are closing it using finally block.
Example
import java.io.File;import java.io.FileReader;import java.io.IOException;publicclassReadData_Demo{publicstaticvoid main(String args[]){FileReader fr =null;try{File file =newFile("file.txt"); fr =newFileReader(file);char[] a =newchar[50]; fr.read(a);// reads the content to the arrayfor(char c : a)System.out.print(c);// prints the characters one by one}catch(IOException e){ e.printStackTrace();}finally{try{ fr.close();}catch(IOException ex){ ex.printStackTrace();}}}}
try-with-resources, also referred as automatic resource management, is a new exception handling mechanism that was introduced in Java 7, which automatically closes the resources used within the try catch block.
To use this statement, you simply need to declare the required resources within the parenthesis, and the created resource will be closed automatically at the end of the block. Following is the syntax of try-with-resources statement.
Syntax
try(FileReader fr = new FileReader("file path")) {
// use the resource
}catch() {
// body of catch
}
}
Following is the program that reads the data in a file using try-with-resources statement.
Example
import java.io.FileReader;import java.io.IOException;publicclassTry_withDemo{publicstaticvoid main(String args[]){try(FileReader fr =newFileReader("E://file.txt")){char[] a =newchar[50]; fr.read(a);// reads the contentto the arrayfor(char c : a)System.out.print(c);// prints the characters one by one}catch(IOException e){ e.printStackTrace();}}}
Following points are to be kept in mind while working with try-with-resources statement.
-
To use a class with try-with-resources statement it should implementAutoCloseable interface and the close()method of it gets invoked automatically at runtime.
-
You can declare more than one class in try-with-resources statement.
-
While you declare multiple classes in the try block of try-with-resources statement these classes are closed in reverse order.
-
Except the declaration of resources within the parenthesis everything is the same as normal try/catch block of a try block.
-
The resource declared in try gets instantiated just before the start of the try-block.
-
The resource declared at the try block is implicitly declared as final.
User-defined Exceptions
You can create your own exceptions in Java. Keep the following points in mind when writing your own exception classes −
-
All exceptions must be a child of Throwable.
-
If you want to write a checked exception that is automatically enforced by the Handle or Declare Rule, you need to extend the Exception class.
-
If you want to write a runtime exception, you need to extend the RuntimeException class.
We can define our own Exception class as below −
class MyException extends Exception {
}
You just need to extend the predefined Exceptionclass to create your own Exception. These are considered to be checked exceptions. The following InsufficientFundsException class is a user-defined exception that extends the Exception class, making it a checked exception. An exception class is like any other class, containing useful fields and methods.
Example
// File Name InsufficientFundsException.javaimport java.io.*;publicclassInsufficientFundsExceptionextendsException{privatedouble amount;publicInsufficientFundsException(double amount){this.amount = amount;}publicdouble getAmount(){return amount;}}
To demonstrate using our user-defined exception, the following CheckingAccount class contains a withdraw() method that throws an InsufficientFundsException.
// File Name CheckingAccount.javaimport java.io.*;publicclassCheckingAccount{privatedouble balance;privateint number;publicCheckingAccount(int number){this.number = number;}publicvoid deposit(double amount){ balance += amount;}publicvoid withdraw(double amount)throwsInsufficientFundsException{if(amount <= balance){ balance -= amount;}else{double needs = amount - balance;thrownewInsufficientFundsException(needs);}}publicdouble getBalance(){return balance;}publicint getNumber(){return number;}}
The following BankDemo program demonstrates invoking the deposit() and withdraw() methods of CheckingAccount.
// File Name BankDemo.javapublicclassBankDemo{publicstaticvoid main(String[] args){CheckingAccount c =newCheckingAccount(101);System.out.println("Depositing $500..."); c.deposit(500.00);try{System.out.println("\nWithdrawing $100..."); c.withdraw(100.00);System.out.println("\nWithdrawing $600..."); c.withdraw(600.00);}catch(InsufficientFundsException e){System.out.println("Sorry, but you are short $"+ e.getAmount()); e.printStackTrace();}}}
Compile all the above three files and run BankDemo. This will produce the following result −
Output
Depositing $500...
Withdrawing $100...
Withdrawing $600...
Sorry, but you are short $200.0
InsufficientFundsException
at CheckingAccount.withdraw(CheckingAccount.java:25)
at BankDemo.main(BankDemo.java:13)
Common Exceptions
In Java, it is possible to define two catergories of Exceptions and Errors.
-
JVM Exceptions − These are exceptions/errors that are exclusively or logically thrown by the JVM. Examples: NullPointerException, ArrayIndexOutOfBoundsException, ClassCastException.
-
Programmatic Exceptions − These exceptions are thrown explicitly by the application or the API programmers. Examples: IllegalArgumentException, IllegalStateException.
The Constructors
A constructor initializes an object when it is created. It has the same name as its class and is syntactically similar to a method. However, constructors have no explicit return type.
Typically, you will use a constructor to give initial values to the instance variables defined by the class, or to perform any other startup procedures required to create a fully formed object.
All classes have constructors, whether you define one or not, because Java automatically provides a default constructor that initializes all member variables to zero. However, once you define your own constructor, the default constructor is no longer used.
Example
Here is a simple example that uses a constructor without parameters −
// A simple constructor.classMyClass{int x;// Following is the constructorMyClass(){ x =10;}}
You will have to call constructor to initialize objects as follows −
publicclassConsDemo{publicstaticvoid main(String args[]){MyClass t1 =newMyClass();MyClass t2 =newMyClass();System.out.println(t1.x +" "+ t2.x);}}
Output
10 10
Parameterized Constructor
Most often, you will need a constructor that accepts one or more parameters. Parameters are added to a constructor in the same way that they are added to a method, just declare them inside the parentheses after the constructor’s name.
Example
Here is a simple example that uses a constructor with a parameter −
// A simple constructor.classMyClass{int x;// Following is the constructorMyClass(int i ){ x = i;}}
You will need to call a constructor to initialize objects as follows −
publicclassConsDemo{publicstaticvoid main(String args[]){MyClass t1 =newMyClass(10);MyClass t2 =newMyClass(20);System.out.println(t1.x +" "+ t2.x);}}
This will produce the following result −
Output
10 20
The this keyword
this is a keyword in Java which is used as a reference to the object of the current class, with in an instance method or a constructor. Using thisyou can refer the members of a class such as constructors, variables and methods.
Note − The keyword this is used only within instance methods or constructors
In general, the keyword this is used to −
-
Differentiate the instance variables from local variables if they have same names, within a constructor or a method.
classStudent{int age;Student(int age){this.age = age;}}
-
Call one type of constructor (parametrized constructor or default) from other in a class. It is known as explicit constructor invocation.
classStudent{int age Student(){this(20);}Student(int age){this.age = age;}}
Example
Here is an example that uses this keyword to access the members of a class. Copy and paste the following program in a file with the name,This_Example.java.
publicclassThis_Example{// Instance variable numint num =10;This_Example(){System.out.println("This is an example program on keyword this");}This_Example(int num){// Invoking the default constructorthis();// Assigning the local variable num to the instance variable numthis.num = num;}publicvoid greet(){System.out.println("Hi Welcome to Tutorialspoint");}publicvoidprint(){// Local variable numint num =20;// Printing the instance variableSystem.out.println("value of local variable num is : "+num);// Printing the local variableSystem.out.println("value of instance variable num is : "+this.num);// Invoking the greet method of a classthis.greet();}publicstaticvoid main(String[] args){// Instantiating the classThis_Example obj1 =newThis_Example();// Invoking the print method obj1.print();// Passing a new value to the num variable through parametrized constructorThis_Example obj2 =newThis_Example(30);// Invoking the print method again obj2.print();}}
This will produce the following result −
Output
This is an example program on keyword this value of local variable num is : 20 value of instance variable num is : 10 Hi Welcome to Tutorialspoint This is an example program on keyword this value of local variable num is : 20 value of instance variable num is : 30 Hi Welcome to Tutorialspoint
Variable Arguments(var-args)
JDK 1.5 enables you to pass a variable number of arguments of the same type to a method. The parameter in the method is declared as follows −
typeName... parameterName
In the method declaration, you specify the type followed by an ellipsis (…). Only one variable-length parameter may be specified in a method, and this parameter must be the last parameter. Any regular parameters must precede it.
Example
publicclassVarargsDemo{publicstaticvoid main(String args[]){// Call method with variable args printMax(34,3,3,2,56.5); printMax(newdouble[]{1,2,3});}publicstaticvoid printMax(double... numbers){if(numbers.length ==0){System.out.println("No argument passed");return;}double result = numbers[0];for(int i =1; i < numbers.length; i++)if(numbers[i]> result) result = numbers[i];System.out.println("The max value is "+ result);}}
This will produce the following result −
Output
The max value is 56.5 The max value is 3.0
The finalize( ) Method
It is possible to define a method that will be called just before an object’s final destruction by the garbage collector. This method is called finalize( ), and it can be used to ensure that an object terminates cleanly.
For example, you might use finalize( ) to make sure that an open file owned by that object is closed.
To add a finalizer to a class, you simply define the finalize( ) method. The Java runtime calls that method whenever it is about to recycle an object of that class.
Inside the finalize( ) method, you will specify those actions that must be performed before an object is destroyed.
The finalize( ) method has this general form −
protected void finalize( ) {
// finalization code here
}
Here, the keyword protected is a specifier that prevents access to finalize( ) by code defined outside its class.
This means that you cannot know when or even if finalize( ) will be executed. For example, if your program ends before garbage collection occurs, finalize( ) will not execute.
Java – Files and I/O
The java.io package contains nearly every class you might ever need to perform input and output (I/O) in Java. All these streams represent an input source and an output destination. The stream in the java.io package supports many data such as primitives, object, localized characters, etc.
Stream
A stream can be defined as a sequence of data. There are two kinds of Streams −
-
InPutStream − The InputStream is used to read data from a source.
-
OutPutStream − The OutputStream is used for writing data to a destination.
Java provides strong but flexible support for I/O related to files and networks but this tutorial covers very basic functionality related to streams and I/O. We will see the most commonly used examples one by one −
Byte Streams
Java byte streams are used to perform input and output of 8-bit bytes. Though there are many classes related to byte streams but the most frequently used classes are, FileInputStream andFileOutputStream. Following is an example which makes use of these two classes to copy an input file into an output file −
Example
import java.io.*;publicclassCopyFile{publicstaticvoid main(String args[])throwsIOException{FileInputStreamin=null;FileOutputStreamout=null;try{in=newFileInputStream("input.txt");out=newFileOutputStream("output.txt");int c;while((c =in.read())!=-1){out.write(c);}}finally{if(in!=null){in.close();}if(out!=null){out.close();}}}}
Now let’s have a file input.txt with the following content −
This is test for copy file.
As a next step, compile the above program and execute it, which will result in creating output.txt file with the same content as we have in input.txt. So let’s put the above code in CopyFile.java file and do the following −
$javac CopyFile.java $java CopyFile
Character Streams
Java Byte streams are used to perform input and output of 8-bit bytes, whereas Java Characterstreams are used to perform input and output for 16-bit unicode. Though there are many classes related to character streams but the most frequently used classes are, FileReader andFileWriter. Though internally FileReader uses FileInputStream and FileWriter uses FileOutputStream but here the major difference is that FileReader reads two bytes at a time and FileWriter writes two bytes at a time.
We can re-write the above example, which makes the use of these two classes to copy an input file (having unicode characters) into an output file −
Example
import java.io.*;publicclassCopyFile{publicstaticvoid main(String args[])throwsIOException{FileReaderin=null;FileWriterout=null;try{in=newFileReader("input.txt");out=newFileWriter("output.txt");int c;while((c =in.read())!=-1){out.write(c);}}finally{if(in!=null){in.close();}if(out!=null){out.close();}}}}
Now let’s have a file input.txt with the following content −
This is test for copy file.
As a next step, compile the above program and execute it, which will result in creating output.txt file with the same content as we have in input.txt. So let’s put the above code in CopyFile.java file and do the following −
$javac CopyFile.java $java CopyFile
Standard Streams
All the programming languages provide support for standard I/O where the user’s program can take input from a keyboard and then produce an output on the computer screen. If you are aware of C or C++ programming languages, then you must be aware of three standard devices STDIN, STDOUT and STDERR. Similarly, Java provides the following three standard streams −
-
Standard Input − This is used to feed the data to user’s program and usually a keyboard is used as standard input stream and represented as System.in.
-
Standard Output − This is used to output the data produced by the user’s program and usually a computer screen is used for standard output stream and represented asSystem.out.
-
Standard Error − This is used to output the error data produced by the user’s program and usually a computer screen is used for standard error stream and represented asSystem.err.
Following is a simple program, which createsInputStreamReader to read standard input stream until the user types a “q” −
Example
import java.io.*;publicclassReadConsole{publicstaticvoid main(String args[])throwsIOException{InputStreamReader cin =null;try{ cin =newInputStreamReader(System.in);System.out.println("Enter characters, 'q' to quit.");char c;do{ c =(char) cin.read();System.out.print(c);}while(c !='q');}finally{if(cin !=null){ cin.close();}}}}
Let’s keep the above code in ReadConsole.java file and try to compile and execute it as shown in the following program. This program continues to read and output the same character until we press ‘q’ −
$javac ReadConsole.java $java ReadConsole Enter characters, 'q' to quit. 1 1 e e q q
Reading and Writing Files
As described earlier, a stream can be defined as a sequence of data. The InputStream is used to read data from a source and the OutputStream is used for writing data to a destination.
Here is a hierarchy of classes to deal with Input and Output streams.
The two important streams are FileInputStreamand FileOutputStream, which would be discussed in this tutorial.
FileInputStream
This stream is used for reading data from the files. Objects can be created using the keywordnew and there are several types of constructors available.
Following constructor takes a file name as a string to create an input stream object to read the file −
InputStream f = new FileInputStream("C:/java/hello");
Following constructor takes a file object to create an input stream object to read the file. First we create a file object using File() method as follows −
File f = new File("C:/java/hello");
InputStream f = new FileInputStream(f);
Once you have InputStream object in hand, then there is a list of helper methods which can be used to read to stream or to do other operations on the stream.
| Sr.No. | Method & Description |
|---|---|
| 1 |
public void close() throws IOException{} This method closes the file output stream. Releases any system resources associated with the file. Throws an IOException. |
| 2 |
protected void finalize()throws IOException {} This method cleans up the connection to the file. Ensures that the close method of this file output stream is called when there are no more references to this stream. Throws an IOException. |
| 3 |
public int read(int r)throws IOException{} This method reads the specified byte of data from the InputStream. Returns an int. Returns the next byte of data and -1 will be returned if it’s the end of the file. |
| 4 |
public int read(byte[] r) throws IOException{} This method reads r.length bytes from the input stream into an array. Returns the total number of bytes read. If it is the end of the file, -1 will be returned. |
| 5 |
public int available() throws IOException{} Gives the number of bytes that can be read from this file input stream. Returns an int. |
There are other important input streams available, for more detail you can refer to the following links −
FileOutputStream
FileOutputStream is used to create a file and write data into it. The stream would create a file, if it doesn’t already exist, before opening it for output.
Here are two constructors which can be used to create a FileOutputStream object.
Following constructor takes a file name as a string to create an input stream object to write the file −
OutputStream f = new FileOutputStream("C:/java/hello")
Following constructor takes a file object to create an output stream object to write the file. First, we create a file object using File() method as follows −
File f = new File("C:/java/hello");
OutputStream f = new FileOutputStream(f);
Once you have OutputStream object in hand, then there is a list of helper methods, which can be used to write to stream or to do other operations on the stream.
| Sr.No. | Method & Description |
|---|---|
| 1 |
public void close() throws IOException{} This method closes the file output stream. Releases any system resources associated with the file. Throws an IOException. |
| 2 |
protected void finalize()throws IOException {} This method cleans up the connection to the file. Ensures that the close method of this file output stream is called when there are no more references to this stream. Throws an IOException. |
| 3 |
public void write(int w)throws IOException{} This methods writes the specified byte to the output stream. |
| 4 |
public void write(byte[] w) Writes w.length bytes from the mentioned byte array to the OutputStream. |
There are other important output streams available, for more detail you can refer to the following links −
Example
Following is the example to demonstrate InputStream and OutputStream −
import java.io.*;publicclass fileStreamTest {publicstaticvoid main(String args[]){try{byte bWrite []={11,21,3,40,5};OutputStream os =newFileOutputStream("test.txt");for(int x =0; x < bWrite.length ; x++){ os.write( bWrite[x]);// writes the bytes} os.close();InputStreamis=newFileInputStream("test.txt");int size =is.available();for(int i =0; i < size; i++){System.out.print((char)is.read()+" ");}is.close();}catch(IOException e){System.out.print("Exception");}}}
The above code would create file test.txt and would write given numbers in binary format. Same would be the output on the stdout screen.
File Navigation and I/O
There are several other classes that we would be going through to get to know the basics of File Navigation and I/O.
Directories in Java
A directory is a File which can contain a list of other files and directories. You use File object to create directories, to list down files available in a directory. For complete detail, check a list of all the methods which you can call on File object and what are related to directories.
Creating Directories
There are two useful File utility methods, which can be used to create directories −
-
The mkdir( ) method creates a directory, returning true on success and false on failure. Failure indicates that the path specified in the File object already exists, or that the directory cannot be created because the entire path does not exist yet.
-
The mkdirs() method creates both a directory and all the parents of the directory.
Following example creates “/tmp/user/java/bin” directory −
Example
import java.io.File;publicclassCreateDir{publicstaticvoid main(String args[]){String dirname ="/tmp/user/java/bin";File d =newFile(dirname);// Create directory now. d.mkdirs();}}
Compile and execute the above code to create “/tmp/user/java/bin”.
Note − Java automatically takes care of path separators on UNIX and Windows as per conventions. If you use a forward slash (/) on a Windows version of Java, the path will still resolve correctly.
Listing Directories
You can use list( ) method provided by File object to list down all the files and directories available in a directory as follows −
Example
import java.io.File;publicclassReadDir{publicstaticvoid main(String[] args){File file =null;String[] paths;try{// create new file object file =newFile("/tmp");// array of files and directory paths = file.list();// for each name in the path arrayfor(String path:paths){// prints filename and directory nameSystem.out.println(path);}}catch(Exception e){// if any error occurs e.printStackTrace();}}}
This will produce the following result based on the directories and files available in your /tmpdirectory −
Output
test1.txt test2.txt ReadDir.java ReadDir.class
Java – Regular Expressions
Java provides the java.util.regex package for pattern matching with regular expressions. Java regular expressions are very similar to the Perl programming language and very easy to learn.
A regular expression is a special sequence of characters that helps you match or find other strings or sets of strings, using a specialized syntax held in a pattern. They can be used to search, edit, or manipulate text and data.
The java.util.regex package primarily consists of the following three classes −
-
Pattern Class − A Pattern object is a compiled representation of a regular expression. The Pattern class provides no public constructors. To create a pattern, you must first invoke one of its public staticcompile() methods, which will then return a Pattern object. These methods accept a regular expression as the first argument.
-
Matcher Class − A Matcher object is the engine that interprets the pattern and performs match operations against an input string. Like the Pattern class, Matcher defines no public constructors. You obtain a Matcher object by invoking the matcher()method on a Pattern object.
-
PatternSyntaxException − A PatternSyntaxException object is an unchecked exception that indicates a syntax error in a regular expression pattern.
Capturing Groups
Capturing groups are a way to treat multiple characters as a single unit. They are created by placing the characters to be grouped inside a set of parentheses. For example, the regular expression (dog) creates a single group containing the letters “d”, “o”, and “g”.
Capturing groups are numbered by counting their opening parentheses from the left to the right. In the expression ((A)(B(C))), for example, there are four such groups −
- ((A)(B(C)))
- (A)
- (B(C))
- (C)
To find out how many groups are present in the expression, call the groupCount method on a matcher object. The groupCount method returns an int showing the number of capturing groups present in the matcher’s pattern.
There is also a special group, group 0, which always represents the entire expression. This group is not included in the total reported by groupCount.
Example
Following example illustrates how to find a digit string from the given alphanumeric string −
import java.util.regex.Matcher;import java.util.regex.Pattern;publicclassRegexMatches{publicstaticvoid main(String args[]){// String to be scanned to find the pattern.String line ="This order was placed for QT3000! OK?";String pattern ="(.*)(\\d+)(.*)";// Create a Pattern objectPattern r =Pattern.compile(pattern);// Now create matcher object.Matcher m = r.matcher(line);if(m.find()){System.out.println("Found value: "+ m.group(0));System.out.println("Found value: "+ m.group(1));System.out.println("Found value: "+ m.group(2));}else{System.out.println("NO MATCH");}}}
This will produce the following result −
Output
Found value: This order was placed for QT3000! OK? Found value: This order was placed for QT300 Found value: 0
Regular Expression Syntax
Here is the table listing down all the regular expression metacharacter syntax available in Java −
| Subexpression | Matches |
|---|---|
| ^ | Matches the beginning of the line. |
| $ | Matches the end of the line. |
| . | Matches any single character except newline. Using m option allows it to match the newline as well. |
| […] | Matches any single character in brackets. |
| [^…] | Matches any single character not in brackets. |
| \A | Beginning of the entire string. |
| \z | End of the entire string. |
| \Z | End of the entire string except allowable final line terminator. |
| re* | Matches 0 or more occurrences of the preceding expression. |
| re+ | Matches 1 or more of the previous thing. |
| re? | Matches 0 or 1 occurrence of the preceding expression. |
| re{ n} | Matches exactly n number of occurrences of the preceding expression. |
| re{ n,} | Matches n or more occurrences of the preceding expression. |
| re{ n, m} | Matches at least n and at most m occurrences of the preceding expression. |
| a| b | Matches either a or b. |
| (re) | Groups regular expressions and remembers the matched text. |
| (?: re) | Groups regular expressions without remembering the matched text. |
| (?> re) | Matches the independent pattern without backtracking. |
| \w | Matches the word characters. |
| \W | Matches the nonword characters. |
| \s | Matches the whitespace. Equivalent to [\t\n\r\f]. |
| \S | Matches the nonwhitespace. |
| \d | Matches the digits. Equivalent to [0-9]. |
| \D | Matches the nondigits. |
| \A | Matches the beginning of the string. |
| \Z | Matches the end of the string. If a newline exists, it matches just before newline. |
| \z | Matches the end of the string. |
| \G | Matches the point where the last match finished. |
| \n | Back-reference to capture group number “n”. |
| \b | Matches the word boundaries when outside the brackets. Matches the backspace (0x08) when inside the brackets. |
| \B | Matches the nonword boundaries. |
| \n, \t, etc. | Matches newlines, carriage returns, tabs, etc. |
| \Q | Escape (quote) all characters up to \E. |
| \E | Ends quoting begun with \Q. |
Methods of the Matcher Class
Here is a list of useful instance methods −
Index Methods
Index methods provide useful index values that show precisely where the match was found in the input string −
| Sr.No. | Method & Description |
|---|---|
| 1 |
public int start() Returns the start index of the previous match. |
| 2 |
public int start(int group) Returns the start index of the subsequence captured by the given group during the previous match operation. |
| 3 |
public int end() Returns the offset after the last character matched. |
| 4 |
public int end(int group) Returns the offset after the last character of the subsequence captured by the given group during the previous match operation. |
Study Methods
Study methods review the input string and return a Boolean indicating whether or not the pattern is found −
| Sr.No. | Method & Description |
|---|---|
| 1 |
public boolean lookingAt() Attempts to match the input sequence, starting at the beginning of the region, against the pattern. |
| 2 |
public boolean find() Attempts to find the next subsequence of the input sequence that matches the pattern. |
| 3 |
public boolean find(int start) Resets this matcher and then attempts to find the next subsequence of the input sequence that matches the pattern, starting at the specified index. |
| 4 |
public boolean matches() Attempts to match the entire region against the pattern. |
Replacement Methods
Replacement methods are useful methods for replacing text in an input string −
| Sr.No. | Method & Description |
|---|---|
| 1 |
public Matcher appendReplacement(StringBuffer sb, String replacement) Implements a non-terminal append-and-replace step. |
| 2 |
public StringBuffer appendTail(StringBuffer sb) Implements a terminal append-and-replace step. |
| 3 |
public String replaceAll(String replacement) Replaces every subsequence of the input sequence that matches the pattern with the given replacement string. |
| 4 |
public String replaceFirst(String replacement) Replaces the first subsequence of the input sequence that matches the pattern with the given replacement string. |
| 5 |
public static String quoteReplacement(String s) Returns a literal replacement String for the specified String. This method produces a String that will work as a literal replacement s in the appendReplacement method of the Matcher class. |
The start and end Methods
Following is the example that counts the number of times the word “cat” appears in the input string −
Example
import java.util.regex.Matcher;import java.util.regex.Pattern;publicclassRegexMatches{privatestaticfinalString REGEX ="\\bcat\\b";privatestaticfinalString INPUT ="cat cat cat cattie cat";publicstaticvoid main(String args[]){Pattern p =Pattern.compile(REGEX);Matcher m = p.matcher(INPUT);// get a matcher objectint count =0;while(m.find()){ count++;System.out.println("Match number "+count);System.out.println("start(): "+m.start());System.out.println("end(): "+m.end());}}}
This will produce the following result −
Output
Match number 1 start(): 0 end(): 3 Match number 2 start(): 4 end(): 7 Match number 3 start(): 8 end(): 11 Match number 4 start(): 19 end(): 22
You can see that this example uses word boundaries to ensure that the letters “c” “a” “t” are not merely a substring in a longer word. It also gives some useful information about where in the input string the match has occurred.
The start method returns the start index of the subsequence captured by the given group during the previous match operation, and the end returns the index of the last character matched, plus one.
The matches and lookingAt Methods
The matches and lookingAt methods both attempt to match an input sequence against a pattern. The difference, however, is that matches requires the entire input sequence to be matched, while lookingAt does not.
Both methods always start at the beginning of the input string. Here is the example explaining the functionality −
Example
import java.util.regex.Matcher;import java.util.regex.Pattern;publicclassRegexMatches{privatestaticfinalString REGEX ="foo";privatestaticfinalString INPUT ="fooooooooooooooooo";privatestaticPattern pattern;privatestaticMatcher matcher;publicstaticvoid main(String args[]){ pattern =Pattern.compile(REGEX); matcher = pattern.matcher(INPUT);System.out.println("Current REGEX is: "+REGEX);System.out.println("Current INPUT is: "+INPUT);System.out.println("lookingAt(): "+matcher.lookingAt());System.out.println("matches(): "+matcher.matches());}}
This will produce the following result −
Output
Current REGEX is: foo Current INPUT is: fooooooooooooooooo lookingAt(): true matches(): false
The replaceFirst and replaceAll Methods
The replaceFirst and replaceAll methods replace the text that matches a given regular expression. As their names indicate, replaceFirst replaces the first occurrence, and replaceAll replaces all occurrences.
Here is the example explaining the functionality −
Example
import java.util.regex.Matcher;import java.util.regex.Pattern;publicclassRegexMatches{privatestaticString REGEX ="dog";privatestaticString INPUT ="The dog says meow. "+"All dogs say meow.";privatestaticString REPLACE ="cat";publicstaticvoid main(String[] args){Pattern p =Pattern.compile(REGEX);// get a matcher objectMatcher m = p.matcher(INPUT); INPUT = m.replaceAll(REPLACE);System.out.println(INPUT);}}
This will produce the following result −
Output
The cat says meow. All cats say meow.
The appendReplacement and appendTail Methods
The Matcher class also provides appendReplacement and appendTail methods for text replacement.
Here is the example explaining the functionality −
Example
import java.util.regex.Matcher;import java.util.regex.Pattern;publicclassRegexMatches{privatestaticString REGEX ="a*b";privatestaticString INPUT ="aabfooaabfooabfoob";privatestaticString REPLACE ="-";publicstaticvoid main(String[] args){Pattern p =Pattern.compile(REGEX);// get a matcher objectMatcher m = p.matcher(INPUT);StringBuffer sb =newStringBuffer();while(m.find()){ m.appendReplacement(sb, REPLACE);} m.appendTail(sb);System.out.println(sb.toString());}}
This will produce the following result −
Output
-foo-foo-foo-
PatternSyntaxException Class Methods
A PatternSyntaxException is an unchecked exception that indicates a syntax error in a regular expression pattern. The PatternSyntaxException class provides the following methods to help you determine what went wrong −
| Sr.No. | Method & Description |
|---|---|
| 1 |
public String getDescription() Retrieves the description of the error. |
| 2 |
public int getIndex() Retrieves the error index. |
| 3 |
public String getPattern() Retrieves the erroneous regular expression pattern. |
| 4 |
public String getMessage() Returns a multi-line string containing the description of the syntax error and its index, the erroneous regular expression pattern, and a visual indication of the error index within the pattern. |
Java – Methods
A Java method is a collection of statements that are grouped together to perform an operation. When you call the System.out.println() method, for example, the system actually executes several statements in order to display a message on the console.
Now you will learn how to create your own methods with or without return values, invoke a method with or without parameters, and apply method abstraction in the program design.
Creating Method
Considering the following example to explain the syntax of a method −
Syntax
public static int methodName(int a, int b) {
// body
}
Here,
-
public static − modifier
-
int − return type
-
methodName − name of the method
-
a, b − formal parameters
-
int a, int b − list of parameters
Method definition consists of a method header and a method body. The same is shown in the following syntax −
Syntax
modifier returnType nameOfMethod (Parameter List) {
// method body
}
The syntax shown above includes −
-
modifier − It defines the access type of the method and it is optional to use.
-
returnType − Method may return a value.
-
nameOfMethod − This is the method name. The method signature consists of the method name and the parameter list.
-
Parameter List − The list of parameters, it is the type, order, and number of parameters of a method. These are optional, method may contain zero parameters.
-
method body − The method body defines what the method does with the statements.
Example
Here is the source code of the above defined method called max(). This method takes two parameters num1 and num2 and returns the maximum between the two −
/** the snippet returns the minimum between two numbers */publicstaticint minFunction(int n1,int n2){int min;if(n1 > n2) min = n2;else min = n1;return min;}
Method Calling
For using a method, it should be called. There are two ways in which a method is called i.e., method returns a value or returning nothing (no return value).
The process of method calling is simple. When a program invokes a method, the program control gets transferred to the called method. This called method then returns control to the caller in two conditions, when −
- the return statement is executed.
- it reaches the method ending closing brace.
The methods returning void is considered as call to a statement. Lets consider an example −
System.out.println("This is tutorialspoint.com!");
The method returning value can be understood by the following example −
int result = sum(6,9);
Following is the example to demonstrate how to define a method and how to call it −
Example
publicclassExampleMinNumber{publicstaticvoid main(String[] args){int a =11;int b =6;int c = minFunction(a, b);System.out.println("Minimum Value = "+ c);}/** returns the minimum of two numbers */publicstaticint minFunction(int n1,int n2){int min;if(n1 > n2) min = n2;else min = n1;return min;}}
This will produce the following result −
Output
Minimum value = 6
The void Keyword
The void keyword allows us to create methods which do not return a value. Here, in the following example we’re considering a void methodmethodRankPoints. This method is a void method, which does not return any value. Call to a void method must be a statement i.e.methodRankPoints(255.7);. It is a Java statement which ends with a semicolon as shown in the following example.
Example
publicclassExampleVoid{publicstaticvoid main(String[] args){ methodRankPoints(255.7);}publicstaticvoid methodRankPoints(double points){if(points >=202.5){System.out.println("Rank:A1");}elseif(points >=122.4){System.out.println("Rank:A2");}else{System.out.println("Rank:A3");}}}
This will produce the following result −
Output
Rank:A1
Passing Parameters by Value
While working under calling process, arguments is to be passed. These should be in the same order as their respective parameters in the method specification. Parameters can be passed by value or by reference.
Passing Parameters by Value means calling a method with a parameter. Through this, the argument value is passed to the parameter.
Example
The following program shows an example of passing parameter by value. The values of the arguments remains the same even after the method invocation.
publicclass swappingExample {publicstaticvoid main(String[] args){int a =30;int b =45;System.out.println("Before swapping, a = "+ a +" and b = "+ b);// Invoke the swap method swapFunction(a, b);System.out.println("\n**Now, Before and After swapping values will be same here**:");System.out.println("After swapping, a = "+ a +" and b is "+ b);}publicstaticvoid swapFunction(int a,int b){System.out.println("Before swapping(Inside), a = "+ a +" b = "+ b);// Swap n1 with n2int c = a; a = b; b = c;System.out.println("After swapping(Inside), a = "+ a +" b = "+ b);}}
This will produce the following result −
Output
Before swapping, a = 30 and b = 45 Before swapping(Inside), a = 30 b = 45 After swapping(Inside), a = 45 b = 30 **Now, Before and After swapping values will be same here**: After swapping, a = 30 and b is 45
Method Overloading
When a class has two or more methods by the same name but different parameters, it is known as method overloading. It is different from overriding. In overriding, a method has the same method name, type, number of parameters, etc.
Let’s consider the example discussed earlier for finding minimum numbers of integer type. If, let’s say we want to find the minimum number of double type. Then the concept of overloading will be introduced to create two or more methods with the same name but different parameters.
The following example explains the same −
Example
publicclassExampleOverloading{publicstaticvoid main(String[] args){int a =11;int b =6;double c =7.3;double d =9.4;int result1 = minFunction(a, b);// same function name with different parametersdouble result2 = minFunction(c, d);System.out.println("Minimum Value = "+ result1);System.out.println("Minimum Value = "+ result2);}// for integerpublicstaticint minFunction(int n1,int n2){int min;if(n1 > n2) min = n2;else min = n1;return min;}// for doublepublicstaticdouble minFunction(double n1,double n2){double min;if(n1 > n2) min = n2;else min = n1;return min;}}
This will produce the following result −
Output
Minimum Value = 6 Minimum Value = 7.3
Overloading methods makes program readable. Here, two methods are given by the same name but with different parameters. The minimum number from integer and double types is the result.
Using Command-Line Arguments
Sometimes you will want to pass some information into a program when you run it. This is accomplished by passing command-line arguments to main( ).
A command-line argument is the information that directly follows the program’s name on the command line when it is executed. To access the command-line arguments inside a Java program is quite easy. They are stored as strings in the String array passed to main( ).
Example
The following program displays all of the command-line arguments that it is called with −
publicclassCommandLine{publicstaticvoid main(String args[]){for(int i =0; i<args.length; i++){System.out.println("args["+ i +"]: "+ args[i]);}}}
Try executing this program as shown here −
$java CommandLine this is a command line 200 -100
This will produce the following result −
Output
args[0]: this args[1]: is args[2]: a args[3]: command args[4]: line args[5]: 200 args[6]: -100
Java – Strings Class
Strings, which are widely used in Java programming, are a sequence of characters. In Java programming language, strings are treated as objects.
The Java platform provides the String class to create and manipulate strings.
Creating Strings
The most direct way to create a string is to write −
String greeting = "Hello world!";
Whenever it encounters a string literal in your code, the compiler creates a String object with its value in this case, “Hello world!’.
As with any other object, you can create String objects by using the new keyword and a constructor. The String class has 11 constructors that allow you to provide the initial value of the string using different sources, such as an array of characters.
Example
publicclassStringDemo{publicstaticvoid main(String args[]){char[] helloArray ={'h','e','l','l','o','.'};String helloString =newString(helloArray);System.out.println( helloString );}}
This will produce the following result −
Output
hello.
Note − The String class is immutable, so that once it is created a String object cannot be changed. If there is a necessity to make a lot of modifications to Strings of characters, then you should use String Buffer & String BuilderClasses.
String Length
Methods used to obtain information about an object are known as accessor methods. One accessor method that you can use with strings is the length() method, which returns the number of characters contained in the string object.
The following program is an example of length(), method String class.
Example
publicclassStringDemo{publicstaticvoid main(String args[]){String palindrome ="Dot saw I was Tod";int len = palindrome.length();System.out.println("String Length is : "+ len );}}
This will produce the following result −
Output
String Length is : 17
Concatenating Strings
The String class includes a method for concatenating two strings −
string1.concat(string2);
This returns a new string that is string1 with string2 added to it at the end. You can also use the concat() method with string literals, as in −
"My name is ".concat("Zara");
Strings are more commonly concatenated with the + operator, as in −
"Hello," + " world" + "!"
which results in −
"Hello, world!"
Let us look at the following example −
Example
publicclassStringDemo{publicstaticvoid main(String args[]){String string1 ="saw I was ";System.out.println("Dot "+ string1 +"Tod");}}
This will produce the following result −
Output
Dot saw I was Tod
Creating Format Strings
You have printf() and format() methods to print output with formatted numbers. The String class has an equivalent class method, format(), that returns a String object rather than a PrintStream object.
Using String’s static format() method allows you to create a formatted string that you can reuse, as opposed to a one-time print statement. For example, instead of −
Example
System.out.printf("The value of the float variable is "+"%f, while the value of the integer "+"variable is %d, and the string "+"is %s", floatVar, intVar, stringVar);
You can write −
String fs; fs =String.format("The value of the float variable is "+"%f, while the value of the integer "+"variable is %d, and the string "+"is %s", floatVar, intVar, stringVar);System.out.println(fs);
String Methods
Here is the list of methods supported by String class −
| Sr.No. | Method & Description |
|---|---|
| 1 | char charAt(int index) Returns the character at the specified index. |
| 2 | int compareTo(Object o) Compares this String to another Object. |
| 3 | int compareTo(String anotherString) Compares two strings lexicographically. |
| 4 | int compareToIgnoreCase(String str) Compares two strings lexicographically, ignoring case differences. |
| 5 | String concat(String str) Concatenates the specified string to the end of this string. |
| 6 | boolean contentEquals(StringBuffer sb) Returns true if and only if this String represents the same sequence of characters as the specified StringBuffer. |
| 7 | static String copyValueOf(char[] data) Returns a String that represents the character sequence in the array specified. |
| 8 | static String copyValueOf(char[] data, int offset, int count) Returns a String that represents the character sequence in the array specified. |
| 9 | boolean endsWith(String suffix) Tests if this string ends with the specified suffix. |
| 10 | boolean equals(Object anObject) Compares this string to the specified object. |
| 11 | boolean equalsIgnoreCase(String anotherString) Compares this String to another String, ignoring case considerations. |
| 12 | byte getBytes() Encodes this String into a sequence of bytes using the platform’s default charset, storing the result into a new byte array. |
| 13 | byte[] getBytes(String charsetName) Encodes this String into a sequence of bytes using the named charset, storing the result into a new byte array. |
| 14 | void getChars(int srcBegin, int srcEnd, char[] dst, int dstBegin) Copies characters from this string into the destination character array. |
| 15 | int hashCode() Returns a hash code for this string. |
| 16 | int indexOf(int ch) Returns the index within this string of the first occurrence of the specified character. |
| 17 | int indexOf(int ch, int fromIndex) Returns the index within this string of the first occurrence of the specified character, starting the search at the specified index. |
| 18 | int indexOf(String str) Returns the index within this string of the first occurrence of the specified substring. |
| 19 | int indexOf(String str, int fromIndex) Returns the index within this string of the first occurrence of the specified substring, starting at the specified index. |
| 20 | String intern() Returns a canonical representation for the string object. |
| 21 | int lastIndexOf(int ch) Returns the index within this string of the last occurrence of the specified character. |
| 22 | int lastIndexOf(int ch, int fromIndex) Returns the index within this string of the last occurrence of the specified character, searching backward starting at the specified index. |
| 23 | int lastIndexOf(String str) Returns the index within this string of the rightmost occurrence of the specified substring. |
| 24 | int lastIndexOf(String str, int fromIndex) Returns the index within this string of the last occurrence of the specified substring, searching backward starting at the specified index. |
| 25 | int length() Returns the length of this string. |
| 26 | boolean matches(String regex) Tells whether or not this string matches the given regular expression. |
| 27 | boolean regionMatches(boolean ignoreCase, int toffset, String other, int ooffset, int len) Tests if two string regions are equal. |
| 28 | boolean regionMatches(int toffset, String other, int ooffset, int len) Tests if two string regions are equal. |
| 29 | String replace(char oldChar, char newChar) Returns a new string resulting from replacing all occurrences of oldChar in this string with newChar. |
| 30 | String replaceAll(String regex, String replacement Replaces each substring of this string that matches the given regular expression with the given replacement. |
| 31 | String replaceFirst(String regex, String replacement) Replaces the first substring of this string that matches the given regular expression with the given replacement. |
| 32 | String[] split(String regex) Splits this string around matches of the given regular expression. |
| 33 | String[] split(String regex, int limit) Splits this string around matches of the given regular expression. |
| 34 | boolean startsWith(String prefix) Tests if this string starts with the specified prefix. |
| 35 | boolean startsWith(String prefix, int toffset) Tests if this string starts with the specified prefix beginning a specified index. |
| 36 | CharSequence subSequence(int beginIndex, int endIndex) Returns a new character sequence that is a subsequence of this sequence. |
| 37 | String substring(int beginIndex) Returns a new string that is a substring of this string. |
| 38 | String substring(int beginIndex, int endIndex) Returns a new string that is a substring of this string. |
| 39 | char[] toCharArray() Converts this string to a new character array. |
| 40 | String toLowerCase() Converts all of the characters in this String to lower case using the rules of the default locale. |
| 41 | String toLowerCase(Locale locale) Converts all of the characters in this String to lower case using the rules of the given Locale. |
| 42 | String toString() This object (which is already a string!) is itself returned. |
| 43 | String toUpperCase() Converts all of the characters in this String to upper case using the rules of the default locale. |
| 44 | String toUpperCase(Locale locale) Converts all of the characters in this String to upper case using the rules of the given Locale. |
| 45 | String trim() Returns a copy of the string, with leading and trailing whitespace omitted. |
| 46 | static String valueOf(primitive data type x) Returns the string representation of the passed data type argument. |
Java – Arrays
Java provides a data structure, the array, which stores a fixed-size sequential collection of elements of the same type. An array is used to store a collection of data, but it is often more useful to think of an array as a collection of variables of the same type.
Instead of declaring individual variables, such as number0, number1, …, and number99, you declare one array variable such as numbers and use numbers[0], numbers[1], and …, numbers[99] to represent individual variables.
This tutorial introduces how to declare array variables, create arrays, and process arrays using indexed variables.
Declaring Array Variables
To use an array in a program, you must declare a variable to reference the array, and you must specify the type of array the variable can reference. Here is the syntax for declaring an array variable −
Syntax
dataType[] arrayRefVar; // preferred way. or dataType arrayRefVar[]; // works but not preferred way.
Note − The style dataType[] arrayRefVar is preferred. The style dataType arrayRefVar[]comes from the C/C++ language and was adopted in Java to accommodate C/C++ programmers.
Example
The following code snippets are examples of this syntax −
double[] myList;// preferred way.ordouble myList[];// works but not preferred way.
Creating Arrays
You can create an array by using the new operator with the following syntax −
Syntax
arrayRefVar = new dataType[arraySize];
The above statement does two things −
-
It creates an array using new dataType[arraySize].
-
It assigns the reference of the newly created array to the variable arrayRefVar.
Declaring an array variable, creating an array, and assigning the reference of the array to the variable can be combined in one statement, as shown below −
dataType[] arrayRefVar = new dataType[arraySize];
Alternatively you can create arrays as follows −
dataType[] arrayRefVar = {value0, value1, ..., valuek};
The array elements are accessed through theindex. Array indices are 0-based; that is, they start from 0 to arrayRefVar.length-1.
Example
Following statement declares an array variable, myList, creates an array of 10 elements of double type and assigns its reference to myList −
double[] myList =newdouble[10];
Following picture represents array myList. Here, myList holds ten double values and the indices are from 0 to 9.
Processing Arrays
When processing array elements, we often use either for loop or foreach loop because all of the elements in an array are of the same type and the size of the array is known.
Example
Here is a complete example showing how to create, initialize, and process arrays −
publicclassTestArray{publicstaticvoid main(String[] args){double[] myList ={1.9,2.9,3.4,3.5};// Print all the array elementsfor(int i =0; i < myList.length; i++){System.out.println(myList[i]+" ");}// Summing all elementsdouble total =0;for(int i =0; i < myList.length; i++){ total += myList[i];}System.out.println("Total is "+ total);// Finding the largest elementdouble max = myList[0];for(int i =1; i < myList.length; i++){if(myList[i]> max) max = myList[i];}System.out.println("Max is "+ max);}}
This will produce the following result −
Output
1.9 2.9 3.4 3.5 Total is 11.7 Max is 3.5
The foreach Loops
JDK 1.5 introduced a new for loop known as foreach loop or enhanced for loop, which enables you to traverse the complete array sequentially without using an index variable.
Example
The following code displays all the elements in the array myList −
publicclassTestArray{publicstaticvoid main(String[] args){double[] myList ={1.9,2.9,3.4,3.5};// Print all the array elementsfor(double element: myList){System.out.println(element);}}}
This will produce the following result −
Output
1.9 2.9 3.4 3.5
Passing Arrays to Methods
Just as you can pass primitive type values to methods, you can also pass arrays to methods. For example, the following method displays the elements in an int array −
Example
publicstaticvoid printArray(int[] array){for(int i =0; i < array.length; i++){System.out.print(array[i]+" ");}}
You can invoke it by passing an array. For example, the following statement invokes the printArray method to display 3, 1, 2, 6, 4, and 2 −
Example
printArray(newint[]{3,1,2,6,4,2});
Returning an Array from a Method
A method may also return an array. For example, the following method returns an array that is the reversal of another array −
Example
publicstaticint[] reverse(int[] list){int[] result =newint[list.length];for(int i =0, j = result.length -1; i < list.length; i++, j--){ result[j]= list[i];}return result;}
The Arrays Class
The java.util.Arrays class contains various static methods for sorting and searching arrays, comparing arrays, and filling array elements. These methods are overloaded for all primitive types.
| Sr.No. | Method & Description |
|---|---|
| 1 |
public static int binarySearch(Object[] a, Object key) Searches the specified array of Object ( Byte, Int , double, etc.) for the specified value using the binary search algorithm. The array must be sorted prior to making this call. This returns index of the search key, if it is contained in the list; otherwise, it returns ( – (insertion point + 1)). |
| 2 |
public static boolean equals(long[] a, long[] a2) Returns true if the two specified arrays of longs are equal to one another. Two arrays are considered equal if both arrays contain the same number of elements, and all corresponding pairs of elements in the two arrays are equal. This returns true if the two arrays are equal. Same method could be used by all other primitive data types (Byte, short, Int, etc.) |
| 3 |
public static void fill(int[] a, int val) Assigns the specified int value to each element of the specified array of ints. The same method could be used by all other primitive data types (Byte, short, Int, etc.) |
| 4 |
public static void sort(Object[] a) Sorts the specified array of objects into an ascending order, according to the natural ordering of its elements. The same method could be used by all other primitive data types ( Byte, short, Int, etc.) |
Java – Date and Time
Java provides the Date class available in java.utilpackage, this class encapsulates the current date and time.
The Date class supports two constructors as shown in the following table.
| Sr.No. | Constructor & Description |
|---|---|
| 1 |
Date( ) This constructor initializes the object with the current date and time. |
| 2 |
Date(long millisec) This constructor accepts an argument that equals the number of milliseconds that have elapsed since midnight, January 1, 1970. |
Following are the methods of the date class.
| Sr.No. | Method & Description |
|---|---|
| 1 |
boolean after(Date date) Returns true if the invoking Date object contains a date that is later than the one specified by date, otherwise, it returns false. |
| 2 |
boolean before(Date date) Returns true if the invoking Date object contains a date that is earlier than the one specified by date, otherwise, it returns false. |
| 3 |
Object clone( ) Duplicates the invoking Date object. |
| 4 |
int compareTo(Date date) Compares the value of the invoking object with that of date. Returns 0 if the values are equal. Returns a negative value if the invoking object is earlier than date. Returns a positive value if the invoking object is later than date. |
| 5 |
int compareTo(Object obj) Operates identically to compareTo(Date) if obj is of class Date. Otherwise, it throws a ClassCastException. |
| 6 |
boolean equals(Object date) Returns true if the invoking Date object contains the same time and date as the one specified by date, otherwise, it returns false. |
| 7 |
long getTime( ) Returns the number of milliseconds that have elapsed since January 1, 1970. |
| 8 |
int hashCode( ) Returns a hash code for the invoking object. |
| 9 |
void setTime(long time) Sets the time and date as specified by time, which represents an elapsed time in milliseconds from midnight, January 1, 1970. |
| 10 |
String toString( ) Converts the invoking Date object into a string and returns the result. |
Getting Current Date and Time
This is a very easy method to get current date and time in Java. You can use a simple Date object with toString() method to print the current date and time as follows −
Example
import java.util.Date;publicclassDateDemo{publicstaticvoid main(String args[]){// Instantiate a Date objectDate date =newDate();// display time and date using toString()System.out.println(date.toString());}}
This will produce the following result −
Output
on May 04 09:51:52 CDT 2009
Date Comparison
Following are the three ways to compare two dates −
-
You can use getTime( ) to obtain the number of milliseconds that have elapsed since midnight, January 1, 1970, for both objects and then compare these two values.
-
You can use the methods before( ), after( ), and equals( ). Because the 12th of the month comes before the 18th, for example, new Date(99, 2, 12).before(new Date (99, 2, 18)) returns true.
-
You can use the compareTo( ) method, which is defined by the Comparable interface and implemented by Date.
Date Formatting Using SimpleDateFormat
SimpleDateFormat is a concrete class for formatting and parsing dates in a locale-sensitive manner. SimpleDateFormat allows you to start by choosing any user-defined patterns for date-time formatting.
Example
import java.util.*;import java.text.*;publicclassDateDemo{publicstaticvoid main(String args[]){Date dNow =newDate();SimpleDateFormat ft =newSimpleDateFormat("E yyyy.MM.dd 'at' hh:mm:ss a zzz");System.out.println("Current Date: "+ ft.format(dNow));}}
This will produce the following result −
Output
Current Date: Sun 2004.07.18 at 04:14:09 PM PDT
Simple DateFormat Format Codes
To specify the time format, use a time pattern string. In this pattern, all ASCII letters are reserved as pattern letters, which are defined as the following −
| Character | Description | Example |
|---|---|---|
| G | Era designator | AD |
| y | Year in four digits | 2001 |
| M | Month in year | July or 07 |
| d | Day in month | 10 |
| h | Hour in A.M./P.M. (1~12) | 12 |
| H | Hour in day (0~23) | 22 |
| m | Minute in hour | 30 |
| s | Second in minute | 55 |
| S | Millisecond | 234 |
| E | Day in week | Tuesday |
| D | Day in year | 360 |
| F | Day of week in month | 2 (second Wed. in July) |
| w | Week in year | 40 |
| W | Week in month | 1 |
| a | A.M./P.M. marker | PM |
| k | Hour in day (1~24) | 24 |
| K | Hour in A.M./P.M. (0~11) | 10 |
| z | Time zone | Eastern Standard Time |
| ‘ | Escape for text | Delimiter |
| “ | Single quote | ` |
Date Formatting Using printf
Date and time formatting can be done very easily using printf method. You use a two-letter format, starting with t and ending in one of the letters of the table as shown in the following code.
Example
import java.util.Date;publicclassDateDemo{publicstaticvoid main(String args[]){// Instantiate a Date objectDate date =newDate();// display time and date using toString()String str =String.format("Current Date/Time : %tc", date );System.out.printf(str);}}
This will produce the following result −
Output
Current Date/Time : Sat Dec 15 16:37:57 MST 2012
It would be a bit silly if you had to supply the date multiple times to format each part. For that reason, a format string can indicate the index of the argument to be formatted.
The index must immediately follow the % and it must be terminated by a $.
Example
import java.util.Date;publicclassDateDemo{publicstaticvoid main(String args[]){// Instantiate a Date objectDate date =newDate();// display time and date using toString()System.out.printf("%1$s %2$tB %2$td, %2$tY","Due date:", date);}}
This will produce the following result −
Output
Due date: February 09, 2004
Alternatively, you can use the < flag. It indicates that the same argument as in the preceding format specification should be used again.
Example
import java.util.Date;publicclassDateDemo{publicstaticvoid main(String args[]){// Instantiate a Date objectDate date =newDate();// display formatted dateSystem.out.printf("%s %tB %<te, %<tY","Due date:", date);}}
This will produce the following result −
Output
Due date: February 09, 2004
Date and Time Conversion Characters
| Character | Description | Example |
|---|---|---|
| c | Complete date and time | Mon May 04 09:51:52 CDT 2009 |
| F | ISO 8601 date | 2004-02-09 |
| D | U.S. formatted date (month/day/year) | 02/09/2004 |
| T | 24-hour time | 18:05:19 |
| r | 12-hour time | 06:05:19 pm |
| R | 24-hour time, no seconds | 18:05 |
| Y | Four-digit year (with leading zeroes) | 2004 |
| y | Last two digits of the year (with leading zeroes) | 04 |
| C | First two digits of the year (with leading zeroes) | 20 |
| B | Full month name | February |
| b | Abbreviated month name | Feb |
| m | Two-digit month (with leading zeroes) | 02 |
| d | Two-digit day (with leading zeroes) | 03 |
| e | Two-digit day (without leading zeroes) | 9 |
| A | Full weekday name | Monday |
| a | Abbreviated weekday name | Mon |
| j | Three-digit day of year (with leading zeroes) | 069 |
| H | Two-digit hour (with leading zeroes), between 00 and 23 | 18 |
| k | Two-digit hour (without leading zeroes), between 0 and 23 | 18 |
| I | Two-digit hour (with leading zeroes), between 01 and 12 | 06 |
| l | Two-digit hour (without leading zeroes), between 1 and 12 | 6 |
| M | Two-digit minutes (with leading zeroes) | 05 |
| S | Two-digit seconds (with leading zeroes) | 19 |
| L | Three-digit milliseconds (with leading zeroes) | 047 |
| N | Nine-digit nanoseconds (with leading zeroes) | 047000000 |
| P | Uppercase morning or afternoon marker | PM |
| p | Lowercase morning or afternoon marker | pm |
| z | RFC 822 numeric offset from GMT | -0800 |
| Z | Time zone | PST |
| s | Seconds since 1970-01-01 00:00:00 GMT | 1078884319 |
| Q | Milliseconds since 1970-01-01 00:00:00 GMT | 1078884319047 |
There are other useful classes related to Date and time. For more details, you can refer to Java Standard documentation.
Parsing Strings into Dates
The SimpleDateFormat class has some additional methods, notably parse( ), which tries to parse a string according to the format stored in the given SimpleDateFormat object.
Example
import java.util.*;import java.text.*;publicclassDateDemo{publicstaticvoid main(String args[]){SimpleDateFormat ft =newSimpleDateFormat("yyyy-MM-dd");String input = args.length ==0?"1818-11-11": args[0];System.out.print(input +" Parses as ");Date t;try{ t = ft.parse(input);System.out.println(t);}catch(ParseException e){System.out.println("Unparseable using "+ ft);}}}
A sample run of the above program would produce the following result −
Output
1818-11-11 Parses as Wed Nov 11 00:00:00 EST 1818
Sleeping for a While
You can sleep for any period of time from one millisecond up to the lifetime of your computer. For example, the following program would sleep for 3 seconds −
Example
import java.util.*;publicclassSleepDemo{publicstaticvoid main(String args[]){try{System.out.println(newDate()+"\n");Thread.sleep(5*60*10);System.out.println(newDate()+"\n");}catch(Exception e){System.out.println("Got an exception!");}}}
This will produce the following result −
Output
Sun May 03 18:04:41 GMT 2009 Sun May 03 18:04:51 GMT 2009
Measuring Elapsed Time
Sometimes, you may need to measure point in time in milliseconds. So let’s re-write the above example once again −
Example
import java.util.*;publicclassDiffDemo{publicstaticvoid main(String args[]){try{long start =System.currentTimeMillis();System.out.println(newDate()+"\n");Thread.sleep(5*60*10);System.out.println(newDate()+"\n");longend=System.currentTimeMillis();long diff =end- start;System.out.println("Difference is : "+ diff);}catch(Exception e){System.out.println("Got an exception!");}}}
This will produce the following result −
Output
Sun May 03 18:16:51 GMT 2009 Sun May 03 18:16:57 GMT 2009 Difference is : 5993
GregorianCalendar Class
GregorianCalendar is a concrete implementation of a Calendar class that implements the normal Gregorian calendar with which you are familiar. We did not discuss Calendar class in this tutorial, you can look up standard Java documentation for this.
The getInstance( ) method of Calendar returns a GregorianCalendar initialized with the current date and time in the default locale and time zone. GregorianCalendar defines two fields: AD and BC. These represent the two eras defined by the Gregorian calendar.
There are also several constructors for GregorianCalendar objects −
| Sr.No. | Constructor & Description |
|---|---|
| 1 |
GregorianCalendar() Constructs a default GregorianCalendar using the current time in the default time zone with the default locale. |
| 2 |
GregorianCalendar(int year, int month, int date) Constructs a GregorianCalendar with the given date set in the default time zone with the default locale. |
| 3 |
GregorianCalendar(int year, int month, int date, int hour, int minute) Constructs a GregorianCalendar with the given date and time set for the default time zone with the default locale. |
| 4 |
GregorianCalendar(int year, int month, int date, int hour, int minute, int second) Constructs a GregorianCalendar with the given date and time set for the default time zone with the default locale. |
| 5 |
GregorianCalendar(Locale aLocale) Constructs a GregorianCalendar based on the current time in the default time zone with the given locale. |
| 6 |
GregorianCalendar(TimeZone zone) Constructs a GregorianCalendar based on the current time in the given time zone with the default locale. |
| 7 |
GregorianCalendar(TimeZone zone, Locale aLocale) Constructs a GregorianCalendar based on the current time in the given time zone with the given locale. |
Here is the list of few useful support methods provided by GregorianCalendar class −
| Sr.No. | Method & Description |
|---|---|
| 1 |
void add(int field, int amount) Adds the specified (signed) amount of time to the given time field, based on the calendar’s rules. |
| 2 |
protected void computeFields() Converts UTC as milliseconds to time field values. |
| 3 |
protected void computeTime() Overrides Calendar Converts time field values to UTC as milliseconds. |
| 4 |
boolean equals(Object obj) Compares this GregorianCalendar to an object reference. |
| 5 |
int get(int field) Gets the value for a given time field. |
| 6 |
int getActualMaximum(int field) Returns the maximum value that this field could have, given the current date. |
| 7 |
int getActualMinimum(int field) Returns the minimum value that this field could have, given the current date. |
| 8 |
int getGreatestMinimum(int field) Returns highest minimum value for the given field if varies. |
| 9 |
Date getGregorianChange() Gets the Gregorian Calendar change date. |
| 10 |
int getLeastMaximum(int field) Returns lowest maximum value for the given field if varies. |
| 11 |
int getMaximum(int field) Returns maximum value for the given field. |
| 12 |
Date getTime() Gets this Calendar’s current time. |
| 13 |
long getTimeInMillis() Gets this Calendar’s current time as a long. |
| 14 |
TimeZone getTimeZone() Gets the time zone. |
| 15 |
int getMinimum(int field) Returns minimum value for the given field. |
| 16 |
int hashCode() Overrides hashCode. |
| 17 |
boolean isLeapYear(int year) Determines if the given year is a leap year. |
| 18 |
void roll(int field, boolean up) Adds or subtracts (up/down) a single unit of time on the given time field without changing larger fields. |
| 19 |
void set(int field, int value) Sets the time field with the given value. |
| 20 |
void set(int year, int month, int date) Sets the values for the fields year, month, and date. |
| 21 |
void set(int year, int month, int date, int hour, int minute) Sets the values for the fields year, month, date, hour, and minute. |
| 22 |
void set(int year, int month, int date, int hour, int minute, int second) Sets the values for the fields year, month, date, hour, minute, and second. |
| 23 |
void setGregorianChange(Date date) Sets the GregorianCalendar change date. |
| 24 |
void setTime(Date date) Sets this Calendar’s current time with the given Date. |
| 25 |
void setTimeInMillis(long millis) Sets this Calendar’s current time from the given long value. |
| 26 |
void setTimeZone(TimeZone value) Sets the time zone with the given time zone value. |
| 27 |
String toString() Returns a string representation of this calendar. |
Example
import java.util.*;publicclassGregorianCalendarDemo{publicstaticvoid main(String args[]){String months[]={"Jan","Feb","Mar","Apr","May","Jun","Jul","Aug","Sep","Oct","Nov","Dec"};int year;// Create a Gregorian calendar initialized// with the current date and time in the// default locale and timezone.GregorianCalendar gcalendar =newGregorianCalendar();// Display current time and date information.System.out.print("Date: ");System.out.print(months[gcalendar.get(Calendar.MONTH)]);System.out.print(" "+ gcalendar.get(Calendar.DATE)+" ");System.out.println(year = gcalendar.get(Calendar.YEAR));System.out.print("Time: ");System.out.print(gcalendar.get(Calendar.HOUR)+":");System.out.print(gcalendar.get(Calendar.MINUTE)+":");System.out.println(gcalendar.get(Calendar.SECOND));// Test if the current year is a leap yearif(gcalendar.isLeapYear(year)){System.out.println("The current year is a leap year");}else{System.out.println("The current year is not a leap year");}}}
This will produce the following result −
Output
Date: Apr 22 2009 Time: 11:25:27 The current year is not a leap year
For a complete list of constant available in Calendar class, you can refer the standard Java documentation.
Java – Character Class
Normally, when we work with characters, we use primitive data types char.
Example
char ch ='a';// Unicode for uppercase Greek omega characterchar uniChar ='\u039A';// an array of charschar[] charArray ={'a','b','c','d','e'};
However in development, we come across situations where we need to use objects instead of primitive data types. In order to achieve this, Java provides wrapper class Character for primitive data type char.
The Character class offers a number of useful class (i.e., static) methods for manipulating characters. You can create a Character object with the Character constructor −
Character ch = new Character('a');
The Java compiler will also create a Character object for you under some circumstances. For example, if you pass a primitive char into a method that expects an object, the compiler automatically converts the char to a Character for you. This feature is called autoboxing or unboxing, if the conversion goes the other way.
Example
// Here following primitive char 'a'// is boxed into the Character object chCharacter ch ='a';// Here primitive 'x' is boxed for method test,// return is unboxed to char 'c'char c = test('x');
Escape Sequences
A character preceded by a backslash (\) is an escape sequence and has a special meaning to the compiler.
The newline character (\n) has been used frequently in this tutorial in System.out.println() statements to advance to the next line after the string is printed.
Following table shows the Java escape sequences −
| Escape Sequence | Description |
|---|---|
| \t | Inserts a tab in the text at this point. |
| \b | Inserts a backspace in the text at this point. |
| \n | Inserts a newline in the text at this point. |
| \r | Inserts a carriage return in the text at this point. |
| \f | Inserts a form feed in the text at this point. |
| \’ | Inserts a single quote character in the text at this point. |
| \” | Inserts a double quote character in the text at this point. |
| \\ | Inserts a backslash character in the text at this point. |
When an escape sequence is encountered in a print statement, the compiler interprets it accordingly.
Example
If you want to put quotes within quotes, you must use the escape sequence, \”, on the interior quotes −
publicclassTest{publicstaticvoid main(String args[]){System.out.println("She said \"Hello!\" to me.");}}
This will produce the following result −
Output
She said "Hello!" to me.
Character Methods
Following is the list of the important instance methods that all the subclasses of the Character class implement −
| Sr.No. | Method & Description |
|---|---|
| 1 | isLetter() Determines whether the specified char value is a letter. |
| 2 | isDigit() Determines whether the specified char value is a digit. |
| 3 | isWhitespace() Determines whether the specified char value is white space. |
| 4 | isUpperCase() Determines whether the specified char value is uppercase. |
| 5 | isLowerCase() Determines whether the specified char value is lowercase. |
| 6 | toUpperCase() Returns the uppercase form of the specified char value. |
| 7 | toLowerCase() Returns the lowercase form of the specified char value. |
| 8 | toString() Returns a String object representing the specified character value that is, a one-character string. |
For a complete list of methods, please refer to the java.lang.Character API specification.
Java – Numbers Class
Normally, when we work with Numbers, we use primitive data types such as byte, int, long, double, etc.
Example
int i =5000;float gpa =13.65;double mask =0xaf;
However, in development, we come across situations where we need to use objects instead of primitive data types. In order to achieve this, Java provides wrapper classes.
All the wrapper classes (Integer, Long, Byte, Double, Float, Short) are subclasses of the abstract class Number.
The object of the wrapper class contains or wraps its respective primitive data type. Converting primitive data types into object is called boxing, and this is taken care by the compiler. Therefore, while using a wrapper class you just need to pass the value of the primitive data type to the constructor of the Wrapper class.
And the Wrapper object will be converted back to a primitive data type, and this process is called unboxing. The Number class is part of the java.lang package.
Following is an example of boxing and unboxing −
Example
publicclassTest{publicstaticvoid main(String args[]){Integer x =5;// boxes int to an Integer object x = x +10;// unboxes the Integer to a intSystem.out.println(x);}}
This will produce the following result −
Output
15
When x is assigned an integer value, the compiler boxes the integer because x is integer object. Later, x is unboxed so that they can be added as an integer.
Number Methods
Following is the list of the instance methods that all the subclasses of the Number class implements −
| Sr.No. | Method & Description |
|---|---|
| 1 | xxxValue() Converts the value of this Number object to the xxx data type and returns it. |
| 2 | compareTo() Compares this Number object to the argument. |
| 3 | equals() Determines whether this number object is equal to the argument. |
| 4 | valueOf() Returns an Integer object holding the value of the specified primitive. |
| 5 | toString() Returns a String object representing the value of a specified int or Integer. |
| 6 | parseInt() This method is used to get the primitive data type of a certain String. |
| 7 | abs() Returns the absolute value of the argument. |
| 8 | ceil() Returns the smallest integer that is greater than or equal to the argument. Returned as a double. |
| 9 | floor() Returns the largest integer that is less than or equal to the argument. Returned as a double. |
| 10 | rint() Returns the integer that is closest in value to the argument. Returned as a double. |
| 11 | round() Returns the closest long or int, as indicated by the method’s return type to the argument. |
| 12 | min() Returns the smaller of the two arguments. |
| 13 | max() Returns the larger of the two arguments. |
| 14 | exp() Returns the base of the natural logarithms, e, to the power of the argument. |
| 15 | log() Returns the natural logarithm of the argument. |
| 16 | pow() Returns the value of the first argument raised to the power of the second argument. |
| 17 | sqrt() Returns the square root of the argument. |
| 18 | sin() Returns the sine of the specified double value. |
| 19 | cos() Returns the cosine of the specified double value. |
| 20 | tan() Returns the tangent of the specified double value. |
| 21 | asin() Returns the arcsine of the specified double value. |
| 22 | acos() Returns the arccosine of the specified double value. |
| 23 | atan() Returns the arctangent of the specified double value. |
| 24 | atan2() Converts rectangular coordinates (x, y) to polar coordinate (r, theta) and returns theta. |
| 25 | toDegrees() Converts the argument to degrees. |
| 26 | toRadians() Converts the argument to radians. |
| 27 | random() Returns a random number. |
Java – Decision Making
Decision making structures have one or more conditions to be evaluated or tested by the program, along with a statement or statements that are to be executed if the condition is determined to be true, and optionally, other statements to be executed if the condition is determined to be false.
Following is the general form of a typical decision making structure found in most of the programming languages −
Java programming language provides following types of decision making statements. Click the following links to check their detail.
| Sr.No. | Statement & Description |
|---|---|
| 1 | if statement An if statement consists of a boolean expression followed by one or more statements. |
| 2 | if…else statement An if statement can be followed by an optional else statement, which executes when the boolean expression is false. |
| 3 | nested if statement You can use one if or else ifstatement inside another if or else ifstatement(s). |
| 4 | switch statement A switch statement allows a variable to be tested for equality against a list of values. |
The ? : Operator
We have covered conditional operator ? : in the previous chapter which can be used to replaceif…else statements. It has the following general form −
Exp1 ? Exp2 : Exp3;
Where Exp1, Exp2, and Exp3 are expressions. Notice the use and placement of the colon.
To determine the value of the whole expression, initially exp1 is evaluated.
-
If the value of exp1 is true, then the value of Exp2 will be the value of the whole expression.
-
If the value of exp1 is false, then Exp3 is evaluated and its value becomes the value of the entire expression.
Java – Loop Control
There may be a situation when you need to execute a block of code several number of times. In general, statements are executed sequentially: The first statement in a function is executed first, followed by the second, and so on.
Programming languages provide various control structures that allow for more complicated execution paths.
A loop statement allows us to execute a statement or group of statements multiple times and following is the general form of a loop statement in most of the programming languages −
Java programming language provides the following types of loop to handle looping requirements. Click the following links to check their detail.
| Sr.No. | Loop & Description |
|---|---|
| 1 | while loop Repeats a statement or group of statements while a given condition is true. It tests the condition before executing the loop body. |
| 2 | for loop Execute a sequence of statements multiple times and abbreviates the code that manages the loop variable. |
| 3 | do…while loop Like a while statement, except that it tests the condition at the end of the loop body. |
Loop Control Statements
Loop control statements change execution from its normal sequence. When execution leaves a scope, all automatic objects that were created in that scope are destroyed.
Java supports the following control statements. Click the following links to check their detail.
| Sr.No. | Control Statement & Description |
|---|---|
| 1 | break statement Terminates the loop or switchstatement and transfers execution to the statement immediately following the loop or switch. |
| 2 | continue statement Causes the loop to skip the remainder of its body and immediately retest its condition prior to reiterating. |
Enhanced for loop in Java
As of Java 5, the enhanced for loop was introduced. This is mainly used to traverse collection of elements including arrays.
Syntax
Following is the syntax of enhanced for loop −
for(declaration : expression) {
// Statements
}
-
Declaration − The newly declared block variable, is of a type compatible with the elements of the array you are accessing. The variable will be available within the for block and its value would be the same as the current array element.
-
Expression − This evaluates to the array you need to loop through. The expression can be an array variable or method call that returns an array.
Example
publicclassTest{publicstaticvoid main(String args[]){int[] numbers ={10,20,30,40,50};for(int x : numbers ){System.out.print( x );System.out.print(",");}System.out.print("\n");String[] names ={"James","Larry","Tom","Lacy"};for(String name : names ){System.out.print( name );System.out.print(",");}}}
This will produce the following result −
Output
10, 20, 30, 40, 50, James, Larry, Tom, Lacy,
Java – Basic Operators
Java provides a rich set of operators to manipulate variables. We can divide all the Java operators into the following groups −
- Arithmetic Operators
- Relational Operators
- Bitwise Operators
- Logical Operators
- Assignment Operators
- Misc Operators
The Arithmetic Operators
Arithmetic operators are used in mathematical expressions in the same way that they are used in algebra. The following table lists the arithmetic operators −
Assume integer variable A holds 10 and variable B holds 20, then −
| Operator | Description | Example |
|---|---|---|
| + (Addition) | Adds values on either side of the operator. | A + B will give 30 |
| – (Subtraction) | Subtracts right-hand operand from left-hand operand. | A – B will give -10 |
| * (Multiplication) | Multiplies values on either side of the operator. | A * B will give 200 |
| / (Division) | Divides left-hand operand by right-hand operand. | B / A will give 2 |
| % (Modulus) | Divides left-hand operand by right-hand operand and returns remainder. | B % A will give 0 |
| ++ (Increment) | Increases the value of operand by 1. | B++ gives 21 |
| — (Decrement) | Decreases the value of operand by 1. | B– gives 19 |
The Relational Operators
There are following relational operators supported by Java language.
Assume variable A holds 10 and variable B holds 20, then −
| Operator | Description | Example |
|---|---|---|
| == (equal to) | Checks if the values of two operands are equal or not, if yes then condition becomes true. | (A == B) is not true. |
| != (not equal to) | Checks if the values of two operands are equal or not, if values are not equal then condition becomes true. | (A != B) is true. |
| > (greater than) | Checks if the value of left operand is greater than the value of right operand, if yes then condition becomes true. | (A > B) is not true. |
| < (less than) | Checks if the value of left operand is less than the value of right operand, if yes then condition becomes true. | (A < B) is true. |
| >= (greater than or equal to) | Checks if the value of left operand is greater than or equal to the value of right operand, if yes then condition becomes true. | (A >= B) is not true. |
| <= (less than or equal to) | Checks if the value of left operand is less than or equal to the value of right operand, if yes then condition becomes true. | (A <= B) is true. |
The Bitwise Operators
Java defines several bitwise operators, which can be applied to the integer types, long, int, short, char, and byte.
Bitwise operator works on bits and performs bit-by-bit operation. Assume if a = 60 and b = 13; now in binary format they will be as follows −
a = 0011 1100
b = 0000 1101
—————–
a&b = 0000 1100
a|b = 0011 1101
a^b = 0011 0001
~a = 1100 0011
The following table lists the bitwise operators −
Assume integer variable A holds 60 and variable B holds 13 then −
| Operator | Description | Example |
|---|---|---|
| & (bitwise and) | Binary AND Operator copies a bit to the result if it exists in both operands. | (A & B) will give 12 which is 0000 1100 |
| | (bitwise or) | Binary OR Operator copies a bit if it exists in either operand. | (A | B) will give 61 which is 0011 1101 |
| ^ (bitwise XOR) | Binary XOR Operator copies the bit if it is set in one operand but not both. | (A ^ B) will give 49 which is 0011 0001 |
| ~ (bitwise compliment) | Binary Ones Complement Operator is unary and has the effect of ‘flipping’ bits. | (~A ) will give -61 which is 1100 0011 in 2’s complement form due to a signed binary number. |
| << (left shift) | Binary Left Shift Operator. The left operands value is moved left by the number of bits specified by the right operand. | A << 2 will give 240 which is 1111 0000 |
| >> (right shift) | Binary Right Shift Operator. The left operands value is moved right by the number of bits specified by the right operand. | A >> 2 will give 15 which is 1111 |
| >>> (zero fill right shift) | Shift right zero fill operator. The left operands value is moved right by the number of bits specified by the right operand and shifted values are filled up with zeros. | A >>>2 will give 15 which is 0000 1111 |
The Logical Operators
The following table lists the logical operators −
Assume Boolean variables A holds true and variable B holds false, then −
| Operator | Description | Example |
|---|---|---|
| && (logical and) | Called Logical AND operator. If both the operands are non-zero, then the condition becomes true. | (A && B) is false |
| || (logical or) | Called Logical OR Operator. If any of the two operands are non-zero, then the condition becomes true. | (A || B) is true |
| ! (logical not) | Called Logical NOT Operator. Use to reverses the logical state of its operand. If a condition is true then Logical NOT operator will make false. | !(A && B) is true |
The Assignment Operators
Following are the assignment operators supported by Java language −
| Operator | Description | Example |
|---|---|---|
| = | Simple assignment operator. Assigns values from right side operands to left side operand. | C = A + B will assign value of A + B into C |
| += | Add AND assignment operator. It adds right operand to the left operand and assign the result to left operand. | C += A is equivalent to C = C + A |
| -= | Subtract AND assignment operator. It subtracts right operand from the left operand and assign the result to left operand. | C -= A is equivalent to C = C – A |
| *= | Multiply AND assignment operator. It multiplies right operand with the left operand and assign the result to left operand. | C *= A is equivalent to C = C * A |
| /= | Divide AND assignment operator. It divides left operand with the right operand and assign the result to left operand. | C /= A is equivalent to C = C / A |
| %= | Modulus AND assignment operator. It takes modulus using two operands and assign the result to left operand. | C %= A is equivalent to C = C % A |
| <<= | Left shift AND assignment operator. | C <<= 2 is same as C = C << 2 |
| >>= | Bitwise AND assignment operator. | C &= 2 is same as C = C & 2 |
| &= | Right shift AND assignment operator. | C >>= 2 is same as C = C >> 2 |
| ^= | bitwise exclusive OR and assignment operator. | C ^= 2 is same as C = C ^ 2 |
| |= | bitwise inclusive OR and assignment operator. | C |= 2 is same as C = C | 2 |
Miscellaneous Operators
There are few other operators supported by Java Language.
Conditional Operator ( ? : )
Conditional operator is also known as the ternary operator. This operator consists of three operands and is used to evaluate Boolean expressions. The goal of the operator is to decide, which value should be assigned to the variable. The operator is written as −
variable x = (expression) ? value if true : value if false
Following is an example −
Example
publicclassTest{publicstaticvoid main(String args[]){int a, b; a =10; b =(a ==1)?20:30;System.out.println("Value of b is : "+ b ); b =(a ==10)?20:30;System.out.println("Value of b is : "+ b );}}
This will produce the following result −
Output
Value of b is : 30 Value of b is : 20
instanceof Operator
This operator is used only for object reference variables. The operator checks whether the object is of a particular type (class type or interface type). instanceof operator is written as −
( Object reference variable ) instanceof (class/interface type)
If the object referred by the variable on the left side of the operator passes the IS-A check for the class/interface type on the right side, then the result will be true. Following is an example −
Example
publicclassTest{publicstaticvoid main(String args[]){String name ="James";// following will return true since name is type of Stringboolean result = name instanceofString;System.out.println( result );}}
This will produce the following result −
Output
true
This operator will still return true, if the object being compared is the assignment compatible with the type on the right. Following is one more example −
Example
classVehicle{}publicclassCarextendsVehicle{publicstaticvoid main(String args[]){Vehicle a =newCar();boolean result = a instanceofCar;System.out.println( result );}}
This will produce the following result −
Output
true
Precedence of Java Operators
Operator precedence determines the grouping of terms in an expression. This affects how an expression is evaluated. Certain operators have higher precedence than others; for example, the multiplication operator has higher precedence than the addition operator −
For example, x = 7 + 3 * 2; here x is assigned 13, not 20 because operator * has higher precedence than +, so it first gets multiplied with 3 * 2 and then adds into 7.
Here, operators with the highest precedence appear at the top of the table, those with the lowest appear at the bottom. Within an expression, higher precedence operators will be evaluated first.
| Category | Operator | Associativity |
|---|---|---|
| Postfix | >() [] . (dot operator) | Left toright |
| Unary | >++ – – ! ~ | Right to left |
| Multiplicative | >* / | Left to right |
| Additive | >+ – | Left to right |
| Shift | >>> >>> << | Left to right |
| Relational | >> >= < <= | Left to right |
| Equality | >== != | Left to right |
| Bitwise AND | >& | Left to right |
| Bitwise XOR | >^ | Left to right |
| Bitwise OR | >| | Left to right |
| Logical AND | >&& | Left to right |
| Logical OR | >|| | Left to right |
| Conditional | ?: | Right to left |
| Assignment | >= += -= *= /= %= >>= <<= &= ^= |= | Right to left |
Java – Variable Types
A variable provides us with named storage that our programs can manipulate. Each variable in Java has a specific type, which determines the size and layout of the variable’s memory; the range of values that can be stored within that memory; and the set of operations that can be applied to the variable.
You must declare all variables before they can be used. Following is the basic form of a variable declaration −
data type variable [ = value][, variable [ = value] ...] ;
Here data type is one of Java’s datatypes andvariable is the name of the variable. To declare more than one variable of the specified type, you can use a comma-separated list.
Following are valid examples of variable declaration and initialization in Java −
Example
inta,b,c;// Declares three ints, a, b, and c.inta=10,b=10;// Example of initializationbyteB=22;// initializes a byte type variable B.doublepi=3.14159;// declares and assigns a value of PI.chara='a';// the char variable a iis initialized with value 'a'
This chapter will explain various variable types available in Java Language. There are three kinds of variables in Java −
- Local variables
- Instance variables
- Class/Static variables
Local Variables
-
Local variables are declared in methods, constructors, or blocks.
-
Local variables are created when the method, constructor or block is entered and the variable will be destroyed once it exits the method, constructor, or block.
-
Access modifiers cannot be used for local variables.
-
Local variables are visible only within the declared method, constructor, or block.
-
Local variables are implemented at stack level internally.
-
There is no default value for local variables, so local variables should be declared and an initial value should be assigned before the first use.
Example
Here, age is a local variable. This is defined insidepupAge() method and its scope is limited to only this method.
publicclassTest{publicvoid pupAge(){int age =0; age = age +7;System.out.println("Puppy age is : "+ age);}publicstaticvoid main(String args[]){Test test =newTest(); test.pupAge();}}
This will produce the following result −
Output
Puppy age is: 7
Example
Following example uses age without initializing it, so it would give an error at the time of compilation.
publicclassTest{publicvoid pupAge(){int age; age = age +7;System.out.println("Puppy age is : "+ age);}publicstaticvoid main(String args[]){Test test =newTest(); test.pupAge();}}
This will produce the following error while compiling it −
Output
Test.java:4:variable number might not have been initialized
age = age + 7;
^
1 error
Instance Variables
-
Instance variables are declared in a class, but outside a method, constructor or any block.
-
When a space is allocated for an object in the heap, a slot for each instance variable value is created.
-
Instance variables are created when an object is created with the use of the keyword ‘new’ and destroyed when the object is destroyed.
-
Instance variables hold values that must be referenced by more than one method, constructor or block, or essential parts of an object’s state that must be present throughout the class.
-
Instance variables can be declared in class level before or after use.
-
Access modifiers can be given for instance variables.
-
The instance variables are visible for all methods, constructors and block in the class. Normally, it is recommended to make these variables private (access level). However, visibility for subclasses can be given for these variables with the use of access modifiers.
-
Instance variables have default values. For numbers, the default value is 0, for Booleans it is false, and for object references it is null. Values can be assigned during the declaration or within the constructor.
-
Instance variables can be accessed directly by calling the variable name inside the class. However, within static methods (when instance variables are given accessibility), they should be called using the fully qualified name.ObjectReference.VariableName.
Example
import java.io.*;publicclassEmployee{// this instance variable is visible for any child class.publicString name;// salary variable is visible in Employee class only.privatedouble salary;// The name variable is assigned in the constructor.publicEmployee(String empName){ name = empName;}// The salary variable is assigned a value.publicvoid setSalary(double empSal){ salary = empSal;}// This method prints the employee details.publicvoid printEmp(){System.out.println("name : "+ name );System.out.println("salary :"+ salary);}publicstaticvoid main(String args[]){Employee empOne =newEmployee("Ransika"); empOne.setSalary(1000); empOne.printEmp();}}
This will produce the following result −
Output
name : Ransika salary :1000.0
Class/Static Variables
-
Class variables also known as static variables are declared with the static keyword in a class, but outside a method, constructor or a block.
-
There would only be one copy of each class variable per class, regardless of how many objects are created from it.
-
Static variables are rarely used other than being declared as constants. Constants are variables that are declared as public/private, final, and static. Constant variables never change from their initial value.
-
Static variables are stored in the static memory. It is rare to use static variables other than declared final and used as either public or private constants.
-
Static variables are created when the program starts and destroyed when the program stops.
-
Visibility is similar to instance variables. However, most static variables are declared public since they must be available for users of the class.
-
Default values are same as instance variables. For numbers, the default value is 0; for Booleans, it is false; and for object references, it is null. Values can be assigned during the declaration or within the constructor. Additionally, values can be assigned in special static initializer blocks.
-
Static variables can be accessed by calling with the class nameClassName.VariableName.
-
When declaring class variables as public static final, then variable names (constants) are all in upper case. If the static variables are not public and final, the naming syntax is the same as instance and local variables.
Example
import java.io.*;publicclassEmployee{// salary variable is a private static variableprivatestaticdouble salary;// DEPARTMENT is a constantpublicstaticfinalString DEPARTMENT ="Development ";publicstaticvoid main(String args[]){ salary =1000;System.out.println(DEPARTMENT +"average salary:"+ salary);}}
This will produce the following result −
Output
Development average salary:1000
Note − If the variables are accessed from an outside class, the constant should be accessed as Employee.DEPARTMENT
What is Next?
You already have used access modifiers (public & private) in this chapter. The next chapter will explain Access Modifiers and Non-Access Modifiers in detail.
Java – Modifier Types
Modifiers are keywords that you add to those definitions to change their meanings. Java language has a wide variety of modifiers, including the following −
To use a modifier, you include its keyword in the definition of a class, method, or variable. The modifier precedes the rest of the statement, as in the following example.
Example
publicclass className {// ...}privateboolean myFlag;staticfinaldouble weeks =9.5;protectedstaticfinalint BOXWIDTH =42;publicstaticvoid main(String[] arguments){// body of method}
Access Control Modifiers
Java provides a number of access modifiers to set access levels for classes, variables, methods and constructors. The four access levels are −
- Visible to the package, the default. No modifiers are needed.
- Visible to the class only (private).
- Visible to the world (public).
- Visible to the package and all subclasses (protected).
Non-Access Modifiers
Java provides a number of non-access modifiers to achieve many other functionality.
-
The static modifier for creating class methods and variables.
-
The final modifier for finalizing the implementations of classes, methods, and variables.
-
The abstract modifier for creating abstract classes and methods.
-
The synchronized and volatile modifiers, which are used for threads.
Java – Basic Datatypes
Variables are nothing but reserved memory locations to store values. This means that when you create a variable you reserve some space in the memory.
Based on the data type of a variable, the operating system allocates memory and decides what can be stored in the reserved memory. Therefore, by assigning different data types to variables, you can store integers, decimals, or characters in these variables.
There are two data types available in Java −
- Primitive Data Types
- Reference/Object Data Types
Primitive Data Types
There are eight primitive datatypes supported by Java. Primitive datatypes are predefined by the language and named by a keyword. Let us now look into the eight primitive data types in detail.
byte
-
Byte data type is an 8-bit signed two’s complement integer
-
Minimum value is -128 (-2^7)
-
Maximum value is 127 (inclusive)(2^7 -1)
-
Default value is 0
-
Byte data type is used to save space in large arrays, mainly in place of integers, since a byte is four times smaller than an integer.
-
Example: byte a = 100, byte b = -50
short
-
Short data type is a 16-bit signed two’s complement integer
-
Minimum value is -32,768 (-2^15)
-
Maximum value is 32,767 (inclusive) (2^15 -1)
-
Short data type can also be used to save memory as byte data type. A short is 2 times smaller than an integer
-
Default value is 0.
-
Example: short s = 10000, short r = -20000
int
-
Int data type is a 32-bit signed two’s complement integer.
-
Minimum value is – 2,147,483,648 (-2^31)
-
Maximum value is 2,147,483,647(inclusive) (2^31 -1)
-
Integer is generally used as the default data type for integral values unless there is a concern about memory.
-
The default value is 0
-
Example: int a = 100000, int b = -200000
long
- Long data type is a 64-bit signed two’s complement integer
- Minimum value is -9,223,372,036,854,775,808(-2^63)
- Maximum value is 9,223,372,036,854,775,807 (inclusive)(2^63 -1)
- This type is used when a wider range than int is needed
- Default value is 0L
- Example: long a = 100000L, long b = -200000L
float
-
Float data type is a single-precision 32-bit IEEE 754 floating point
-
Float is mainly used to save memory in large arrays of floating point numbers
-
Default value is 0.0f
-
Float data type is never used for precise values such as currency
-
Example: float f1 = 234.5f
double
-
double data type is a double-precision 64-bit IEEE 754 floating point
-
This data type is generally used as the default data type for decimal values, generally the default choice
-
Double data type should never be used for precise values such as currency
-
Default value is 0.0d
-
Example: double d1 = 123.4
boolean
- boolean data type represents one bit of information
- There are only two possible values: true and false
- This data type is used for simple flags that track true/false conditions
- Default value is false
- Example: boolean one = true
char
- char data type is a single 16-bit Unicode character
- Minimum value is ‘\u0000’ (or 0)
- Maximum value is ‘\uffff’ (or 65,535 inclusive)
- Char data type is used to store any character
- Example: char letterA = ‘A’
Reference Datatypes
-
Reference variables are created using defined constructors of the classes. They are used to access objects. These variables are declared to be of a specific type that cannot be changed. For example, Employee, Puppy, etc.
-
Class objects and various type of array variables come under reference datatype.
-
Default value of any reference variable is null.
-
A reference variable can be used to refer any object of the declared type or any compatible type.
-
Example: Animal animal = new Animal(“giraffe”);
Java Literals
A literal is a source code representation of a fixed value. They are represented directly in the code without any computation.
Literals can be assigned to any primitive type variable. For example −
byte a =68;char a ='A'
byte, int, long, and short can be expressed in decimal(base 10), hexadecimal(base 16) or octal(base 8) number systems as well.
Prefix 0 is used to indicate octal, and prefix 0x indicates hexadecimal when using these number systems for literals. For example −
intdecimal=100;int octal =0144;int hexa =0x64;
String literals in Java are specified like they are in most other languages by enclosing a sequence of characters between a pair of double quotes. Examples of string literals are −
Example
"Hello World""two\nlines""\"This is in quotes\""
String and char types of literals can contain any Unicode characters. For example −
char a ='\u0001';String a ="\u0001";
Java language supports few special escape sequences for String and char literals as well. They are −
| Notation | Character represented |
|---|---|
| \n | Newline (0x0a) |
| \r | Carriage return (0x0d) |
| \f | Formfeed (0x0c) |
| \b | Backspace (0x08) |
| \s | Space (0x20) |
| \t | tab |
| \” | Double quote |
| \’ | Single quote |
| \\ | backslash |
| \ddd | Octal character (ddd) |
| \uxxxx | Hexadecimal UNICODE character (xxxx) |
Java – Object and Classes
Java is an Object-Oriented Language. As a language that has the Object-Oriented feature, Java supports the following fundamental concepts −
- Polymorphism
- Inheritance
- Encapsulation
- Abstraction
- Classes
- Objects
- Instance
- Method
- Message Parsing
In this chapter, we will look into the concepts – Classes and Objects.
-
Object − Objects have states and behaviors. Example: A dog has states – color, name, breed as well as behaviors – wagging the tail, barking, eating. An object is an instance of a class.
-
Class − A class can be defined as a template/blueprint that describes the behavior/state that the object of its type support.
Objects in Java
Let us now look deep into what are objects. If we consider the real-world, we can find many objects around us, cars, dogs, humans, etc. All these objects have a state and a behavior.
If we consider a dog, then its state is – name, breed, color, and the behavior is – barking, wagging the tail, running.
If you compare the software object with a real-world object, they have very similar characteristics.
Software objects also have a state and a behavior. A software object’s state is stored in fields and behavior is shown via methods.
So in software development, methods operate on the internal state of an object and the object-to-object communication is done via methods.
Classes in Java
A class is a blueprint from which individual objects are created.
Following is a sample of a class.
Example
publicclassDog{String breed;int ageC String color;void barking(){}void hungry(){}void sleeping(){}}
A class can contain any of the following variable types.
-
Local variables − Variables defined inside methods, constructors or blocks are called local variables. The variable will be declared and initialized within the method and the variable will be destroyed when the method has completed.
-
Instance variables − Instance variables are variables within a class but outside any method. These variables are initialized when the class is instantiated. Instance variables can be accessed from inside any method, constructor or blocks of that particular class.
-
Class variables − Class variables are variables declared within a class, outside any method, with the static keyword.
A class can have any number of methods to access the value of various kinds of methods. In the above example, barking(), hungry() and sleeping() are methods.
Following are some of the important topics that need to be discussed when looking into classes of the Java Language.
Constructors
When discussing about classes, one of the most important sub topic would be constructors. Every class has a constructor. If we do not explicitly write a constructor for a class, the Java compiler builds a default constructor for that class.
Each time a new object is created, at least one constructor will be invoked. The main rule of constructors is that they should have the same name as the class. A class can have more than one constructor.
Following is an example of a constructor −
Example
publicclassPuppy{publicPuppy(){}publicPuppy(String name){// This constructor has one parameter, name.}}
Java also supports Singleton Classeswhere you would be able to create only one instance of a class.
Note − We have two different types of constructors. We are going to discuss constructors in detail in the subsequent chapters.
Creating an Object
As mentioned previously, a class provides the blueprints for objects. So basically, an object is created from a class. In Java, the new keyword is used to create new objects.
There are three steps when creating an object from a class −
-
Declaration − A variable declaration with a variable name with an object type.
-
Instantiation − The ‘new’ keyword is used to create the object.
-
Initialization − The ‘new’ keyword is followed by a call to a constructor. This call initializes the new object.
Following is an example of creating an object −
Example
publicclassPuppy{publicPuppy(String name){// This constructor has one parameter, name.System.out.println("Passed Name is :"+ name );}publicstaticvoid main(String[]args){// Following statement would create an object myPuppyPuppy myPuppy =newPuppy("tommy");}}
If we compile and run the above program, then it will produce the following result −
Output
Passed Name is :tommy
Accessing Instance Variables and Methods
Instance variables and methods are accessed via created objects. To access an instance variable, following is the fully qualified path −
/* First create an object */ ObjectReference = new Constructor(); /* Now call a variable as follows */ ObjectReference.variableName; /* Now you can call a class method as follows */ ObjectReference.MethodName();
Example
This example explains how to access instance variables and methods of a class.
publicclassPuppy{int puppyAge;publicPuppy(String name){// This constructor has one parameter, name.System.out.println("Name chosen is :"+ name );}publicvoid setAge(int age ){ puppyAge = age;}publicint getAge(){System.out.println("Puppy's age is :"+ puppyAge );return puppyAge;}publicstaticvoid main(String[]args){/* Object creation */Puppy myPuppy =newPuppy("tommy");/* Call class method to set puppy's age */ myPuppy.setAge(2);/* Call another class method to get puppy's age */ myPuppy.getAge();/* You can access instance variable as follows as well */System.out.println("Variable Value :"+ myPuppy.puppyAge );}}
If we compile and run the above program, then it will produce the following result −
Output
Name chosen is :tommy Puppy's age is :2 Variable Value :2
Source File Declaration Rules
As the last part of this section, let’s now look into the source file declaration rules. These rules are essential when declaring classes, importstatements and package statements in a source file.
-
There can be only one public class per source file.
-
A source file can have multiple non-public classes.
-
The public class name should be the name of the source file as well which should be appended by .java at the end. For example: the class name is public class Employee{}then the source file should be as Employee.java.
-
If the class is defined inside a package, then the package statement should be the first statement in the source file.
-
If import statements are present, then they must be written between the package statement and the class declaration. If there are no package statements, then the import statement should be the first line in the source file.
-
Import and package statements will imply to all the classes present in the source file. It is not possible to declare different import and/or package statements to different classes in the source file.
Classes have several access levels and there are different types of classes; abstract classes, final classes, etc. We will be explaining about all these in the access modifiers chapter.
Apart from the above mentioned types of classes, Java also has some special classes called Inner classes and Anonymous classes.
Java Package
In simple words, it is a way of categorizing the classes and interfaces. When developing applications in Java, hundreds of classes and interfaces will be written, therefore categorizing these classes is a must as well as makes life much easier.
Import Statements
In Java if a fully qualified name, which includes the package and the class name is given, then the compiler can easily locate the source code or classes. Import statement is a way of giving the proper location for the compiler to find that particular class.
For example, the following line would ask the compiler to load all the classes available in directory java_installation/java/io −
import java.io.*;
A Simple Case Study
For our case study, we will be creating two classes. They are Employee and EmployeeTest.
First open notepad and add the following code. Remember this is the Employee class and the class is a public class. Now, save this source file with the name Employee.java.
The Employee class has four instance variables – name, age, designation and salary. The class has one explicitly defined constructor, which takes a parameter.
Example
import java.io.*;publicclassEmployee{String name;int age;String designation;double salary;// This is the constructor of the class EmployeepublicEmployee(String name){this.name = name;}// Assign the age of the Employee to the variable age.publicvoid empAge(int empAge){ age = empAge;}/* Assign the designation to the variable designation.*/publicvoid empDesignation(String empDesig){ designation = empDesig;}/* Assign the salary to the variable salary.*/publicvoid empSalary(double empSalary){ salary = empSalary;}/* Print the Employee details */publicvoid printEmployee(){System.out.println("Name:"+ name );System.out.println("Age:"+ age );System.out.println("Designation:"+ designation );System.out.println("Salary:"+ salary);}}
As mentioned previously in this tutorial, processing starts from the main method. Therefore, in order for us to run this Employee class there should be a main method and objects should be created. We will be creating a separate class for these tasks.
Following is the EmployeeTest class, which creates two instances of the class Employee and invokes the methods for each object to assign values for each variable.
Save the following code in EmployeeTest.java file.
import java.io.*;publicclassEmployeeTest{publicstaticvoid main(String args[]){/* Create two objects using constructor */Employee empOne =newEmployee("James Smith");Employee empTwo =newEmployee("Mary Anne");// Invoking methods for each object created empOne.empAge(26); empOne.empDesignation("Senior Software Engineer"); empOne.empSalary(1000); empOne.printEmployee(); empTwo.empAge(21); empTwo.empDesignation("Software Engineer"); empTwo.empSalary(500); empTwo.printEmployee();}}
Now, compile both the classes and then runEmployeeTest to see the result as follows −
Output
C:\> javac Employee.java C:\> javac EmployeeTest.java C:\> java EmployeeTest Name:James Smith Age:26 Designation:Senior Software Engineer Salary:1000.0 Name:Mary Anne Age:21 Designation:Software Engineer Salary:500.0
Java – Basic Syntax
When we consider a Java program, it can be defined as a collection of objects that communicate via invoking each other’s methods. Let us now briefly look into what do class, object, methods, and instance variables mean.
-
Object − Objects have states and behaviors. Example: A dog has states – color, name, breed as well as behavior such as wagging their tail, barking, eating. An object is an instance of a class.
-
Class − A class can be defined as a template/blueprint that describes the behavior/state that the object of its type supports.
-
Methods − A method is basically a behavior. A class can contain many methods. It is in methods where the logics are written, data is manipulated and all the actions are executed.
-
Instance Variables − Each object has its unique set of instance variables. An object’s state is created by the values assigned to these instance variables.
First Java Program
Let us look at a simple code that will print the words Hello World.
Example
publicclassMyFirstJavaProgram{/* This is my first java program. * This will print 'Hello World' as the output */publicstaticvoid main(String[]args){System.out.println("Hello World");// prints Hello World}}
Let’s look at how to save the file, compile, and run the program. Please follow the subsequent steps −
-
Open notepad and add the code as above.
-
Save the file as: MyFirstJavaProgram.java.
-
Open a command prompt window and go to the directory where you saved the class. Assume it’s C:\.
-
Type ‘javac MyFirstJavaProgram.java’ and press enter to compile your code. If there are no errors in your code, the command prompt will take you to the next line (Assumption : The path variable is set).
-
Now, type ‘ java MyFirstJavaProgram ‘ to run your program.
-
You will be able to see ‘ Hello World ‘ printed on the window.
Output
C:\> javac MyFirstJavaProgram.java C:\> java MyFirstJavaProgram Hello World
Basic Syntax
About Java programs, it is very important to keep in mind the following points.
-
Case Sensitivity − Java is case sensitive, which means identifier Hello and hellowould have different meaning in Java.
-
Class Names − For all class names the first letter should be in Upper Case. If several words are used to form a name of the class, each inner word’s first letter should be in Upper Case.
Example: class MyFirstJavaClass
-
Method Names − All method names should start with a Lower Case letter. If several words are used to form the name of the method, then each inner word’s first letter should be in Upper Case.
Example: public void myMethodName()
-
Program File Name − Name of the program file should exactly match the class name.
When saving the file, you should save it using the class name (Remember Java is case sensitive) and append ‘.java’ to the end of the name (if the file name and the class name do not match, your program will not compile).
Example: Assume ‘MyFirstJavaProgram’ is the class name. Then the file should be saved as ‘MyFirstJavaProgram.java’
-
public static void main(String args[]) − Java program processing starts from the main() method which is a mandatory part of every Java program.
Java Identifiers
All Java components require names. Names used for classes, variables, and methods are calledidentifiers.
In Java, there are several points to remember about identifiers. They are as follows −
-
All identifiers should begin with a letter (A to Z or a to z), currency character ($) or an underscore (_).
-
After the first character, identifiers can have any combination of characters.
-
A key word cannot be used as an identifier.
-
Most importantly, identifiers are case sensitive.
-
Examples of legal identifiers: age, $salary, _value, __1_value.
-
Examples of illegal identifiers: 123abc, -salary.
Java Modifiers
Like other languages, it is possible to modify classes, methods, etc., by using modifiers. There are two categories of modifiers −
-
Access Modifiers − default, public , protected, private
-
Non-access Modifiers − final, abstract, strictfp
We will be looking into more details about modifiers in the next section.
Java Variables
Following are the types of variables in Java −
- Local Variables
- Class Variables (Static Variables)
- Instance Variables (Non-static Variables)
Java Arrays
Arrays are objects that store multiple variables of the same type. However, an array itself is an object on the heap. We will look into how to declare, construct, and initialize in the upcoming chapters.
Java Enums
Enums were introduced in Java 5.0. Enums restrict a variable to have one of only a few predefined values. The values in this enumerated list are called enums.
With the use of enums it is possible to reduce the number of bugs in your code.
For example, if we consider an application for a fresh juice shop, it would be possible to restrict the glass size to small, medium, and large. This would make sure that it would not allow anyone to order any size other than small, medium, or large.
Example
classFreshJuice{enumFreshJuiceSize{ SMALL, MEDIUM, LARGE }FreshJuiceSize size;}publicclassFreshJuiceTest{publicstaticvoid main(String args[]){FreshJuice juice =newFreshJuice(); juice.size =FreshJuice.FreshJuiceSize.MEDIUM ;System.out.println("Size: "+ juice.size);}}
The above example will produce the following result −
Output
Size: MEDIUM
Note − Enums can be declared as their own or inside a class. Methods, variables, constructors can be defined inside enums as well.
Java Keywords
The following list shows the reserved words in Java. These reserved words may not be used as constant or variable or any other identifier names.
| abstract | assert | boolean | break |
| byte | case | catch | char |
| class | const | continue | default |
| do | double | else | enum |
| extends | final | finally | float |
| for | goto | if | implements |
| import | instanceof | int | interface |
| long | native | new | package |
| private | protected | public | return |
| short | static | strictfp | super |
| switch | synchronized | this | throw |
| throws | transient | try | void |
| volatile | while |
Comments in Java
Java supports single-line and multi-line comments very similar to C and C++. All characters available inside any comment are ignored by Java compiler.
Example
publicclassMyFirstJavaProgram{/* This is my first java program. * This will print 'Hello World' as the output * This is an example of multi-line comments. */publicstaticvoid main(String[]args){// This is an example of single line comment/* This is also an example of single line comment. */System.out.println("Hello World");}}
Output
Hello World
Using Blank Lines
A line containing only white space, possibly with a comment, is known as a blank line, and Java totally ignores it.
Java – Environment Setup
Local Environment Setup
If you are still willing to set up your environment for Java programming language, then this section guides you on how to download and set up Java on your machine. Following are the steps to set up the environment.
Java SE is freely available from the link Download Java. You can download a version based on your operating system.
Follow the instructions to download Java and run the .exe to install Java on your machine. Once you installed Java on your machine, you will need to set environment variables to point to correct installation directories −
Setting Up the Path for Windows
Assuming you have installed Java in c:\Program Files\java\jdk directory −
-
Right-click on ‘My Computer’ and select ‘Properties’.
-
Click the ‘Environment variables’ button under the ‘Advanced’ tab.
-
Now, alter the ‘Path’ variable so that it also contains the path to the Java executable. Example, if the path is currently set to ‘C:\WINDOWS\SYSTEM32’, then change your path to read ‘C:\WINDOWS\SYSTEM32;c:\Program Files\java\jdk\bin’.
Setting Up the Path for Linux, UNIX, Solaris, FreeBSD
Environment variable PATH should be set to point to where the Java binaries have been installed. Refer to your shell documentation, if you have trouble doing this.
Example, if you use bash as your shell, then you would add the following line to the end of your ‘.bashrc: export PATH = /path/to/java:$PATH’
Popular Java Editors
To write your Java programs, you will need a text editor. There are even more sophisticated IDEs available in the market. But for now, you can consider one of the following −
-
Notepad − On Windows machine, you can use any simple text editor like Notepad (Recommended for this tutorial), TextPad.
-
Netbeans − A Java IDE that is open-source and free which can be downloaded fromhttps://www.netbeans.org/index.html
-
Eclipse − A Java IDE developed by the eclipse open-source community and can be downloaded from https://www.eclipse.org/
What is Next?
Next chapter will teach you how to write and run your first Java program and some of the important basic syntaxes in Java needed for developing applications.
History of Java
James Gosling initiated Java language project in June 1991 for use in one of his many set-top box projects. The language, initially called ‘Oak’ after an oak tree that stood outside Gosling’s office, also went by the name ‘Green’ and ended up later being renamed as Java, from a list of random words.
Sun released the first public implementation as Java 1.0 in 1995. It promised Write Once, Run Anywhere (WORA), providing no-cost run-times on popular platforms.
On 13 November, 2006, Sun released much of Java as free and open source software under the terms of the GNU General Public License (GPL).
On 8 May, 2007, Sun finished the process, making all of Java’s core code free and open-source, aside from a small portion of code to which Sun did not hold the copyright.
Tools You Will Need
For performing the examples discussed in this tutorial, you will need a Pentium 200-MHz computer with a minimum of 64 MB of RAM (128 MB of RAM recommended).
You will also need the following softwares −
- Linux 7.1 or Windows xp/7/8 operating system
- Java JDK 8
- Microsoft Notepad or any other text editor
This tutorial will provide the necessary skills to create GUI, networking, and web applications using Java.
Try It Option
We have provided you with an option to compile and execute available code online. Just click theTry it button avaiable at the top-right corner of the code window to compile and execute the available code. There are certain examples which cannot be executed online, so we have skipped those examples.
publicclassMyFirstJavaProgram{publicstaticvoid main(String[]args){System.out.println("Hello World");}}
There may be a case that you do not see the result of the compiled/executed code. In such case, you can re-try to compile and execute the code using execute button available in the compilation pop-up window.
What is Next?
The next chapter will guide you to how you can obtain Java and its documentation. Finally, it instructs you on how to install Java and prepare an environment to develop Java applications.
Java – Overview
Java programming language was originally developed by Sun Microsystems which was initiated by James Gosling and released in 1995 as core component of Sun Microsystems’ Java platform (Java 1.0 [J2SE]).
The latest release of the Java Standard Edition is Java SE 8. With the advancement of Java and its widespread popularity, multiple configurations were built to suit various types of platforms. For example: J2EE for Enterprise Applications, J2ME for Mobile Applications.
The new J2 versions were renamed as Java SE, Java EE, and Java ME respectively. Java is guaranteed to be Write Once, Run Anywhere.
Java is −
-
Object Oriented − In Java, everything is an Object. Java can be easily extended since it is based on the Object model.
-
Platform Independent − Unlike many other programming languages including C and C++, when Java is compiled, it is not compiled into platform specific machine, rather into platform independent byte code. This byte code is distributed over the web and interpreted by the Virtual Machine (JVM) on whichever platform it is being run on.
-
Simple − Java is designed to be easy to learn. If you understand the basic concept of OOP Java, it would be easy to master.
-
Secure − With Java’s secure feature it enables to develop virus-free, tamper-free systems. Authentication techniques are based on public-key encryption.
-
Architecture-neutral − Java compiler generates an architecture-neutral object file format, which makes the compiled code executable on many processors, with the presence of Java runtime system.
-
Portable − Being architecture-neutral and having no implementation dependent aspects of the specification makes Java portable. Compiler in Java is written in ANSI C with a clean portability boundary, which is a POSIX subset.
-
Robust − Java makes an effort to eliminate error prone situations by emphasizing mainly on compile time error checking and runtime checking.
-
Multithreaded − With Java’s multithreaded feature it is possible to write programs that can perform many tasks simultaneously. This design feature allows the developers to construct interactive applications that can run smoothly.
-
Interpreted − Java byte code is translated on the fly to native machine instructions and is not stored anywhere. The development process is more rapid and analytical since the linking is an incremental and light-weight process.
-
High Performance − With the use of Just-In-Time compilers, Java enables high performance.
-
Distributed − Java is designed for the distributed environment of the internet.
-
Dynamic − Java is considered to be more dynamic than C or C++ since it is designed to adapt to an evolving environment. Java programs can carry extensive amount of run-time information that can be used to verify and resolve accesses to objects on run-time.
